In Odoo, a "dynamic snippet" is a reusable block of code that can be used to create dynamic content on a website. Dynamic snippets are useful for creating customized content that is tailored to the needs and interests of each website visitor. For example, a dynamic snippet could be used to display different products or promotions based on the visitor's location or to display a personalized message based on the visitor's browsing history.
The chunk function is a built-in Python function that is used to split a list into smaller lists of a specified size. We will use the chunk function to split a list of products into smaller chunks, which will then be displayed in a dynamic snippet on a website.
Dynamic snippet
To create a dynamic snippet in Odoo, we need to define a view, a controller, and a JavaScript file.
*The view is defined using an XML file and determines the layout and design of the snippet.
*The controller is defined using a Python file and is responsible for retrieving the data from the Odoo backend and passing it to the view.
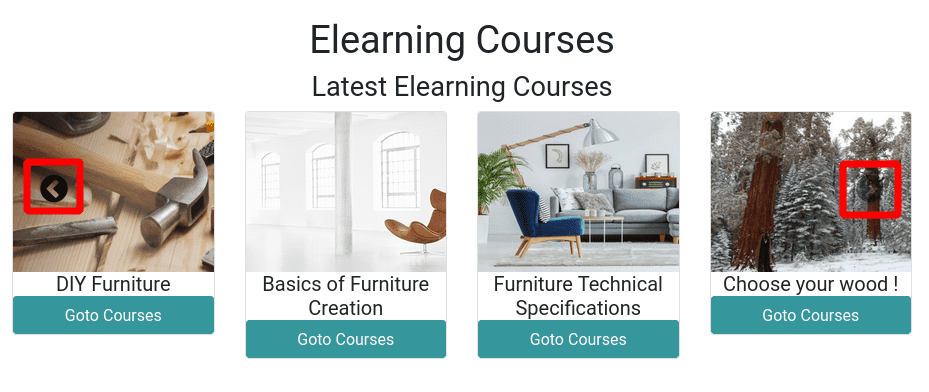
Controller: First, let us create a controller to fetch data from the backend. For this example, let's get the ten eLearning courses that were published on the website in descending order of created date.
from odoo import http
class ElearningSnippet(http.Controller):
@http.route(['/latest_elearning_courses'], type="json", auth="public",            website=True, methods=['POST'])
	def all_courses(self):
    	   courses = http.request.env['slide.channel'].search_read(
         [('website_published','=', True)],['name', 'image_1920', 'id'],
         order='create_date desc', limit=10)
    	return courses
XML: First, we need to define the content of the snippet as in the static snippet.
<template id="elearning_snippet" name="Elearning Course Snippet">
   	<section class="oe_structure container dynamic_snippet_blog">
       	<div class="row">
           	<div class="col-md-12">
               	<div class="text-center py-5">
                    	<h1 class="h1">Elearning Courses</h1>
                   	<div class="h3" style="text-align:center">Latest Elearning Courses</div>
                   	<div id="courosel">
                   	</div>
                	</div>
           	</div>
       	</div>
   	</section>
</template>
Here we created a span with id dynamic_snippet_blog to show the latest ten eLearning courses.
The value will be fetched in Javascript and will render here.
After defining the view, we need to add this to the website builder snippet blocks. To do that, we need to inherit the website.snippets and add our snippet inside that as in the static snippet.
<template id="external_snippets" inherit_id="website.snippets" priority="8">
   	<xpath expr="//div[@id='snippet_effect']//t[@t-snippet][last()]" position="after">
       	<t t-snippet="elearning_course_snippet.elearning_snippet"/>
   	</xpath>
</template>
This time we are adding the snippet inside the Dynamic section.
Js: To get the data from the server and view it on the website, we will use JavaScript.
odoo.define('elearning_course_snippet.snippet', function(require) {
	'use strict';
	var PublicWidget = require('web.public.widget');
	var rpc = require('web.rpc');
	var core = require('web.core');
	var qweb = core.qweb;
	var Dynamic = PublicWidget.Widget.extend({
    	selector: '.dynamic_snippet_blog',
    	willStart: async function() {
        	var self = this;
        	await rpc.query({
            	route: '/latest_elearning_courses',
        	}).then((data) => {
            	this.data = data;
        	});
    	},
    	start: function() {
        	var chunks = _.chunk(this.data, 4)
        	chunks[0].is_active = true
        	this.$el.find('#courosel').html(
            	qweb.render('elearning_course_snippet.elearning_snippet_carousel', {
                	chunks
            	})
        	)
    	},
	});
	PublicWidget.registry.dynamic_snippet_blog = Dynamic;
	return Dynamic;
});
rpc: Here, we are giving the class of the section as a selector. It uses the rpc to send a query to the server to retrieve the latest e-learning courses.
Await: Used to wait for the response from the server. Once the data is retrieved, it is stored in the data property of the widget instance.
chunk function
The start() method is executed after willStart() completes successfully. It uses the _.chunk() function from the Underscore.js library to split the courses into chunks of 4. It then sets the is_active property of the first chunk to true. Finally, it renders the HTML for the e-learning snippet using the qweb.render() function and inserts it into the DOM.
The _.chunk() function is used to split the array of e-learning courses into smaller arrays of 4 courses each. This is done to display the courses in a carousel with multiple slides. Each slide displays four courses. The chunks[0].is_active = true line sets the is_active property of the first chunk to true so that it is displayed by default when the carousel is loaded.
Next, we need to define the qweb template inside xml directory of static.
<templates id="template" xml:space="preserve">
	<t t-name="elearning_course_snippet.elearning_snippet_carousel">
    	<div id="course_carousel" class="container carousel slide" data-bs-ride="carousel" t-att-data-bs-interval="interval">
       	<div class="carousel-inner row w-100 mx-auto" role="listbox">
          	<t t-foreach="chunks" t-as="chunk">
                	<div t-att-class="chunk.is_active ? 'carousel-item active' : 'carousel-item'">
                     	<div class="row">
                        	<t t-foreach="chunk" t-as="item">
                           	<div class="block span3 col-3">
                               	<div class="card-group">
                                   	<div class="card">
<img class="card-img-top" t-attf-src="data:image/png;base64,{{item.image_1920}}"
                                             	style="padding: 0px; margin: 0px; height: 160px; width:305px;"/>
                                        	<h5 class="mb-0"><t t-esc="item.name"/></h5>
                                        	<a t-attf-href="/slides/{{item.id}}" class="btn btn-primary">
                                            	Goto Courses
                                        	</a>
                                   	</div>
                               	</div>
                           	</div>
                        	</t>
                    	</div>
                	</div>
          	</t>
      	</div>
    	</div>
    	<a t-attf-href="#course_carousel" class="carousel-control-prev" data-bs-slide="prev" role="button" aria-label="Previous" title="Previous">
        	<span class="fa fa-chevron-circle-left fa-2x"/>
<span class="visually-hidden">Previous</span>
    	</a>
 <a t-attf-href="#course_carousel" class="carousel-control-next" data-bs-slide="next" role="button" aria-label="Next" title="Next">
        	<span class="fa fa-chevron-circle-right fa-2x"/>
        	<span class="visually-hidden">Next</span>
    	</a>
	</t>
</templates>
* The t-foreach directive loops over the "chunks" variable, which is a list of items that have been grouped into chunks. For each chunk, a div with the class "carousel-item" is created, and if the chunk is active, the "active" class is added to the div using the t-att-class directive.
* The button with the label "Goto Courses" is added using the Bootstrap button component, and the href attribute is set using the t-attf-href directive to redirect to the slide with the item's id.
* Finally, two additional links are added to allow the user to navigate to the previous or next slide in the carousel. These links use the Bootstrap carousel-control-prev and carousel-control-next classes, and the data-bs-slide attribute is set to "prev" or "next," respectively. The t-attf-href directive is used to set the href attribute to the ID of the carousel container.
Now, we need to add the XML file to the data section and the js and qweb xml file in the assets section of the manifest.py file.
'data': [
    	'views/elearning_snippet.xml',
	],
	'assets': {
'web.assets_frontend': ['elearning_course_snippet/static/src/xml/dynamic_courosel.xml',
                          'elearning_course_snippet/static/src/js/snippet.js',
                        ],
	},
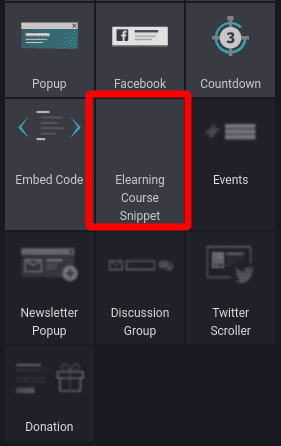
After installing or updating the module, go to the website and click on the edit button. Now we can see the snippet under Dynamic Content.
When you Drag and drop the snippet you can see the Carousel