Odoo 19 continues to offer strong website management features that allow users to design and customize web pages without much technical effort. The snippet feature is one of the key components that makes the Odoo website builder flexible and easy to customize. Snippets are small content blocks that can be dragged and dropped onto a web page using the website editor. They help users build pages quickly while keeping the layout consistent.
Snippets are especially helpful for beginners because they reduce the need to write code repeatedly. Once a snippet is created, it can be reused on multiple pages and adjusted visually using the editor.
In Odoo 19, snippets still follow the same basic concept as earlier versions, but the structure is cleaner and better aligned with modern website-building practices.This article explains the process of building a basic static snippet in a simple step-by-step manner.
Before starting the development process, it is helpful to know what snippets are and how they function within Odoo.
Static snippets
These contain fixed content such as headings, text, images, or banners. The content stays the same unless the user edits it manually in the website editor.
Dynamic snippets
These fetch data from the Odoo backend, such as products, blog posts, or records from a model. They change automatically based on data.
In this guide, we focus only on static snippets, as they are the easiest to understand and are a good starting point for beginners.
Step 1: Create the Snippet Template
A snippet is defined using an XML template. This template describes the structure of the snippet and the content that will appear on the website.
Create a new XML file inside your custom module snippet_custom, for example:
views/basic_snippet_template.xml
Below is a simple example of a static snippet template in Odoo 19:
    <?xml version="1.0" encoding="UTF-8"?>
    <odoo>
        <template id="snippet_custom.basic_snippet_template" name="Basic Snippet">
            <section class="s_basic_snippet">
                <div class="container py-4">
                    <div class="row">
                        <div class="col-12 text-center">
                            <h2>Basic Snippet</h2>
                            <p>
                                This is a simple static snippet created in Odoo 19.
                                You can use it to display fixed content on your website.
                            </p>
                        </div>
                    </div>
                </div>
            </section>
        </template>
    </odoo>
This template defines a section with a heading and a paragraph. Additional HTML structures or Bootstrap styling can be included based on the required layout and design.
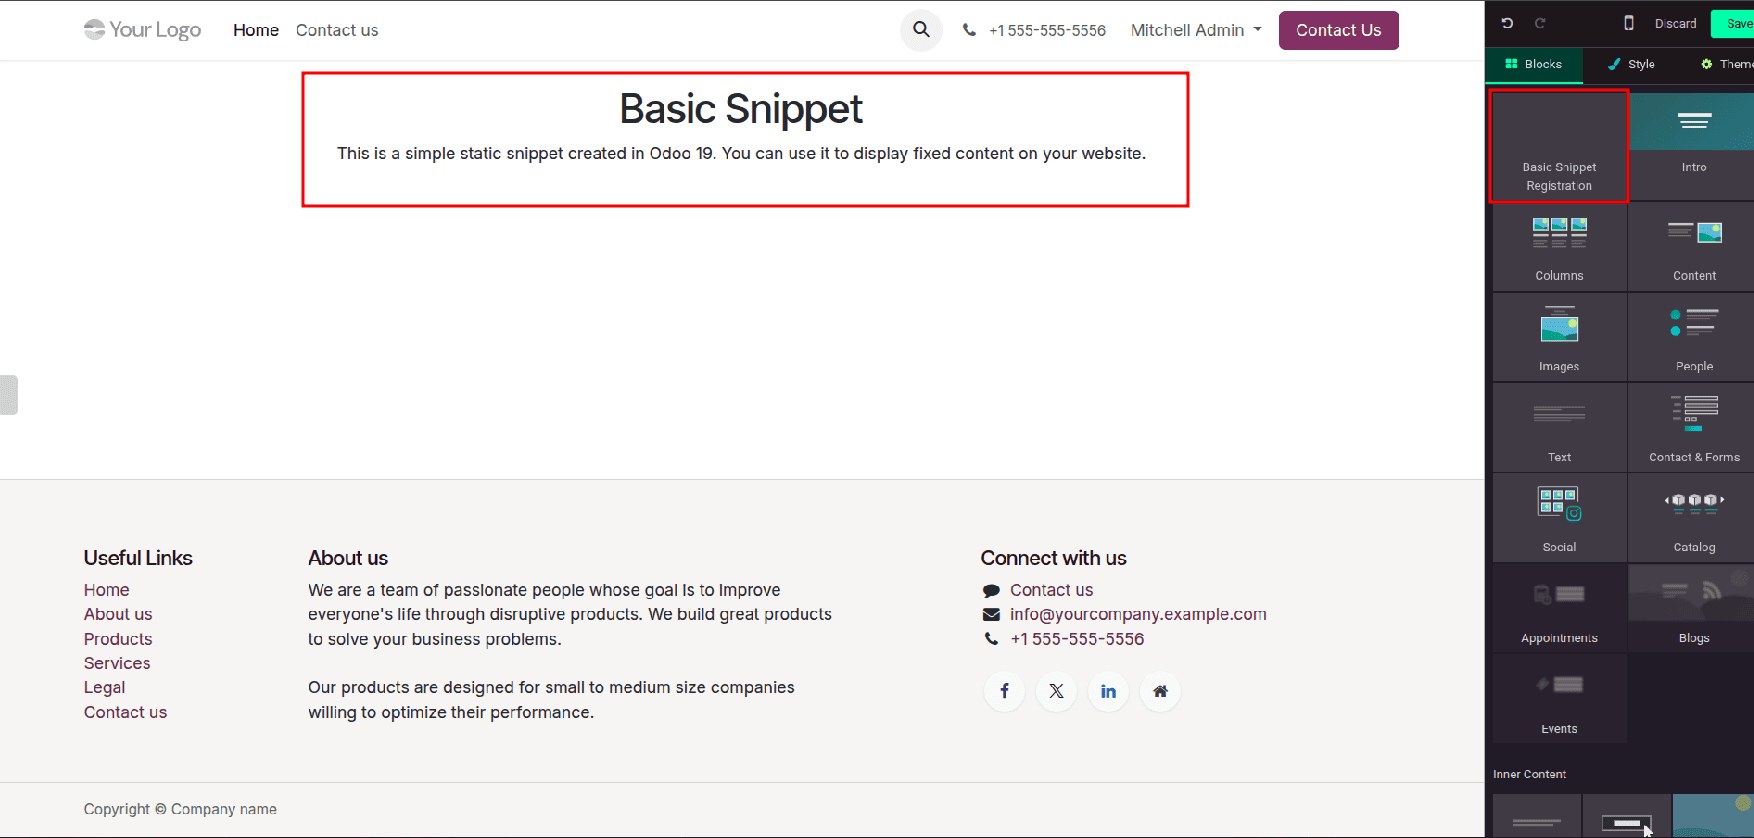
Step 2: Register the Snippet in the Website Editor
Creating the template alone is not enough. To display the snippet inside the website builder, it must be added to the snippet registry panel.
This is done by inheriting the website.snippets template and adding your snippet to one of the snippet groups.
Create another XML file, for example:
views/snippet_registration.xml
<?xml version="1.0" encoding="UTF-8"?>
<odoo>
    <template id="category_highlight_snippet" inherit_id="website.snippets" name="Category Highlight Snippet">
        <xpath expr="//snippets[@id='snippet_groups']/*[1]" position="before">
            <t snippet-group="basic_snippet" t-snippet="website.s_snippet_group" string="Basic Snippet Registration"/>
        </xpath>
        <xpath expr="//snippets[@id='snippet_structure']/*[1]" position="before">
            <t t-snippet="snippet_custom.basic_snippet_template" string="Custom snippet" group="basic_snippet"/>
        </xpath>
    </template>
</odoo>
This step makes your snippet visible in the website editor so users can drag and drop it onto a page. The t-thumbnail attribute is optional but recommended, as it shows a preview image for the snippet.
Step 3: Update the Module Manifest File
To ensure Odoo loads your snippet files, you must include them in the module’s __manifest__.py file.
Example manifest for Odoo 19:
{
   'name': 'Website Basic Snippet',
   'version': '19.0.1.0.0',
   'category': 'Website',
   'depends': ['website'],
   'data': [
       'views/basic_snippet_template.xml',
       'views/snippet_registration.xml',
   ],
}
If you do not have custom CSS, you can remove the assets section. However, keeping styling separate is a good practice.
Step 4: Install or Upgrade the Module
Once the module is installed or updated, open the website editor, select “Edit,” and find the snippet under the “Features” category. From there, it can be dragged and placed anywhere on the page.
Creating a snippet in Odoo 19 is a simple and effective way to customize website pages. By defining a snippet template, registering it in the website editor, and loading it through the module manifest, you can create reusable content blocks that are easy to manage.
For beginners, static snippets are a great starting point because they require only basic XML knowledge and no backend logic. Once you are comfortable with static snippets, you can explore dynamic snippets to display data from Odoo models.
Snippets help keep website design consistent, reduce repetitive work, and make content management easier for both developers and non-technical users. In Odoo 19, snippets continue to play an important role in creating well-structured and visually appealing websites.
To read more about How to Create a Snippet in Odoo 18, refer to our blog How to Create a Snippet in Odoo 18.