Odoo is widely recognized for its modular architecture and extensive customization capabilities. Modularity and flexibility are the key features of Odoo and are well-known among developers worldwide. One of the features Odoo provides is client actions, which can be used to make the user interface more convenient and interactive. Client actions allow you to define and call certain client side actions from the server side.
In this tutorial, we will create a simple Overview page showing live counts and linking back to the standard contacts list in Odoo 20.
What Are Client Actions?
A client action is a record of the ir.actions.client model. Whereas server actions are executed through Python code, a client action is executed in the browser of the user usually via an OWL component. Odoo gets the XMLID tag of the action and uses the corresponding component from the client-side registry to render it.
Common Uses of Client Actions
- Redirect users to a certain view (form, list, kanban views)
- Open external URLs in a new browser tab or window
- Execute JavaScript widgets or other front-end code
- Show wizards, reports and dashboards
As you can see, client actions are really flexible and cover a variety of cases.
So three components need to agree on one string:
- The XML action declaration
- The registry entry in JavaScript
- The OWL component which renders the view
Unlike the server action, nothing from above runs in Python unless requested explicitly. This happens in the user's browser.
We will create a simple Contact Overview view in Odoo 20 that will display live counts and link back to the standard contacts list in a module called partner_insights:
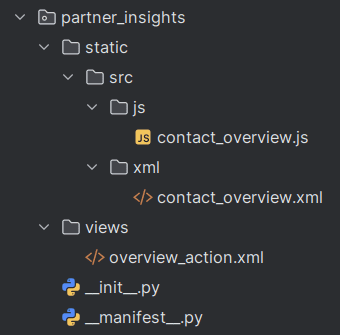
Step 1: Declare the Action and a Menu Entry
views/overview_action.xml
<?xml version="1.0" encoding="UTF-8"?>
<odoo>
   <record id="action_contact_overview" model="ir.actions.client">
       <field name="name">Contact Overview</field>
       <field name="tag">partner_insights.overview</field>
   </record>
   <menuitem id="menu_contact_overview"
             name="Contact Overview"
             sequence="5"
             action="action_contact_overview"/>
</odoo>
The partner_insights.overview string is the one the other two should match. Using the module name prefix prevents naming conflicts with other addons. If you wish to place the menu item under another application, simply set the parent attribute of the entry to this application's menu ID.
Step 2: Write the Component
static/src/js/contact_overview.js
/** @odoo-module **/
import { registry } from "@web/core/registry";
import { Component, onWillStart, proxy } from "@odoo/owl";
import { useService } from "@web/core/utils/hooks";
import { standardActionServiceProps } from "@web/webclient/actions/action_plugin";
export class ContactOverview extends Component {
   static template = "partner_insights.ContactOverview";
   static props = { ...standardActionServiceProps };
   setup() {
       this.orm = useService("orm");
       this.actionService = useService("action");
       this.state = proxy({ total: 0, companies: 0, loading: true });
       onWillStart(() => this.loadStats());
   }
   async loadStats() {
       this.state.loading = true;
       const [total, companies] = await Promise.all([
           this.orm.searchCount("res.partner", []),
           this.orm.searchCount("res.partner", [["is_company", "=", true]]),
       ]);
       Object.assign(this.state, { total, companies, loading: false });
   }
   openContacts() {
       this.actionService.doAction({
           type: "ir.actions.act_window",
           name: "Contacts",
           res_model: "res.partner",
           views: [[false, "list"], [false, "form"]],
       });
   }
}
registry.category("actions").add("partner_insights.overview", ContactOverview);
Odoo 20 Compatibility Notes:
- Reactive objects (Owl 3): In Odoo 20, useState is not available and proxy should be used for reactive objects creation.
- Action properties: standardActionServiceProps is imported from @web/webclient/actions/action_plugin instead of action_service.
- Services: useService("orm") makes requests to the database and useService("action") handles navigation.
Step 3: Create the Template
static/src/xml/contact_overview.xml
<?xml version="1.0" encoding="UTF-8"?>
<templates xml:space="preserve">
   <t t-name="partner_insights.ContactOverview">
       <div class="p-4 h-100 overflow-auto">
           <h2>Contact Overview</h2>
           <p t-if="this.state.loading" class="text-muted">Loading figures...</p>
           <div t-else="" class="d-flex gap-3 my-3">
               <div class="card p-3">
                   <small class="text-muted">All contacts</small>
                   <strong class="fs-2" t-out="this.state.total"/>
               </div>
               <div class="card p-3">
                   <small class="text-muted">Companies</small>
                   <strong class="fs-2" t-out="this.state.companies"/>
               </div>
           </div>
           <button class="btn btn-primary me-2" t-on-click="this.loadStats">Refresh</button>
           <button class="btn btn-secondary" t-on-click="this.openContacts">Open contact list</button>
       </div>
   </t>
</templates>
The outer div is h-100 overflow-auto, meaning that the content of it will be scrollable inside the action area.
Step 4: Declare Everything in the Manifest File
__manifest__.py
{
   'name': 'Partner Insights',
   'version': '20.0.1.0.0',
   'summary': 'Contact overview screen built as a client action',
   'depends': ['base', 'web'],
   'data': ['views/overview_action.xml'],
   'assets': {
       'web.assets_backend': [
           'partner_insights/static/src/js/contact_overview.js',
           'partner_insights/static/src/xml/contact_overview.xml',
       ],
   },
   'license': 'LGPL-3',
}
Opening the Action from Elsewhere
It's not just the menu.
From a Python method (e.g., a button press on the partner form):
from odoo import models
class ResPartner(models.Model):
    _inherit = 'res.partner'
    def action_show_overview(self):
        self.ensure_one()
        return {
            'type': 'ir.actions.client',
            'tag': 'partner_insights.overview',
            'params': {'partner_id': self.id},
        }
From JavaScript:
this.actionService.doAction({
    type: "ir.actions.client",
    tag: "partner_insights.overview",
    params: { partner_id: 7 },
});
Reading the values inside the component:
setup() {
    const params = this.props.action.params || {};
    this.partnerId = params.partner_id;
}
params is how the server communicates the information (which record the user was viewing, for example) to the client. All the context of the action is accessible in this way, in this.props.action.context.
Target Field Display Modes
The optional target field defines where the screen is displayed:
| Value | Behavior |
| current | Replaces the current view in the main area |
| main | Same as current, but resets the breadcrumb trail |
| fullscreen | Covers the whole window and hides the navbar |
| new | Opens inside a dialog, which suits small wizard-like screens |
Adding <field name="target">new</field> to our record XML would cause the action to appear in a popup.
Common Mistakes
- Wrong tag: A small typo between XML and registry call results in the "could not find client action" error.
- Different template names: The name from the static template should exactly coincide with t-name in XML.
- Asset entries are missing: Files that are not listed in the manifest will never reach the browser.
- Outdated Owl coding practices: If you copy-paste code for useState import from Odoo 19 or older versions, it will no longer work with Owl 3. Use proxy instead.
- Cache problems: If you modify your JavaScript files, reload the page (or turn debug mode with assets on).
Client actions are the canonical way of creating an absolutely custom screen which is at the same time native to Odoo. First declare the record, then register the component by using the proper tag, create template and load both through the manifest. When this is done, open your screen from menus, buttons, or JavaScript with params.
Starting from here, implement additional features like charts, filters, or services that will cache your queries. It all goes the same way – from basic counter pages to complete analytics dashboards.
To read more about How to Create and Use Client Actions in Odoo 19, refer to our blog How to Create and Use Client Actions in Odoo 19.