We have different types of views in Odoo such as tree, form, kanban, graph, calendar and many more. Each of the views available will help you to define the data available in a distinctive form which is sustainable for your understanding. Moreover, the view selecting options are available in almost all the menu of Odoo.
Here, I am going to explain about one of the advanced views in Odoo called the Gantt view.
Currently the Gantt view works only on Odoo enterprise edition of Odoo because it can only be defined by the installation web_gantt module which is only available for the enterprise edition of Odoo. The module will be defined as shown in the following screenshot under Apps menu of the Enterprise edition of Odoo.

Now let me get into detail about the Gantt view of Odoo, I ’m sure that you have heard about bar charts, and we know the different types of bar charts, i.e, horizontal or vertical. Moreover, in Odoo horizontal bar chart concept is used in the Gantt view.
Example: The following image depicts the Gantt view in the Planning module.
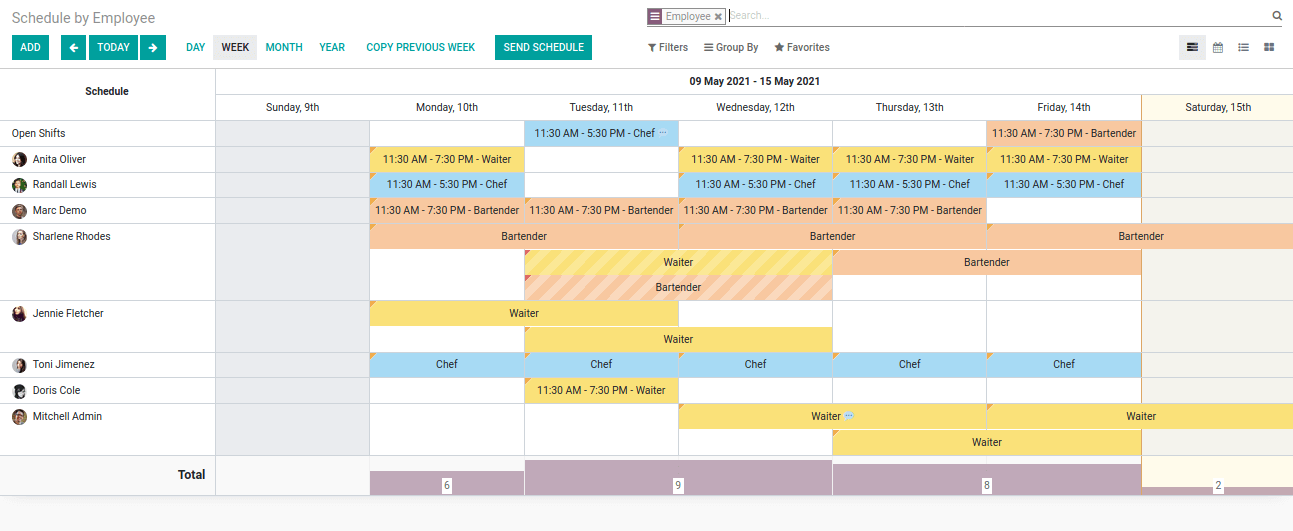
The main representation concept behind the Gantt view is the planning aspect, so you can plan your project, production or anything, also we can use it as an analysis report. In addition, it has a more attractive and user-friendly view.
So let's try to create this view on our application. I Am going to create a simple basic view of gantt. Before going to create a gantt view we have to check and ensure about certain attributes and main elements used in the gantt view creation.
Main Element
- Gantt tag
Attributes
- String
- Start date
- Stop date
- Default group by
- Progress
- Default scale
- Scales
- Precision
- Thumbnails
- Color
These are some example attributes, you can use more advanced attributes just as in all other views.
Now we are going to create a basic view with start_date, stop_date, group_by etc.
First we need a model for representing a gantt view. Here, I have created one model with parameters like date_from, date_to and employee_id. Moreover, here I have only used three fields, you can add more fields as per your needs.
.py
from odoo import api, fields, models

class SimpleGantt(models.TransientModel):
   _name = 'simple.gantt'
   _rec_name = 'employee_id'
   employee_id = fields.Many2one('hr.employee', string="Employee")
   date_from = fields.Date('Date From', required=True, index=True,default=fields.Date.context_today)
   date_to = fields.Date('Date To', required=True, index=True, default=fields.Date.context_today)
Then we need an xml file just as the ones where we create form views however, instead of form tag we used gantt tag and their attributes.
.xml
<record id="simple_gantt_view" model="ir.ui.view">
   <field name="name">simple.gantt.view.gantt</field>
   <field name="model">simple.gantt</field>
   <field name="arch" type="xml">
       <gantt
               date_start="date_from"
               date_stop="date_to"
               default_group_by="employee_id"
               default_scale="week"
               color="employee_id"
               scales="day,week,month,year"
               precision="{'day': 'hour:full', 'week': 'day:full', 'month': 'day:full', 'year': 'day:full'}"
               thumbnails="{'employee_id': 'image_128'}">
           <field name="employee_id"/>
           <templates>
               <div t-name="gantt-popover" class="container-fluid">
                   <div class="row no-gutters">
                       <div class="col">
                           <ul class="pl-1 mb-0">
                               <li>
                                   <strong>Start Date:</strong>
                                   <t t-esc="userTimezoneStartDate.format('YYYY-MM-DD hh:mm:ss A')"/>
                               </li>
                               <li>
                                   <strong>Stop Date:</strong>
                                   <t t-esc="date_to.format('YYYY-MM-DD hh:mm:ss A')"/>
                               </li>
                           </ul>
                       </div>
                   </div>
               </div>
           </templates>
       </gantt>
   </field>
</record>
Now that we have defined the view, let's move to the next step. The gantt tag contains some attributes, it provides basic features. The template is used to show the details of each bar as we move through the top of the bar. Next we have to add gantt view mode in our action.
<record id="simple_gantt_analysis" model="ir.actions.act_window">
   <field name="name">Simple Gantt View</field>
   <field name="res_model">simple.gantt</field>
   <field name="view_mode">gantt,form</field>
 </record>
Along with our form view mode we have added gantt view.
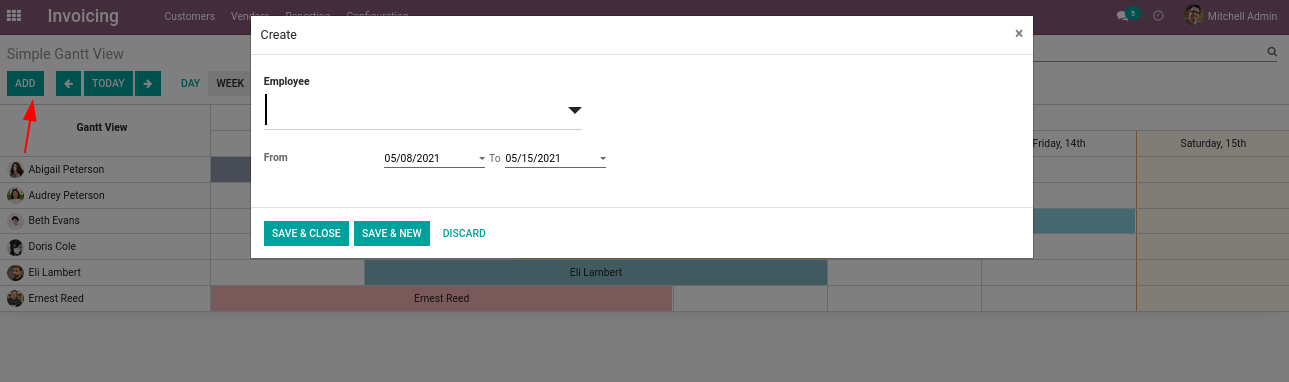
Let us now examine how this code affects our application. The view that I created is shown below.

We can add a new record by clicking on the Add button in the view.
We can filter data by day, week, and year wise. The different colors indicate different employee’s allocations. Moreover, you can try different attributes within the gantt tag for more advanced features.
Watch Video: