Header, Statusbar, and Buttons in Odoo are tools that help users to achieve functional operations of an organization more efficient and user-friendly. Hence these make all kinds of operations simpler with higher accuracy.
This blog discusses how to define header, status bar, and buttons in Odoo 15.
This screenshot shows a Sale Order. The marked section is a header with buttons and a status bar for the sale order form.
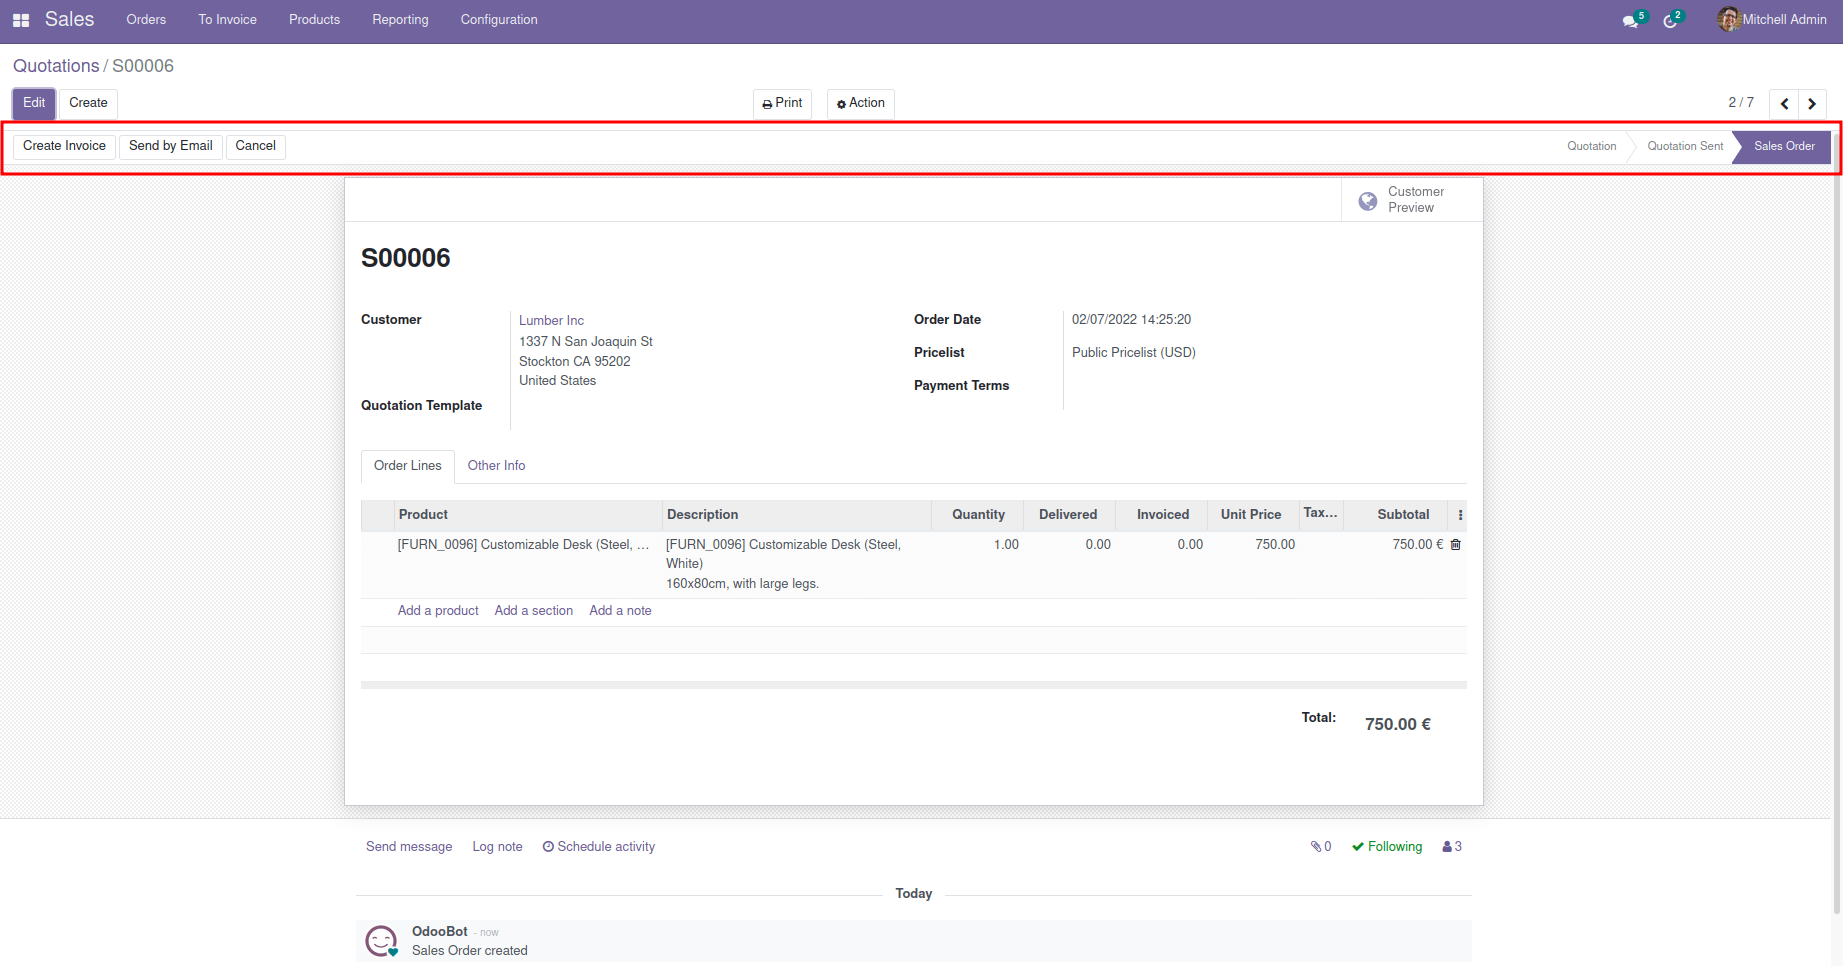
A sale order goes through different states. Other data may be used in an organization that usually goes through different states or stages. The status bar in Odoo is beneficial in such cases, which is the simplest and most efficient tool. Users will get the overview of each record using the status bar option itself. There may be some requirements, such as performing any operations for a single record. There will be some situations like performing multiple operations sequentially. Here comes the relevance of buttons in form view as mentioned, buttons are usually used to perform business operations for a single record. This makes the Odoo platform less complex and more user-friendly.
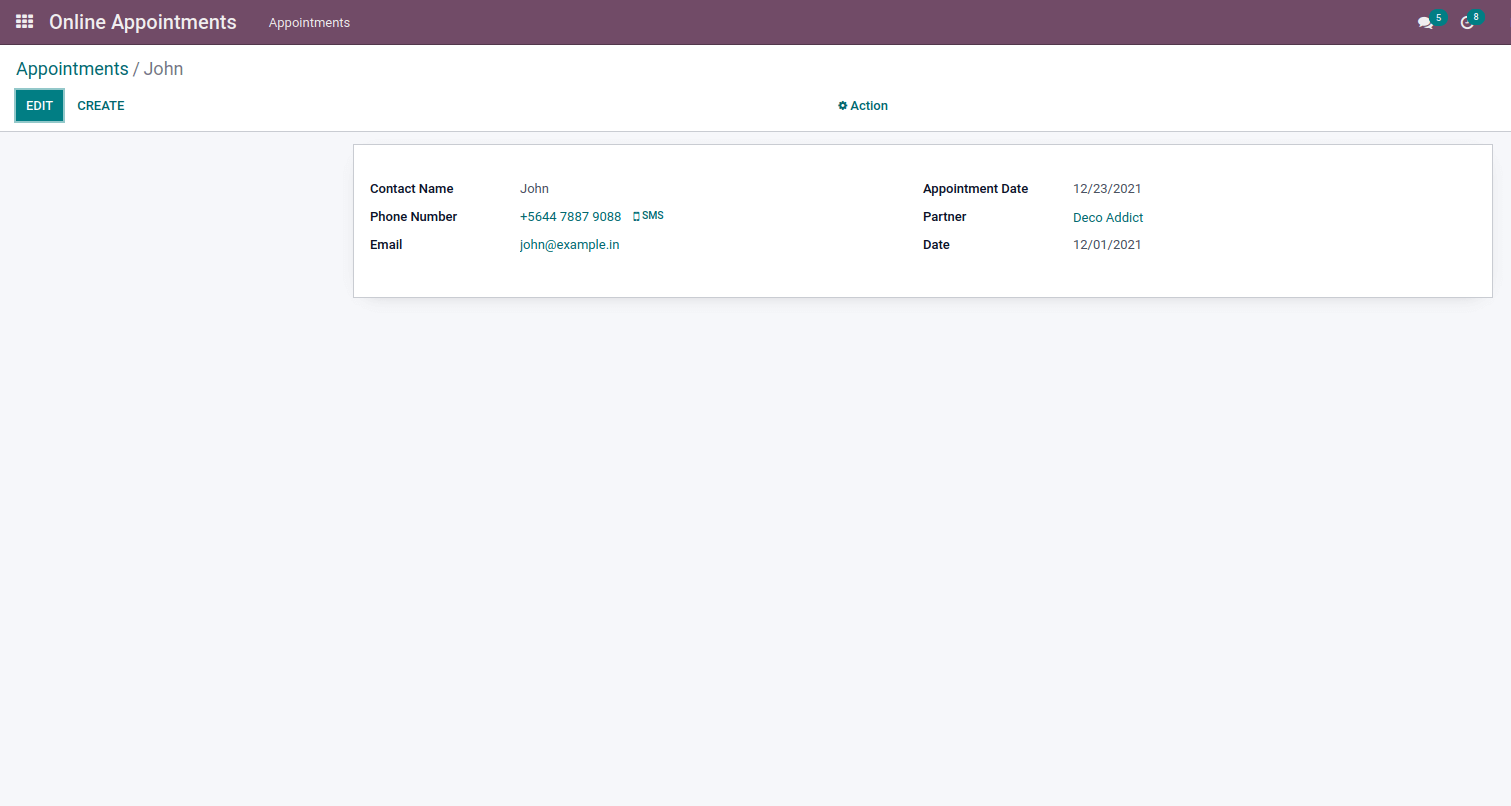
Now let’s discuss how we can add these buttons and status bars in the custom model form view. As an example, consider a model to store online appointments. First, let's see the existing model file and simple form view, which is given below.
Model.py
# -*- coding: utf-8 -*-
from odoo import api, fields, models
class Appointment(models.Model):
   _name = "appointment.appointment"
   _description = "Appointment"
   name = fields.Char(string="Contact Name", required=True)
   phone = fields.Char(string="Phone Number")
   email = fields.Char(string="Email")
   partner_id = fields.Many2one('res.partner', string="Partner", required=True)
   date = fields.Date(string="Date", default=fields.Date.today())
   appointment_date = fields.Date(string="Appointment Date", required=True)
View.xml
<?xml version="1.0" encoding="utf-8"?>
<odoo>
       <!--        form view-->
       <record model="ir.ui.view" id="appointment_form_view">
           <field name="name">Appointments</field>
           <field name="model">appointment.appointment</field>
           <field name="arch" type="xml">
               <form string="Appointment">
                   <sheet>
                       <group>
                           <group>
                               <field name="name"/>
                               <field name="phone" widget="phone"/>
                               <field name="email" widget="email"/>
                           </group>
                           <group>
                               <field name="appointment_date" widget="date"/>
                               <field name="partner_id"/>
                               <field name="date" widget="date"/>
                           </group>
                       </group>
                   </sheet>
               </form>
           </field>
       </record>
</odoo>
Let's start editing the existing form view for adding a header section with the status bar. For that add a field to store the state of the model appointment.appointment. The following code snippet shows the python code for the field which is added to the model Appointment. A new state field is added which is of type Selection with states Draft, In Progress, Done, Canceled.
Example:
state = fields.Selection(selection=[
       ('draft', 'Draft'),
       ('in_progress', 'In Progress'),
       ('cancel', 'Cancelled'),
       ('done', 'Done'),
   ], string='Status', required=True, readonly=True, copy=False,
   tracking=True, default='draft')
Statusbar in Odoo
Now let's see how to achieve the status bar in form view using the state field just created. For that edit the existing view file and add the header section inside the form tag before the sheet tag.
Example:
<header>
   <field name="state" widget="statusbar" statusbar_visible="draft,in_progress,done"/>
</header>
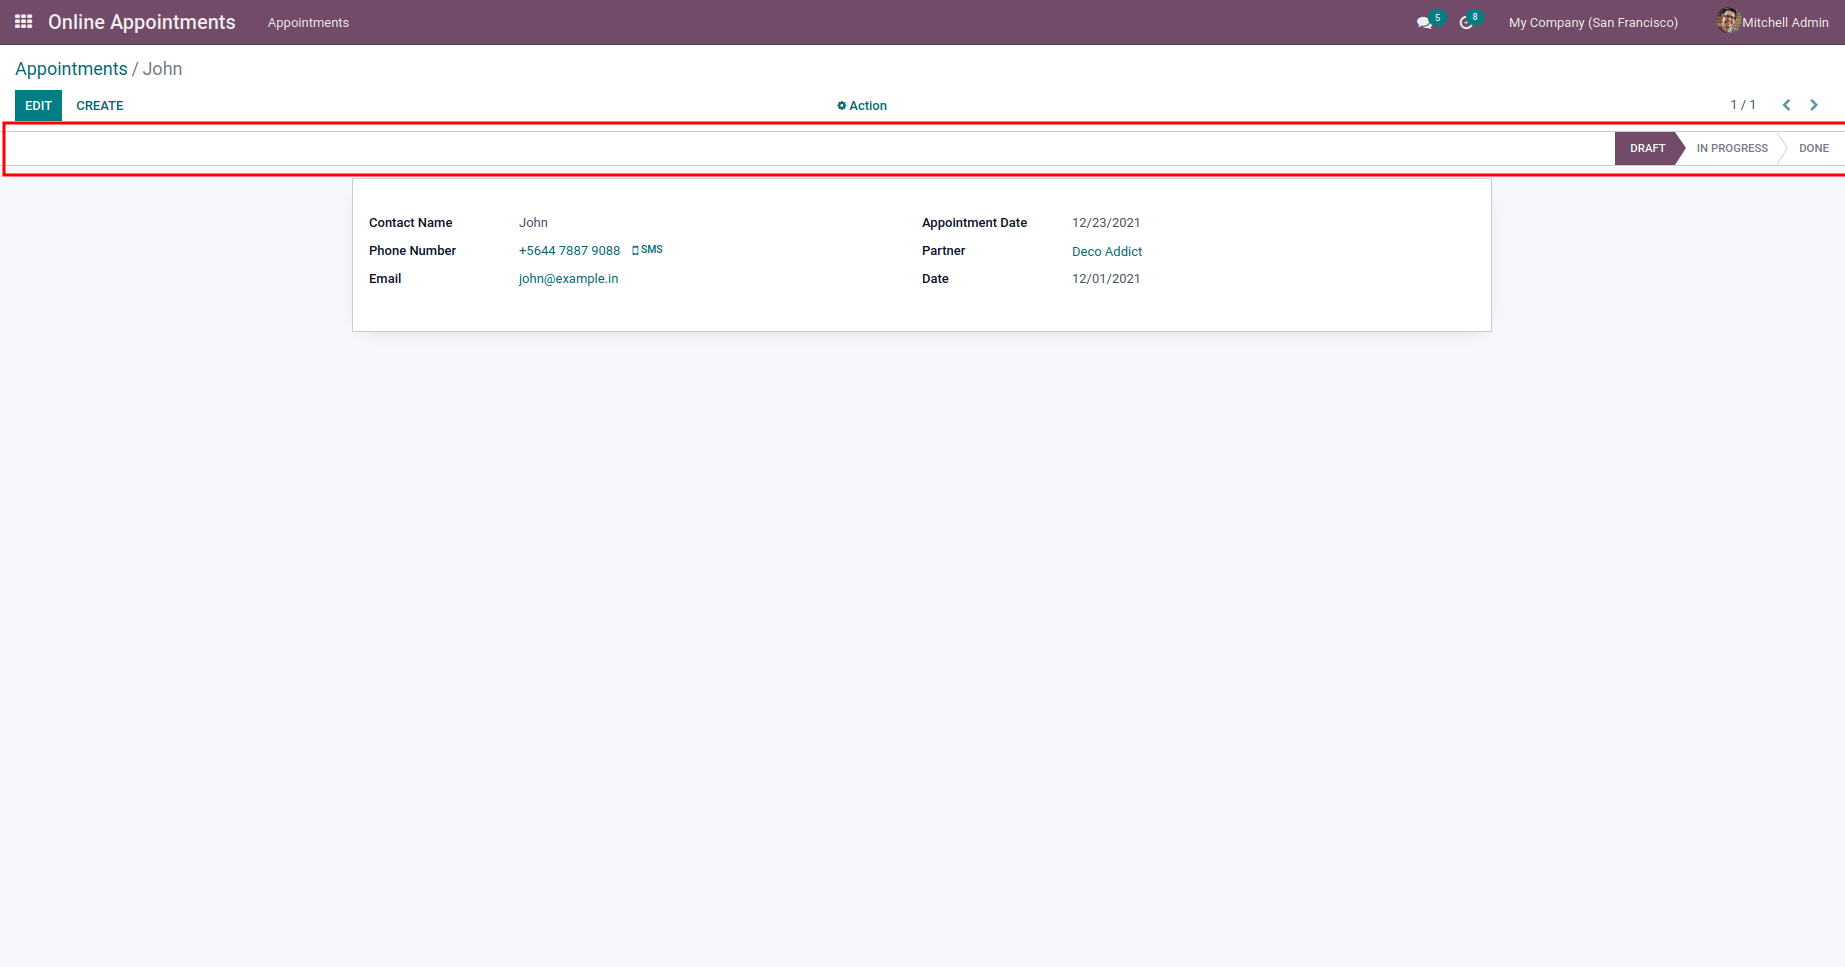
Status bar widget must be used for achieving this kind of header. Otherwise, the view type will be changed. It will be good to try without using the status bar widget to see the difference. It is possible to specify which states need to be displayed in the statusbar.statusbar_visible attribute can be used to achieve this feature. Here only draft, in_progress, and done are given. Hence cancel state will be hidden by default in all forms. It will be shown only if a record falls in this state.
The form view for the appointment will look like below after adding the status bar.
Buttons in Odoo
Now let’s see how to add a button with some operations inside the header. Consider the operation of making an appointment in the “In Progress” state from the “Draft” state. The prime step in adding a button inside the header is adding it in the view file.
Example:
<button name="button_in_progress" class="oe_highlight" states="draft" string="In Progress" type="object" help="Move Appointment to In Progress state"/>
String: Stands for the displayed name of the button.
Type: Type of button. Either Object or Action.
Help: Short description of button. Displayed on hovering.
Name Name of python method executed on button click. Applicable only if the type is an object.
Class: Used to apply style for button
States: States in which this button is visible. It is also possible to add multiple stages.
There are two types of buttons in Odoo. They are Object type and Action type. If the button is of the type object, then the python method mentioned in the name attribute of the button will be executed on button click. It is also possible to call an action record using the button. In such cases, buttons of type action are used. Here is discussing the button of type object.
In this case, it is necessary to declare the python method in the corresponding model. On button click, the corresponding Python function will be executed on the specific record.
Example:
def button_in_progress(self): self.write({ 'state': "in_progress" })After updating the code upgrade the module to view changes applied. The form view will be updated as shown below.

After clicking the button IN PROGRESS the state of appointment will be automatically changed to In Progress. It is also possible to perform all kinds of operations with a button click. Hence it makes one of the most used features in Odoo.
The final model.py and view.xml file will be
Model.py
# -*- coding: utf-8 -*-
from odoo import api, fields, models, _, tools
from odoo.osv import expression
from odoo.exceptions import UserError, ValidationError
class Appointment(models.Model):
   _name = "appointment.appointment"
   _description = "Appointment"
   name = fields.Char(string="Contact Name", required=True)
   phone = fields.Char(string="Phone Number")
   email = fields.Char(string="Email")
   partner_id = fields.Many2one('res.partner', string="Partner", required=True)
   date = fields.Date(string="Date", default=fields.Date.today())
   appointment_date = fields.Date(string="Appointment Date", required=True)
   state = fields.Selection(selection=[
           ('draft', 'Draft'),
           ('in_progress', 'In Progress'),
           ('cancel', 'Cancelled'),
           ('done', 'Done'),
       ], string='Status', required=True, readonly=True, copy=False,
       tracking=True, default='draft')
   def button_in_progress(self):
       self.write({
           'state': "in_progress"
       })
View.xml
<?xml version="1.0" encoding="utf-8"?>
<odoo>
       <!--        form view-->
       <record model="ir.ui.view" id="appointment_form_view">
           <field name="name">Appointments</field>
           <field name="model">appointment.appointment</field>
           <field name="arch" type="xml">
               <form string="Appointment">
                   <header>
                       <button name="button_in_progress" class="oe_highlight" states="draft" string="In Progress" type="object" help="Move Appointment to In Progress state"/>
                       <field name="state" widget="statusbar" statusbar_visible="draft,in_progress,done"/>
                   </header>
                   <sheet>
                       <group>
                           <group>
                               <field name="name"/>
                               <field name="phone" widget="phone"/>
                               <field name="email" widget="email"/>
                           </group>
                           <group>
                               <field name="appointment_date" widget="date"/>
                               <field name="partner_id"/>
                               <field name="date" widget="date"/>
                           </group>
                       </group>
                   </sheet>
               </form>
           </field>
       </record>
</odoo>