The Geolocator plugin is used in Flutter for accessing the device locations. It makes platform-specific location services easily accessible.
Features
* Obtain the latest location that is known.
* Get the device's current location.
* Obtain real-time location updates.
* Verify that the device has location services turned on.
* Determine the separation between two geocoordinates (in meters).
* Determine the bearing in coordinates between two points.
Initial setup
To create a Flutter app, which can access the location of the device. We need to add the geolocator inside the dependencies of the .yaml file of your app.
dependencies:
  flutter:
	sdk: flutter
  geolocator: ^10.1.0 // you can use the latest one
After adding the dependencies, we need to run the command ‘flutter pub get’ that fetches all the packages defined.
flutter pub get
Or you can directly enter the below command in the terminal without adding anything inside the .yaml file.
flutter pub add geolocator
This will add the geolocator package to our project, so you can use those in the dart code.
Now, you can use the ‘geolocator’ package in the Dart code.
import 'package:geolocator/geolocator.dart';
Android
Next, in Android, you must include the ACCESS_FINE_LOCATION or ACCESS_COARSE_LOCATION permission in your Android Manifest file.
For that, follow the below steps.
1. Navigate to the android/app/src/main/AndroidManifest.xml file.
2. Then add the following permission within the <manifest> element:
<manifest xmlns:android="http://schemas.android.com/apk/res/android"
	package="com.example.myapp">
	<uses-permission android:name="android.permission.ACCESS_FINE_LOCATION" />
	<application>
    	<!-- ... -->
	</application>
</manifest>
Or
<manifest xmlns:android="http://schemas.android.com/apk/res/android"
	package="com.example.myapp">
	<uses-permission android:name="android.permission.ACCESS_COARSE_LOCATION" />
	<application>
    	<!-- ... -->
	</application>
</manifest>
The geolocator plugin will utilize ACCESS_FINE_LOCATION when both permissions are configured inside the manifest.
If you want to receive updates even when your app is running in the background, you must add the ACCESS_BACKGROUND_LOCATION permission (next to the ACCESS_COARSE_LOCATION or the ACCESS_FINE_LOCATION permission) as of Android 10. So just add the code below inside the manifest.
<uses-permission android:name="android.permission.ACCESS_BACKGROUND_LOCATION" />
iOS
To obtain the location of your iOS device, add the following items to your Info.plist file (found under ios/Runner). To begin, open your Info.plist file and add the following (be sure to alter the description to make it relevant to your application):
<key>NSLocationWhenInUseUsageDescription</key>
<string>Access to the location is needed for the app when open.</string>
<key>NSLocationAlwaysUsageDescription</key>
<string>Access to the location is needed when in the background.</string>
You must additionally add the Background Modes capability to your XCode project (Project > Signing and Capabilities > "+ Capability" button) and choose Location Updates if you want to receive updates when your app is running in the background. When submitting your app to the AppStore, you must provide Apple with a detailed explanation of why your app requires this, so proceed with caution. Your application will be refused if Apple isn't happy with the justification.
To utilize the requestTemporaryFullAccuracy({purposeKey: "SecondKey"}) function, the Info.plist file has to have a dictionary added to it.
<key>NSLocationTemporaryUsageDescriptionDictionary</key>
<dict>
  <key>SecondKey</key>
  <string>The App requires temporary access to the device location.</string>
</dict>
The ‘purposeKey’ that is supplied in the requestTemporaryFullAccuracy() function should match the second key, which in this case is named ‘SecondKey’. You may designate separate keys for distinct functionality inside your application. See Apple's documentation for further details.
Flutter App
Next, We need to design the Flutter app.
import 'package:flutter/material.dart';
import 'package:geolocator/geolocator.dart';
void main(){
  runApp(const MyApp());
}
class MyApp extends StatelessWidget {
  const MyApp({super.key});

  @override
  Widget build(BuildContext context) {
	return MaterialApp(

  	home: GeolocationApp(),
	);
  }
}
class GeolocationApp extends StatefulWidget {
  const GeolocationApp({super.key});
  @override
  State<GeolocationApp> createState() => _GeolocationAppState();
}
class _GeolocationAppState extends State<GeolocationApp> {
  Position? _currentLocation;
  late bool servicePermission = false;
  late LocationPermission permission;
  Future<Position> _getCurrentLocation() async {
	servicePermission = await Geolocator.isLocationServiceEnabled();
	if (!servicePermission) {
  	print("Service Disabled");
	}
	permission = await Geolocator.checkPermission();
	if (permission == LocationPermission.denied) {
  	permission = await Geolocator.requestPermission();
	}
	return await Geolocator.getCurrentPosition();
  }
  @override
  Widget build(BuildContext context) {
	return Scaffold(
  	appBar: AppBar(
    	title: Text("Get Your Location"),
    	centerTitle: true,
  	),
  	body: Center(
      	child: Column(
        	mainAxisAlignment: MainAxisAlignment.center,
        	crossAxisAlignment: CrossAxisAlignment.center,
        	children: [
          	Text(
            	"Location Coordinates",
            	style: TextStyle(
              	fontSize: 24,
              	fontWeight: FontWeight.bold,
            	),
          	),
          	SizedBox(
            	height: 6,
          	),
          	Text(
              	// "${_currentLocation}"
              	"Latitude = ${_currentLocation?.latitude} ; Longitude = ${_currentLocation?.longitude}"
              	),
          	SizedBox(
            	height: 30.0,
          	),
          	ElevatedButton(onPressed: () async {
            	_currentLocation= await _getCurrentLocation();
            	/// Determine the current position of the device.
            	///
            	/// When the location services are not enabled or permissions
            	/// are denied the `Future` will return an error.
          	}, child: Text('get location'))
        	],
      	)),
	);
  }
}
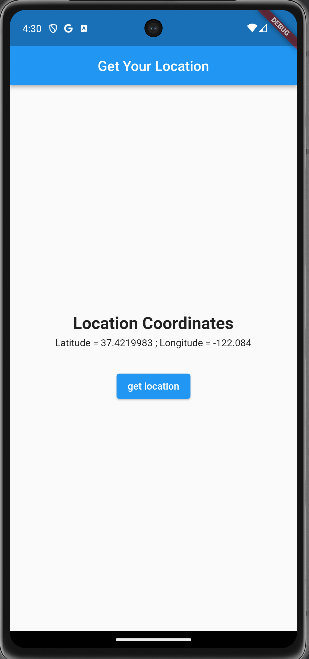
* UI
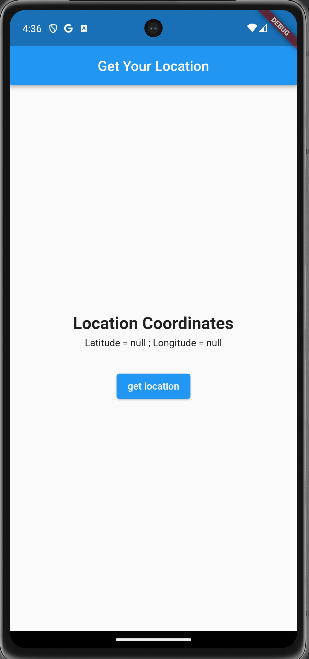
Here on clicking the button get location, the device's current location will be shown.
Let's go through the code step by step:
1. Imports:
import 'package:flutter/material.dart';
import 'package:geolocator/geolocator.dart';
First of all, we are importing the flutter/material.dart, which is the core Flutter framework for building Flutter applications or for building Flutter UIs. And ‘geolocator’ is for fetching the device location.
2. Main Function:
void main() {
  runApp(MyApp());
}
The main function is the entry point of the Flutter application. It calls runApp to run the MyApp widget.
3. MyApp Class:
class MyApp extends StatelessWidget {
  const MyApp({super.key});
  @override
  Widget build(BuildContext context) {
	return MaterialApp(
  	home: GeolocationApp(),
	);
  }
}
MyApp is a stateless widget that returns a MaterialApp widget. It sets the home property to an instance of the GeolocationApp widget.
4. GeolocationApp Class:
class GeolocationApp extends StatefulWidget {
  const GeolocationApp({super.key});
  @override
  State<GeolocationApp> createState() => _GeolocationAppState();
}
‘GeolocationApp’ is a stateful widget that returns an instance of ‘_GeolocationAppState’ as its state.
5. _GeolocationAppState Class:
class _GeolocationAppState extends State<GeolocationApp> {
  // State variables
  Position? _currentLocation;
  late bool servicePermission = false;
  late LocationPermission permission;
  String _currentAddress = "";
  // Function to get the current location
  Future<Position> _getCurrentLocation() async {
	servicePermission = await Geolocator.isLocationServiceEnabled();
	if (!servicePermission) {
  	print("Service Disabled");
	}
	permission = await Geolocator.checkPermission();
	if (permission == LocationPermission.denied) {
  	permission = await Geolocator.requestPermission();
	}
	return await Geolocator.getCurrentPosition();
  }
  @override
  Widget build(BuildContext context) {
	return Scaffold(
  	appBar: AppBar(
    	title: Text("Get Your Location"),
    	centerTitle: true,
  	),
  	body: Center(
    	child: Column(
      	mainAxisAlignment: MainAxisAlignment.center,
      	crossAxisAlignment: CrossAxisAlignment.center,
      	children: [
        	// Displaying the title
        	Text(
          	"Location Coordinates",
          	style: TextStyle(
            	fontSize: 24,
            	fontWeight: FontWeight.bold,
          	),
        	),
        	SizedBox(
          	height: 6,
        	),
        	// Displaying the latitude and longitude
        	Text(
          	"Latitude = ${_currentLocation?.latitude} ; Longitude = ${_currentLocation?.longitude}",
        	),
        	SizedBox(
          	height: 30.0,
        	),
        	// Button to trigger location fetching
        	ElevatedButton(
          	onPressed: () async {
            	// Fetch and print the current location
            	_currentLocation = await _getCurrentLocation();
          	},
          	child: Text('Get Location'),
        	)
      	],
    	),
  	),
	);
  }
}
_GeolocationAppState is the state class for GeolocationApp. It contains state variables for storing the current location, service permissions, and location permissions. The _getCurrentLocation function is responsible for checking and requesting location permissions and fetching the current position using the Geolocator package.
The build method returns a Scaffold widget with an AppBar and a Center widget containing a column of text widgets displaying the title, latitude, and longitude. There's also an ElevatedButton that triggers the _getCurrentLocation function when pressed.
Permissions
If the browser does not implement the JavaScript Permissions API, the web platform's checkPermission method will return the LocationPermission.denied status. On the web platform, however, you may still utilize the getCurrentPosition and getPositionStream APIs.
You may call the checkPermission method to see if the user has previously been permitted to obtain the device's location:
import 'package:geolocator/geolocator.dart';
permission = await Geolocator.checkPermission();
You may use the requestPermission method to ask for permission to access the device's location:
import 'package:geolocator/geolocator.dart';
permission = await Geolocator.requestPermission();
Location service information
You may use the isLocationServiceEnabled function to determine whether location services are enabled:
import 'package:geolocator/geolocator.dart';
servicePermission = await Geolocator.isLocationServiceEnabled();
You may use the getServiceStatusStream function to listen for changes in the service status. To get location service status updates, this will return a Stream<ServiceStatus> that may be listened to.
import 'package:geolocator/geolocator.dart';
StreamSubscription<ServiceStatus> serviceStatusStream = Geolocator.getServiceStatusStream().listen(
    (ServiceStatus status) {
        print(status);
    });
The app provides a visual interface for users to get the current location of the device. This example serves as a foundation for understanding how we can use the Flutter Geolocator Plugin.
To read more about getting the user's current location from the website in Odoo 16, refer to our blog How to Get the User's Current Location from the Website in Odoo 16