Navigating between different screens in a mobile app is super important. It affects how users experience your app and how everything connects. In Flutter, the default way of moving between screens is achieved through a system commonly known as the "Navigator."
In the Flutter world, when you move from one screen to another, you're essentially utilizing the Navigator to manage these transitions. The Navigator keeps track of your app's navigation stack, allowing you to push new screens onto the stack, pop screens off, and control the overall flow.
However, the default navigation system in Flutter, while effective, can sometimes be a bit intricate, especially when dealing with complex navigation scenarios. This is where go_router comes into play as a simplified and powerful alternative.
The default navigation system in Flutter uses the Navigator class, which is responsible for managing a stack of routes. Each route represents a screen or a page in your app. Here's a simple example to demonstrate the default navigation system:
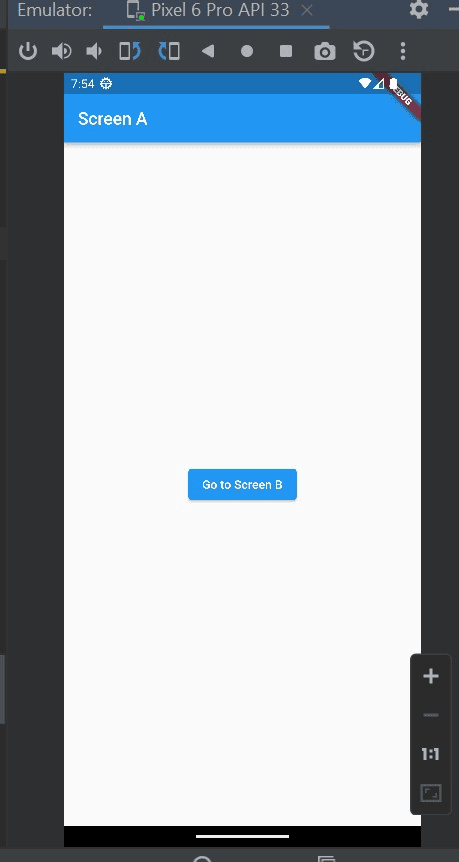
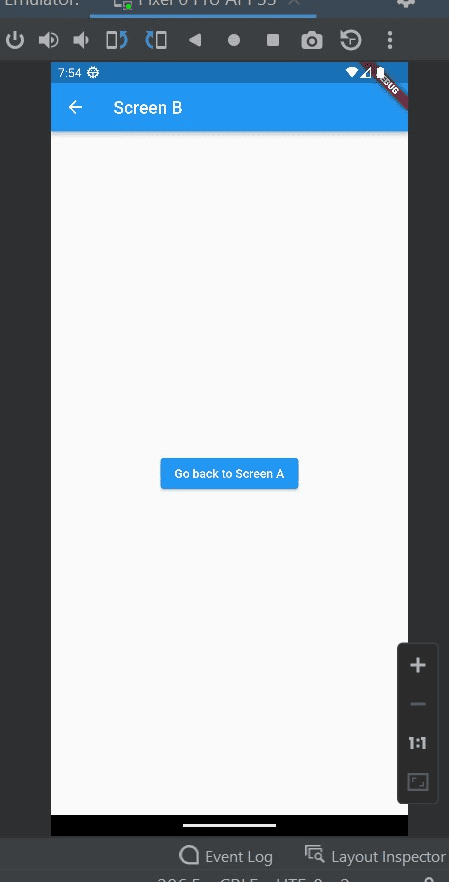
Suppose you have two screens, ScreenA and ScreenB. Here's how you would navigate from ScreenA to ScreenB using the default Navigator:
Add the below code to your dart file and run the code.
import 'package:flutter/material.dart';
void main() {
  runApp(MyApp());
}
class MyApp extends StatelessWidget {
  @override
  Widget build(BuildContext context) {
    return MaterialApp(
      home: ScreenA(),
    );
  }
}
class ScreenA extends StatelessWidget {
  @override
  Widget build(BuildContext context) {
    return Scaffold(
      appBar: AppBar(title: Text('Screen A')),
      body: Center(
        child: ElevatedButton(
          onPressed: () {
            // Navigate to ScreenB
            Navigator.push(
              context,
              MaterialPageRoute(builder: (context) => ScreenB()),
            );
          },
          child: Text('Go to Screen B'),
        ),
      ),
    );
  }
}
class ScreenB extends StatelessWidget {
  @override
  Widget build(BuildContext context) {
    return Scaffold(
      appBar: AppBar(title: Text('Screen B')),
      body: Center(
        child: ElevatedButton(
          onPressed: () {
            // Navigate back to ScreenA
            Navigator.pop(context);
          },
          child: Text('Go back to Screen A'),
        ),
      ),
    );
  }
}
In the above example:
ScreenA is the initial screen with a button. When the button is pressed, we use Navigator.push to navigate to ScreenB. ScreenB has a button to navigate back to ScreenA using Navigator.pop.
The following screenshots display the default navigator on the emulator
While the default navigation system works well for many scenarios, go_router offers a more declarative and concise approach, simplifying the navigation code and providing additional features.
How to add go_router to the Flutter project
1. Open `pubspec.yaml`:
Open your project's `pubspec.yaml` file. This file is located at the root of your Flutter project. Inside the dependencies section, add the following line to include the go_router package:
dependencies:
  flutter:
    sdk: flutter
  go_router: ^12.1.0
2. Include the following code snippet in your Dart file. This code demonstrates the usage of go_router for streamlined navigation in your Flutter app.
import 'package:flutter/material.dart';
import 'package:go_router/go_router.dart';
void main() => runApp(const MyApp());
/// The route configuration.
final GoRouter _router = GoRouter(
  routes: <RouteBase>[
    GoRoute(
      path: '/',
      builder: (BuildContext context, GoRouterState state) {
        return const HomeScreen();
      },
      routes: <RouteBase>[
        GoRoute(
          path: 'details',
          builder: (BuildContext context, GoRouterState state) {
            return const DetailsScreen();
          },
        ),
      ],
    ),
  ],
);
/// The main app.
class MyApp extends StatelessWidget {
  /// Constructs a [MyApp]
  const MyApp({super.key});
  @override
  Widget build(BuildContext context) {
    return MaterialApp.router(
      routerConfig: _router,
    );
  }
}
/// The home screen
class HomeScreen extends StatelessWidget {
  /// Constructs a [HomeScreen]
  const HomeScreen({super.key});
  @override
  Widget build(BuildContext context) {
    return Scaffold(
      appBar: AppBar(title: const Text('Home Screen')),
      body: Center(
        child: ElevatedButton(
          onPressed: () => context.go('/details'),
          child: const Text('Go to the Details screen'),
        ),
      ),
    );
  }
}
/// The details screen
class DetailsScreen extends StatelessWidget {
  /// Constructs a [DetailsScreen]
  const DetailsScreen({super.key});
  @override
  Widget build(BuildContext context) {
    return Scaffold(
      appBar: AppBar(title: const Text('Details Screen')),
      body: Center(
        child: ElevatedButton(
          onPressed: () => context.go('/'),
          child: const Text('Go back to the Home screen'),
        ),
      ),
    );
  }
}
First, import the ‘go_router’ package. The route configuration defines a ‘_router’ instance of the ‘GoRouter’ class, responsible for managing the navigation routes. The root route is configured with a path '/', typically representing the home or main screen of the application. The ‘builder’ function is responsible for constructing and returning the widget associated with the home screen (‘HomeScreen’ in this case). Inside the root route, there's a nested route with the path 'details', associated with the ‘DetailsScreen’ widget. Navigating to the 'details' path will display the ‘DetailsScreen’ widget.
The ‘MyApp’ class represents the main Flutter application. It uses ‘MaterialApp.router’ and provides the configured ‘routerConfig’ using the ‘_router’ instance. The ‘build’ method overrides the ‘build’ method of the ‘StatelessWidget’ class, returning a ‘MaterialApp.router’ widget. This widget uses the router property to define the routing configuration, and the ‘routerConfig’ property is set to ‘_router’, presumably an instance of ‘GoRouter’ as seen in the code.
Next, define the pages for the Home screen and Details screen. The ‘HomeScreen’ is the initial screen containing a button that, when pressed, navigates to the 'details' route using the ‘context.go('/details')’ method provided by ‘go_router’. The ‘DetailsScreen' is another screen accessed through the nested 'details' route and contains a button that, when pressed, navigates back to the '/' route using ‘context.go('/')’.
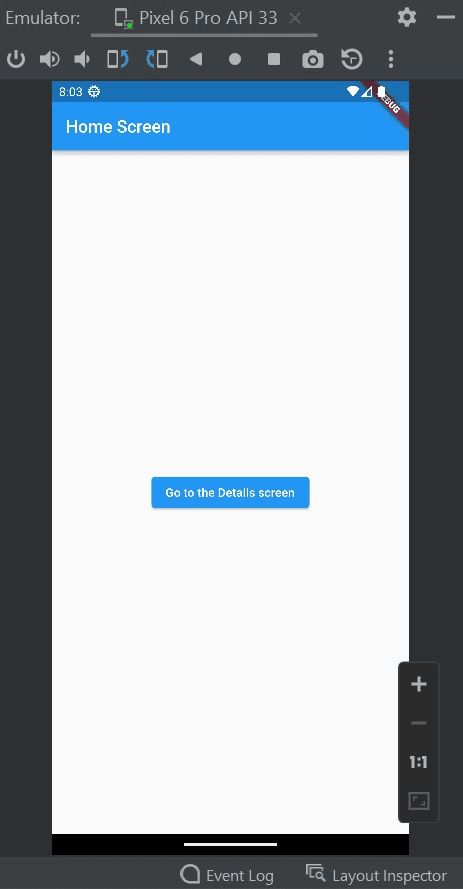
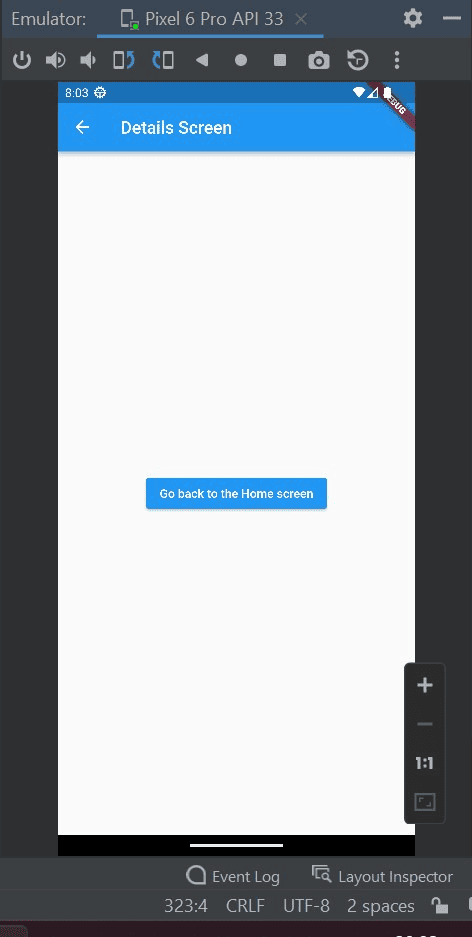
The screenshots above illustrate the navigation from one page to another using the go_router package on the emulator.
Advantage of go_router over default Navigator
Declarative Routing: Provides a more expressive and readable syntax for defining routes, resulting in cleaner navigation logic.
Conciseness and Simplicity: The code is more concise and streamlined, reducing boilerplate and improving maintainability.
Built-in Guards: Allows implementing navigation guards to control access based on conditions, improving app security.
Easier Testing: The structured nature facilitates easier testing of navigation logic, contributing to better code reliability.
In conclusion, go_router is a valuable tool for Flutter developers seeking a more streamlined and expressive way to handle app navigation. Its declarative syntax, middleware support, and other key features make it an excellent choice for projects of all sizes. By adopting go_router, you can enhance the overall navigation experience and simplify the maintenance of your Flutter applications.
To read more about using Font Awesome icons in Flutter, refer to our blog How to Use Font Awesome Icons in Flutter