Software testing is the process of implementing a program or application to detect software bugs. It allows the developer to validate and test the software program. Testing is a method of checking whether the actual client needs to be compatible with the developed project or product requirements, and testing helps to ensure quality.
Odoo supports testing modules with the help of Python's UnitTest library. Testing in Odoo is straightforward to write and use. This is a great feature you can use if you are writing a lot of custom codes and you want to keep an overview. Testing and debugging are a good part of the job of a developer. Automatic testing is an essential tool for building and maintaining robust software. Allows you to integrate automated tests on test clusters in Odoo into standard unit testing. Another reason for writing a test case is:
a) Make sure the code will not be broken in the future.
b) Give examples of use cases.
c) Specify the scope of your code.
d) It is one method to write code technically.
e) Help with your coding by explaining your goal before you work on it.
In this blog, let us discuss how to write a test case in Odoo 15
How to run a Test?
Before we know how to write test cases, we need to know how they run.
To run a test, the --test-enable parameter and -i parameters are used to indicate which you would like to test. Apply the given command if you are required to execute a test on your local odoo:
./odoo-bin -i {module_to_install} --test-enable -c {conf path}
1) Launch odoo with the flag --test-enable
2) Launch odoo with the flag -d [my_database]
3) Launch odoo with the flag -i [modules_to_install]
Eg: ./odoo-bin -i automated_test_demo --test-enable -c /odoo.conf
How to write a test?
To write tests, define a test sub-package in your module that will automatically test for the test module. Test modules must have a name beginning with test_, and tests / __ init__.py, e.g.,
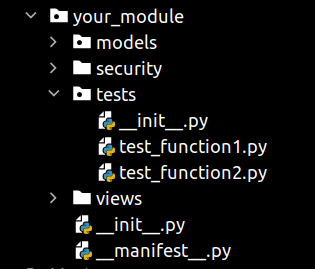
The __init__.py file includes the below content:
from . import test_function1, test_function2
test modules that are not imported from tests/__init__.py will not be run. Only the imported tests will be executed in your_module/test /__init__.py.
Initially, there are some specific prerequisites that we must use for the Odoo Test Framework. Let's see how the contents of the sample test we wrote can be applied. The points to consider are:
1) All tests must extend to an Odoo action class
2) All tests must be included in the tests/__init__.py
3) All test files should start as test_name.py
4) All test methods should start as def test_name(self):
5) All tests must be in the test directory of your module
Creating the Classes:-
For testing a module, odoo has some predefined test classes. If we extend them within our module, we can use them.
odoo.tests.common.TransactionCase
Most common test class. Separate transactions for each test.
odoo.tests.common.SingleTransactionCase
Runs all the tests in a single transaction.
odoo.tests.common.HttpCase
odoo.tests.common.SavepointCase
Now, our test class should be:
from odoo.tests import common
class TestModuleDemo(common.TransactionCase):
    def setUp(self):
        super(TestModuleDemo, self).setUp()
        # Add test setUp code here
    def test_some_action(self):
        # Add test code here
The setup () method creates the data and variables we want to use. These are available for use in test methods as it is usually stored as class attributes. Odoo uses unittest2, unittest extension library.
Writing the demo test case:-
We can write simple tests by running some code from the tested object, searching for a result to verify, and then using the assert function to compare with the expected result.
 def test_some_action(self):
        # add a record in a model.
        record = self.env['model.a'].create({'field': 'value'})
        record.some_action()
        # Check if the field and match the expected result
        self.assertEqual(record.field, 'expected_field_value')
        print('Your test was successful!')
To examine whether the output is true or false assertion function is used. In the message argument msg in Assert functions, we can also mention the error message if our test fails. In the example above, assertEqual() is equal to arg1 and arg2. If the values of arg1 and agr2 are not equal, the test fails.
Testing Exceptions:-
Sometimes, we need our tests to see if an exception has been created. It is a common case when testing that some evaluations are going right. To verify that an exception has been raised, we use the self.assertRaises () block to place the associated code inside.
To do this, we must import the warning exception on top of the file and add to the test class a method with another test case.
from odoo.exceptions import Warning
COMMONLY USED ASSERT FUNCTIONS FOR TESTING:
The assert functions are used to examine whether the output is true or false. If our test fails, we can also define the error message in the message argument msg in Assert functions. Let's take a look at some of the most commonly used assert methods and their purpose.
a) assertEqual(arg1, arg2, msg=None)
This is one of the most commonly used assert methods. It verifies whether the first and second arguments are equal, and the test fails if they are not equal. It is used to check whether argument arg1 is equal to argument arg2. If they are not equal, then the test will fail.
b) assertNotEqual(arg1, arg2, msg = None)
This is the opposite of assertEqual as described above. In this case, the test fails if arg1 and arg2 are equal.
c) assertTrue(expression, msg = None)
checks whether the given expression is true. If the given expression is false, the test will fail.
d) assertFalse(expression, msg = None)
It checks whether the given expression is false. If the given expression is true, the test will fail.
e) assertIsNone(expression, msg = None)
It checks that expression is None. If the expression is None, then the test will succeed. Else it will fail.
f) assertIsNotNone(expression, msg = None)
The assertIsNotNone() tests that expression is Not None. If the expression is None, then the test will fail.
g) assertIsInstance(object, class, msg = None)
This will check if the given object is an instance of the class we have given.
h) assertNotIsInstance(object, class, msg = None)
This will check if the given object is not an instance of the class we have given
i) assertIn(arg1, arg2, msg = None)
This will test if the given arg1 exists in arg2.
j) assertNotIn(arg1, arg2, msg = None)
This will test if the given arg1 is not in arg2.
k) assertIs(arg1, arg2, msg = None)
It will test that arg1 and arg2 evaluate the same object.
l) assertIsNot(arg1, arg2, msg = None)
This will check that the arg1 and arg2 do not evaluate the same object.
Hope you guys got a basic idea of how to write the python test case in odoo 15. With the help of the different assert functions, you can create more test cases in your code and module.