Automated actions are considered to be an ensured feature that will help us to add functionalities on top of Odoo’s default features. This is the enhanced functionality in Odoo without any coding and which can be done from the user interface. These types of actions provide a friendly user interface for creating different addons without much complexity. Although we can add conditions for the functionalities, when we look at the form of automated actions we can see the field 'Trigger”, which is used either for creating a function or for creation and updating of the function.
This blog will discuss “Modify create/edit functions from the user interface”. Let's understand how it works.
Automated Action also can be considered as Server Action. We can start by installing the 'Automated Actions' from the Apps and then configuring it from the Settings > Technical > Automated actions menu. When we open the automated actions menu here, you can create a new one.
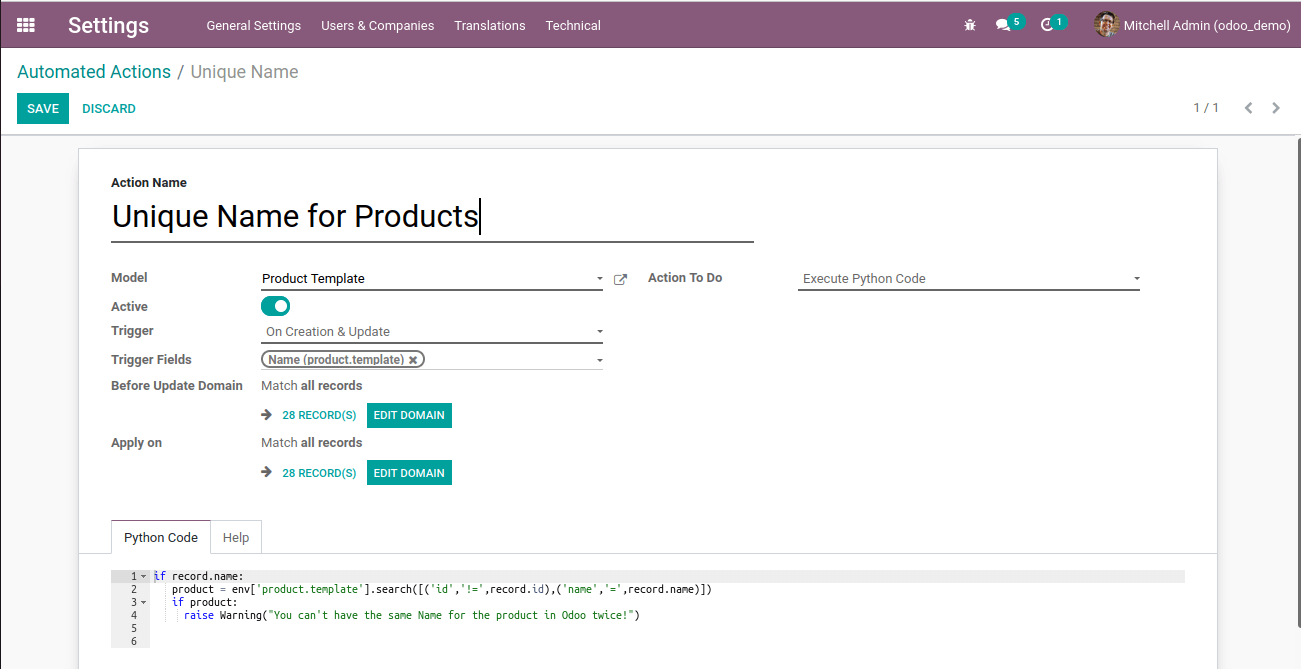
Upon selecting to create an Automated Action you will be depicted with the window as depicted in the following screenshot. Here we are trying to create an automated action where we check if the ‘Name’ of any products (whether is a newly created or existing product) duplicates, if it is so we will raise a Warning or User error. Firstly we need to provide the name for the automated action. Then select the required model to which we want to apply the action.
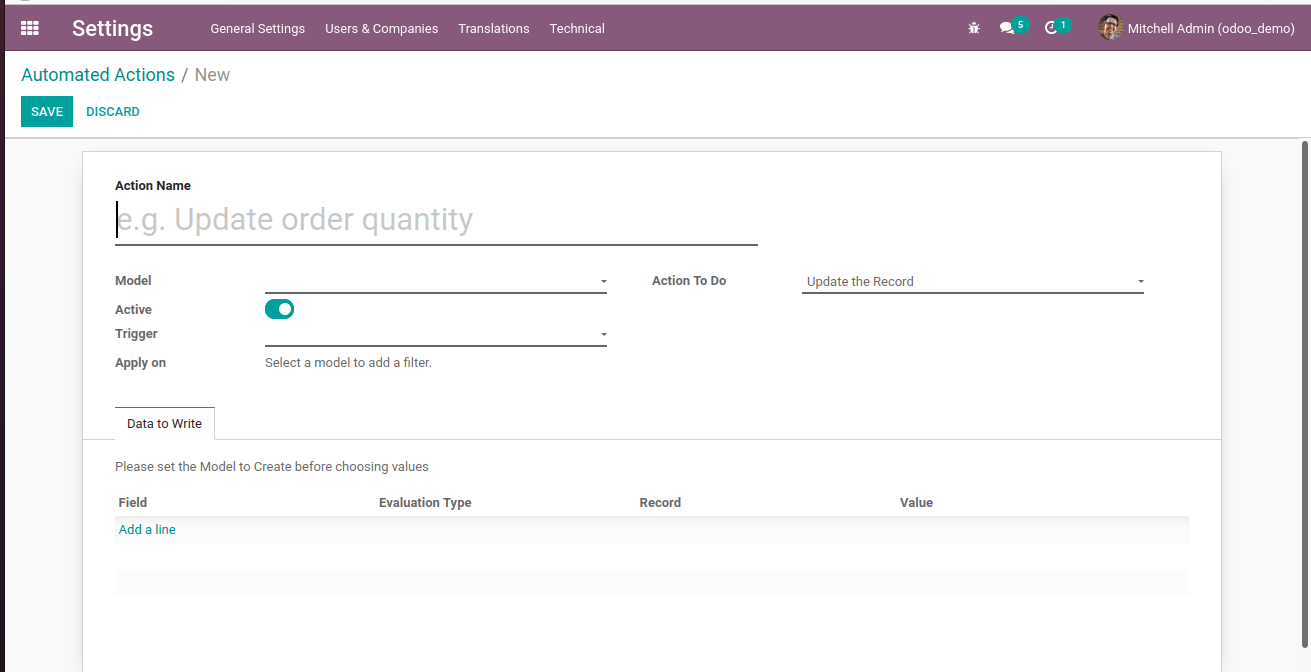
The model will be 'Product Template' since this is the model where we are applying the condition. The next step is to select the ‘Trigger’ field where we select the event that causes the automation to happen. Automated actions can be used on Creation, Deletion, Update of record on the specified model, and also can be triggered on Form Modification or a Timed Condition.
On Creation: It will be used while creating a new record. The important thing is that it is created once saved for the first time.
On Update: It is chosen when there is a need of updating the records. The update is done when the record is saved.
On Creation & Updation: This option is chosen when a record is creating or updating the record once the form is saved.
On Deletion: This is chosen when there is a need of removing some records foe\r specific conditions.
Based on Timed Condition: Here the action will trigger based on the date/time mentioned.
Based on Form Modification: It will be executed when there are any changes in the trigger field. When we choose this Trigger then the action type will be ‘Execute Python Code’.
The triggering condition for this action which will be chosen here will be 'Create and Update'.
The option “Active” can be disabled if the action needs not be executed. The 'Action To Do' selects the type of server action. It is to be executed once the record meets the trigger conditions.
Execute Python Code: Python code to establish the feature to be deployed on the model.
Create New Record: Creates records with new data.
Update Record: Updates the records which triggered the action.
Execute Several actions: Mentions the action which triggers other server actions.
Send Email: Send automatic emails.
Add Followers: the followers mentioned here will get to know if there are any changes in the task.
Create Next Activity: Create further activities like call, Email, Reminder.
Send SMS Text Message: Send SMS.
Here we will be choosing the action type as Executing Python Code for example. When selecting this option then there will be a section menu “Python Code” for adding the python code.
To illustrate how the operation works here we will add a few lines of code for checking the duplicate of the Name.
if record.name:
   product = env['product.template'].search([('id','!=',record.id),('name','=',record.name)])
   if product:
     raise Warning("You can't have the same Name for the product in Odoo twice!!")
The field 'Trigger Fields' is used to mention the field where we are going to apply the action. And here we will be choosing the field ‘Name’ which is in the model ‘Product Template’. If the field ‘Before Update Domain’ is present in the view then the condition should be satisfied before updating the record.
The field "Apply on" the condition is to be satisfied before executing the action rule if present.
After saving the automated action which we have created recently it will get applied to the situations we have mentioned in the view of that action.
Now in this context if we try to create a new product with the name of an existing product, there will raise a warning which we gave in the automated action.
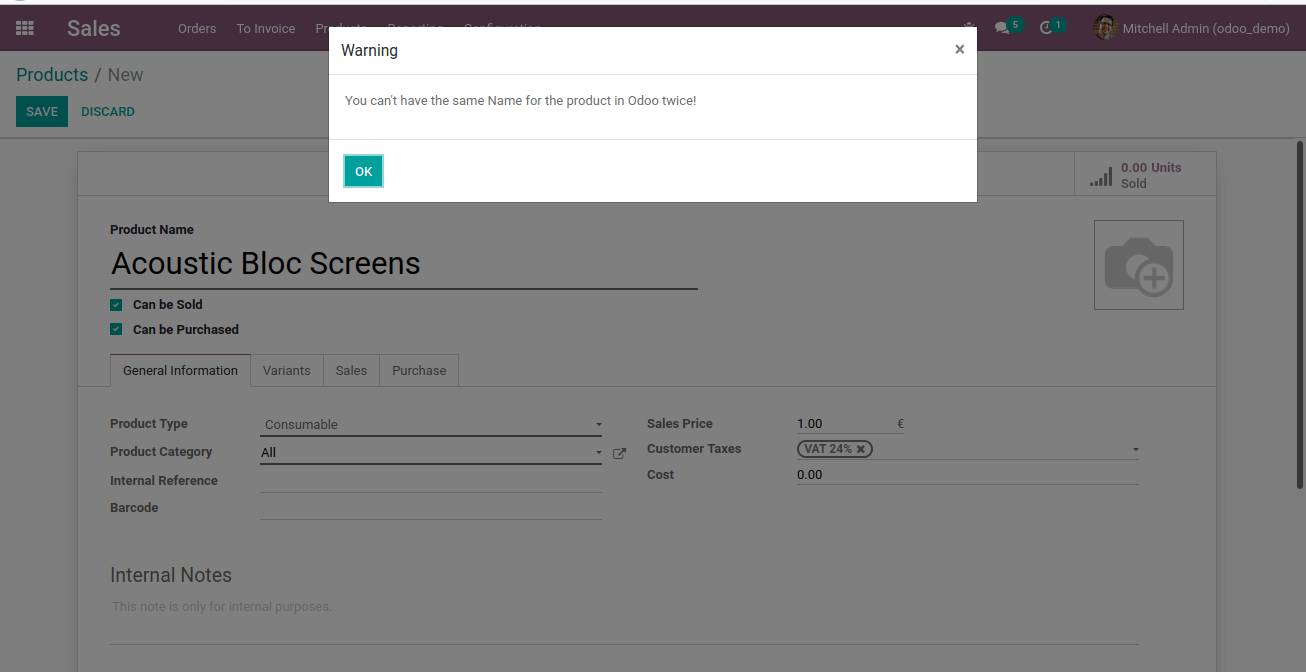
Likewise, if we try to modify an existing product with the same name as another product we will get a warning message. This is how the action works.