Due to its extreme personalization techniques, certain insight data reports claim that email marketing was the most successful digital marketing method. Even though it's the earliest digital communication medium available, live chat, social media, and other similar channels, all continue to play important roles in marketing. No marketing area has the longevity of email marketing, as some analysis reports state. While various marketing fads come and go, email is still the most effective channel at the marketer's disposal in the current world.
Email Marketing is easy, effective, and affordable. With email marketing, business owners may communicate with a large number of clients at a low cost for each message. This makes it a more cost-effective option for small-business owners than conventional marketing strategies like TV, radio, or direct mail.
Tools used by marketers to build, send, assess, optimize, and analyze their email campaigns are called email marketing tools. Today, there are numerous email marketing solutions available.
Odoo 16 Email- marketing module is a Complete ERP software system that gives organizations the tools to design stunning emails, program automated workflows, and send out personalized messages that strengthen customer relationships. By sending relevant auto-generated messages at the right moment, the Odoo E-mail Marketing tool helps organizations maximize their potential. Odoo Implementers uses one of the most effective low-cost marketing solutions to deliver company notifications in order to assist you in engaging with your consumers. Odoo will help you through every step of the Email Marketing app setting process and will show you how to effectively plan, organize, and generate reports for your mailings.
Features of Odoo 16 Email Marketing Module
1. With just a few clicks, you can easily create your email using the pre-built building blocks; you can add headers and footers, calls to action, pictures, links, and much more.
2. Before publishing, get a real-time preview of how your email will appear. Additionally, you can save your emails as templates and utilize them in future campaigns.
3. Wonderful themes without having to start from scratch, quickly and easily change the look and feel of your email.
Contacts may be quickly imported into Odoo from any CSV file.
4. Make personalized mailing lists: Assigning subscribers to one or more mailing lists can help you segment your subscriber database.
Schedule your Campaigns.
5. Send a sample of your mailing to selected email addresses for a preview.
6. Automatically remove contacts who unsubscribed from your mailing list.
7. Display emails clearly on any screen.
8. Track emails that haven't been delivered in the last 24 hours and learn why.
9. Set up multiple email servers with unique IPs and domains to maximize efficiency.
10. Archive your Campaigns in Odoo Database.
11. KPIs provide real-time data on email performance, including leads, orders, revenue, delivery, open, click, and bounce rates.
12. Adding a tracking link to email campaigns provides a comprehensive overview of campaign results.
13. Odoo CRM can be used to analyze the conversion rate, predicted income, and generated revenue of campaigns.
Mailing List Contacts
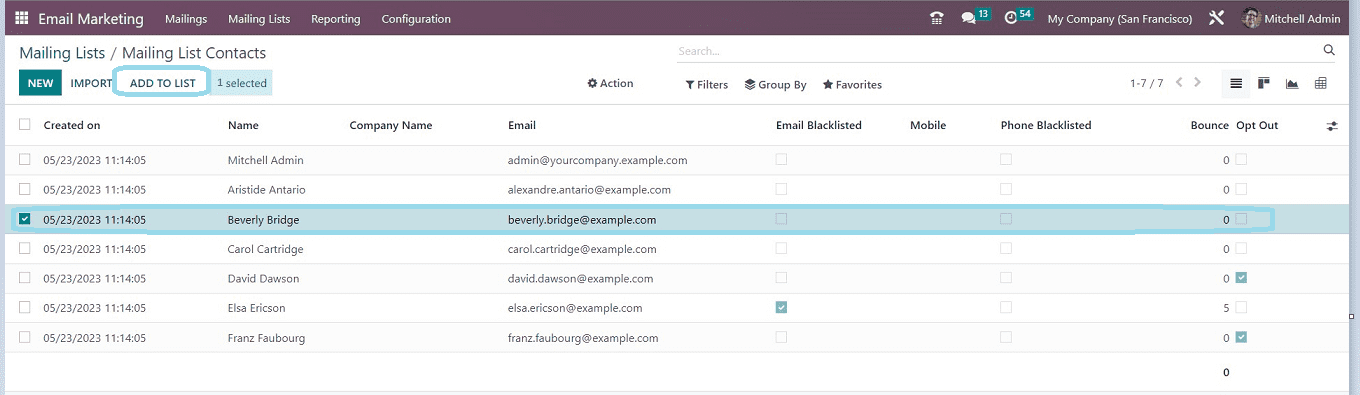
The fundamental element of the email marketing module is contacts. Mailing List Contacts are the email addresses or contact information of the customers. You can add contacts to mailing lists by using the Mailing List Contacts menu illustrated in the screenshot below.
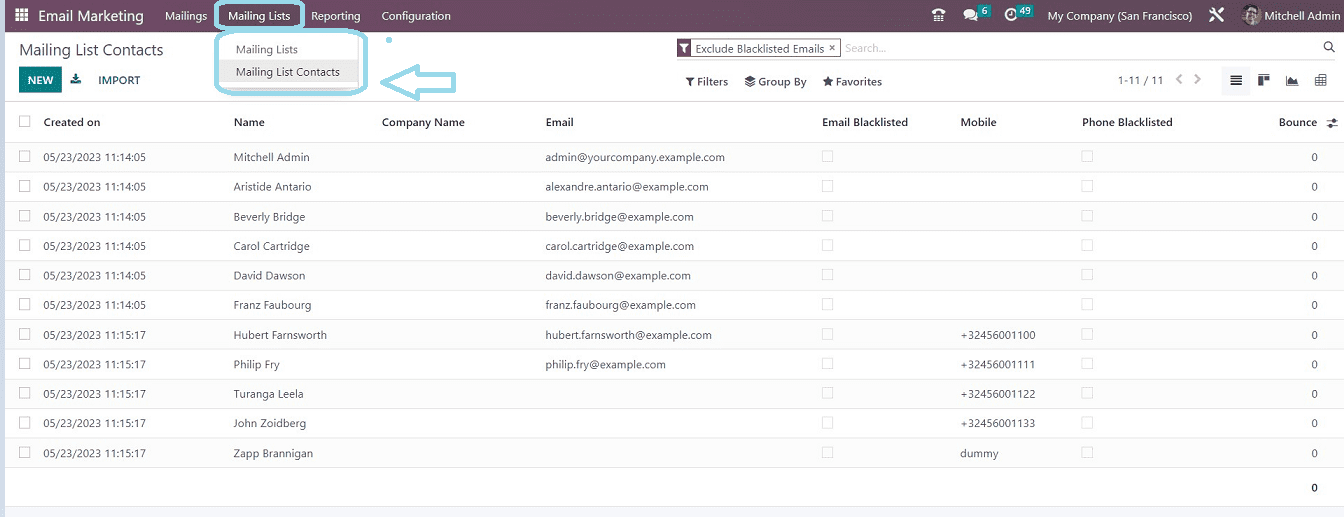
You can see the Mailing List Contacts homepage view as a dashboard view of previously created Contacts based upon the Created On, Name, Company Name, Email, Email Blacklisted, Mobile, Phone Blacklisted, and Bounce. Filters, Group By, Favorite, and Search options are available in the window. Default Filters include Bounced, Exclude Blacklisted Emails, and Exclude Blacklisted Phones can be accessed from the Filter options dropdown list. And also Custom Filters can be created using the “Add Custom Filter” option.
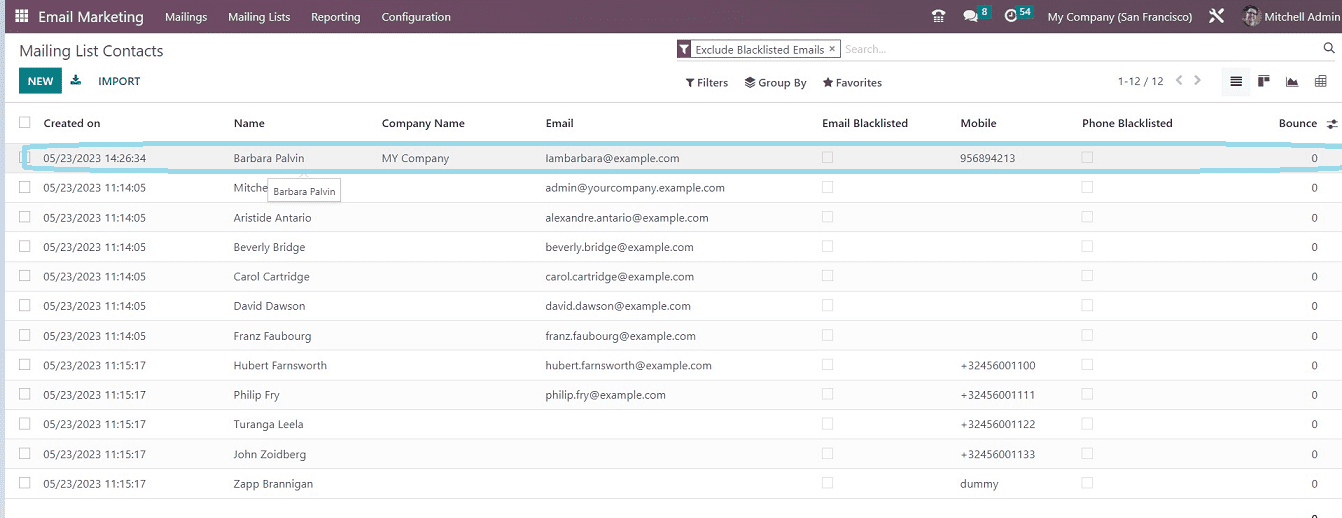
You can create new Email contact details using the “NEW” button available in the top-left corner of the page. When you select this button, a Mailing List Contacts creation window will appear, as seen in the screenshot below.

In this form, you can enter the Contact Name and select Tags if required. You can later assign the Email, Mobile, Title, Company Name, and Country. The Bounce data section will show the total number of emails that have bounced to this contact.
By clicking on the Add a Line option in the Mailing List tab, you can add the mailing list for the contact according to the customer type. The Unsubscription Date and the Opt-Out option can be enabled or disabled by selecting the checkboxes. As shown below, our new Mailing List Contact has been saved and added to the mailing list dashboard.
Mailing Lists
Using the Mailing List tool, you can customize the email addresses of these defined groups. This function helps you to easily establish several email lists for various operations such as events, company promotions, business promotions, and advertising purposes. You can create a new Mailing List Group using the Mailing List Menu.

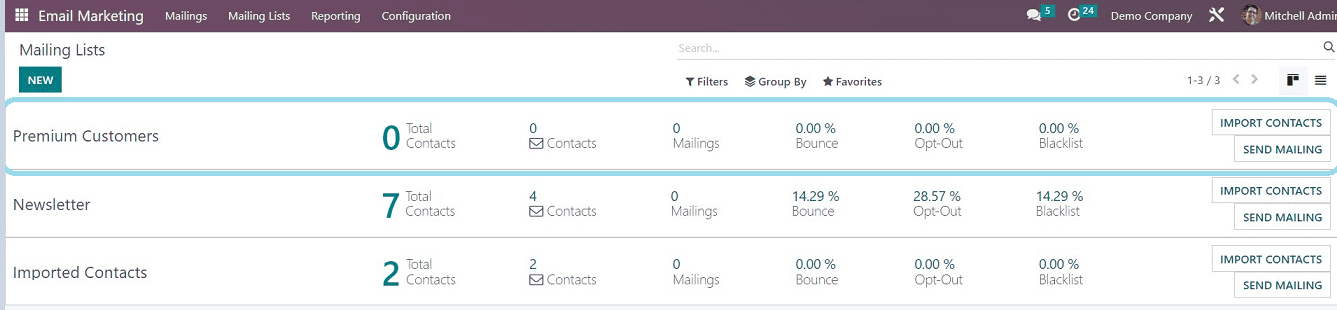
The Mailing Lists homepage will be displayed as shown in the screenshot below.

All previously configured Mailing Lists will be displayed in the Mailing Lists window. The system provides access to the window in Kanban and List view forms. You can see that the Mailing Lists are organized in separate cards. Each of these cards will reveal all of the important information about that particular Mailing List, such as the Total Number of contacts, Mail contacts, Count of mailings, Bounce percentage, Opt-Out percentage, and Blacklist percentage.
You can send a mailing to the particular mailing List by clicking on the “ SEND MAILING” button provided in the right corner of the Kanban card, which will again open a new mail configuration form.
Create New Mailing List
Creating a new Mailing List is a simple task in Odoo. Users can create a new Mailing List using the NEW button provided on the mailing list homepage, which will open a mailing List Configuration form, as shown in the screenshot below.
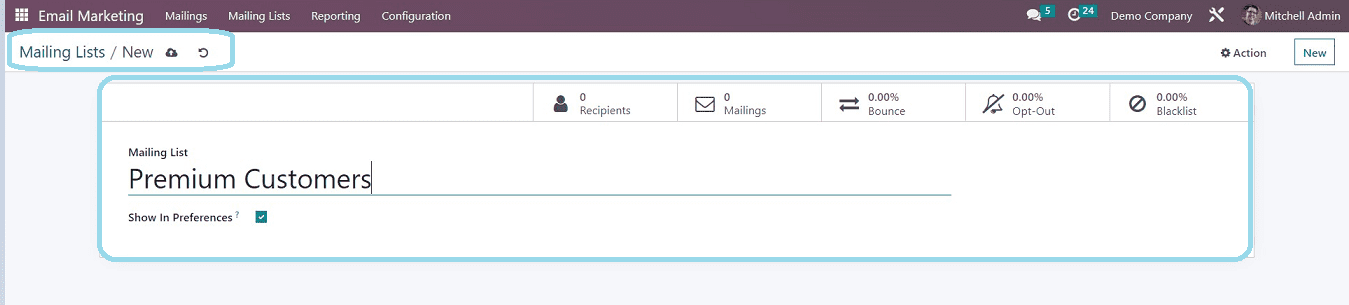
You can type the required Mailing List name as per your requirement in the “Mailing List” area. Choose the “Show in Preference” option as per your requirement. If you select this option, then the recipient can modify his subscription preferences on the unsubscription page.
Now, our new Mailing List is also created and added to the dashboard, as shown in the screenshot below.
Import Mailing List Contacts
To view the contacts on the mailing list, click the applicable CONTACTS button from the Kanban card available on the home page. This button will trigger the opening of the contacts window. You can select any contact information and press the "ADD TO LIST" button located in the top left corner of the page, as shown in the screenshot below.
Then it will open a popup window in which we have to mention the targeted Mailing List Contact group name, as shown in the screenshot below.
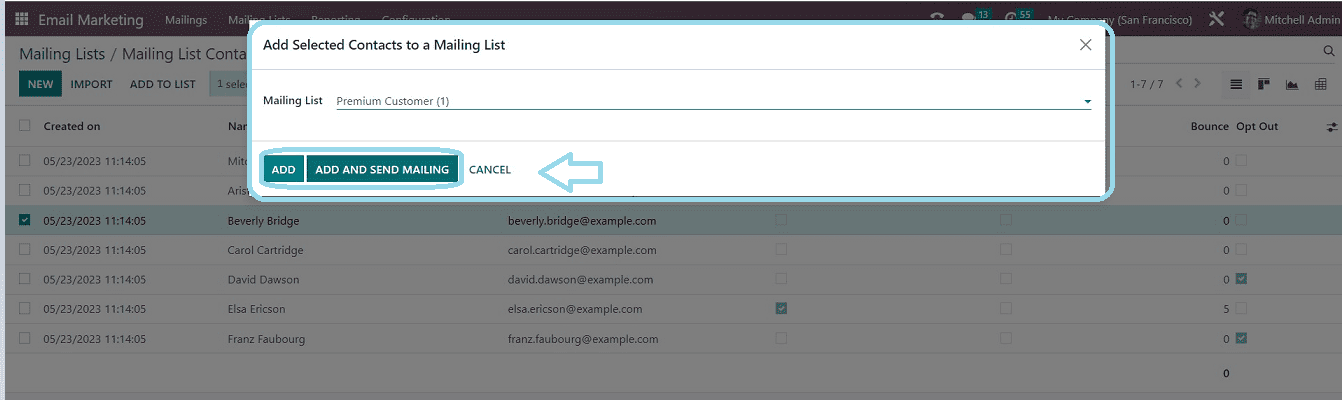
This will include that specific contact in the Mailing List Contacts group that is being targeted, illustrated in the screenshot below.
You can import new contacts to the newly created or existing mailing List by clicking on the “IMPORT CONTACTS” button available on the Kanban card of each Mailing Lists group.

This will open a pop-up window where you can import the contacts, as depicted in the screenshot below.
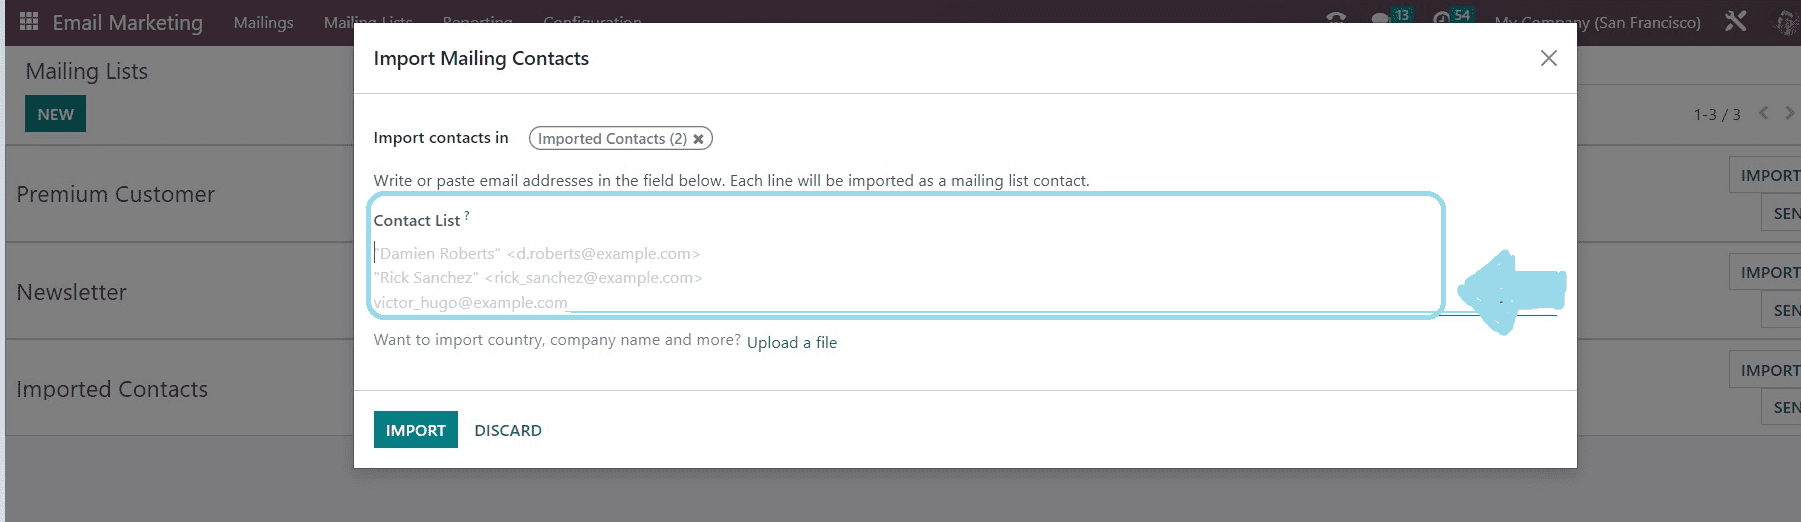
Using the options available in this Popup window, you can add recipients from one mailing list to another mailing list contact group.
Import Contacts: Mention the targeted mailing list name.
Contact List: Mention the name or email address of the contact that has to be imported.
You can import all of the contact details, such as an address, company name, country, etc., using the "Upload a file" button. Contact information can be uploaded from files or papers on your device. Click the "IMPORT" button after entering the name or email address of the Contact list. in order for the contact to be added to the specified mailing list.
Creating and Managing mailings in Odoo 16
Install the Odoo 16 E-mail marketing module from the Odoo ERP system to create a new mailing list. The home page will appear after you open the module, as shown in the screenshot below.
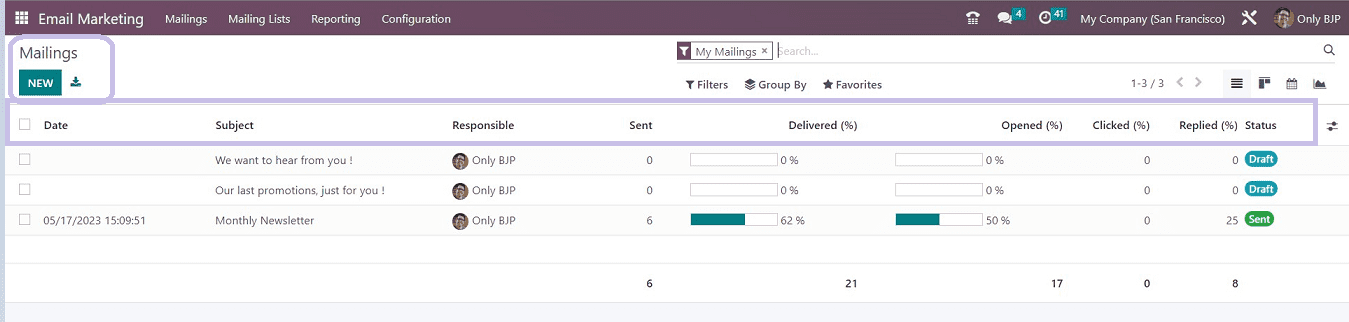
The dashboard of previously created mailings is organized in a list view here by date, Subject, and Responsible user name. And we can see how many letters have been sent, delivered, opened, clicked, and responded to. In addition, the email's status will be displayed in the Status area. From this dashboard, we may readily comprehend the specifics and status of a campaign or mailings. You can sort the required mailing data using the dashboard's Filter, Group by, and Favorites settings. By clicking on the corresponding buttons in the top-right corner of the page, you can switch between Kanban, Pivot, and Calendar views.
Before creating a new mailing Campaign, we have to configure some settings in the Odoo platform. Let's discuss them in detail.
Configuration Settings
The marketing campaign programs are supported by the Odoo Email Marketing module, which also has a powerful Mailing Campaign tool in its system. You must activate the Mailing Campaigns option from the Email Marketing module's Settings page in order to use this tool.
You can configure these settings from the “Configuration” menu of the Email Marketing Module illustrated in the screenshot below.
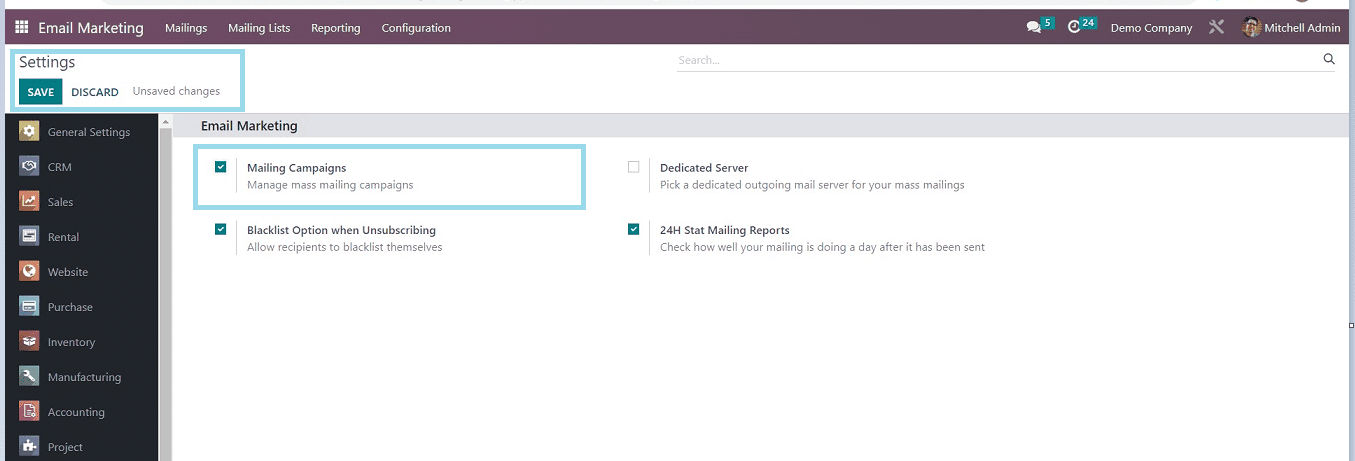
Enable the “Mailing Campaigns” options from the settings page and save the details using the SAVE button. Now we can create new Mailing Campaigns.
You can create a new mailing campaign using the “NEW” button available in the upper left corner of the page this will open a new Configuration form, as shown below.
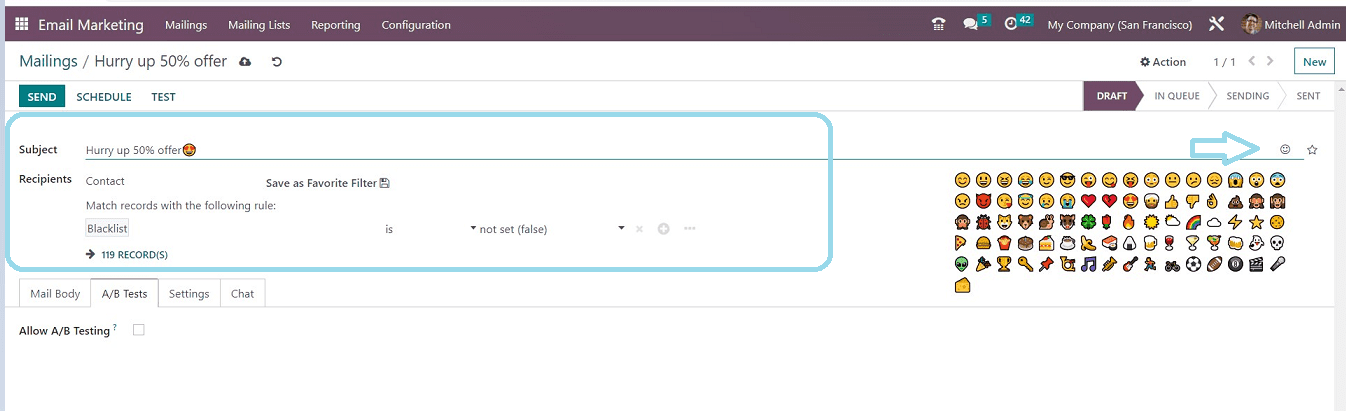
In this configuration form, we have to give the details such as
Subject: In the Subject area of this Mails creation form, you can describe the subject of the email. By clicking on the smilies, you can also add them to the list.
Select Mailing list: In the Select mailing lists field, you can specify the email lists. To do so, open the dropdown menu that contains all of the default mailing lists. You can apply for a mailing list from the provided list. You may also customize a mailing list using the Mailing Lists option in the email marketing module's main menu bar.
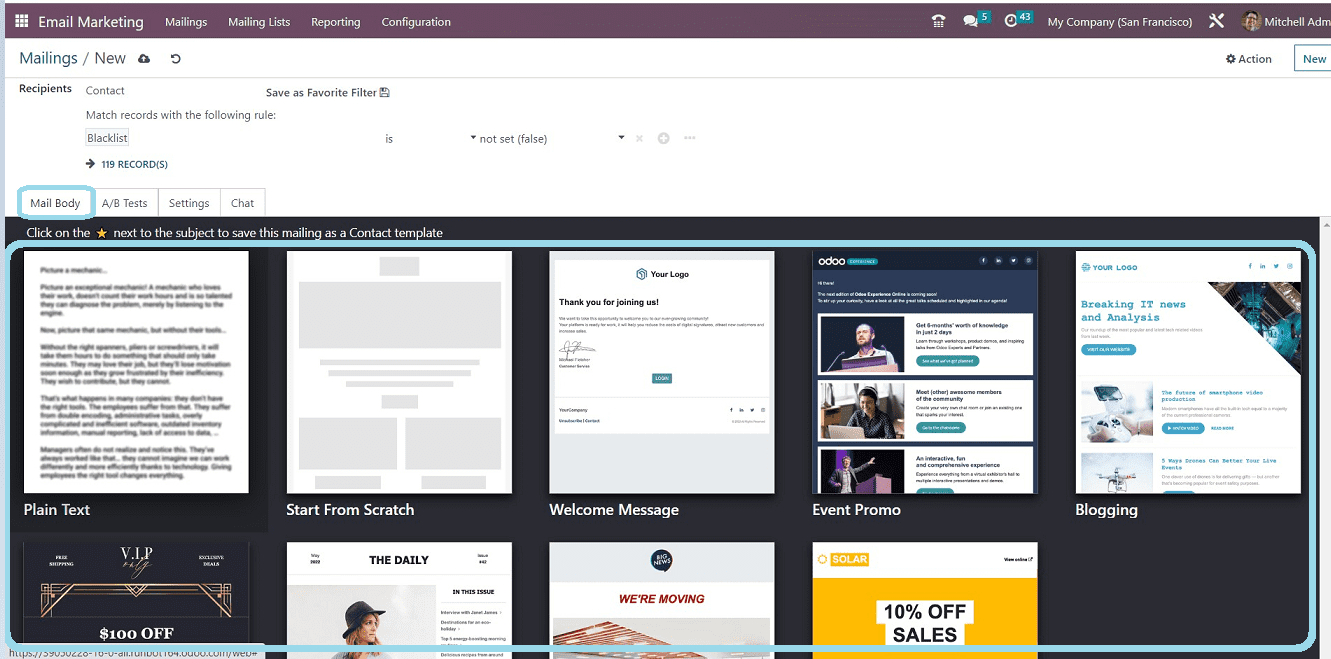
This Configuration form contains four Tab sections such as Mail Body, A/B Tests, Settings, and Chat. Let’s discuss them in detail.
Mail Body Tab
From the variety of mail bodies shown under the Mail Body page, you can choose the ideal one for your mail. Drag and drop is simple.
After deciding on a letter body, you may begin designing and customizing your mail according to your requirements, as depicted in the screenshot below.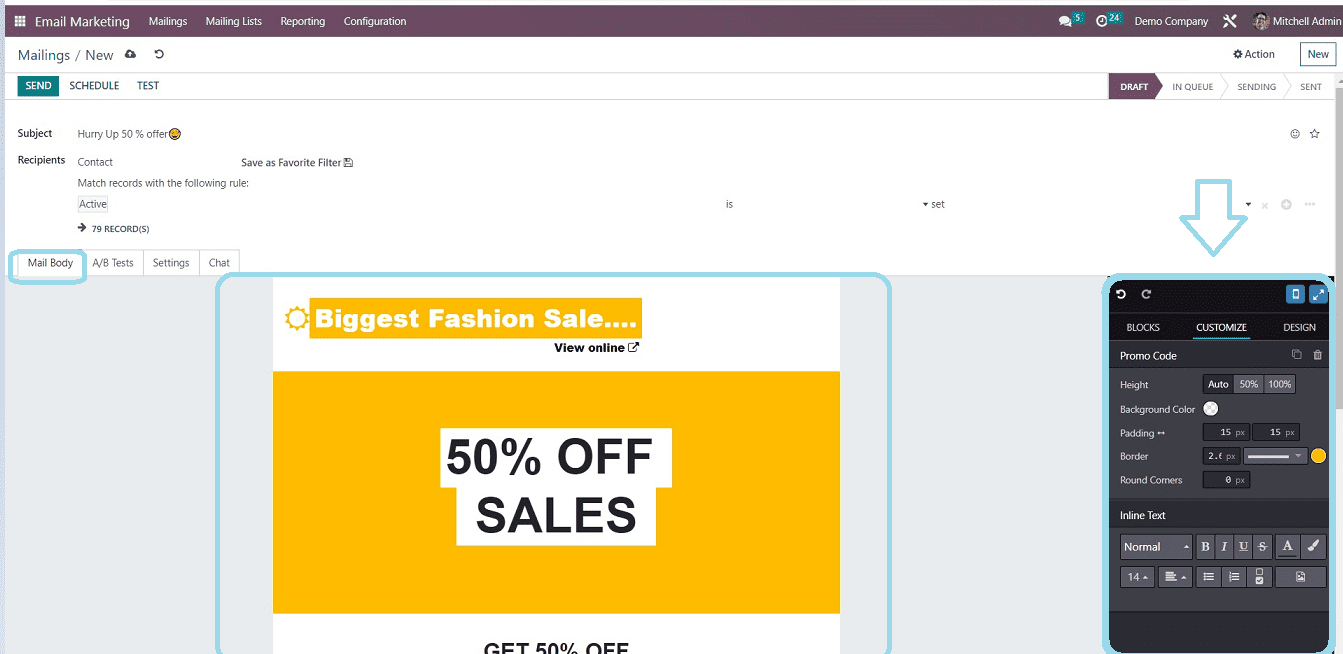
A/B Tests
Using Odoo A/B testing, you may concurrently publish two versions of the same page and assess their effectiveness. By checking the box on this tab, as illustrated below, users can enable or disable this feature.
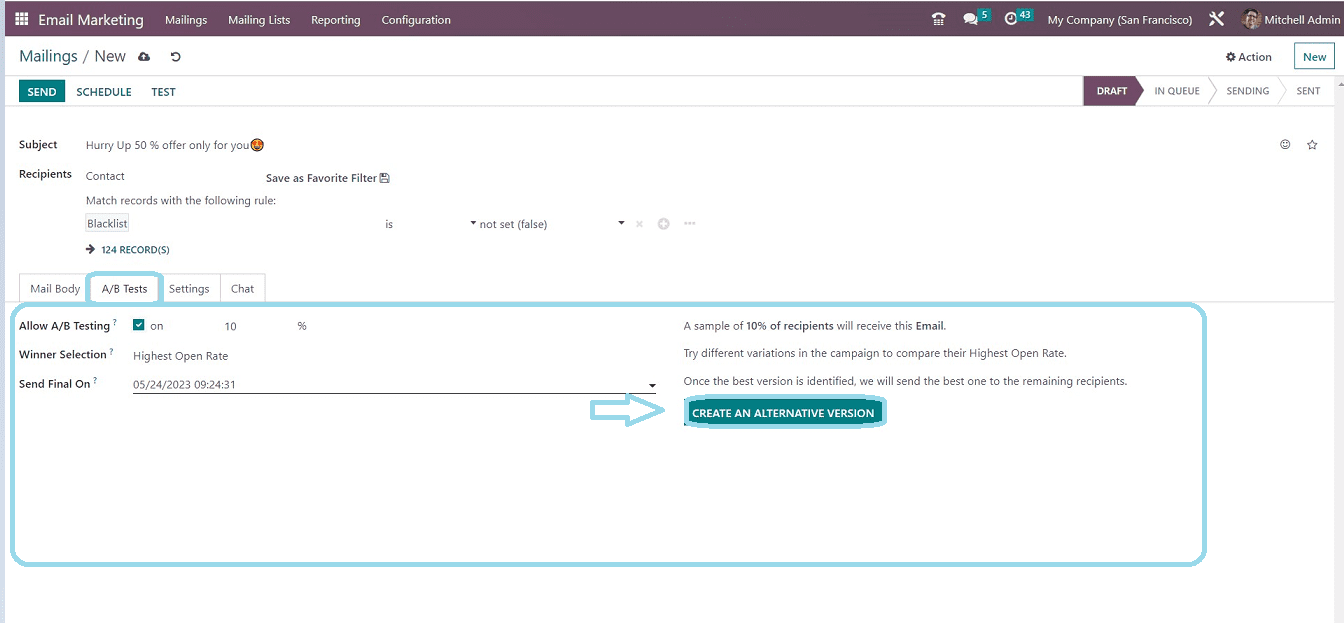
After enabling the A/B testing option, you can specify the Winner Selection process based on the various methods provided in the field’s drop-down list as manual, Highest Open Rate, Highest Click Rate, Leads, Quotations, etc. In the "Send Final On" data column, you can specify a Final date on which the recipient will get the message announcing the winner.
Another option is to design a different letter body. The "CREATE AN ALTERNATIVE VERSION" button can be clicked to launch a fresh mail setup form. Using the appropriate choices added to the form shown in the below screenshot, you can compare the two versions of the page after creating the alternative, build another alternative, and send a winning message.
Settings Tab
Users can customize the Email Contents and Tracking options in the settings area.
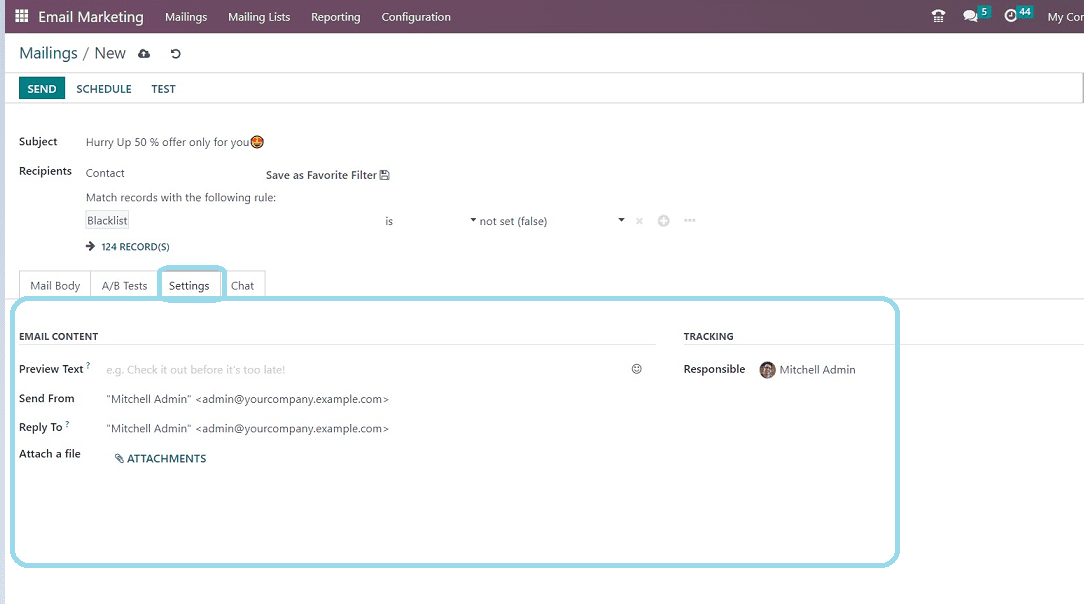
Preview Text: You can write a catchy preview text which displays before opening the email.
Send From: Sender mail address.
Reply To: Recipient Mail Id.
Attach File: You can attach Files and Documents from your device using the “ATTACHMENTS” button.
Responsible: Mention the Responsible user’s name.
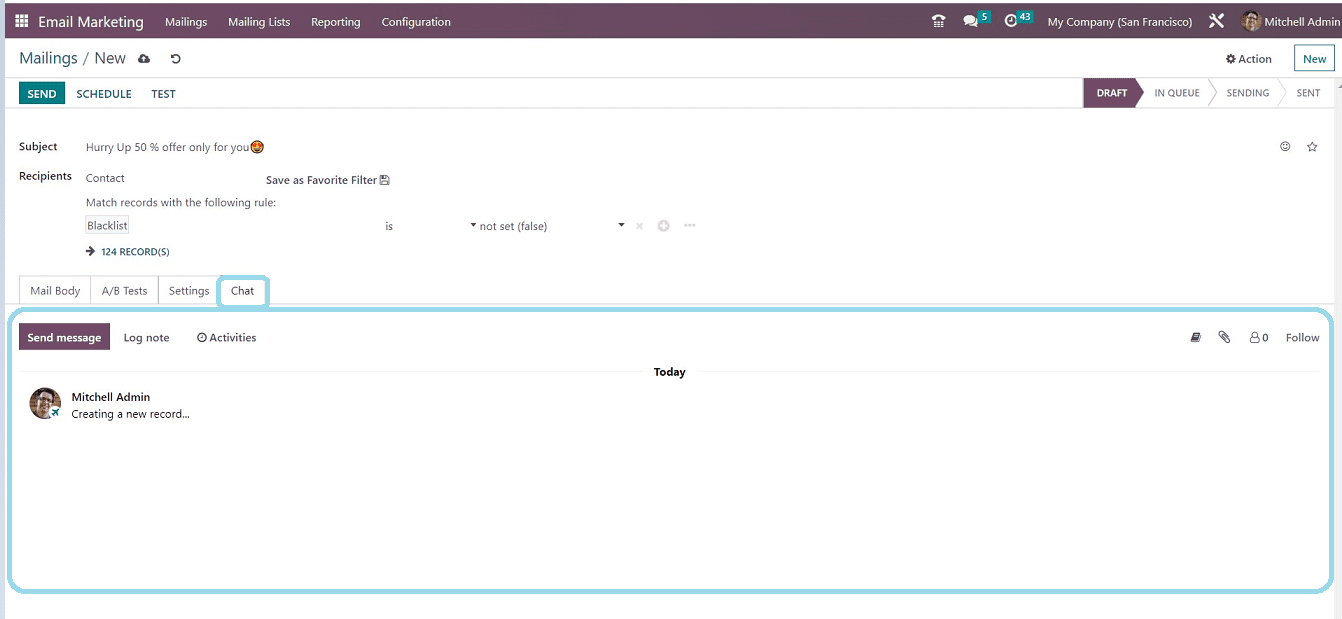
Chat Tab
You can access Send Message, Log Not, and Schedule Activity options under the Chat Tab, illustrated in the screenshot below.
After completing the procedure, Save the details using the save icon. You can Send the Mail right away using the “SEND” button or postpone the mail using the “SCHEDULE” button. Clicking on the SEND button will open a small Pop-Up window, as shown in the screenshot below.
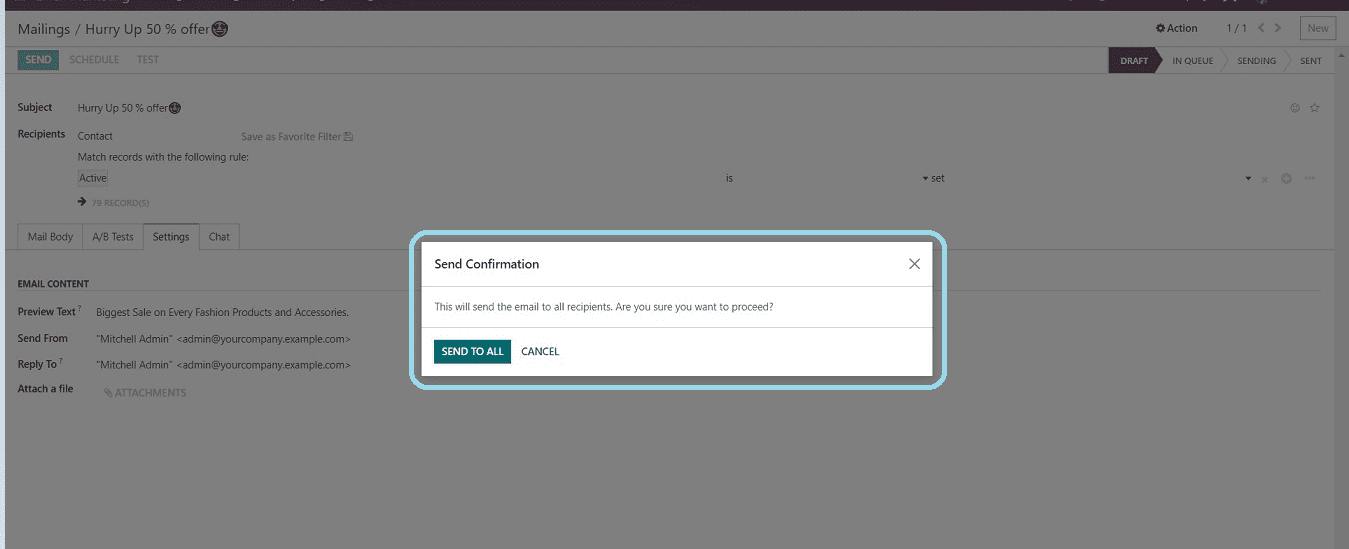
You can continue the process using the SEND TO ALL button or discard the sending process.
After sending the mail, various smart buttons will appear in the Configuration form, as depicted in the screenshot below.
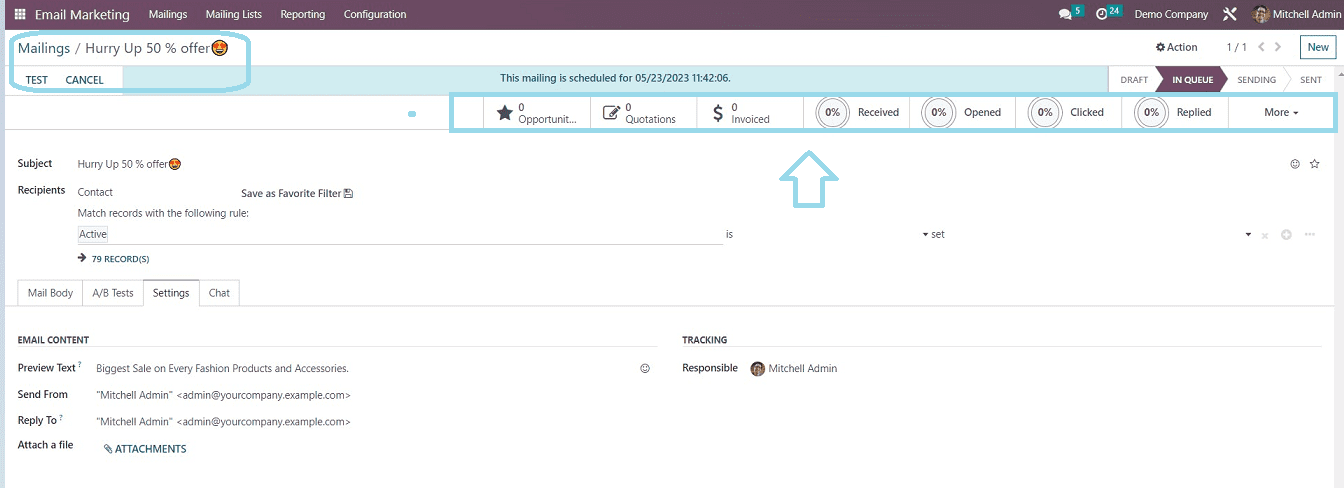
Depending on the module you installed in your system, the system will assist you in seeing a few smart buttons after the sending process is complete. Some of the smart buttons are Opportunities, Quotations, Invoiced, Received, Opened, Clicked, Replied, etc.
You can see the new mailing campaign is added and arranged in the dashboard view from the Mailings home page, as shown in the screenshot below.
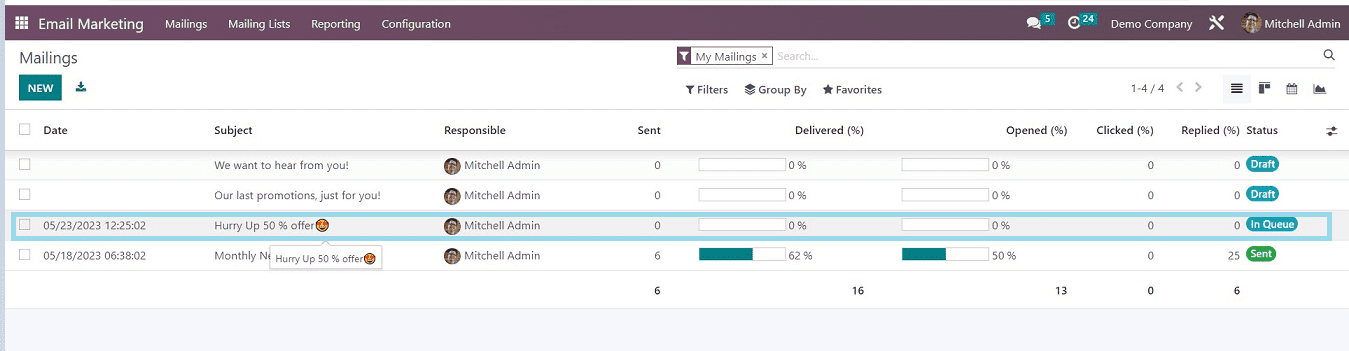
From the Status section of the dashboard, users can check the current status of the mailings.
We glimpsed over the functionalities and features of the Odoo 16 Email-marketing module in detail in this blog. The procedures of creating and managing Mailing List Contacts, Mailing Lists, and Mailing Campaigns were also reviewed. We truly hope that you found this blog post to be useful in understanding the Odoo 16 Email-marketing Module.