Odoo has a global authorization/user access policy that restricts access to information on a global/enterprise level. For example, as a salesperson, you cannot delete an invoice, and as an intern, you cannot change pricing. An outline manager is able at all times to access all information for their department.
The protection of all information is accomplished through four primary types of permissions/authorizations, i.e., Read, Write, Create & Delete.
The Four Types of Permissions
1. READ - Grants a user
The right to view records, see individual record details, produce reports, and export records.
Will not allow a user: A user cannot see if there is no READ permission for that model. The model will literally not exist in the menu.
Ex: Sales Reps can view the details of all Customer Orders, and Interns cannot view financials.
2. WRITE - Grants a user
The right to modify an existing record to add to its field values or change the record status.
IMPORTANT: WRITE permission requires READ permission, i.e., if a user cannot view the record, then they cannot modify the record.
Ex: Sales reps can modify their own orders. An accountant cannot modify previously created invoices.
3. CREATE - Grants a user
To create a new record, add a new customer, or generate a document.
NOTE: CREATE permission is independent of WRITE permission, i.e., you can create a "new Invoice" but cannot modify an existing invoice, or vice versa.
Ex: An accountant can create invoices but cannot modify them once created (Separate permission).
4. DELETE
This feature provides the owner with the ability to permanently remove records from the system.
This function should only be allowed for account administrators and managers in order to prevent accidental losses of data.
- The manager can delete older test records
- To avoid potential loss of data, regular employees are prohibited from deleting (or removing) records.
Permission Examples by Role
| Role | Read | Write | Create | Delete |
| Intern | Yes | No | No | No |
| Sales Rep | Yes | Yes | Yes | No |
| Manager | Yes | Yes | Yes | Yes |
| Admin | Yes | Yes | Yes | Yes |
Understanding How Permissions Work
There is a hierarchy in permissions:
Your first level of access is "Read" - if you don't have "Read" access, then you won't be able to do anything else because then "Write" access doesn't really matter, etc.
To "Write" something, you must first have "Read" access in order to modify the item(s) that you can Read.
To "Create" something, you have the ability to create new items without modifying an existing item.
To “delete” something is something that is separate and will be allowed only for authorized users.
As an example: Within the Sales organization.
Sales Representative:
- Sale Order = Read=1; Write=1; Create=1; Delete=0;
- Product = Read=1; Write=0; Create=0; Delete=0;
This means that a sales representative can create, modify, and delete Sales Orders, but can only have access to read products.
How Are Permissions Set?
Users are given permissions via Security Groups.
- Go to Settings > Users & Groups
- Create or Select a Security Group (e.g., Sales Team).
- Define Permissions associated with Models.
- Add User(s) to the Security Group.
- Users automatically inherit all permissions from the Security Group.
Key Principles
| Principle | Why It Matters |
| Read First | You must see data before you can do anything with it. |
| Least Privilege | Give only the permissions needed for the job. |
| Delete is Special | Restrict it to managers only - prevents accidents. |
| Test Everything | Log in as each role and verify access works correctly. |
Common Mistakes to Avoid
- Full access for everyone seems easy, but it creates significant security issues. Grant access based on position (for example, finance, warehouse, sales).
- Create 'write' and 'read' buttons and ensure that the 'read' button is enabled first (this would be useless otherwise).
- Don't forget to review permissions for employees who are no longer there or for people who have just changed position. Audit permissions every quarter when a position change occurs.
- Too many groups make it difficult to manage all of them effectively (it's better to group a person's access by job function instead of individually).
Why Permissions Matter
Because they provide a safeguard for data security, without the right permissions, there will be many potential people with the ability to delete sensitive data. Interns will have access to see sensitive data. There will be violations of compliance regulations.
With the right permissions in place, there are ways to verify who changed/added or deleted records, and the data will be protected by the user's role within the company.
Where to Check Permissions in Odoo 19
To see what current access has been given to the user:
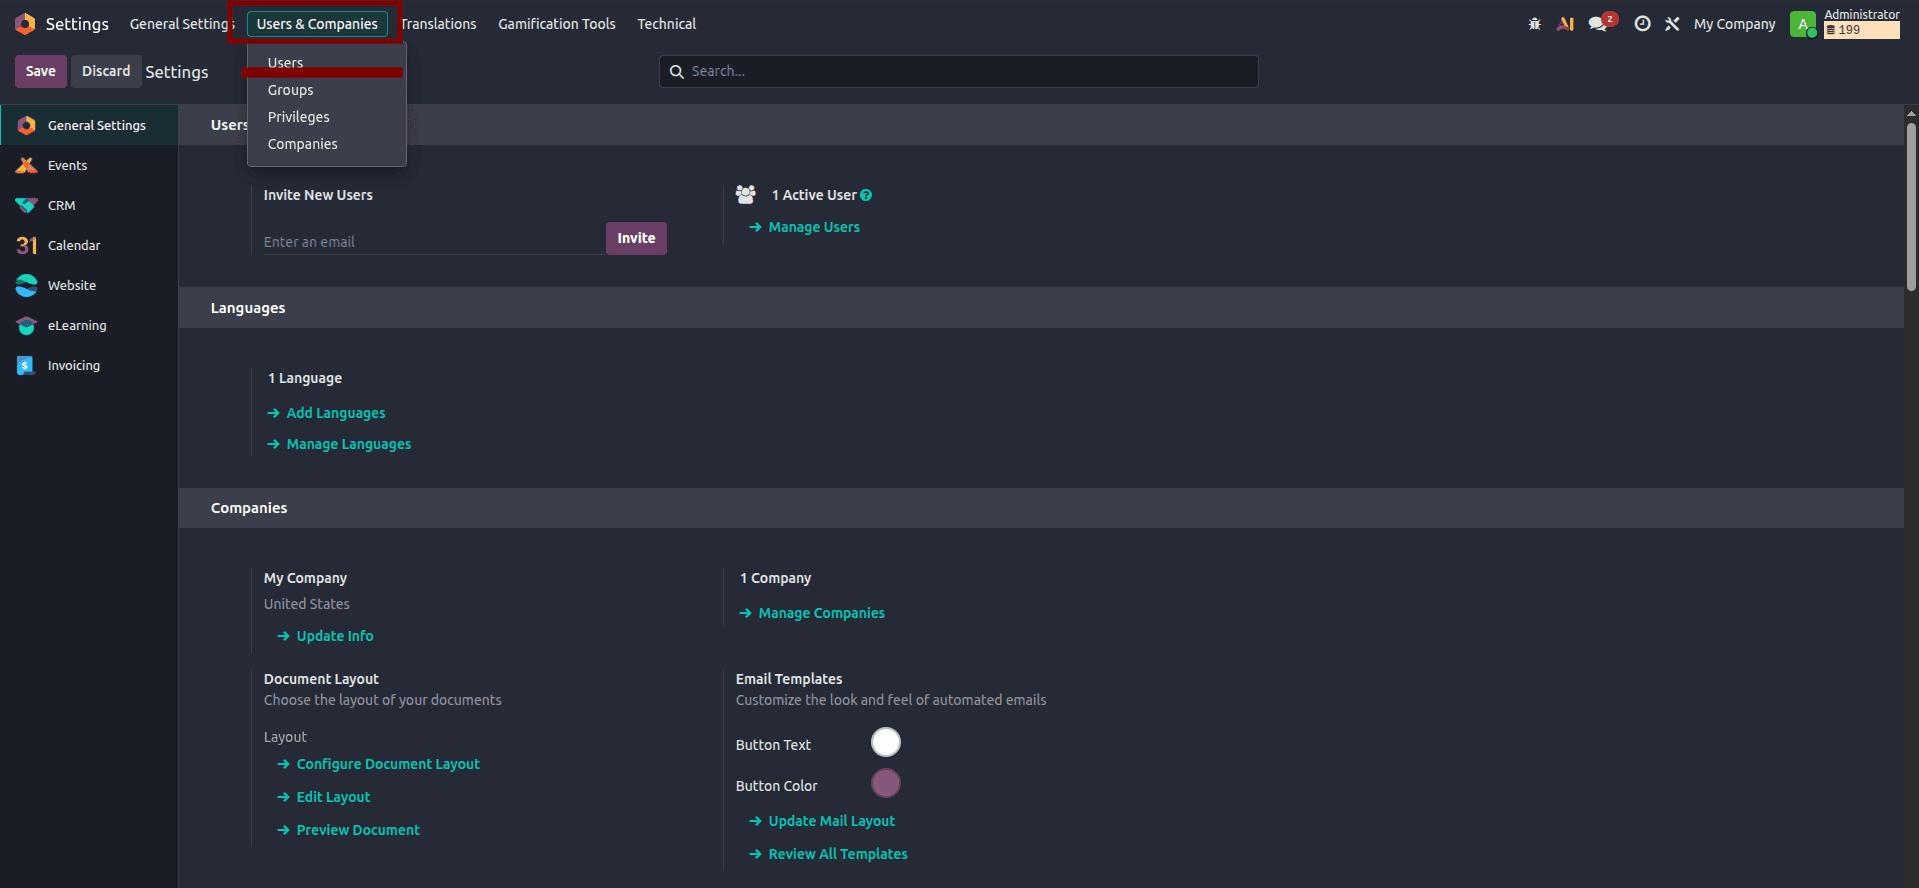
- View the User Profile page.
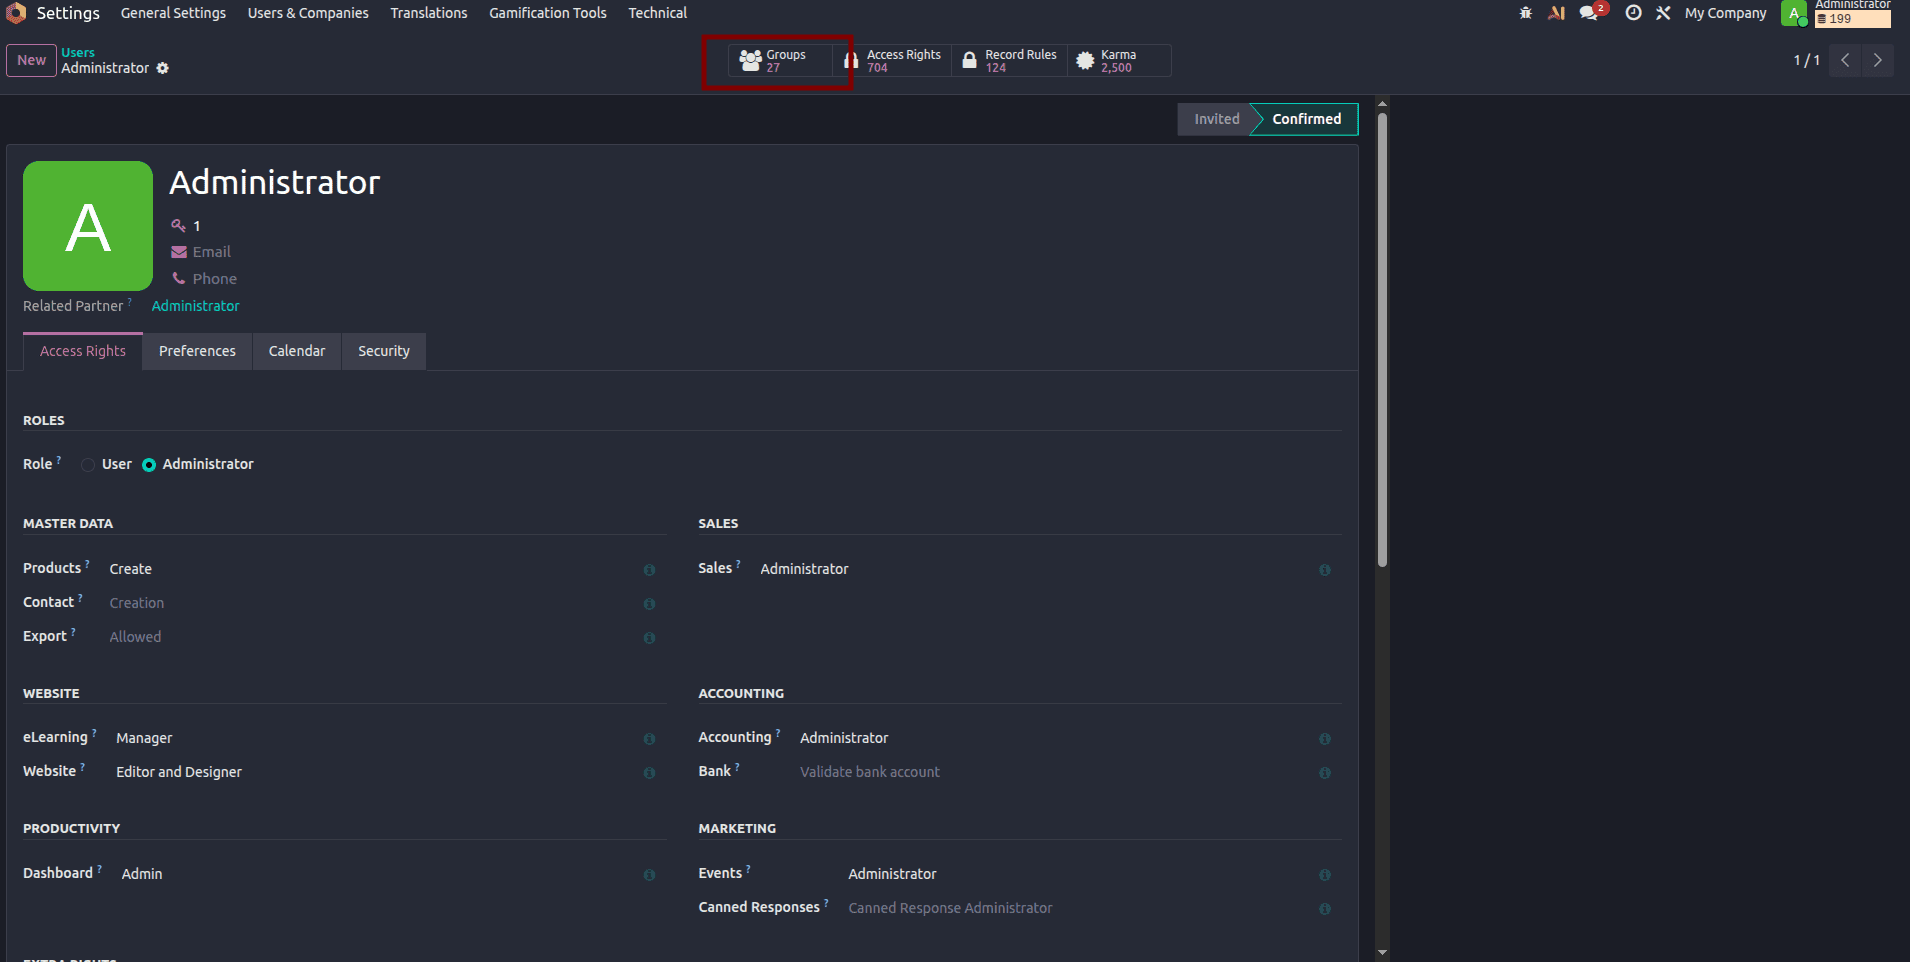
- Select the Groups smart button to view assigned groups.
- You will see which Groups have been assigned and their corresponding permissions.
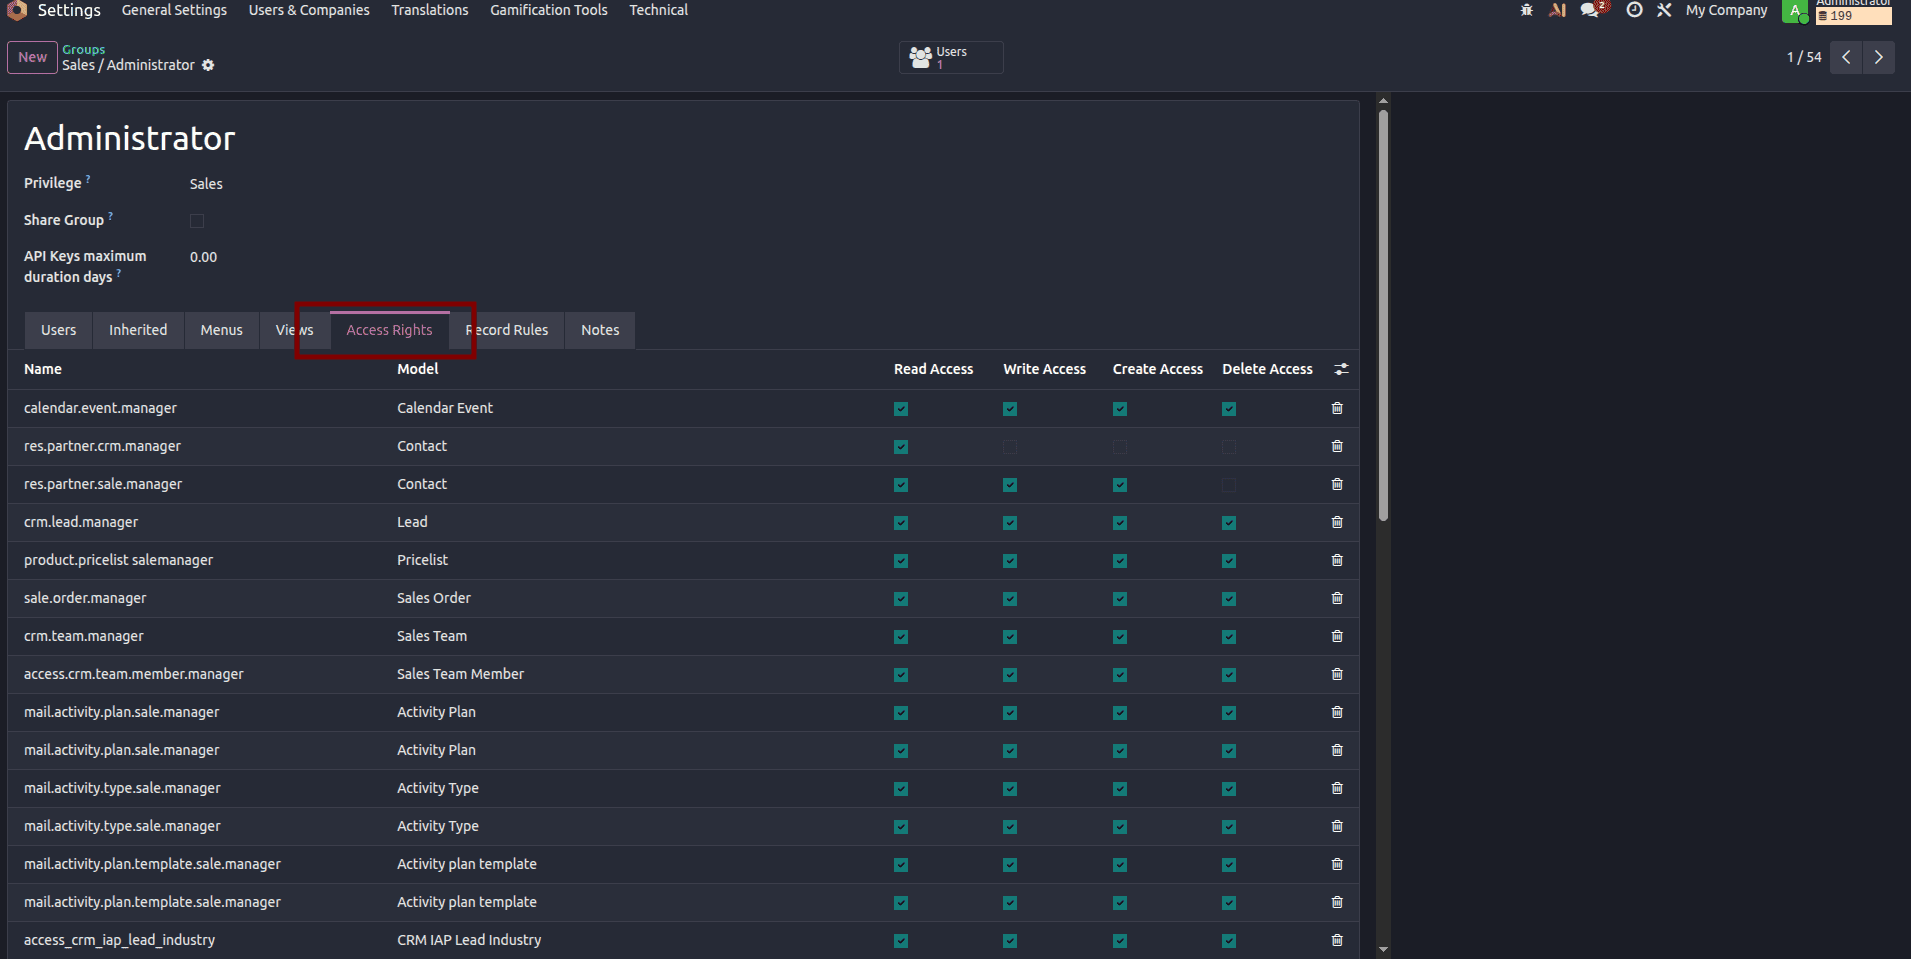
The four permissions (Read, Write, Create, Delete) provide Odoo security:
- Read determines if it can be seen
- Write allows modification of records
- Create allows new records to be added
- Delete has the most power
Assign permissions based on the role within the organization, not by the user. Implement the principle of least privilege. Regularly review every quarter. Test with thoroughness.
Good permissions = Secure data + Productive Team + Clean audits.
To read more about How to Manage Odoo 19 Permissions by Groups, refer to our blog How to Manage Odoo 19 Permissions by Groups.