Odoo 19 represents the latest upgrade for the most popular open-source ERP software solution, loaded with enhanced performance tuning, an intuitive user interface design, and improved automation. One of the key elements ensuring flawless communication within businesses is Email Queues. Irrespective of whether you are sending one invoice email or a batch of automated notification emails, Odoo's email queue framework makes sure that each outbound email gets processed in a streamlined fashion.
This blog post is dedicated to a detailed discussion on how email queues are processed by Odoo 19, how to get and control them, what cron jobs do the trick, and how programmers can communicate with the queue.
What is an Email Queue in Odoo?
However, when Odoo is required to send any email, whether it be due to an order confirmation, ticket updates in the helpdesk module, or any other bulk mailing campaigns, the email may not be sent immediately. Rather, Odoo pushes the email into a queue of emails that is controlled by the model called mail.mail. The email queue serves as an intermediate step before any emails are sent out.
The key benefits of this queued approach include the following:
- Preventing server overload during bulk email operations
- Allowing failed emails to be retried without manual re-composition
- Providing administrators with full visibility into the status of every outgoing message
- Enabling the system to prioritize transactional emails over mass mailings
Accessing the Email Queue in Odoo 19
In order to see and control the email queue, you need to switch on the developer mode (Debug Mode) in Odoo 19.
Steps to turn on Developer Mode:
Go to Settings > General Settings, find the Developer Tools part in the list, and click the Activate developer mode button. One may also add ?debug=1 to the URL.
Once Developer Mode is active, navigate to: Settings > Technical > Email > Emails
This section lists all the emails currently held in the queue along with their statuses.
Understanding Email Status in the Queue
Each email record in the queue carries one of the following statuses:
| Status | Description |
| Outgoing | The email is queued and waiting to be sent by the next cron run. |
| Sent | The email has been successfully delivered. |
| Delivery Failed | The email could not be sent due to an error (wrong address, server issue, etc.). |
| Cancelled | The email was manually removed from the queue before sending. |
Emails with a ‘Delivery Failed’ status can be attempted again by clicking on the Retry option. As a result, such emails will get the Outgoing status and will be sent out at the next execution of the email queue cron. If it is necessary to send an email right away, not waiting for the scheduled action, then you should click the "Send Now" button. In order to remove an email from the queue, use Email.
The Email Queue Cron Job
Odoo version 19 comes with an email queue that is managed via a scheduled action called Mail: Email Queue Manager. By default, this cron job executes itself every 60 minutes. The lowest interval value allowed is 5 minutes. However, the recommended interval by Odoo is 15 minutes.
To view or configure the cron job:
Navigate to Settings > Technical > Automation > Scheduled Actions and search for Mail: Email Queue Manager.
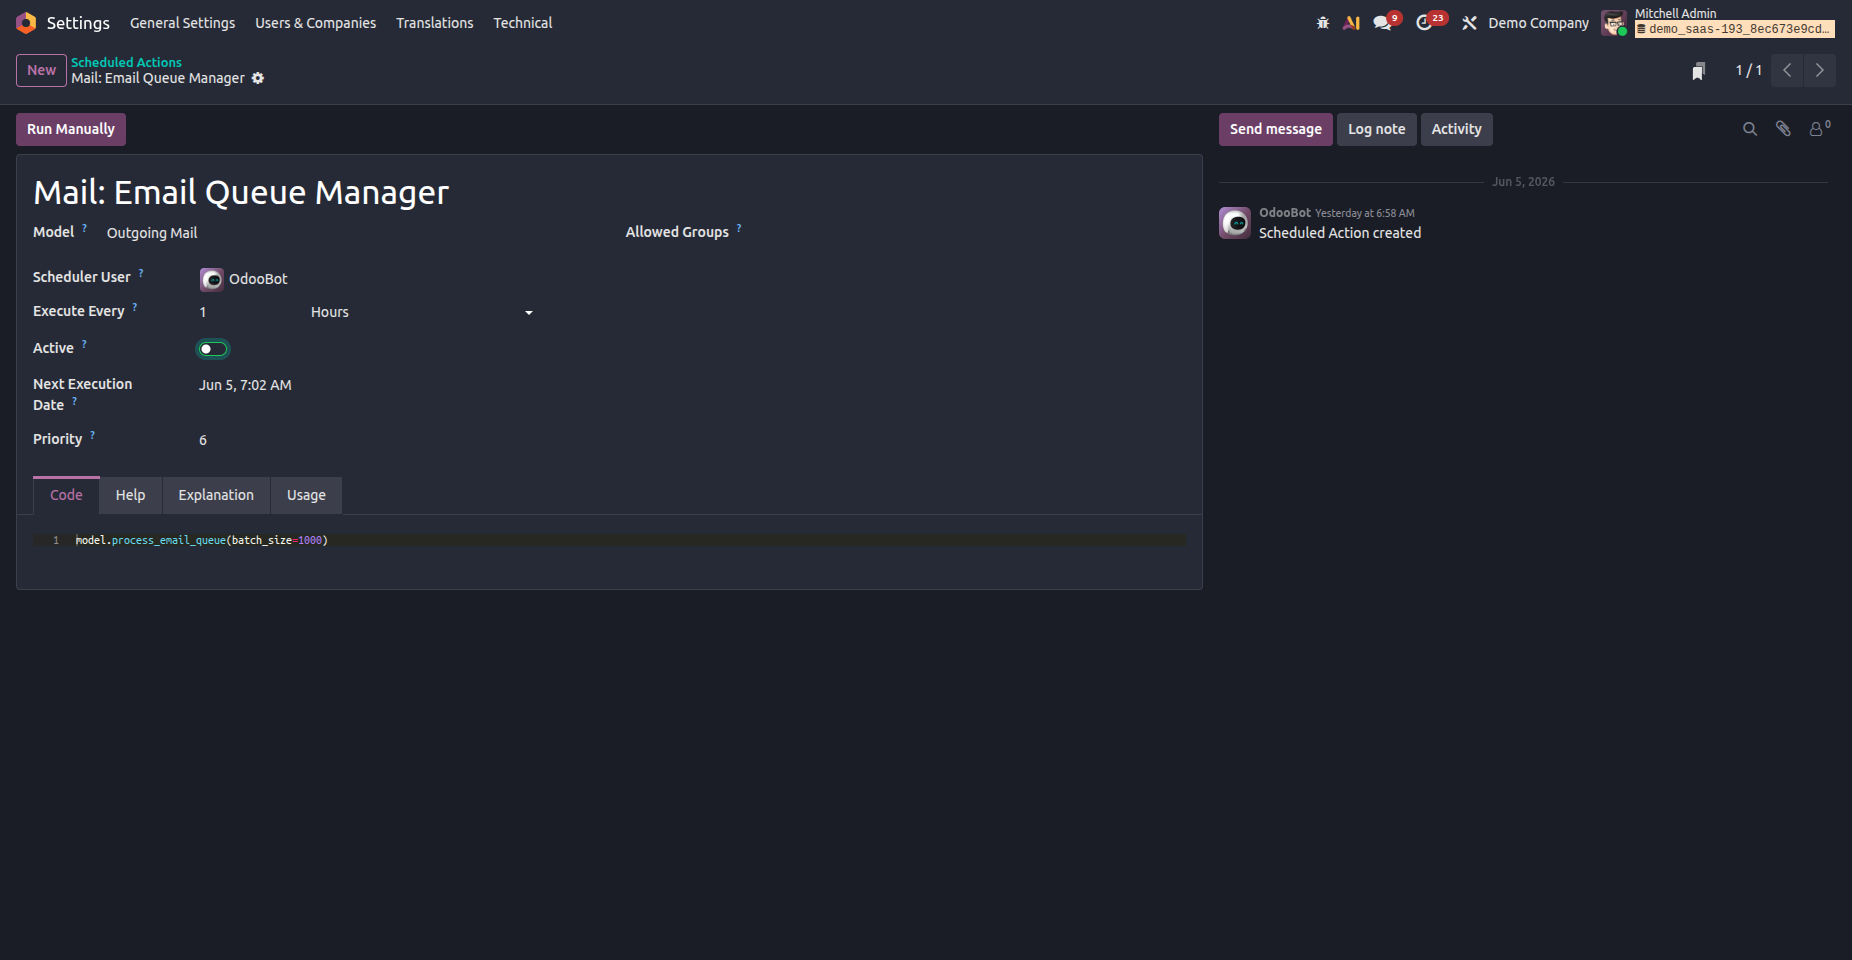
It is here that you can modify the time interval for execution according to your business needs. Remember that a very small time interval (for example, 1 minute) can lead to the cron timing out due to the large number of outgoing emails, thus leaving them unprocessed.
Important Note: Urgent emails like user-to-user messages, sales order confirmation, invoice notification, and purchase orders are instantly sent without going into the queue. They can only be viewed from Settings > Technical > Email > Emails when there is a failure in the delivery of the email.
Outgoing Mail Servers and the Queue
However, the Queue itself doesn’t function independently; it requires the use of Outgoing Mail Servers for the delivery of the emails. Odoo 19 allows configuring several outgoing mail servers, each having its own priority.
Steps to configure outgoing mail servers:
Go to Settings > Technical > Email > Outgoing Mail Servers (Developer Mode needs to be enabled).
One of the best practices is to configure two different servers:
- Transactional Email Server – This will be responsible for sending regular emails (invoices, quotations, and CRM). Use lower priority (for example, 1) so that Odoo uses it first.
- Mass Mailing Server – This will be responsible for sending marketing emails. Use higher priority (for example, 2).
The most popular transactional email services include Gmail, Amazon SES, and Brevo, whereas Mass mailing email services are Mailgun, SendGrid, and Mailjet.
Auto-Vacuum and Queue Cleanup
As time passes, sent e-mails pile up in the mail.mail table. Odoo 19 automates the whole process through the Auto-Vacuum Scheduled Action. This will take care of cleaning up sent e-mail entries as well as any other duplicate data entries in the database. This way, the database will remain clean and efficient, as there will be no thousands of duplicate entries affecting the email queue table.
It is not necessary for you to delete sent emails.
Technical Overview: The mail.mail Model
The developer needs to know the key model that drives the queue system for emails. The model "mail.mail" in the mail module contains the RFC2822 compliant emails and the system of queuing and sending them.
Key fields in mail.mail:
python
_name = 'mail.mail'
_description = 'Outgoing Mails'
_inherits = {'mail.message': 'mail_message_id'}
_order = 'id desc'
- state - Tracks the current status of the email (outgoing, sent, received, exception, cancel)
- mail_message_id - Links the email to the parent mail.message record
- email_to - The recipient's email address
- auto_delete - When set to True, the record is automatically deleted after being sent
To queue an email programmatically, you can create a mail.mail record with state='outgoing' and it will be picked up by the cron:
python
mail_values = {
   'subject': 'Test Email from Queue',
   'email_to': 'recipient@example.com',
   'body_html': '<p>This email is sent through the Odoo email queue.</p>',
   'state': 'outgoing',
   'auto_delete': True,
}
mail = self.env['mail.mail'].create(mail_values)
If you want to trigger the send immediately from code (bypassing the queue cron), you can call the following:
Python
mail.send()
The send() method on mail.mail handles the SMTP connection via the configured outgoing mail server and updates the state accordingly.
Triggering Email Queue via message_post()
In most actual cases of Odoo development, mail.mail is never created directly. Mail is rather created indirectly using the message_post() function on any model that inherits from mail.thread. Odoo internally creates the record and pushes it to the queue.
Python
record.message_post(
   body="Your order has been confirmed.",
   subject="Order Confirmation",
   message_type='email',
   subtype_xmlid='mail.mt_comment',
)
When message_type is set to 'email', Odoo dispatches the notification as an actual email through the queue system.
Monitoring and Troubleshooting the Email Queue
Here are some practical tips for keeping the email queue healthy in Odoo 19:
- Regular Check on Delivery Failures: Go to Settings > Technical > Email > Emails and then select Delivery Failed. Analyze the reasons behind delivery failures; they are mostly SMTP errors, wrong email addresses, or wrong mail server configuration.
- Make Sure the Cron Job Is Running: Check under Settings > Technical > Automation > Scheduled Actions to ensure Mail: Email Queue Manager is enabled and has a Recent Last Execution Time.
- Limitations in Sending Emails: Online databases in Odoo have a daily limit on sending emails, and exceeding this limit means you cannot send any more emails. To get rid of this limit, use a third-party SMTP server.
- Do Not Use One Server for Transactional and Marketing Messages. Combining transactional messages and marketing email on one SMTP server may cause problems with deliverability. Have separate outgoing mail servers and set appropriate priority values as mentioned earlier.
- SMTP Error Codes: Check SMTP error codes that will give details about the failure of your emails. Some of the common errors are 421 (service temporarily unavailable), 450 (mailbox unavailable), and 550 (mailbox not available). This can indicate whether the problem lies with the recipient's server or yours.
Odoo Email Queue in Odoo 19 is a reliable solution for sending emails. One can be sure about the reliability, traceability, and scalability of emails that are sent through this queue. From scheduling emails to configuring emails by developers using the mail.mail object, everything necessary to send your emails is covered in Odoo. Understanding how Odoo Email Queue works, configuring the outbound mail servers correctly, and monitoring scheduled actions will help you avoid missing any important emails.
how-to-access-the-email-queue-in-odoo-19 , refer to our blog How to Track Email Status in Odoo 19.