In this blog, we are discussing how to add a button inside a dialog box in odoo 17. A dialog box is a small window that is displayed on the existing window on a button click, or on changing fields such as Confirmation Dialog, Alert Dialogs, or Warning Dialogs. It can also be like Modals or Popups. Mostly, Dialogs are used in Websites and also used in the backend.
Here, we are discussing adding buttons inside different Dialogs, namely ConfirmationDialog for asking for confirmation, WarningDialogs for showing error dialogs, and AlertDialogs.
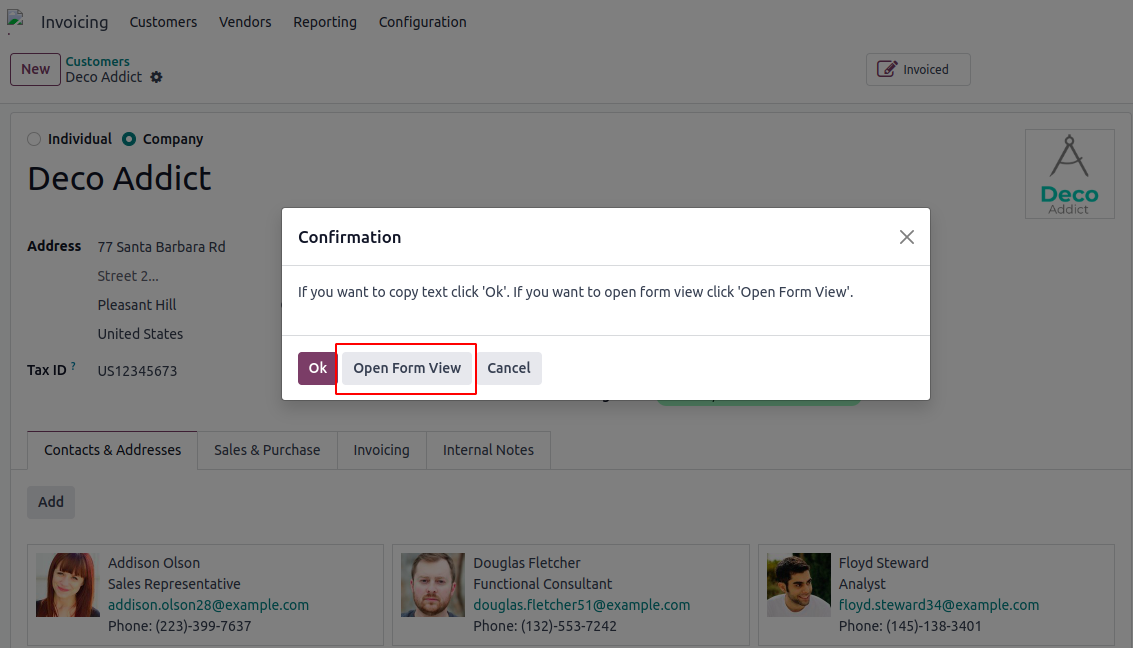
Confirmation
web.ConfirmationDialog is used to show a simple message to the user. web.ConfirmationDialog has two buttons, that is the Ok button and the Cancel button. Therefore, we have two ways to close the dialog. By clicking the button with the X icon or by clicking the Cancel button. So, in order to add a new button, the template extends the web.ConfirmationDialog component. It adds buttons after existing buttons, and the button's class and label are dynamically controlled by props. The button's click event is bound to the method.
<?xml version="1.0" encoding="UTF-8" ?>
<templates>
   <t t-name="advanced_many2many_tags.SaveFormDialog"
      t-inherit="web.ConfirmationDialog" t-inherit-mode="extension">
       <xpath expr="//button[hasclass('btn')]" position="after">
           <button class="btn btn-secondary"
                   t-att-class="props.open_form_viewClass"
                   t-on-click="_open_form_view">Open form View
           </button>
       </xpath>
   </t>
</templates>
The code imports various modules and components needed for patch function to extend the behavior of the ConfirmationDialog component.
/** @odoo-module */
import { Dialog } from "@web/core/dialog/dialog";
import { _t, _lt } from "@web/core/l10n/translation";
import { ConfirmationDialog } from "@web/core/confirmation_dialog/confirmation_dialog";
import { patch } from "@web/core/utils/patch";
import { useService } from "@web/core/utils/hooks";
Add the button function.
patch(ConfirmationDialog.prototype, {
   setup() {
       super.setup();
       this.action = useService("action");
       },
         _open_form_view(ev) {
   return this.props.close();
   },
       });
In this code snippet, the ConfirmationDialog component is being defined
With additional props and default props.
ConfirmationDialog.props = {
   ...ConfirmationDialog.props,
   open_form_viewClass: { type: String, optional: true },
   open_form_view: { type: Function, optional: true },
   open_form_viewLabel: { type: String, optional: true },
   recordResId: {type: Number, optional: true}
};
ConfirmationDialog.defaultProps = {
...ConfirmationDialog.defaultProps,
   open_form_viewLabel: _t("Open Form View"),
   open_form_viewClass: "btn-primary",
};
Here is the ConfirmationDialog and message, and we can see the added button along with other buttons.
This is the view.
Likewise, we can add buttons inside in odoo , different dialogs like WarningDialogs, and AlertDialogs through the same method inside the website.