In Odoo, we have different views for different purposes. Each of these views has its own importance. We use these views in different scenarios for specific purposes.
Normally we create a view using XML. We have a lot of examples of creating a view. It is difficult to create a view from the Python side for an end user. In this blog, we will see how we can create a view using Python code.
Let's check this case using an example. Consider the scenario of the creation of tags. While we create a tag from the UI by an end user, we cannot get the record in the filter. For getting this record in the filter dynamically, we can add some Python codes.
Now we can create a new model for creating the tags in invoices. For that, we use the following codes.
class InvoiceTag(models.Model):
   """class for creating tags"""
   _name = "invoice.tag"
   _description = "Invoice Tag"
   name = fields.Char(string='Tag Name', required=True, translate=True, help="Invoice tags")
Here we create a new model named ‘IvoiceTag’ with the model name ‘invoice.tag’. Then we can create a new field ("name") for storing the record of the tags. Now we create the view for this field. For that, we can use the following code.
<record id="invoice_tag_view_form" model="ir.ui.view">
   <field name="name">invoice.tag.view.form</field>
   <field name="model">invoice.tag</field>
   <field name="arch" type="xml">
       <form string="Tags">
           <sheet>
               <div class="oe_title">
                   <label for="name"/>
                   <h1><field name="name" placeholder="e.g. Services"/></h1>
               </div>
           </sheet>
       </form>
   </field>
</record>
Now we have created a field as well as a view.
Now let's see how we can dynamically add these created tags into the filter. Ie, whenever we create a tag from the UI, the tag will appear in the filter. For that, we use some Python code.
@api.model
def create(self, vals):
   """Create filtering option in accordance with tags that are created"""
   result = super(InvoiceTag, self).create(vals)
   inherit_id = self.env.ref('account.view_account_invoice_filter')
   arch_base = _("""<?xml version="1.0"?>
                     <xpath expr="//filter[@name='draft']"
                       position="before">
                       <separator/>
                     <filter string="%s" name="%s"
                       domain="[('invoice_tag_ids','=','%s')]"/>
                       <separator/>
                     </xpath>
                     """) % (result.name, result.name, result.name)
   value = {'name': 'filter.%s' % result.name,
            'type': 'search',
            'model': 'account.move',
            'mode': 'extension',
            'inherit_id': inherit_id.id,
            'arch_base': arch_base,
            'active': True}
   self.env['ir.ui.view'].sudo().create(value)
   return result
Here we inherit the create function of the model using the keyword ‘super.’
result = super(InvoiceTag, self).create(vals)
We want to create the new record in a filter corresponding tags that are created from the UI. For that, we want to get the template id of the filter. By using the ‘ref’ keyword, we store the template id of the filter in the variable ‘inherit_id’.
inherit_id = self.env.ref('account.view_account_invoice_filter')Now we can pass the data that needs to be specified in the field ‘arch’ of type xml. So we should pass the data directly as xml tags to the variable ‘arch_base’ in the create function. Here we set the view in xml using the ‘arch_base.’
Here we specify the position of the tags that need to be displayed in the filter. For that, we use the ‘<xpath>’ tag. Here in this example, we add the newly created tags are displayed in the filter, just before the ‘draft.’
arch_base = _("""<?xml version="1.0"?>
                 <xpath expr="//filter[@name='draft']"
                   position="before">
                   <separator/>
                 <filter string="%s" name="%s"
                   domain="[('invoice_tag_ids','=','%s')]"/>
                   <separator/>
                 </xpath>
                 """) % (result.name, result.name, result.name)
Then we want to specify the data that is required for the creation of the view.
value = {'name': 'filter.%s' % result.name,
        'type': 'search',
        'model': 'account.move',
        'mode': 'extension',
        'inherit_id': inherit_id.id,
        'arch_base': arch_base,
        'active': True}
Now we create a record in the model “ir.ui.view” by using these data.
self.env['ir.ui.view'].sudo().create(value)
So by using these Python codes, we can create a view dynamically in Odoo. The view can be customized dynamically based on our requirements.
Now we can check how this works on the user interface.
Firstly, we can create new tags in the model ‘invoice.tag’.
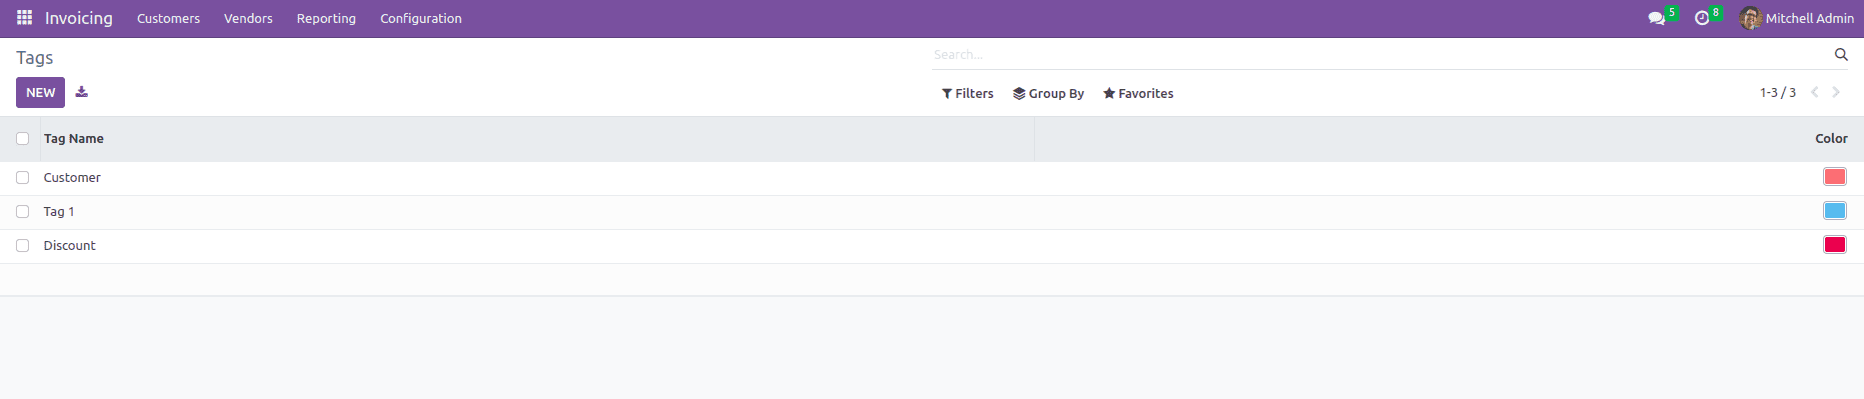
We can see the created tags on the filter tab.
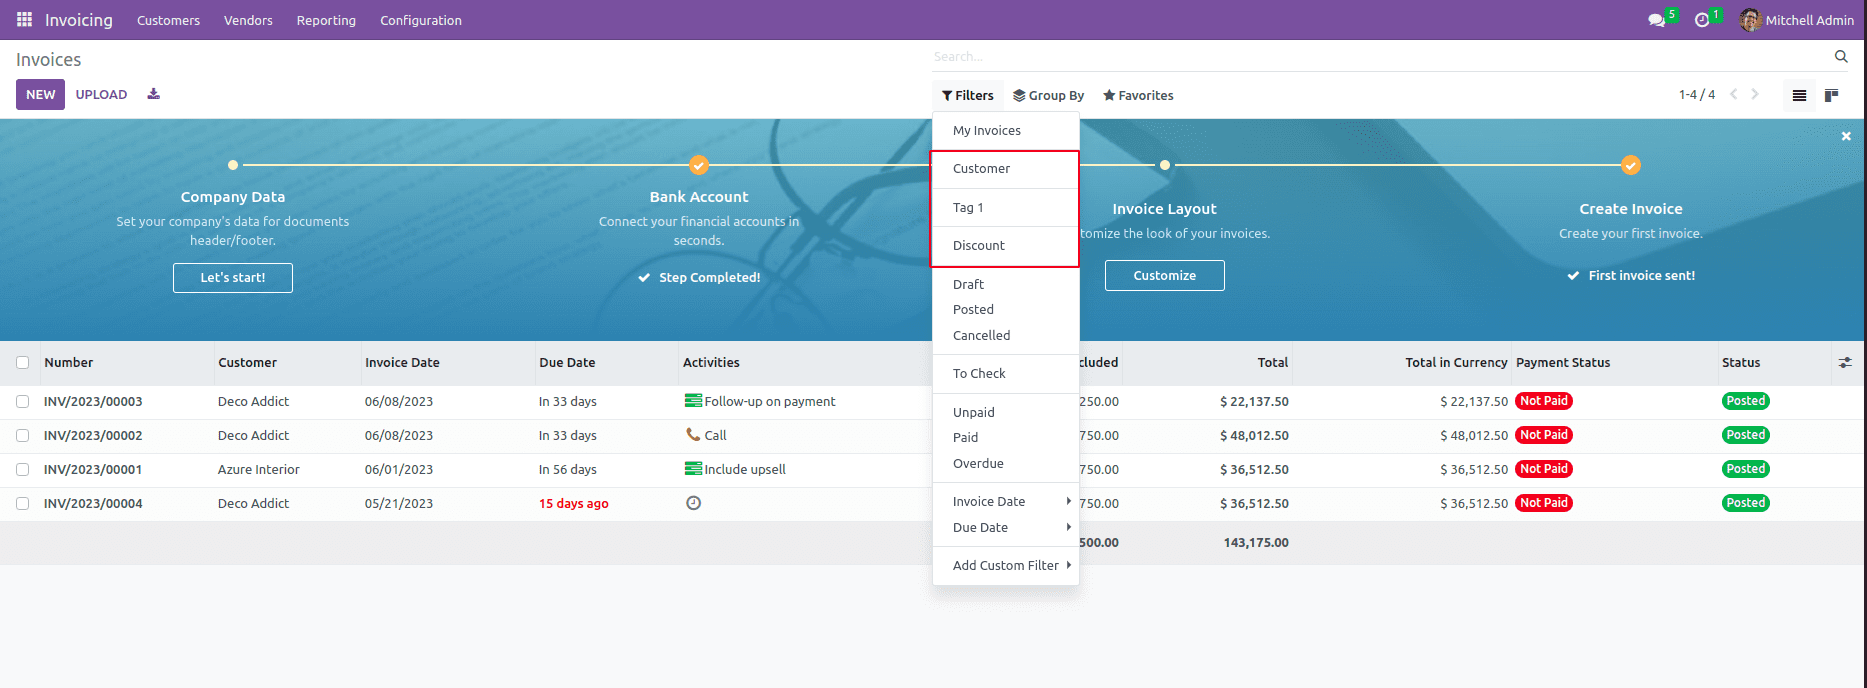
So in this way, we can create a dynamic view from python. When ever we create a new tag, the tag will appear on the filter. By adding additional codes, we can remove the tag from the filter while we are deleting the tags.
For that, we can use the following codes. Here we inherit the unlink function for deleting the view from the model.
def unlink(self):
   """Unlink the tags from filtering"""
   for rec in self:
       tag_name = self.env['ir.ui.view'].sudo().search([('name', '=', 'filter.%s' % rec.name)])
       tag_name.active = False
       tag_name.unlink()
   return super(InvoiceTag, self).unlink()