Zebra Programming Language (ZPL) is a widely-used language for printing labels and barcodes. In business environments, it is often necessary to print labels for packaging, shipping, and inventory tracking purposes. Odoo 16 provides a powerful labeling feature that allows you to create custom labels based on your specific requirements. In this blog, we will explore how to create a ZPL label in Odoo 16.
What is ZPL?
ZPL (Zebra Programming Language) is a standardized language utilized for crafting labels tailored for Zebra printers, which enjoy widespread use across various industries. Its significance stems from its compatibility with Zebra printers, ensuring uniform label design, adaptability for a broad spectrum of labeling requirements, swift and efficient printing, error mitigation to enhance accuracy, seamless integration into operational workflows, cost-effective in-house label production, and the capacity to incorporate security features such as encrypted barcodes. All in all, ZPL plays an integral role in guaranteeing precision, efficiency, and dependability in label printing across diverse industries.
Before delving into the implementation process, it's essential to grasp the basics of ZPL and label design. ZPL is a text-based language that follows a specific syntax to format and print labels. Labels are containers that hold data and can include text, graphics, and barcodes.
To create a ZPL label in Odoo, you'll need to define the label layout using ZPL code and integrate it with the Odoo infrastructure.
Implementation
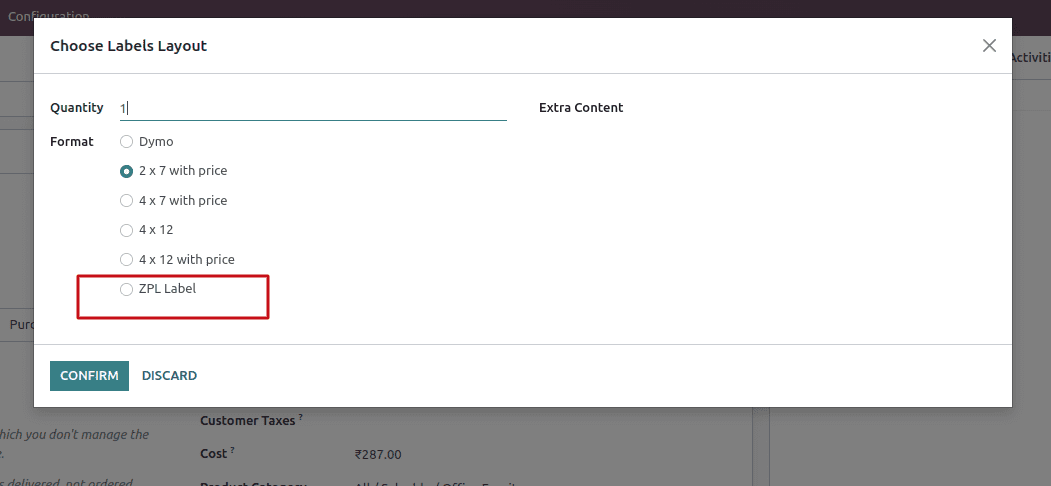
Add a new selection option ('ZPL Label') to the 'print_format' field within the 'product.label.layout' wizard:
class ProductLabelLayout(models.TransientModel):
    _inherit = 'product.label.layout'
    print_format = fields.Selection(selection_add=[('zpl_label', 'ZPL Label')],
                                    ondelete={'zpl_label': 'cascade'})
    def _prepare_report_data(self):
        res = super(ProductLabelLayout, self)._prepare_report_data()
        if self.print_format == 'zpl_label':
            xml_id = list(res)
            xml_id[0] = 'zpl_label.report_product_template_zpl_label'
            res = tuple(xml_id)
        return res
* Inherit the class 'product.label.layout'.
* Modification of Print Format: It adds a new print format option called 'ZPL Label' to the print_format field of product label layouts.
* Cascade Deletion: When the 'ZPL Label' format is deleted, it's configured to cascade delete associated records.
* Override of _prepare_report_data Method: The code overrides the _prepare_report_data method. This method is likely used to prepare data for generating a product label report. When the selected print format is 'zpl_label', it appears to modify the xml_id, possibly to specify a different template for report generation.
Report Actions (ir.actions.report):
 <record id="report_product_template_zpl_label" model="ir.actions.report">
            <field name="name">Product Label (ZPL)</field>
            <field name="model">product.template</field>
            <field name="report_type">qweb-text</field>
            <field name="report_name">zpl_label.report_producttemplate_zpllabel</field>
            <field name="report_file">zpl_label.report_producttemplate_zpllabel</field>
            <field name="binding_model_id" eval="False"/>
            <field name="binding_type">report</field>
        </record>
The descriptions of each field in the Report actions are provided below:
* name: This field refers to the name assigned to the action or report which's Product Label (ZPL)" in this case.
* model: The model field indicates the model associated with this report, which's product.template". It signifies that this report is connected to the "product.template" model.
* report_type: The report_type field defines the format of the report as "qweb-text". This means that the generated report will be in text format using templating engine.
* report_name: The report_name field specifies the name of the report. It serves as an identifier used to locate and identify the template file, for this report.
* report_file: The report_file field points out the precise file path where you can find and access the template file needed to generate this specific report using QWeb templating engine.
Fetch data:
class ReportProductTemplateZplLabel(models.AbstractModel):
    _name = 'report.zpl_label.report_producttemplate_zpllabel'
    _description = 'Product Label Report'
    def _get_report_values(self, docids, data):
        if data.get('active_model') == 'product.template':
            Product = self.env['product.template']
        elif data.get('active_model') == 'product.product':
            Product = self.env['product.product']
        else:
            raise UserError(
                _('Product model not defined, Please contact your administrator.'))
        quantity_by_product = defaultdict(list)
        for p, q in data.get('quantity_by_product').items():
            product = Product.browse(int(p))
            quantity_by_product[product].append((product.barcode, q))
        if data.get('custom_barcodes'):
            for product, barcodes_qtys in data.get('custom_barcodes').items():
                quantity_by_product[Product.browse(int(product))] += (
                    barcodes_qtys)
        data['quantity'] = quantity_by_product
        data['company_id'] = self.env.company.name
        return data
* Create a class using the _name and _description attributes. This class is likely intended to generate product labels in ZPL format.
* The class contains a method named _get_report_values responsible for generating the data needed to create the ZPL label report. It takes two parameters, docids and data.
* The code includes a conditional block to determine the active model based on the data received. It checks if the active_model in the provided data is 'product.template' or 'product.product' and assigns the appropriate model to the Product variable.
* This dictionary appears to store information about product quantities based on their IDs. It uses the defaultdict from Python's collections module to group products by their ID and store related barcode-quantity pairs. The code iterates through the provided data (quantity_by_product and custom_barcodes) and organizes it in the quantity_by_product dictionary. It seems to be collecting barcode-quantity pairs for each product.Error handling is included to raise a UserError if the active model is undefined in the data.
* If the active_model in the data is neither 'product.template' nor 'product.product', the code raises a UserError with a message indicating that the product model is not defined. This is likely used for error handling when the expected data is not provided.
Report Template:
<template id="report_producttemplate_zpllabel">
		<t t-foreach="quantity.items()" t-as="barcode_and_qty_by_product">
                <t t-set="product" t-value="barcode_and_qty_by_product[0]"/>
                <t t-foreach="barcode_and_qty_by_product[1]" t-as="barcode_and_qty">
                    <t t-set="barcode" t-value="barcode_and_qty[0]"/>
                    <t t-foreach="range(barcode_and_qty[1])" t-as="qty">
                        <t t-translation="off">
^XA
^FT150,80^A0N,30,30^FD<t t-esc="company_id"/>^FS
^FO30,120^GB620,3,3^FS
^FT100,180^A0N,30,30^FD<t t-esc="product.display_name"/>^FS
^FT80,240^A0N,30,24^FD<t t-esc="product.default_code"/>^FS
^FO600,200,1
^CI28
<t t-if="product.currency_id.position == 'after'">
^A0N,60,40^FH^FD<t t-esc="product.list_price" t-options='{"widget": "float", "precision": 2}'/><t t-esc="product.currency_id.symbol"/>^FS
</t>
<t t-if="product.currency_id.position == 'before'">
^A0N,60,40^FH^FD<t t-esc="product.currency_id.symbol"/><t t-esc="product.list_price" t-options='{"widget": "float", "precision": 2}'/>^FS
</t>
<t t-if="barcode">
^FO80,250^BY3
^BCN,80,Y,N,N
^FD<t t-esc="barcode"/>^FS
</t>
^XZ
                        </t>
                    </t>
                </t>
            </t>
        </template>
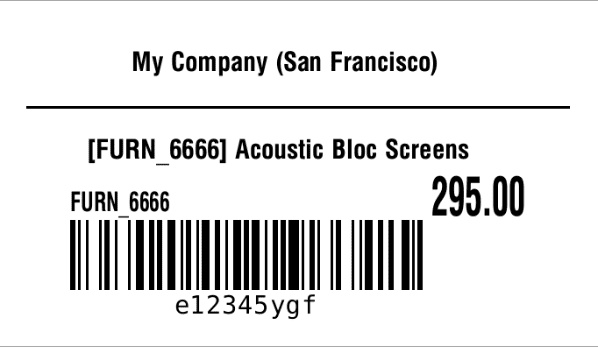
The template is designed for generating ZPL (Zebra Programming Language) labels for products. It utilizes a loop to iterate through a dictionary containing product quantities, product objects, and barcodes. For each product, it dynamically generates ZPL code that includes company name, product name, product code, and price information. The template is adaptable to different currency symbol positions and accommodates barcode printing if a barcode is available. Overall, it serves as a tool for producing ZPL labels tailored to product details and quantities within an Odoo-based system.
Let me break down the components of the ZPL code:
* ^XA and ^XZ: These are ZPL control commands that mark the beginning and end of a label format. Anything between these two commands defines the content and layout of the label.
* ^FT150,80: This command sets the position where the text will be printed, with coordinates (150, 80).
* ^A0N,30,30: This command specifies the font and text size (font A, normal size).
* ^FO30,120: This sets the starting position for drawing a graphic box with coordinates (30, 120).
* ^GB620,3,3: This command draws a graphic box that is 620 units wide, 3 units tall, and uses a line thickness of 3 units.
* ^FS: Marks the end of the box.
* ^FO80,250^BY3: Sets the position and barcode parameters.
* ^BCN,80,Y,N,N: Configures barcode printing, specifying settings like barcode type, width, and placement.
Designing ZPL labels, in Odoo 16 can greatly improve your labeling procedures leading to increased accuracy and efficiency. By following the steps provided in this blog post, you will be able to create, customize and print ZPL labels that perfectly cater to your business needs. Whether you're labeling products, shipping packages or managing inventory, the versatility of ZPL labels can significantly streamline your operations. Minimize errors in your business processes.