One of the key features of Odoo is the ability to create custom views that allow users to interact with data in new and innovative ways. In this blog post, we will explore how to create a custom view in Odoo that uses a JavaScript class to render the form view.
We will start by looking at an XML view definition that includes a custom button. When the button is clicked, a JavaScript function will be called from the custom renderer class. We will then dive into the JavaScript code and explain how it works in detail.
By the end of this blog post, you will have a solid understanding of how to create custom views in Odoo using JavaScript classes and how they can be used to enhance the user experience.
The first code snippet is an XML view definition that includes a custom button and references a JavaScript class to render the form view.
<?xml version="1.0"?>
<odoo>
   <data>
       <recordid="view_sale_order_form_inherit"model="ir.ui.view">
           <field name="name">sale.order</field>
           <field name="model">sale.order</field>
           <field name="inherit_id" ref="sale.view_order_form"/>
           <field name="arch" type="xml">
           <xpath expr="//form" position="attributes">
            <attributename="js_class">sale_order_blog</attribute>
           </xpath>
              <xpath expr="//header" position="inside">
                   <a href="#" t-on-click="_MoreOptions">
                       <i class="fa fa-ellipsis-v"
                         style="font-size:24px"></i>
                   </a>
               </xpath>
           </field>
       </record>
   </data>
</odoo>
The Added button in sale order form view.
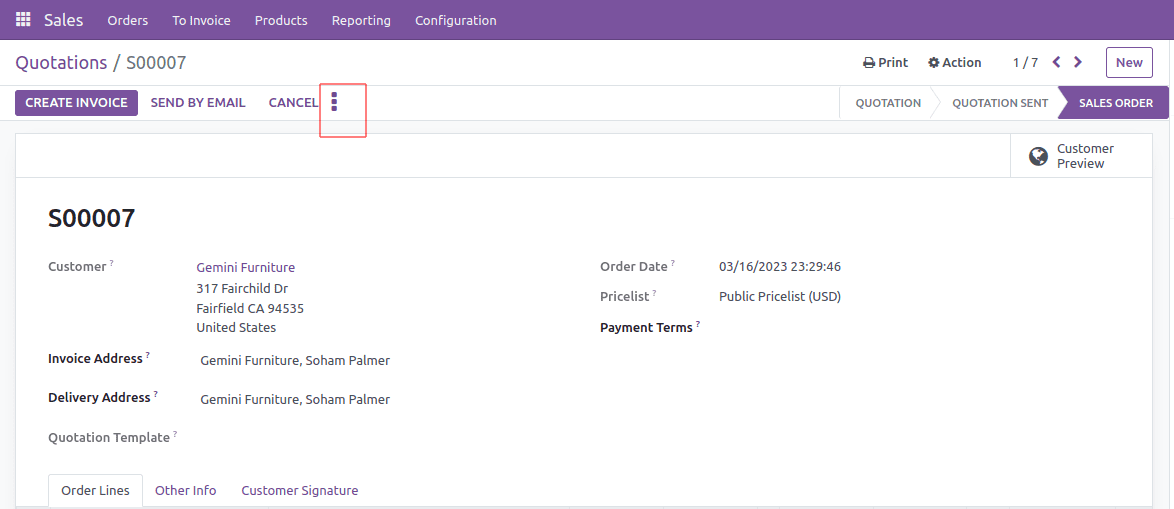
This XML view definition extends the default sale.view_order_form form view, which is used to display sales orders. It includes a custom button that will call the _MoreOptions() method when clicked.
The js_class attribute in the <form> element references the JavaScript class that will be used to render the form view. In this case, it references sale_order_blog.
The second code snippet is the JavaScript class definition that is referenced in the XML view definition. This class extends the FormRenderer class provided by Odoo.
/** @odoo-module **/
import { FormRenderer } from "@web/views/form/form_renderer";
const Dialog = require('web.Dialog');
export class ComSaleOrderRender extends FormRenderer {
setup() {
super.setup();
}
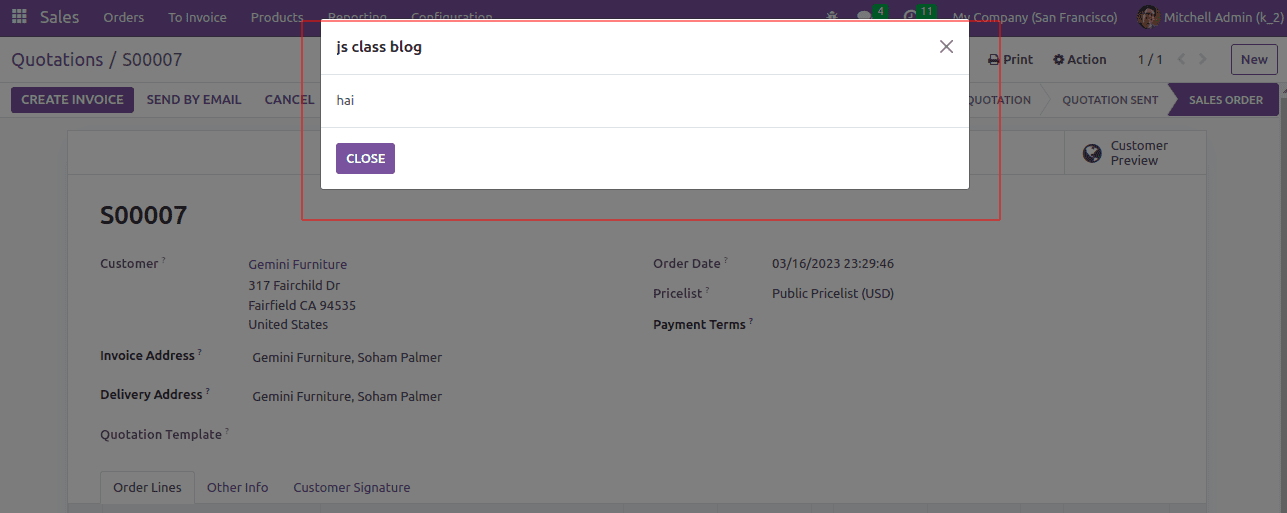
_MoreOptions(){
var dialog = new Dialog(null, {
title: "js class blog",
size: 'medium',
$content: $('<div/>', {
html: 'hai'
}),
buttons: [{
text: "Close",
close: true
}]
});
dialog.open();
}
}
The _MoreOptions() method is called when the custom button in the form view is clicked. It logs a message to the console and opens a dialog box using the web.Dialog module.
The final code snippet is the integration code that registers the custom view with Odoo. It references the JavaScript class defined earlier and adds it to the registry.
import { formView } from '@web/views/form/form_view';
import { registry } from "@web/core/registry";
import { ComSaleOrderRender } from '@js_class_blog/js/formrender';
console.log('SaleOrderRender',ComSaleOrderRender)
export const JsClassBlog = {
   ...formView,
   Renderer: ComSaleOrderRender,
};
registry.category("views").add("sale_order_blog", JsClassBlog);
The dialogue box pops up when the button is clicked.
In conclusion, using js_class in Odoo form views is a powerful way to extend the functionalities of Odoo's web interface. It allows developers to easily create and integrate custom JavaScript code into the web interface, allowing them to customize and enhance its functionality. The process involves defining a custom class for the form renderer and then referencing it in the form view through the js_class attribute.
Through this blog, we have walked through an example of how to use js_class in Odoo form view to call a custom JavaScript function. This was done by creating a custom class that extends the default form renderer and defining a custom function in it, which was then called from a button added to the form view.
The process may seem complicated at first, but it opens up many possibilities for customization and extension of the Odoo web interface. With a little bit of knowledge of JavaScript and Odoo's web framework, developers can create custom functionalities that can greatly improve the user experience for Odoo users.