In Odoo, importing customers and vendors can be incredibly useful for businesses to streamline their data entry processes or migrate data from another system. Importing data allows us to add multiple customer and vendor records quickly and efficiently, saving time compared to manual entry.
Importing Customers in Odoo 17
The customer import template needs to be downloaded first to import the customers. After downloading, we can modify and customize the template and upload it into the Odoo database.
To download the necessary import template, navigate to Sales app ? Orders ? Customers. On the Customers page, you can activate the list view, select a record for exporting, and click the actions button to reveal the export option.
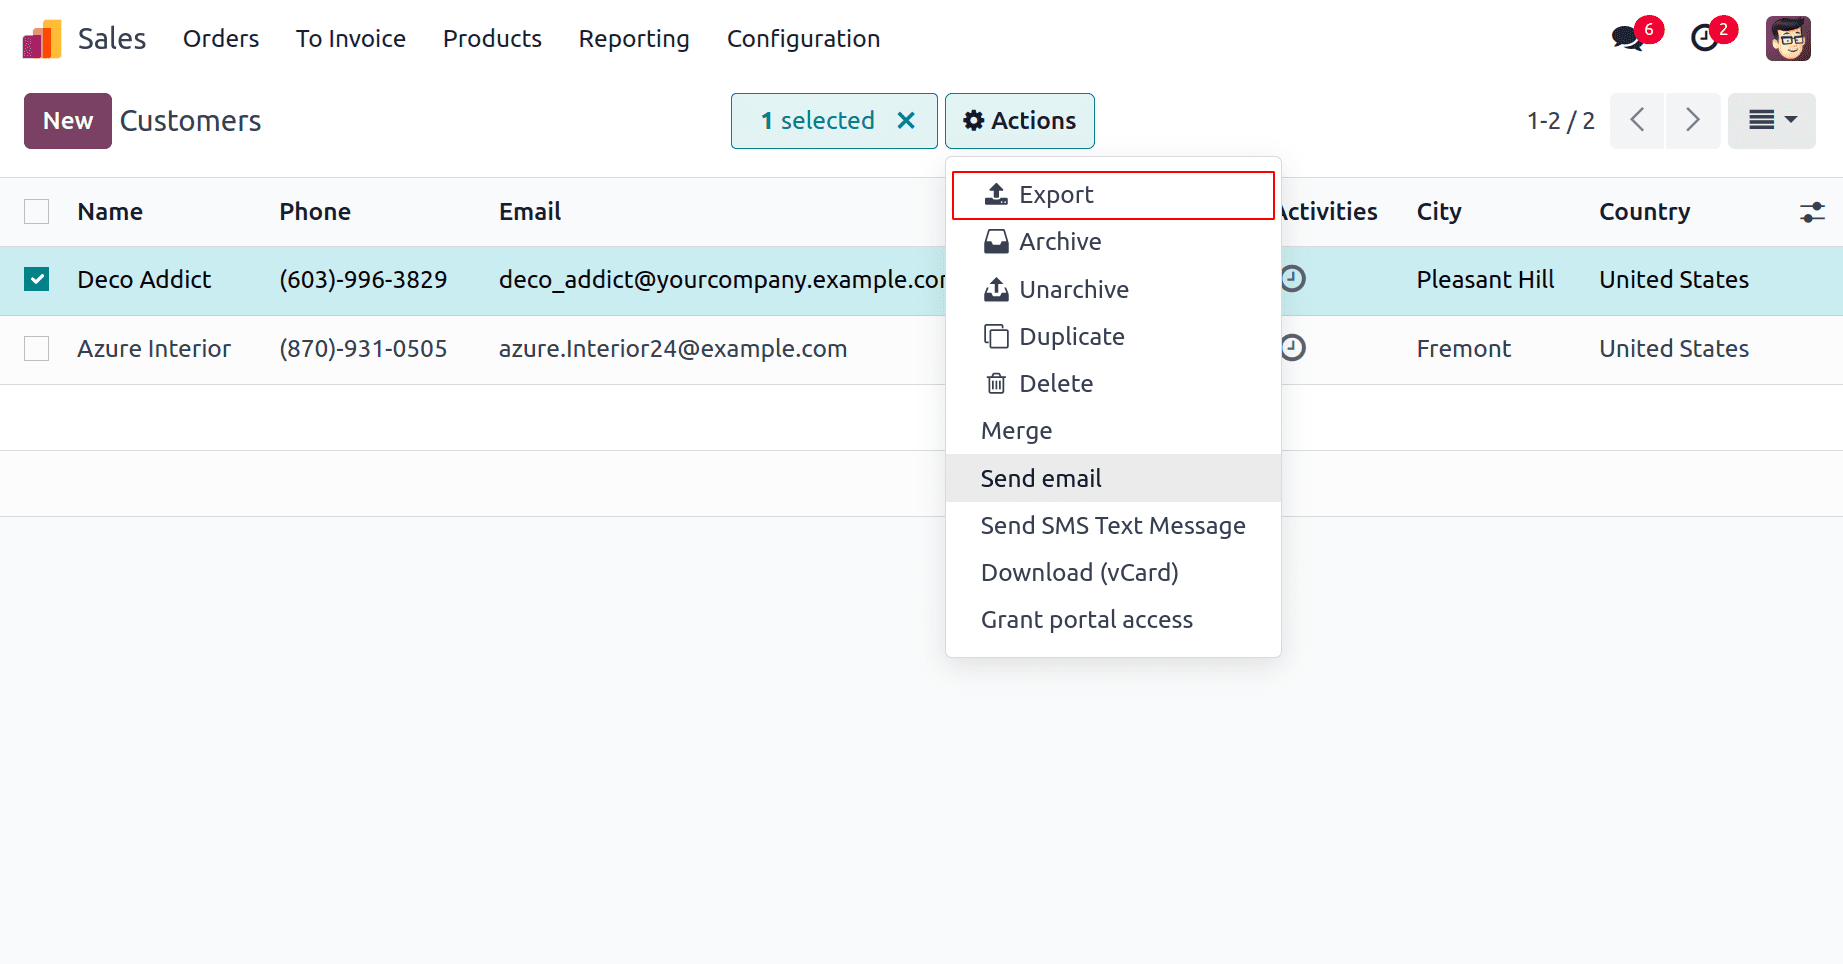
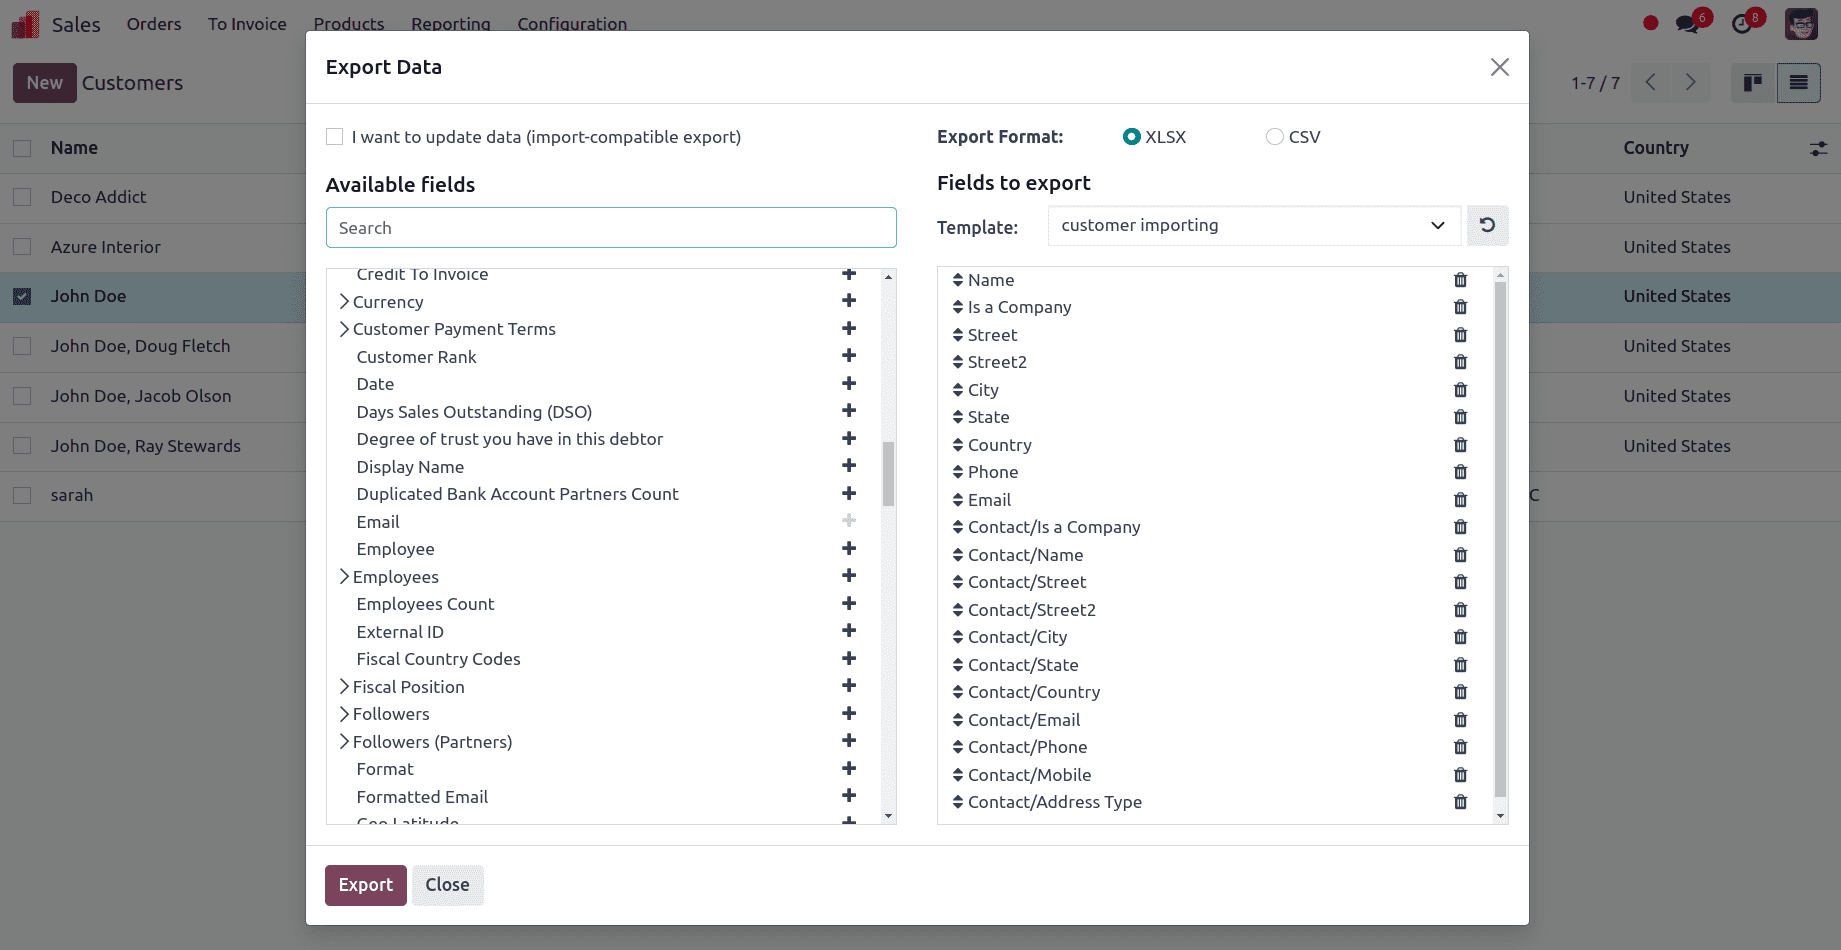
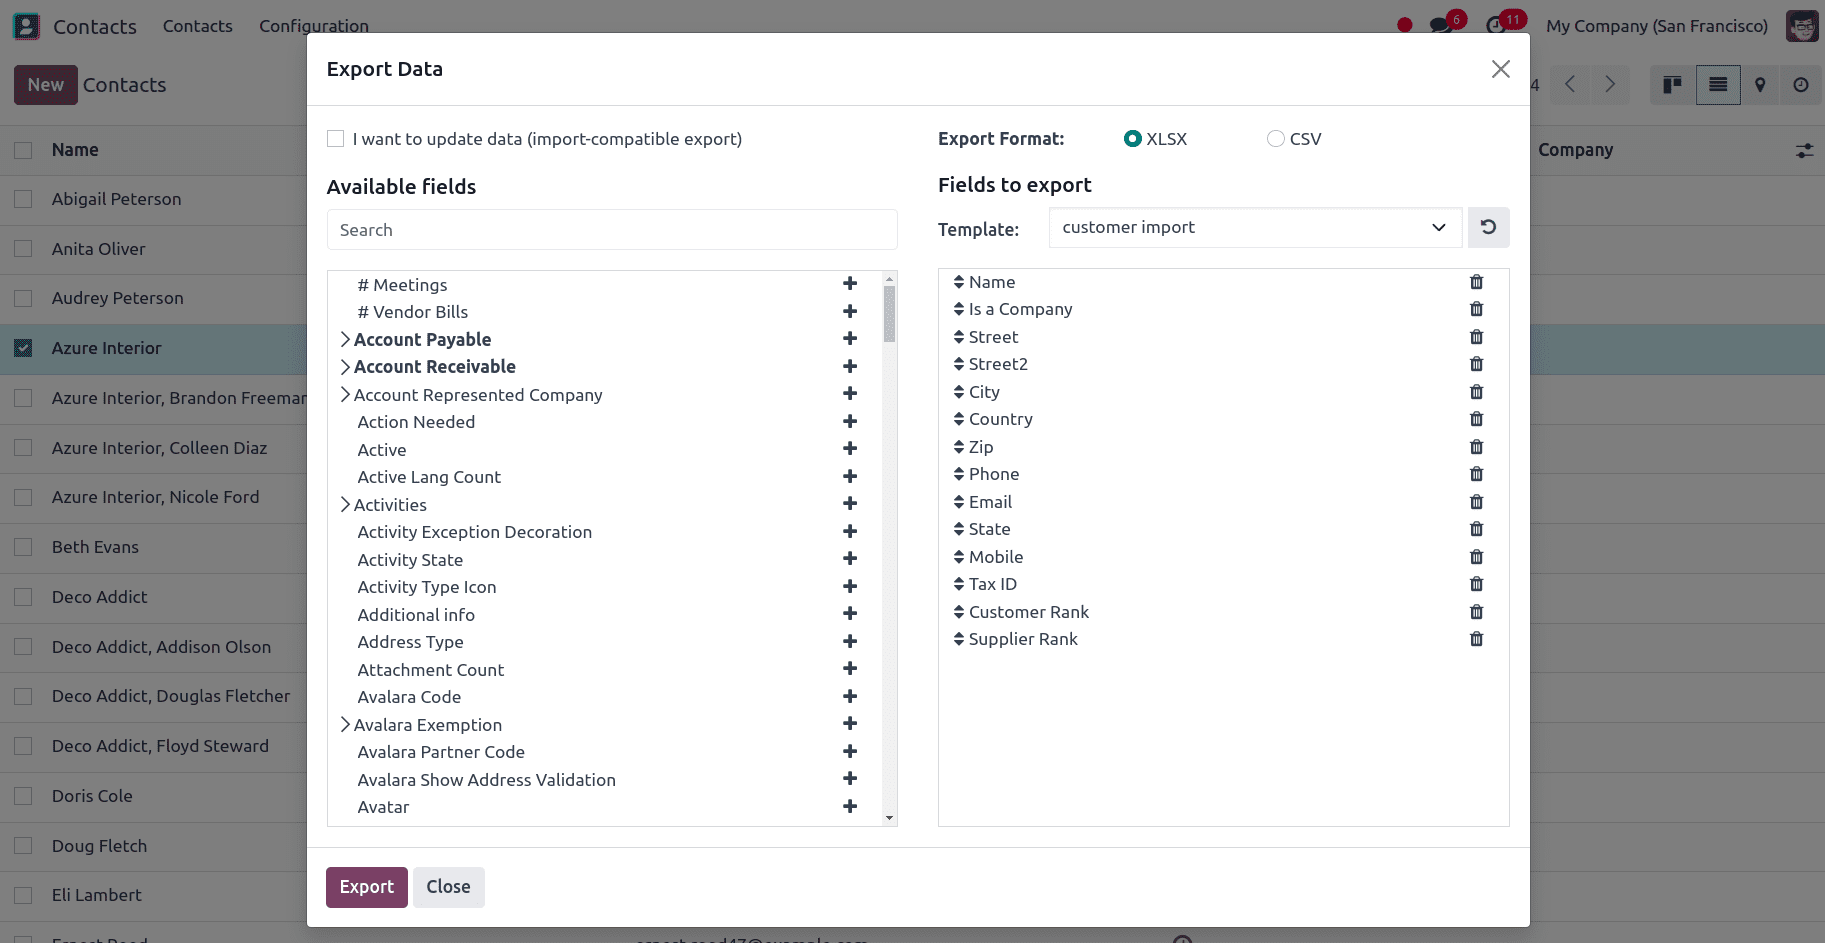
Click on Export and a new window appears with available fields on the left and fields to export on the right. We have all the fields that can be added to the template we are exporting. From the available fields section, we can add the fields we want to export to the ‘fields to export’ section by clicking the + icon. A name can be provided for the template to save the template in that name and we can use this template if we are exporting the data multiple times.

An option called, I want to update data (import-compatible export) is also available. If we check that option, the fields that can be imported are only shown. If we want to update any existing data, an extra field called external ID is added to the file we are exporting to identify the existing data that needs to be updated and when we import the data Odoo 17 maps the field with the unique ID provided. When the box is left unchecked, all of the fields are displayed, not only the ones that can be imported, giving you a lot more field options.
The exporting method offers two export formats: CSV and XLSX. Items in a CSV file are separated by commas, but the XLSX file contains details on every worksheet in the file, including layout and content.
We can use the > (right arrow) icon to display more sub-field options and the search bar to find specific fields. We can also drag the fields to arrange them in the order we want in the exported file and trash icon to delete unnecessary fields.
Here we are adding the following fields:
*Name: Display the name of the customer.
*Is a company: It is a boolean field, if it is true, that is, if it is a company we can give 1, and if it is an individual we can give 0.
*Street: Display the Street of the customer.
*Street 2: Display the Street 2 of the customer.
*City: Display the City of the customer.
*State: Display the State of the customer here.
*Country: Display the Country of the customer.
*Phone: Display the Contact number of the customer.
*Email: The email of the contact can be provided in this field.
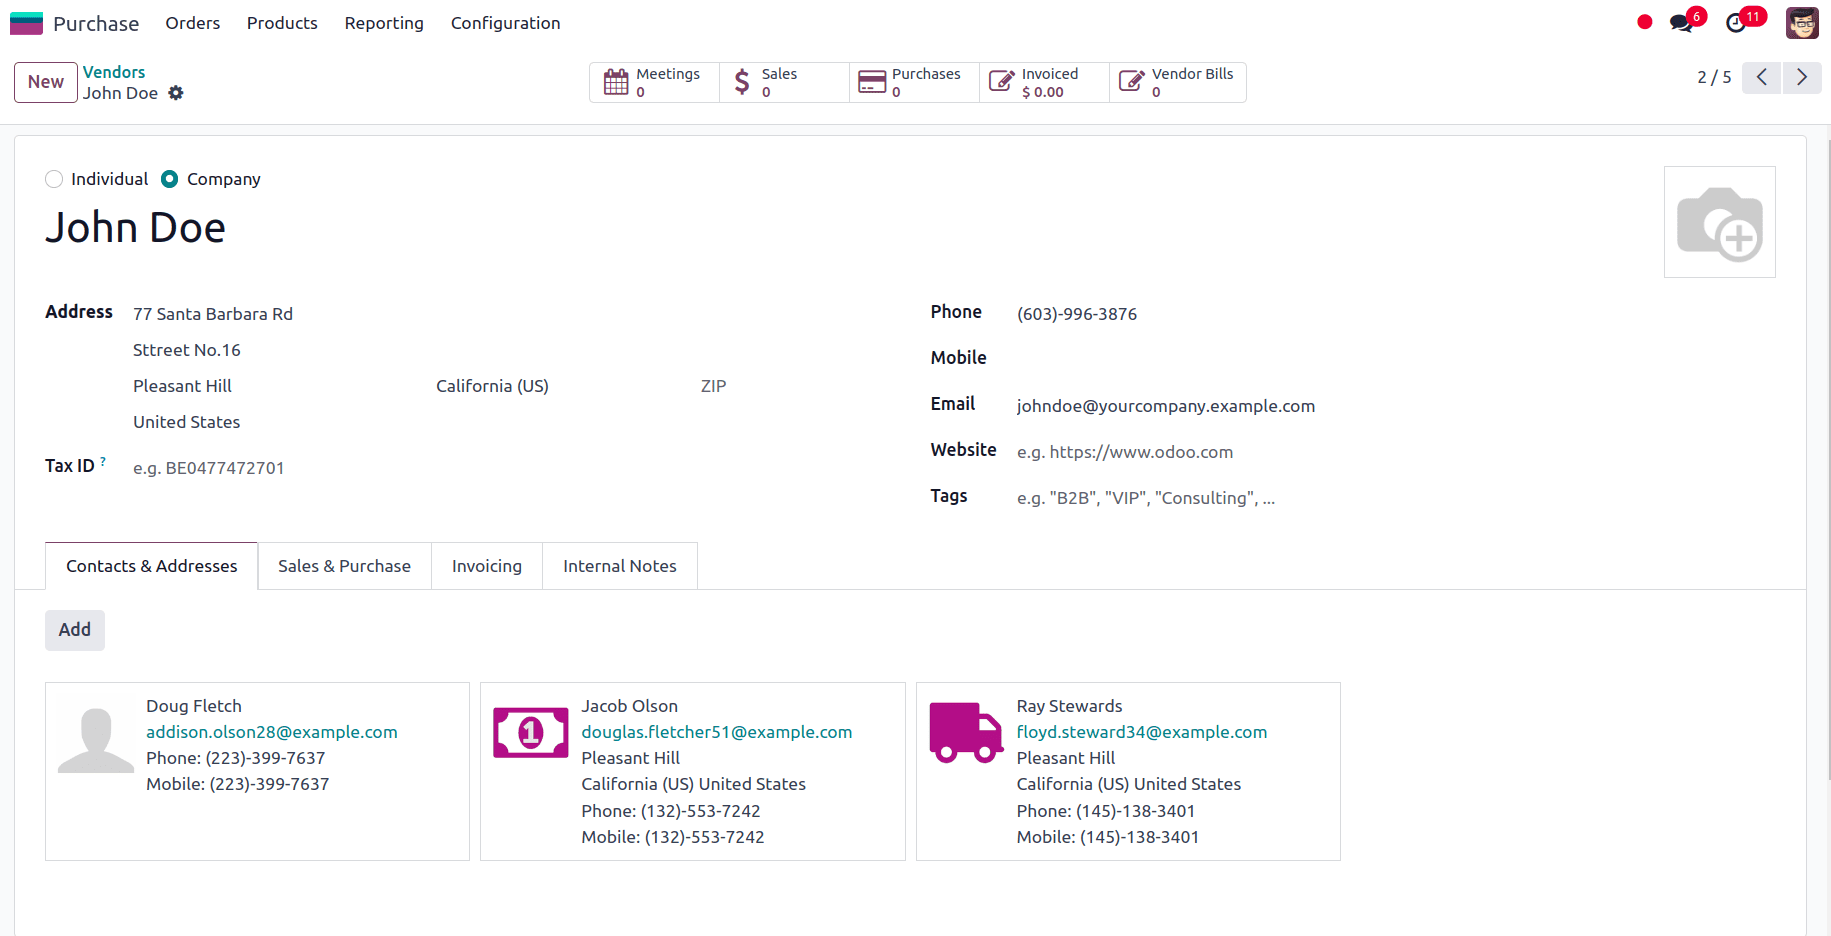
Multiple contacts can be added under a customer by adding the following fields:
*Contact/Is a company: It is a boolean field, if it is true, that is if it is a company we can give 1, and if it is an individual we can give 0.
*Contact/Name: Display the Name of the contact.
*Contact/Street: Display the Street of the contact.
*Contact/Street 2: Display the Street 2 of the contact.
*Contact/City: Display the City of the contact.
*Contact/State: Display the State of the contact.
*Contact/Country: Display the Country of the contact.
*Contact/Phone: Here we can provide the Contact number of the contact.
*Contact/Mobile: Here we can provide the Contact number of the contact.
*Contact/Email: The email of the contact can be provided in this field.
*Contact/Address Type: We can give whether the added contact is a contact, invoice address, delivery address, or other address in this field.
After adding all the fields to export we can click on the export button to export the template. And customize the template according to the need.


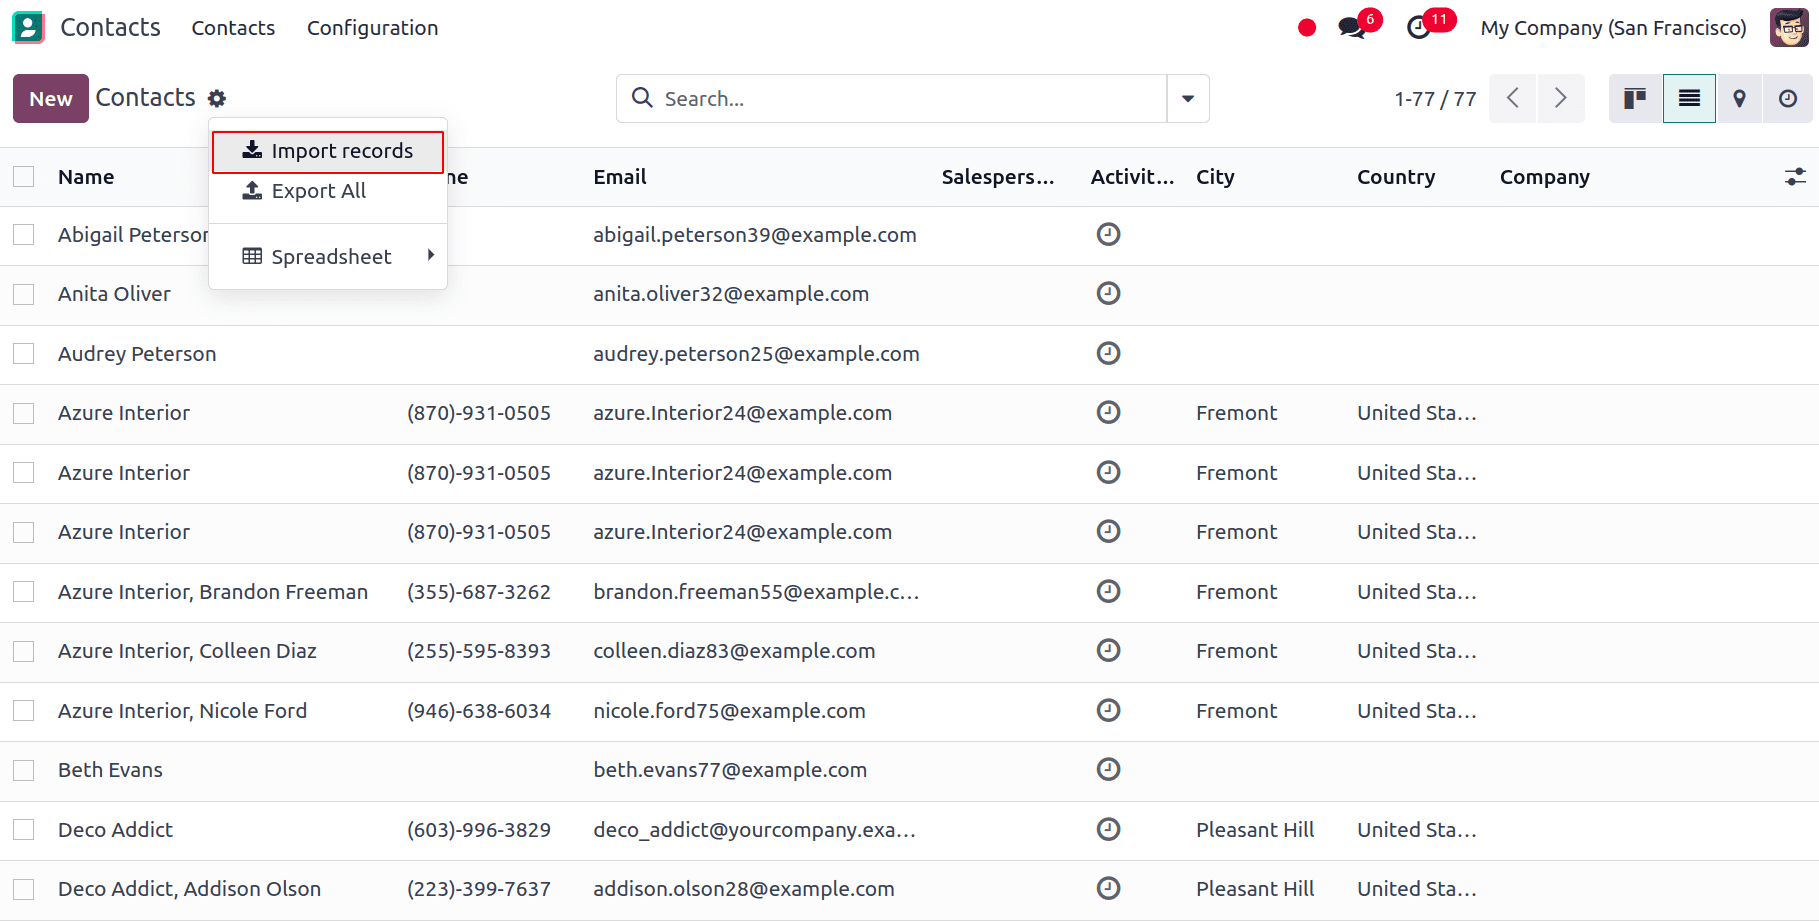
After updating the customer template spreadsheet we can go back to the customer's page and click on the gear icon ?? at the upper left corner and select import records.
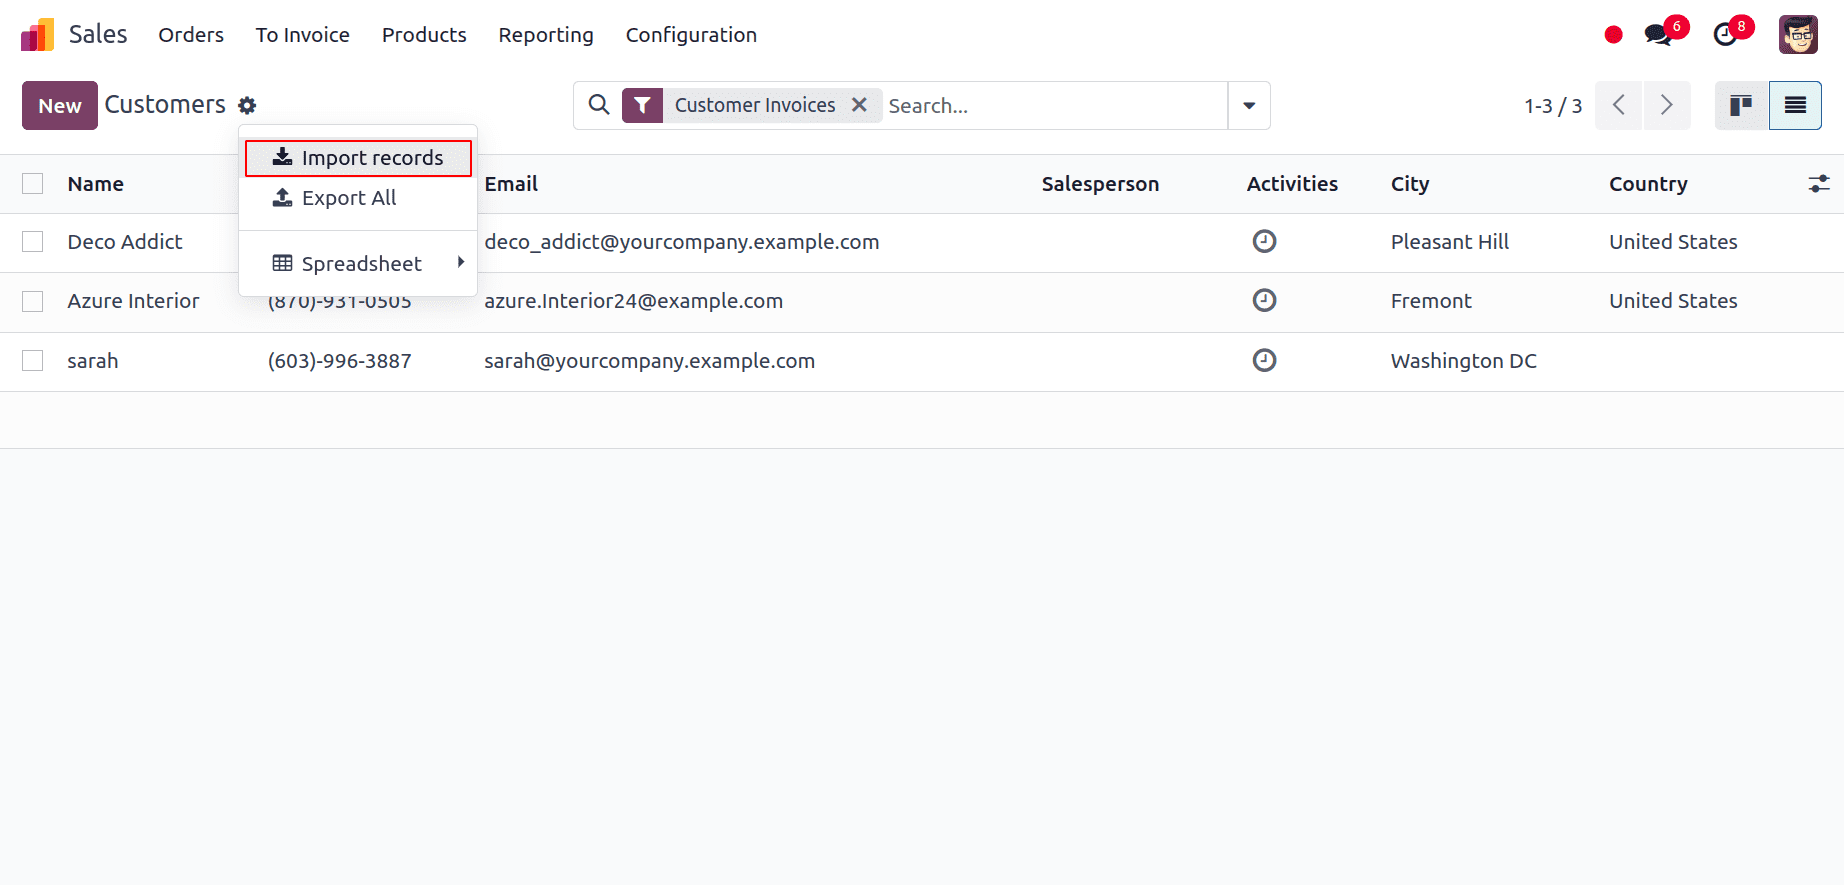
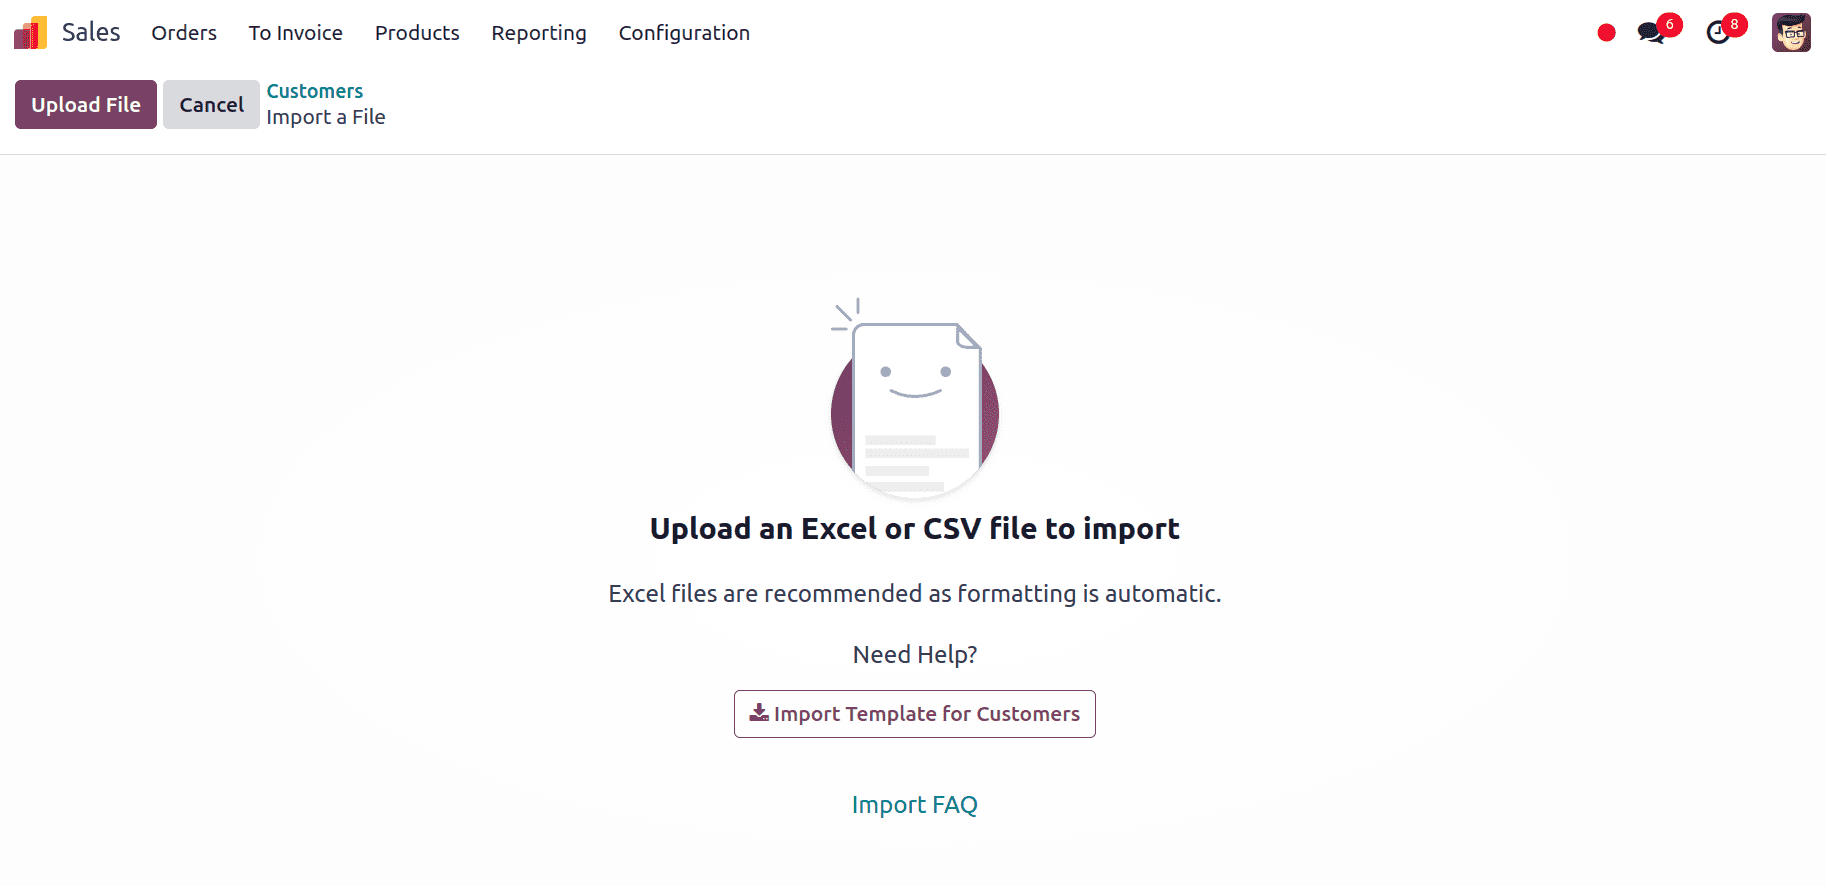
At the top left we have an option to upload the file from our system.
A page displaying every component of the freshly updated customer template spreadsheet—separated by File Column, Odoo Field, and Comments—appears upon file upload.
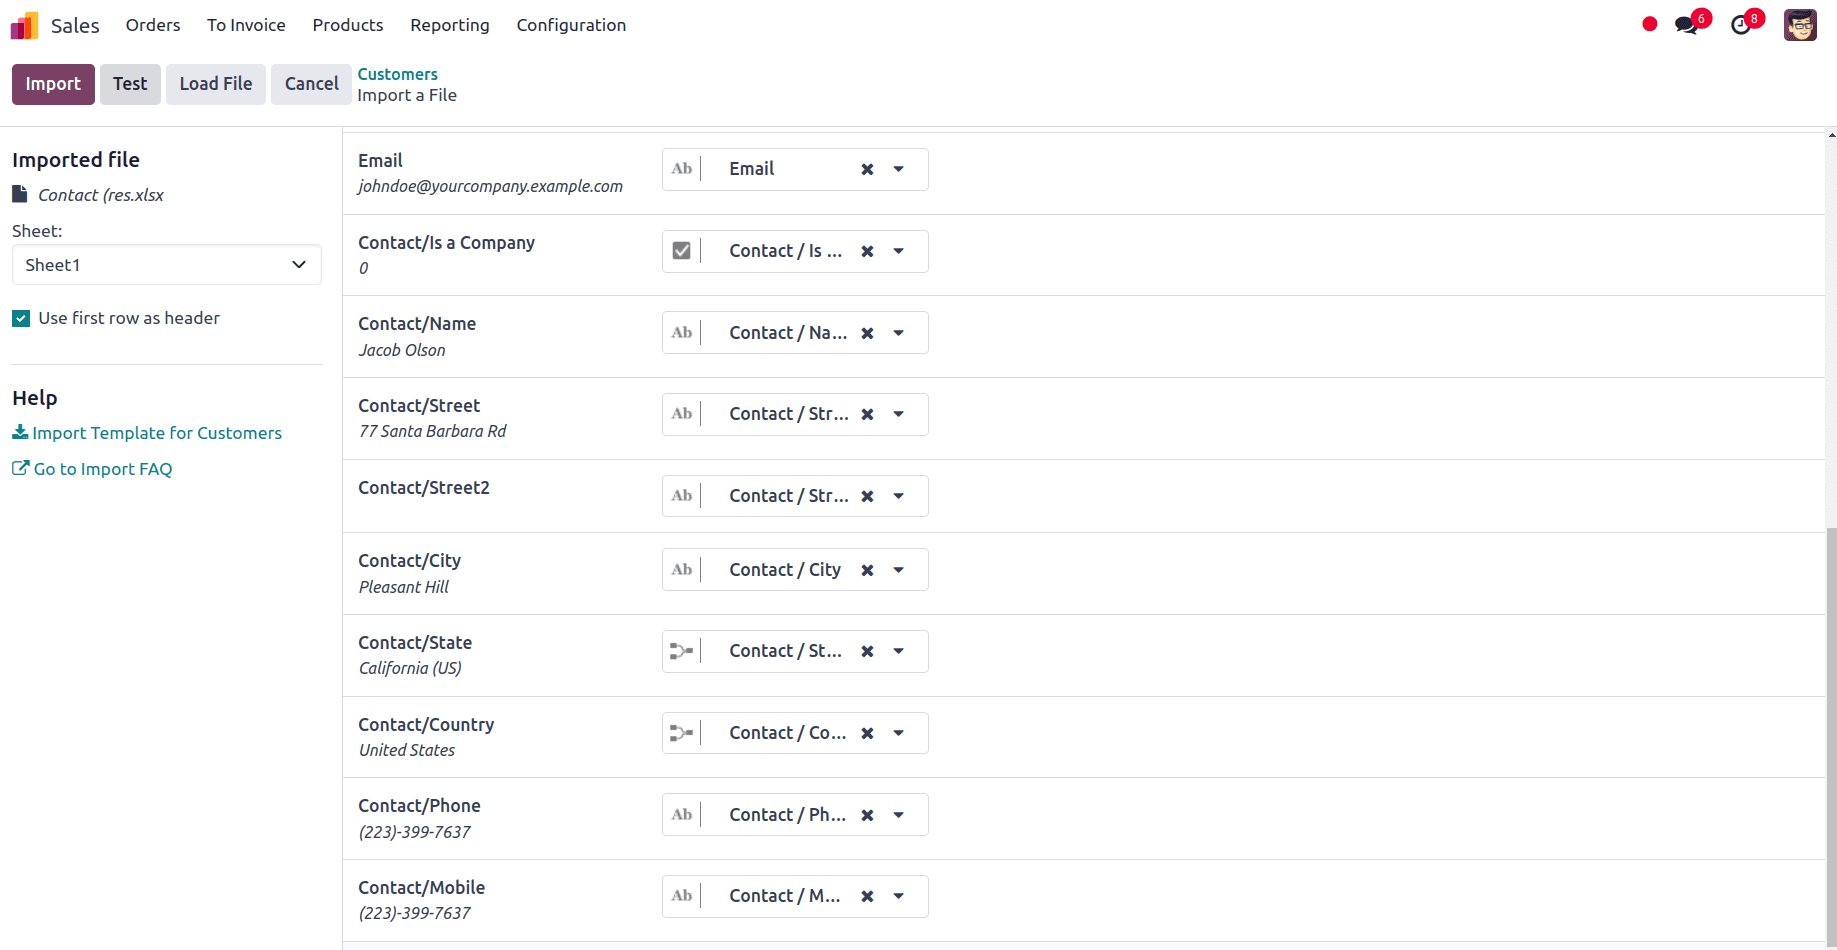
If needed, one can now manually designate the file column to an Odoo Field.
The Test button may be clicked in the top-left corner to verify that all the fields and columns are correctly aligned and that everything is proper.
Odoo notifies the user that everything seems valid at the top of the page with a blue banner if everything is applied successfully.
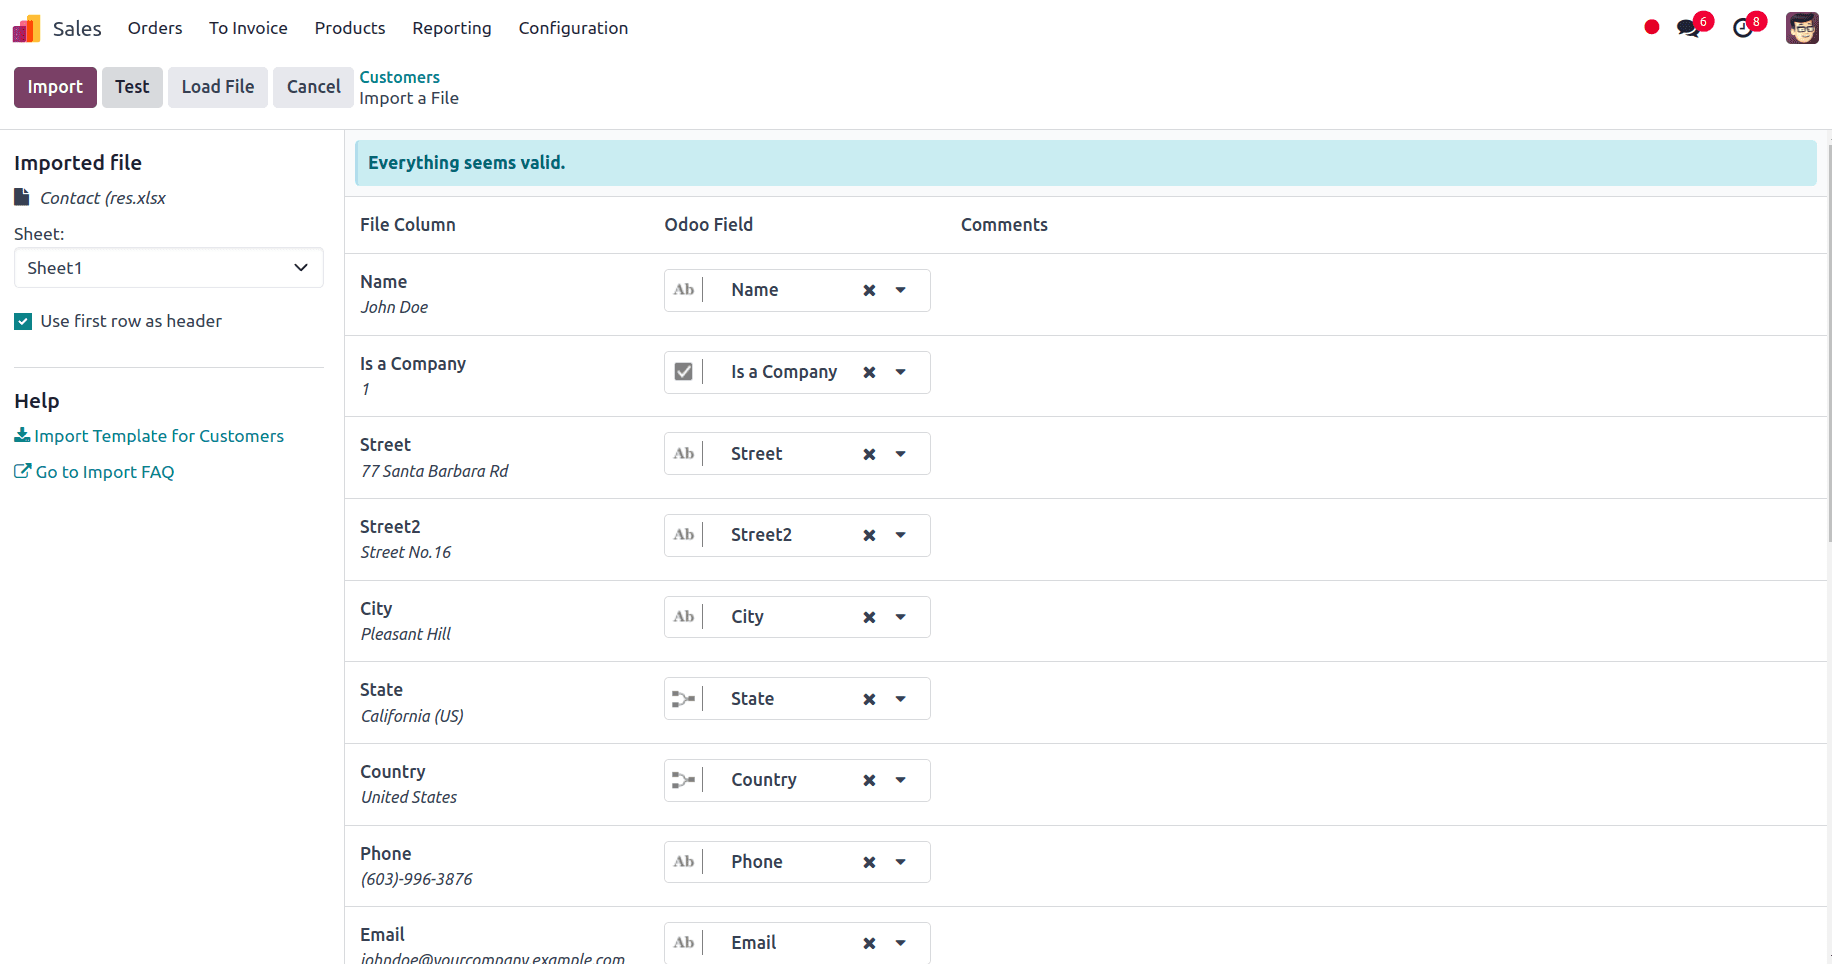
If there are any mistakes, a red banner with information on where to find each issue and how to repair them appears at the top of the page.
Once all the errors are fixed we can click on the test button and then on the Import button to import the records. When the records are imported a pop-up message in the upper-right corner appears which informs the user how many customers were successfully imported.
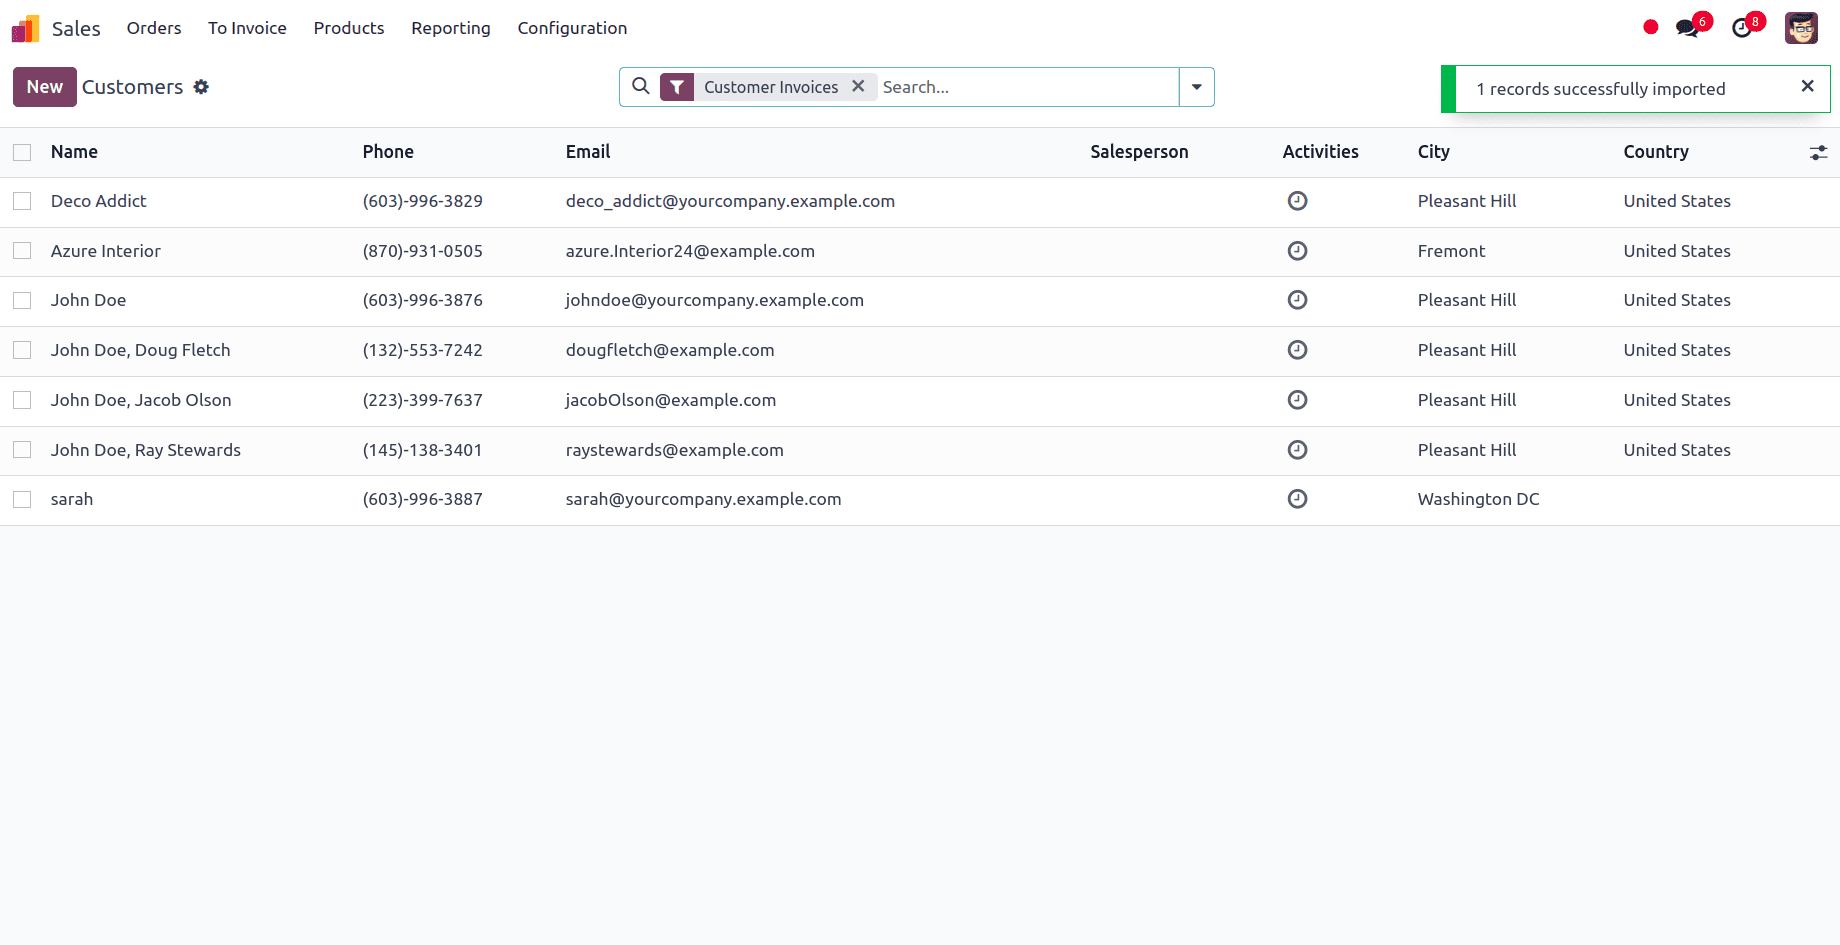
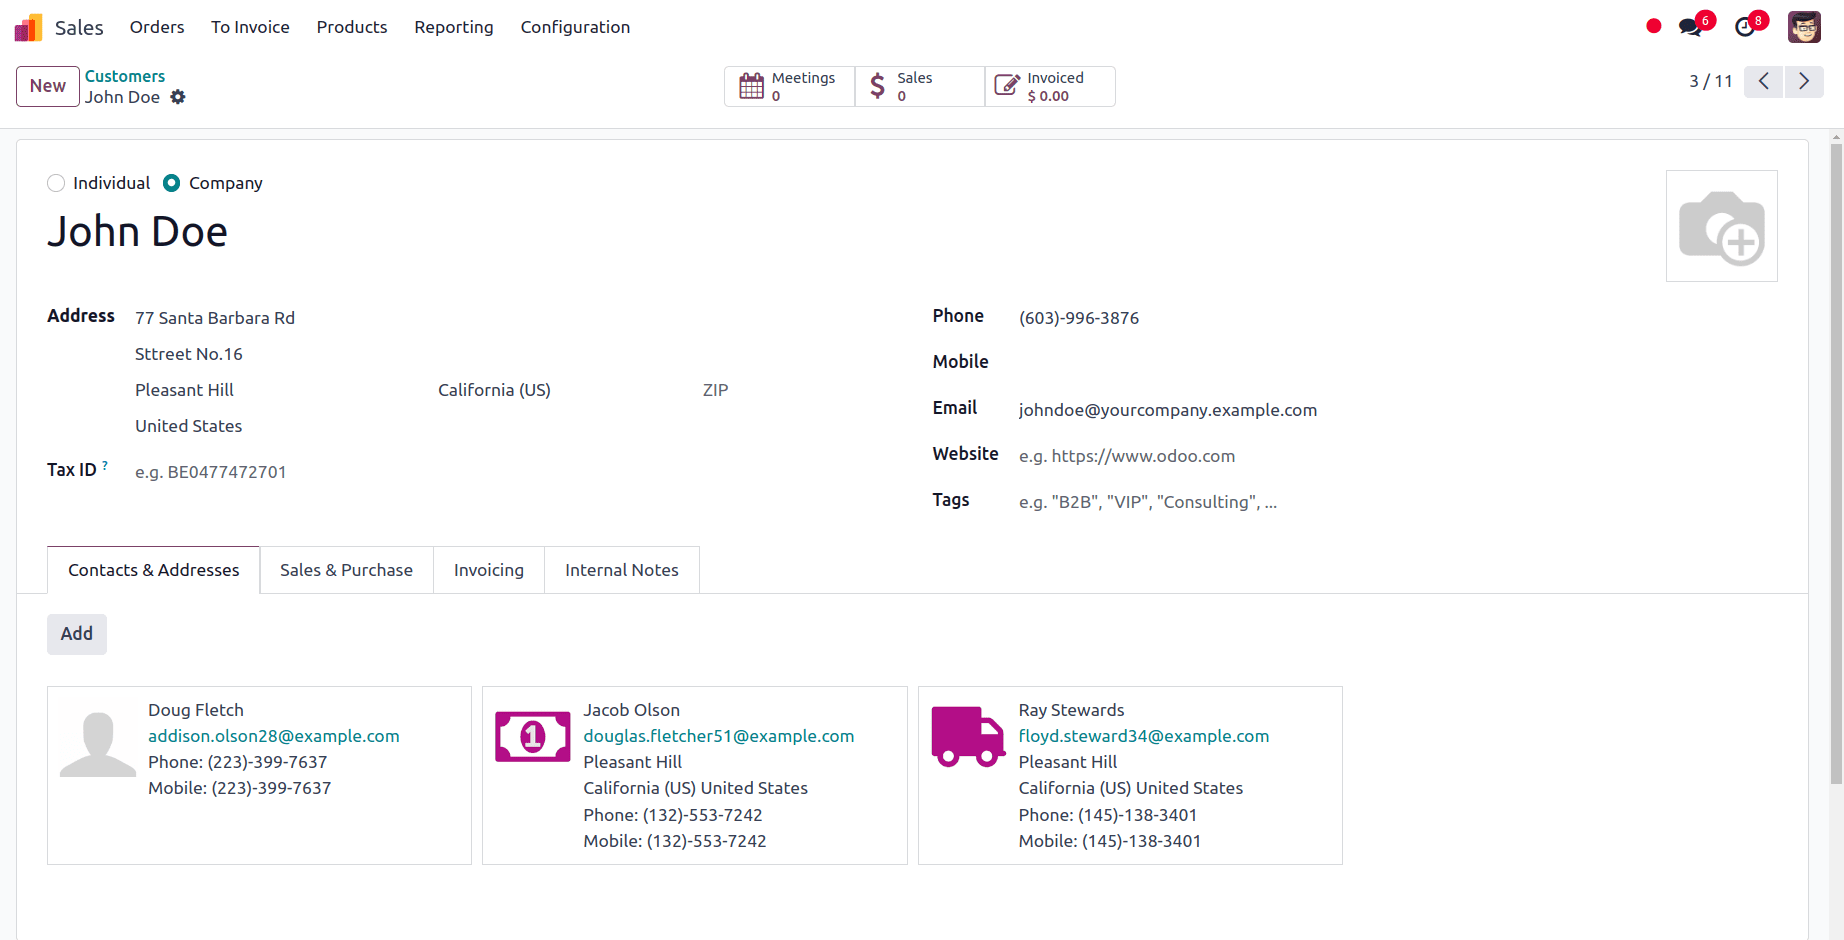
Now we will be able to view all the newly-imported customers and we can access and edit them from the customers page.
Importing Vendors in Odoo 17
To import the Vendors the vendor import template needs to be downloaded first. After downloading, we can modify and customize the template and upload it into the Odoo database.
To download the necessary import template, navigate to Purchase app ? Orders ? Vendors. On the vendor's page, you can activate the list view, select a record for exporting, and click the actions button to reveal the export option.
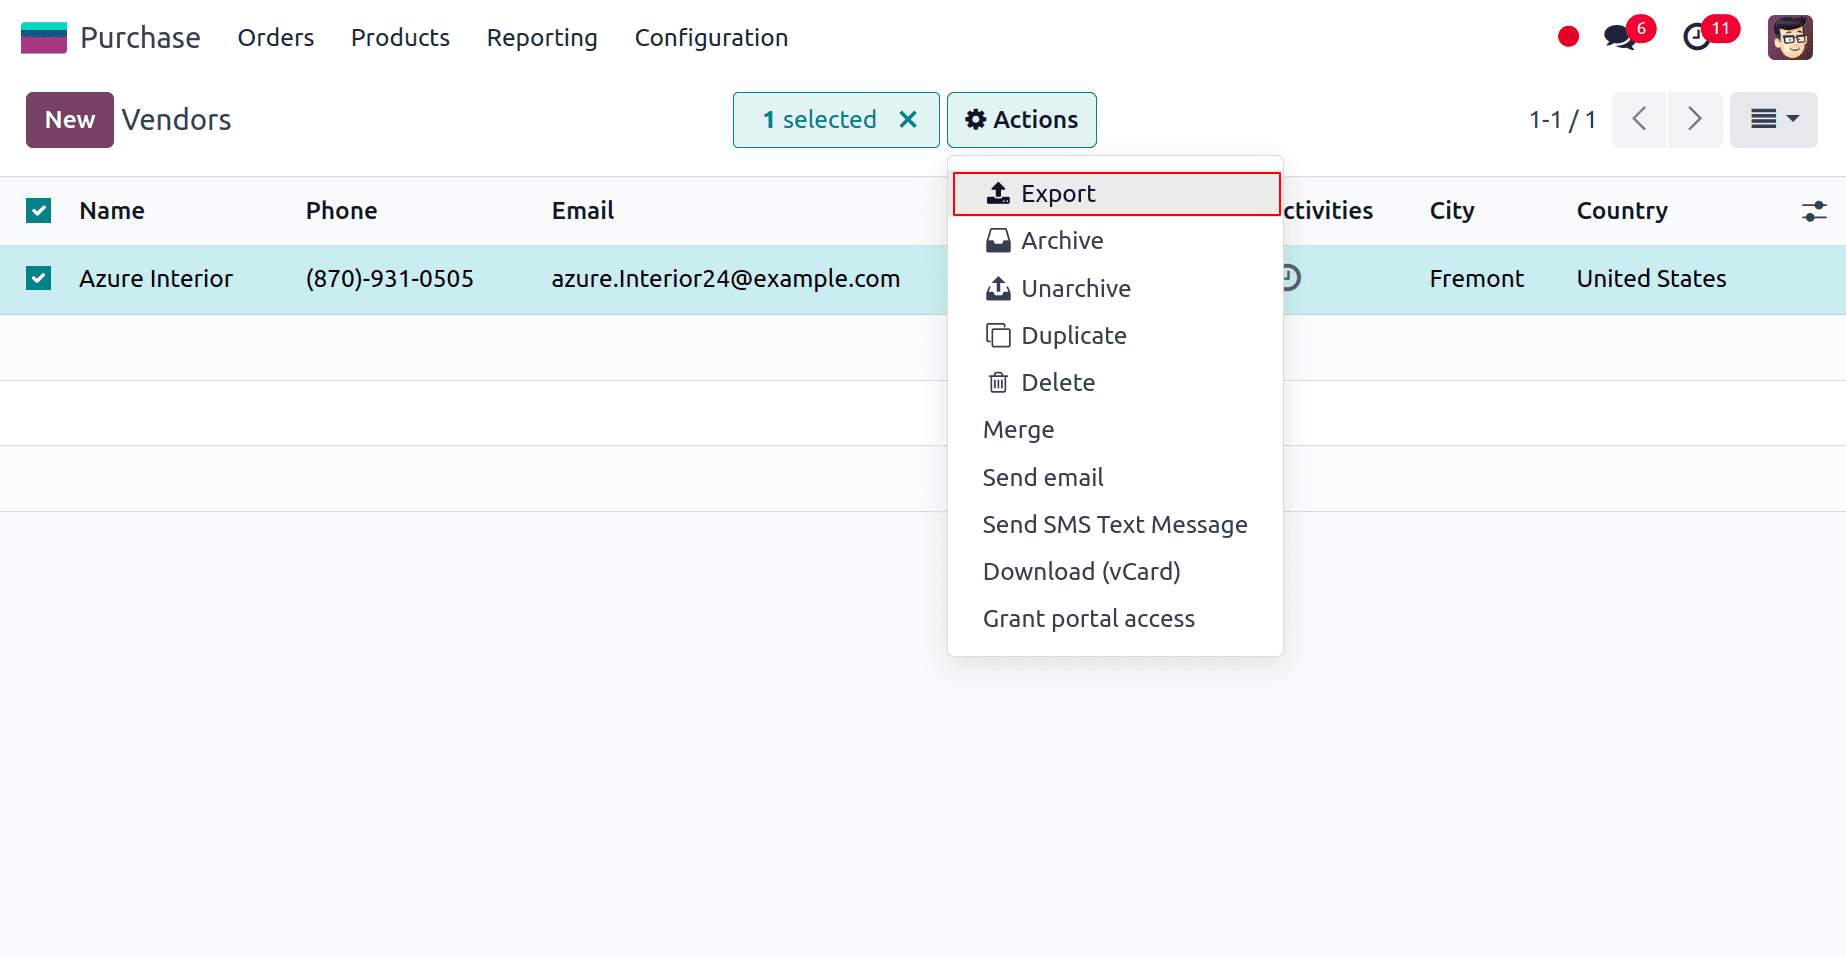
Click on Export and a new window appears with available fields on the left and fields to export on the right. From the available fields, we can add the fields which we want to export to fields to export section by clicking on the + icon. A name can be provided for the template to save the template in that name and we can use this template if we are exporting the data multiple times.
An option called, I want to update data (import-compatible export) is also available. If we check that option, the fields that can be imported are only shown. If we want to update any existing data we can add an external ID field to the file we are exporting to identify the existing data that needs to be updated and when we import the data Odoo maps the field with the unique ID provided. When the box is left unchecked, all of the fields are displayed, not only the ones that can be imported, giving you a lot more field options.
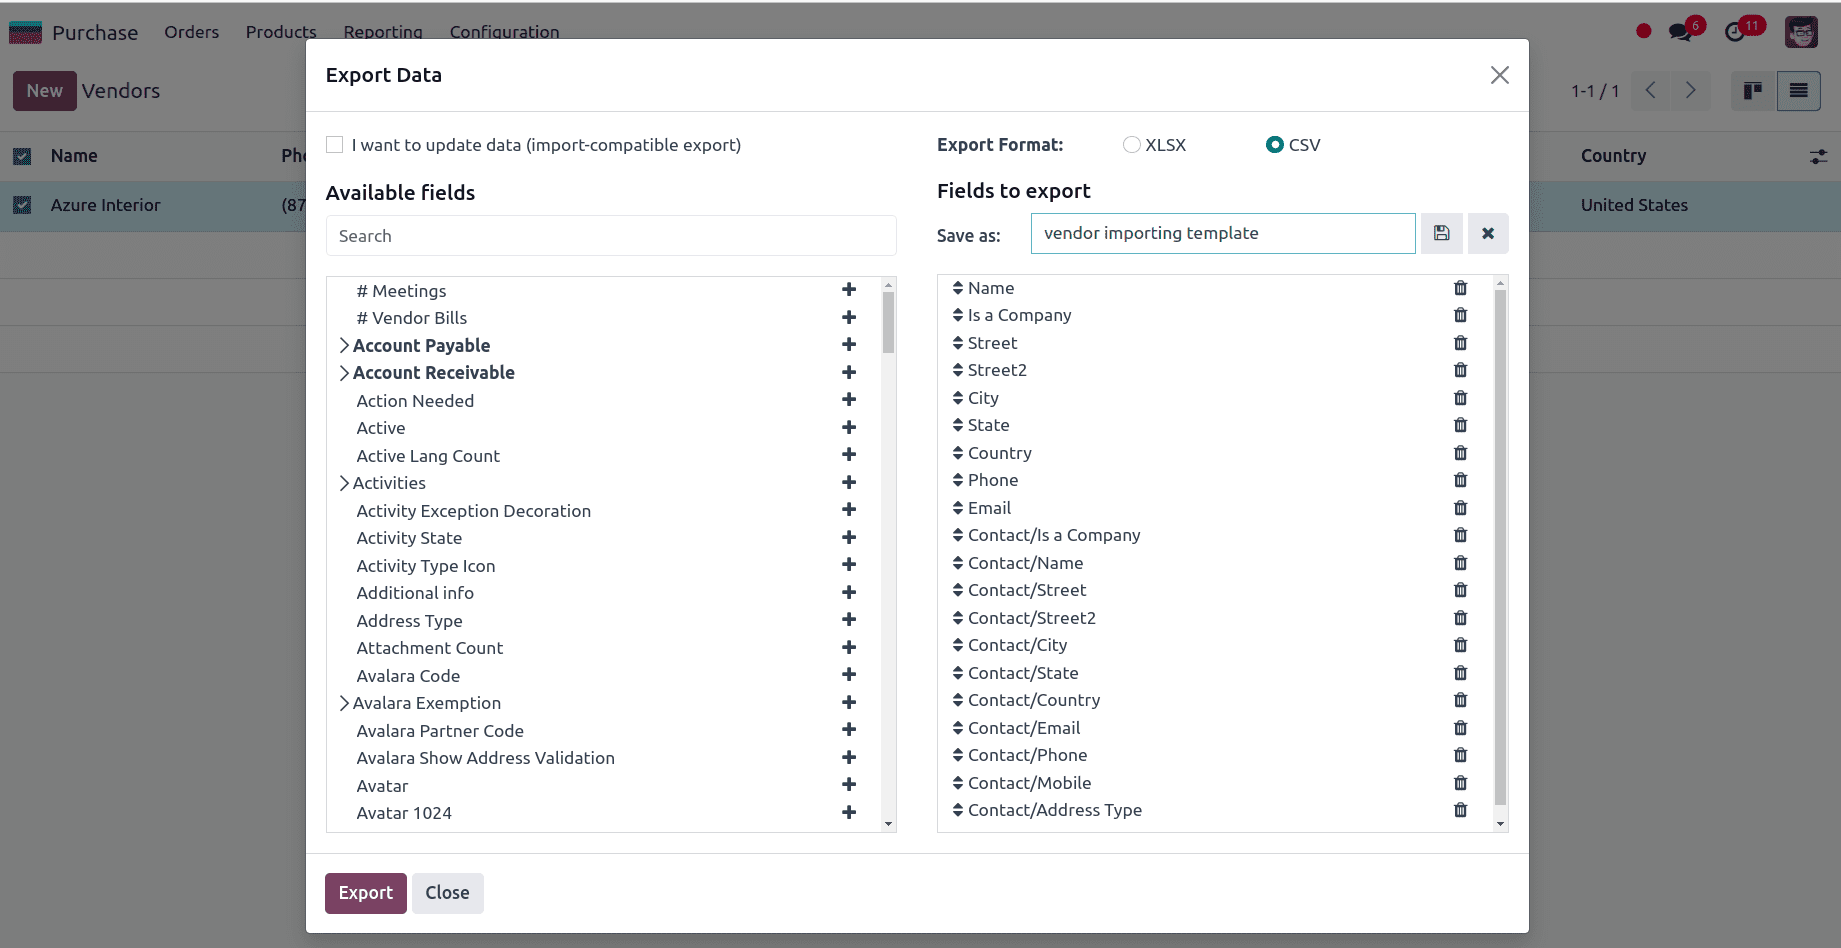
When exporting, there is the option to export in two formats: .csv and .xlsx. With .csv items are separated by a comma, while .xlsx holds information about all the worksheets in a file, including both content and formatting.
We can use the > (right arrow) icon to display more sub-field options and the search bar to find specific fields. We can also drag the fields to arrange it in the order we want in the exported file and there is a trash icon to delete unnecessary fields.
Here we are adding the following fields:
*Name: Display the name of the vendor.
*Is a company: It is a boolean field, if it is true, that is, if it is a company, we can give 1, and if it is an individual we can give 0.
*Street: Street of the vendor can be provided in this field.
*Street 2: Street 2 of the vendor can be provided in this field.
*City: We can display the City of the vendor in this field.
*State: The state of the vendor can be provided in this field.
*Country: The country of the vendor can be provided in this field.
*Phone: The contact number of the vendor can be provided in this field.
*Email: The email of the vendor can be given in this field.
Multiple contacts can be added under a vendor by adding the following fields:
*Contact/Is a company: It is a boolean field, if it is true, that is if it is a company we can give 1, and if it is an individual we can give 0.
*Contact/Name: Display the Name of the contact.
*Contact/Street: Display the Street of the contact.
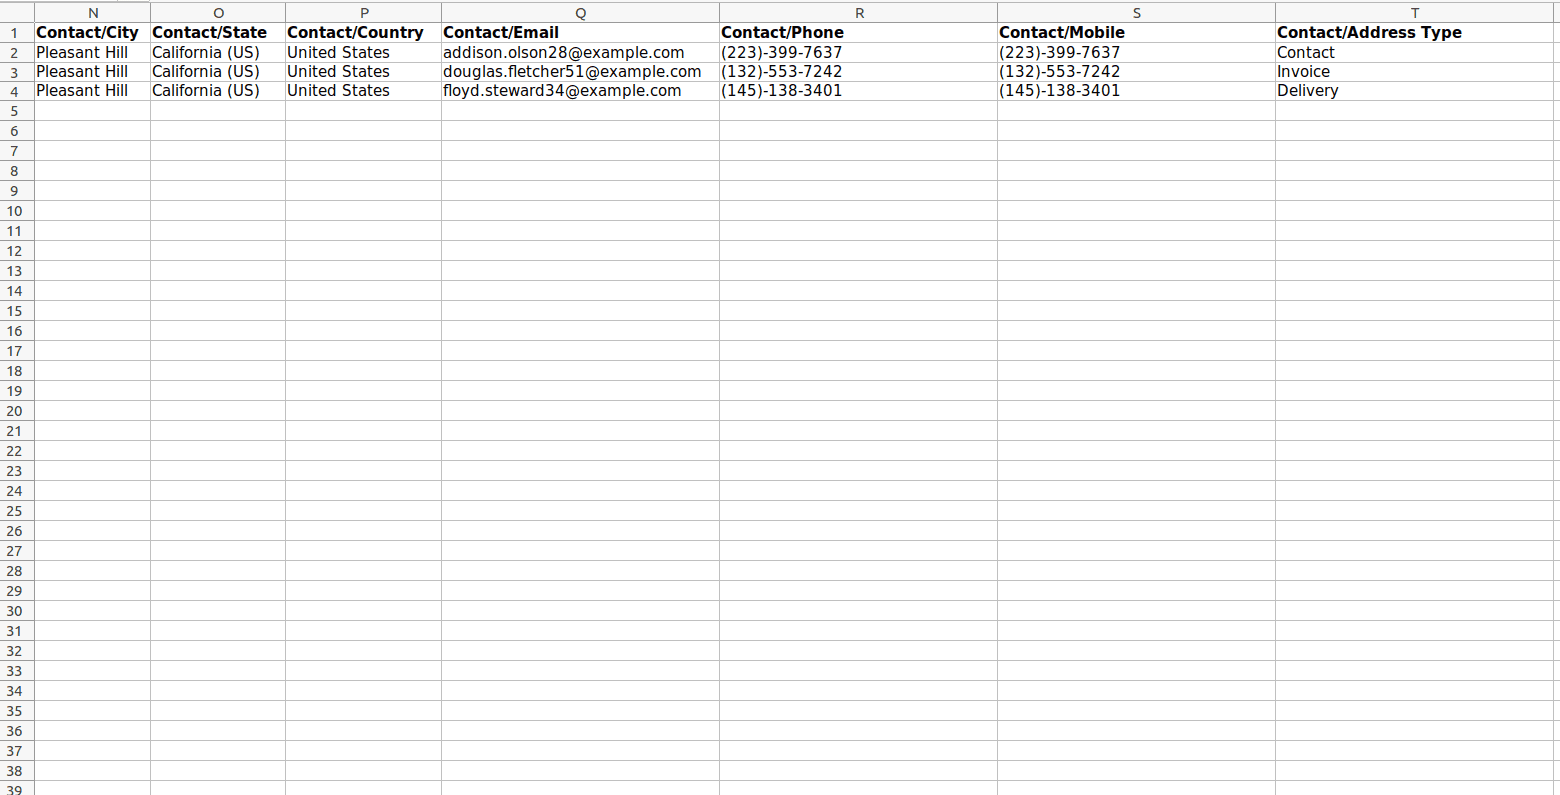
*Contact/Street 2: Display the Street 2 of the contact.
*Contact/City: Display the City can be.
*Contact/State: Display the State of the contact.
*Contact/Country: Display the Country of the contact.
*Contact/Phone: Here we can provide the Contact number of the contact.
*Contact/Mobile: Here we can provide the Contact number of the contact.
*Contact/Email: The email of the contact can be provided in this field.
*Contact/Address Type: We can give whether the added contact is a contact, invoice address, delivery address, or other address in this field.

After adding all the fields to export we can click on the export button to export the template. And customize the template according to the need.
After updating the vendor template spreadsheet we can go back to the vendor's page and click on the gear icon ?? at the upper left corner and select import records.
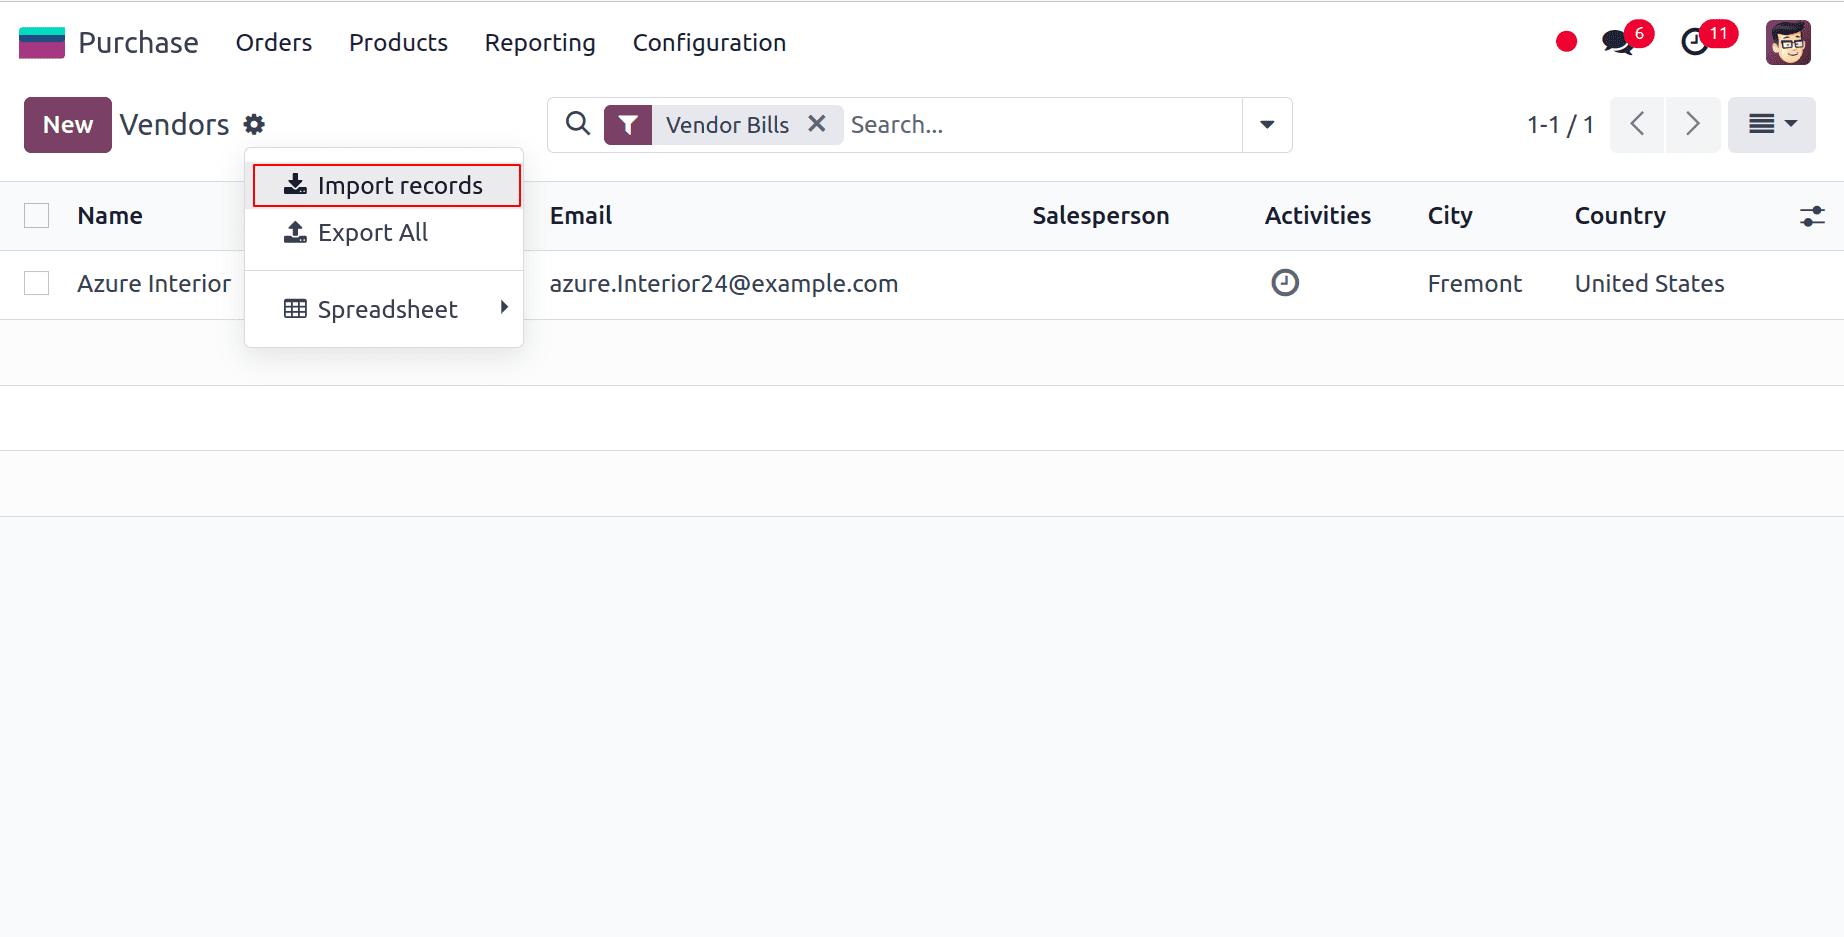
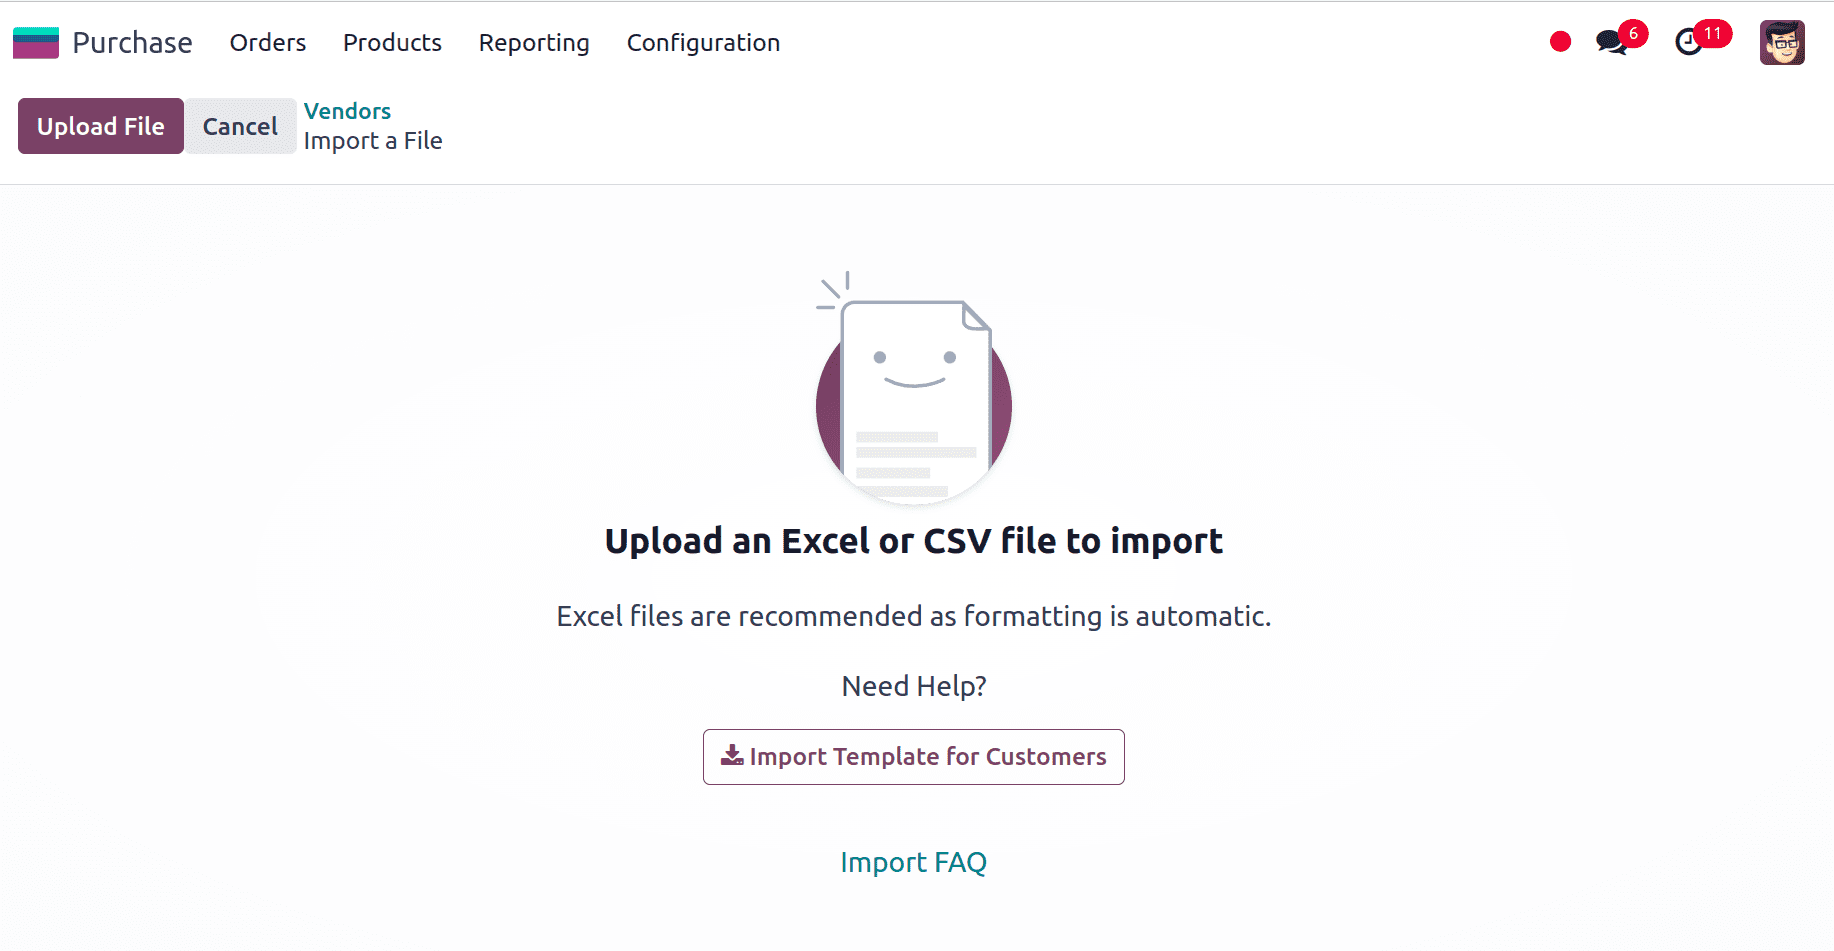
At the top left we have an option to upload the file from our system.
After uploading the file, a page showcasing all the elements of the newly configured vendor template spreadsheet, separated by File Column, Odoo Field, and Comments appears.
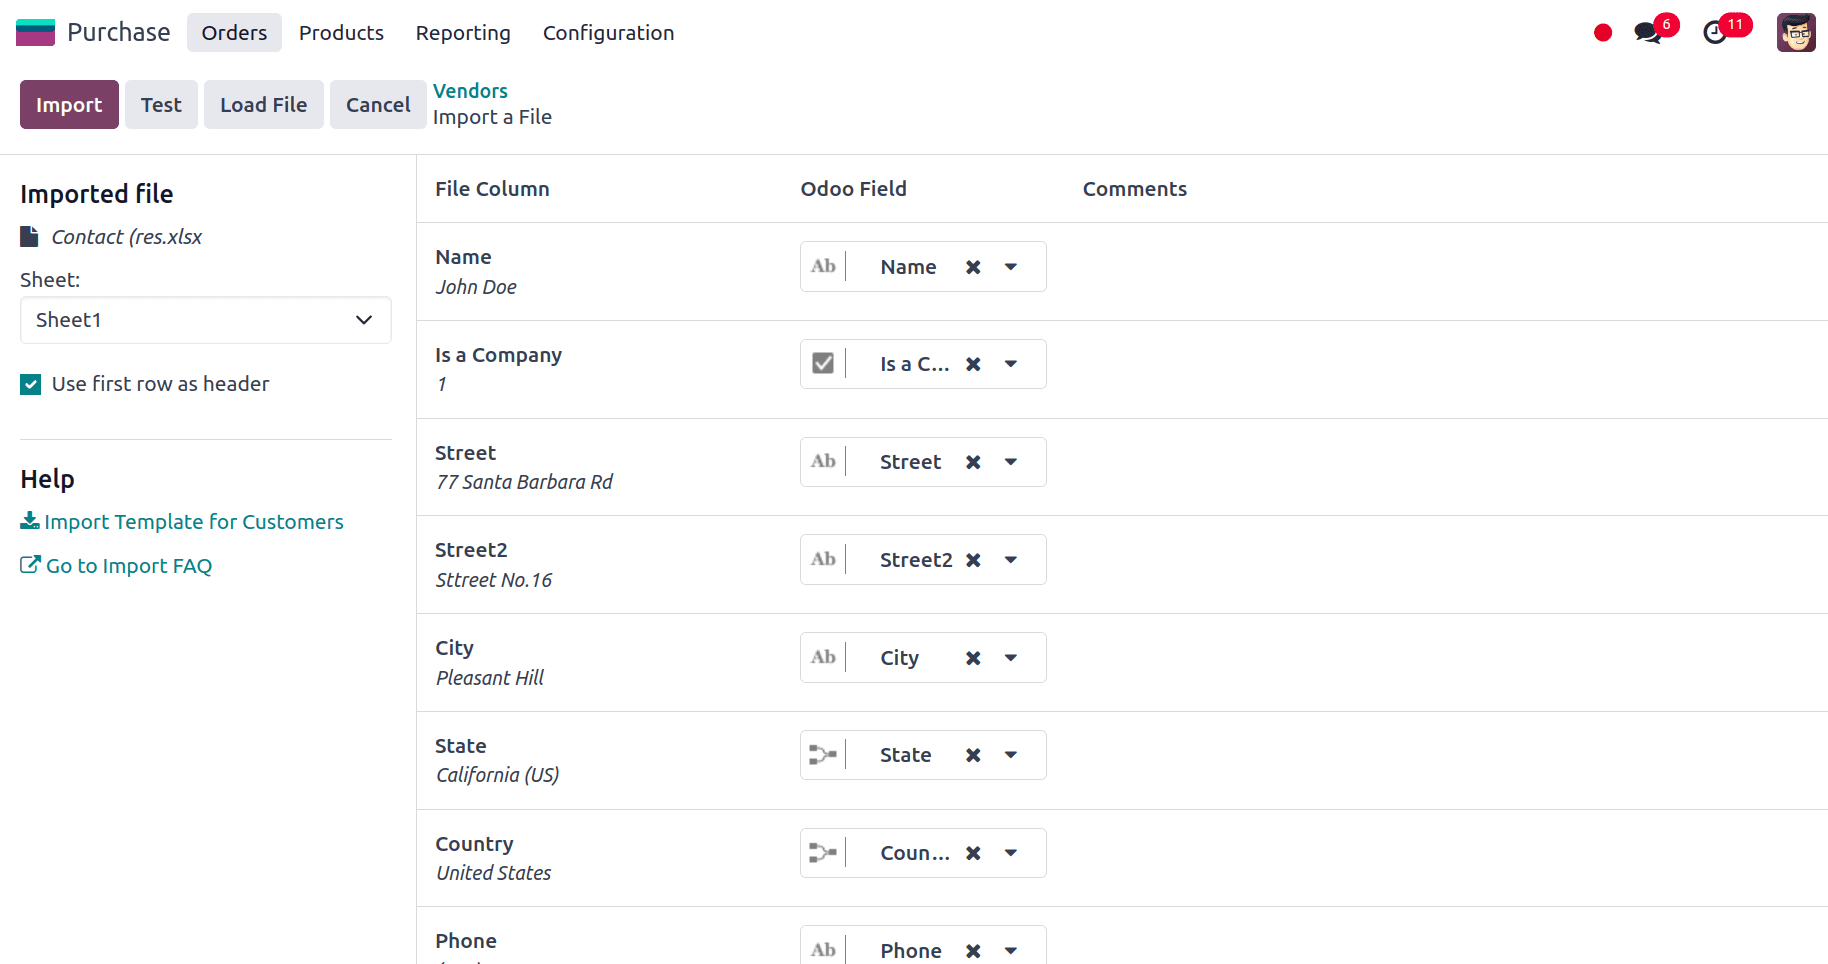
From here, we can manually assign the file column to an Odoo Field, if necessary.
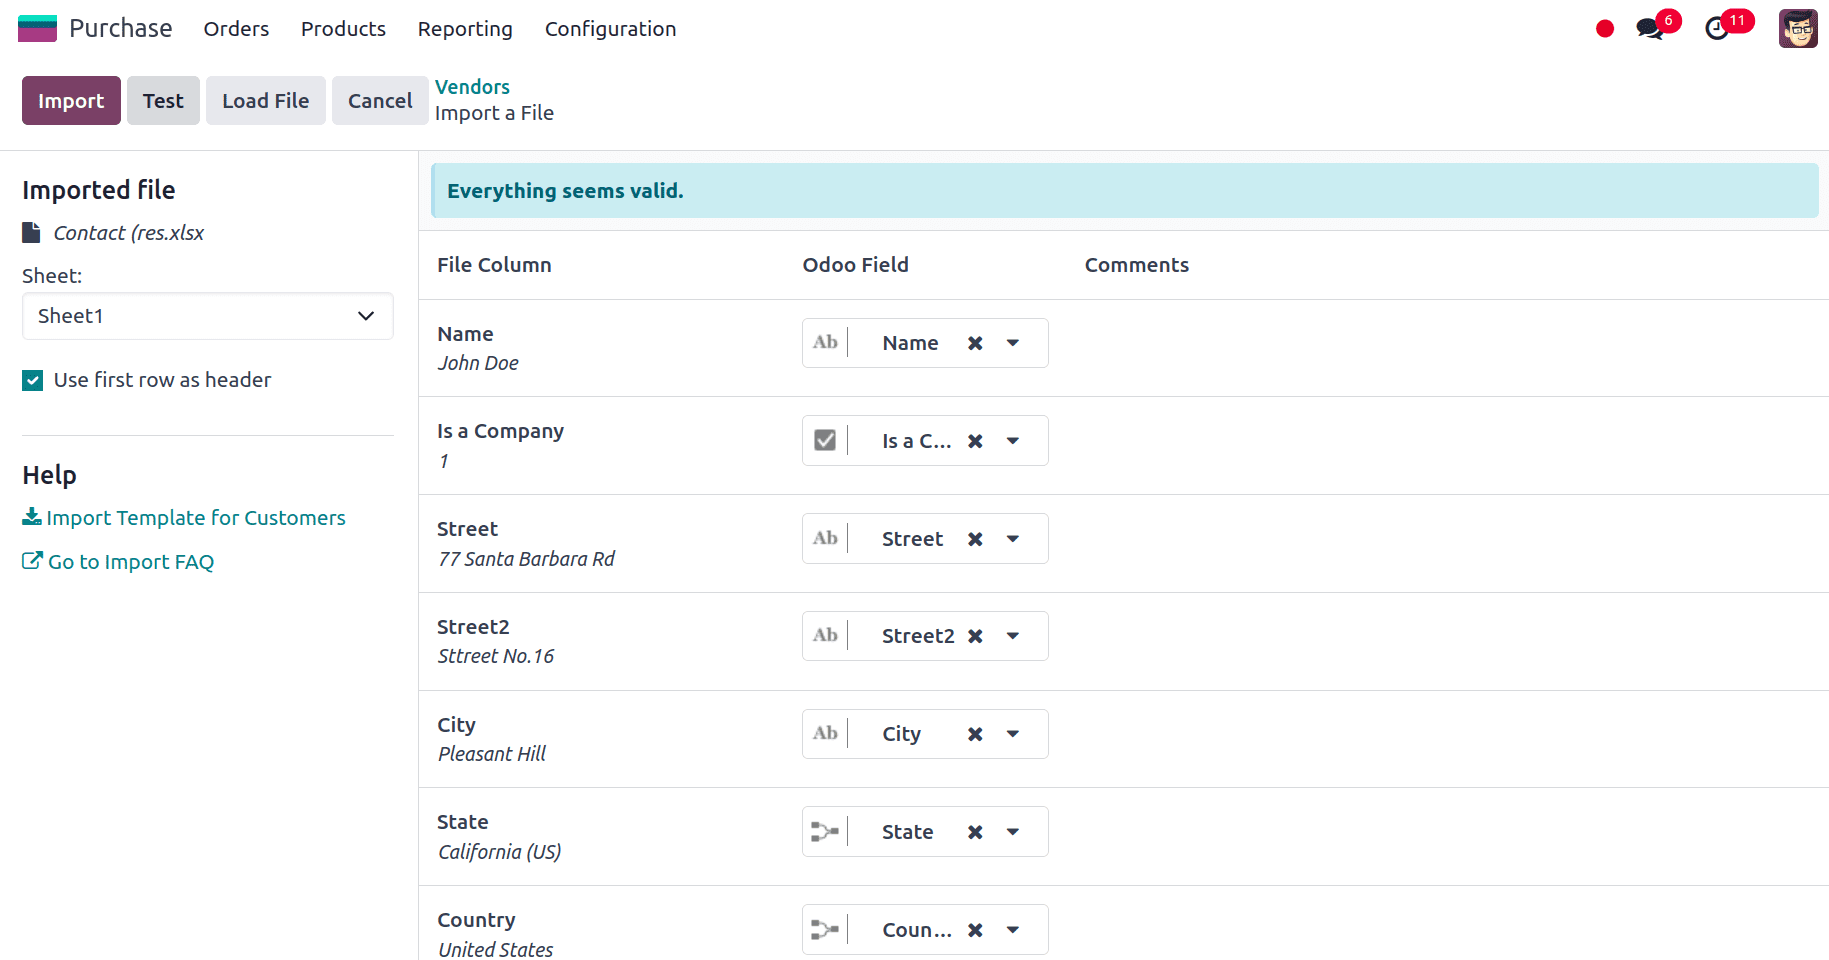
We can click on the test button in the upper-left corner to check whether everything is appropriate, and if all the columns and fields are lined up accurately.
Odoo notifies the user that everything seems legitimate at the top of the page with a blue banner if everything is applied successfully.
If there are any mistakes, a red banner with information on where to find the individual problems and how to repair them appears at the top of the page.
Once all the errors are fixed we can click on the test button and then on the Import button to import the records. When the records are imported a pop-up message in the upper-right corner appears which informs the user how many vendors were successfully imported.
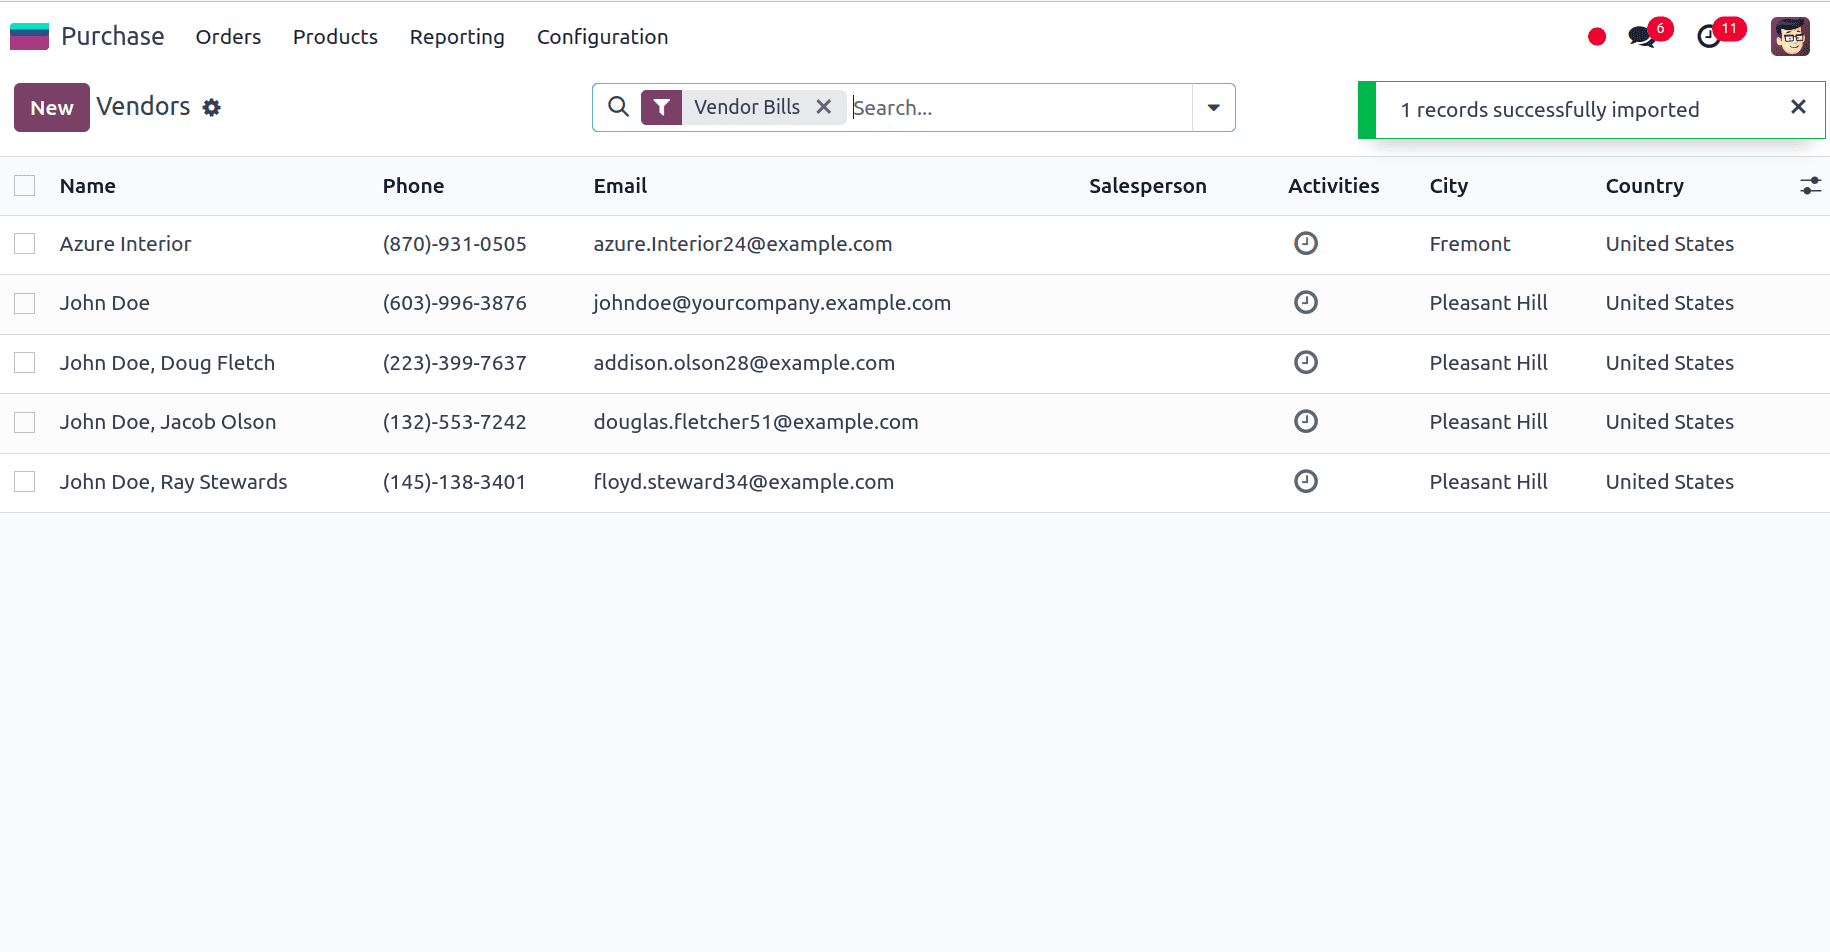
Now we will be able to view all the newly-imported vendors and we can access and edit them from the vendors page. Now we will be able to view all the newly-imported vendors and we can access and edit them from the vendors page.
Importing Customers and Vendors from the Contact Module in Odoo 17
We can import Customers and Vendors from the Contact Module as well in Odoo 17. For that navigate to Contacts app ? Contacts. On the Contacts page, you can activate the list view select a record for exporting, and click the actions button to reveal the export option.
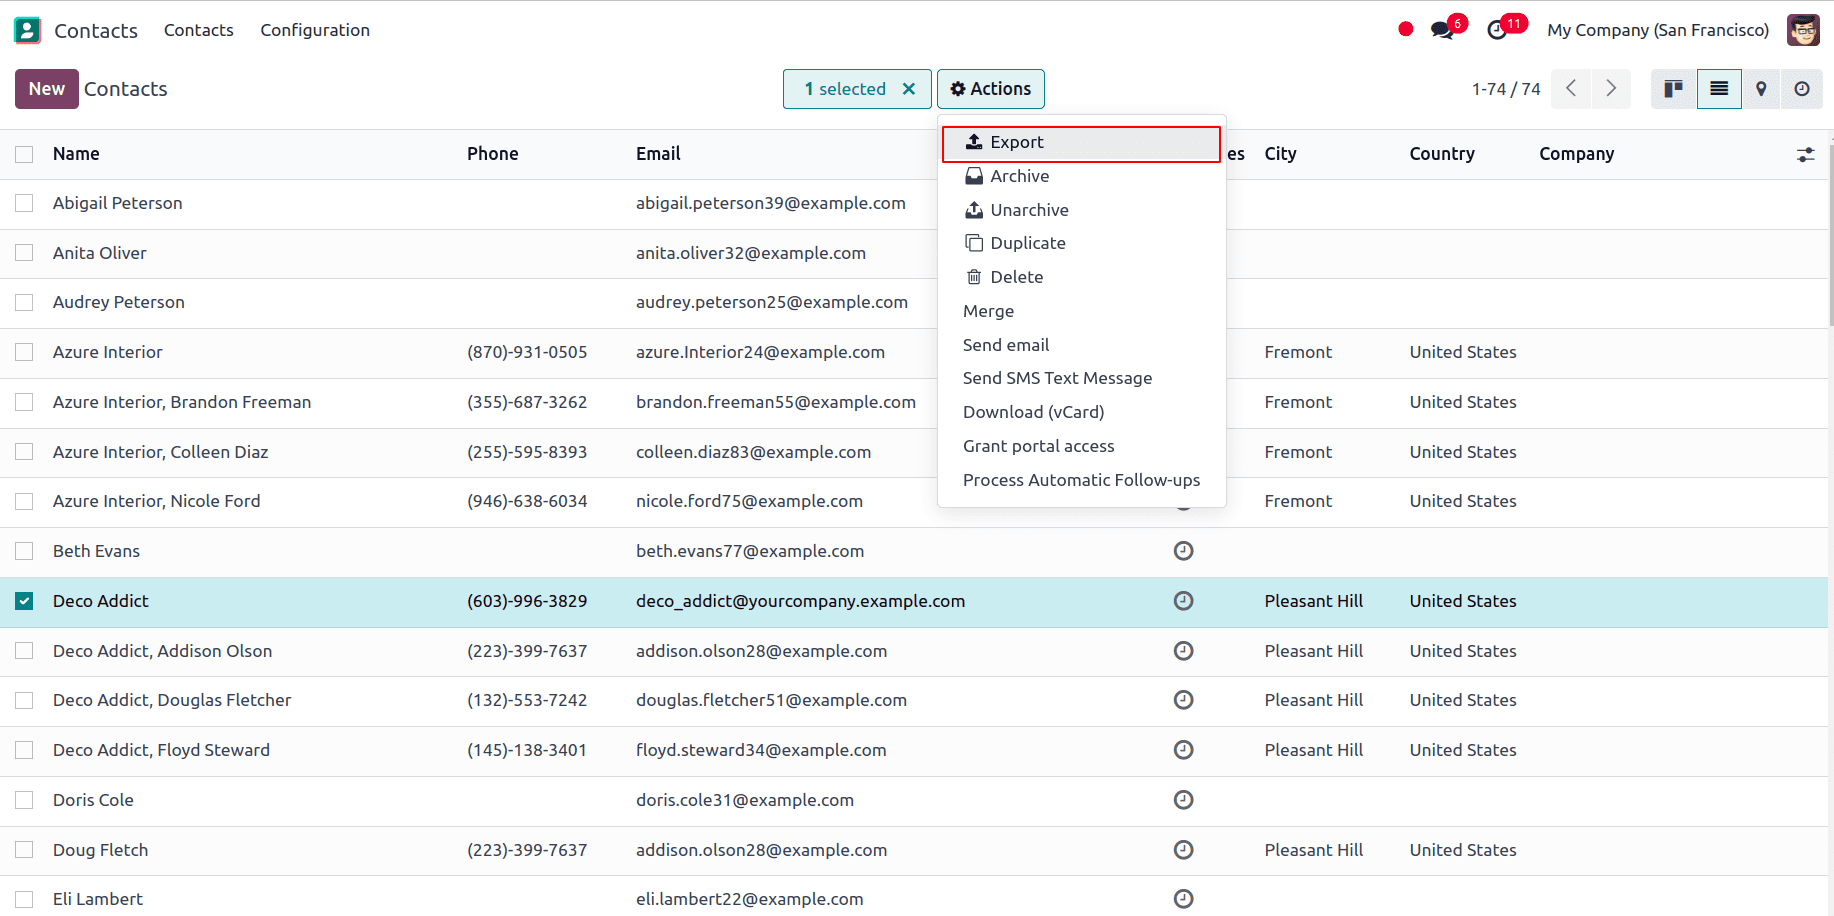
Click on Export and a new window appears with available fields on the left and fields to export on the right. In the available fields, we have all the fields that can be added to the template we are exporting. From the available fields section, we can add the fields we want to export to the ‘fields to export’ section by clicking the + icon. A name can be provided for the template to save the template in that name and we can use this template if we are exporting the data multiple times.

An option called, I want to update data (import-compatible export) is also available. If we check that option, the fields that can be imported are only shown. If we want to update any existing data we can add an external ID field to the file we are exporting to identify the existing data that needs to be updated and when we import the data odoo maps the field with the unique id provided. When the box is left unchecked, all of the fields are displayed, not only the ones that can be imported, giving you a lot more field options.
When exporting, there is the option to export in two formats: .csv and .xlsx. With .csv items are separated by a comma, while .xlsx holds information about all the worksheets in a file, including both content and formatting. We can use the > (right arrow) icon to display more sub-field options and the search bar to find specific fields. We can also drag the fields to arrange them in the order we want in the exported file and trash icon to delete unnecessary fields.
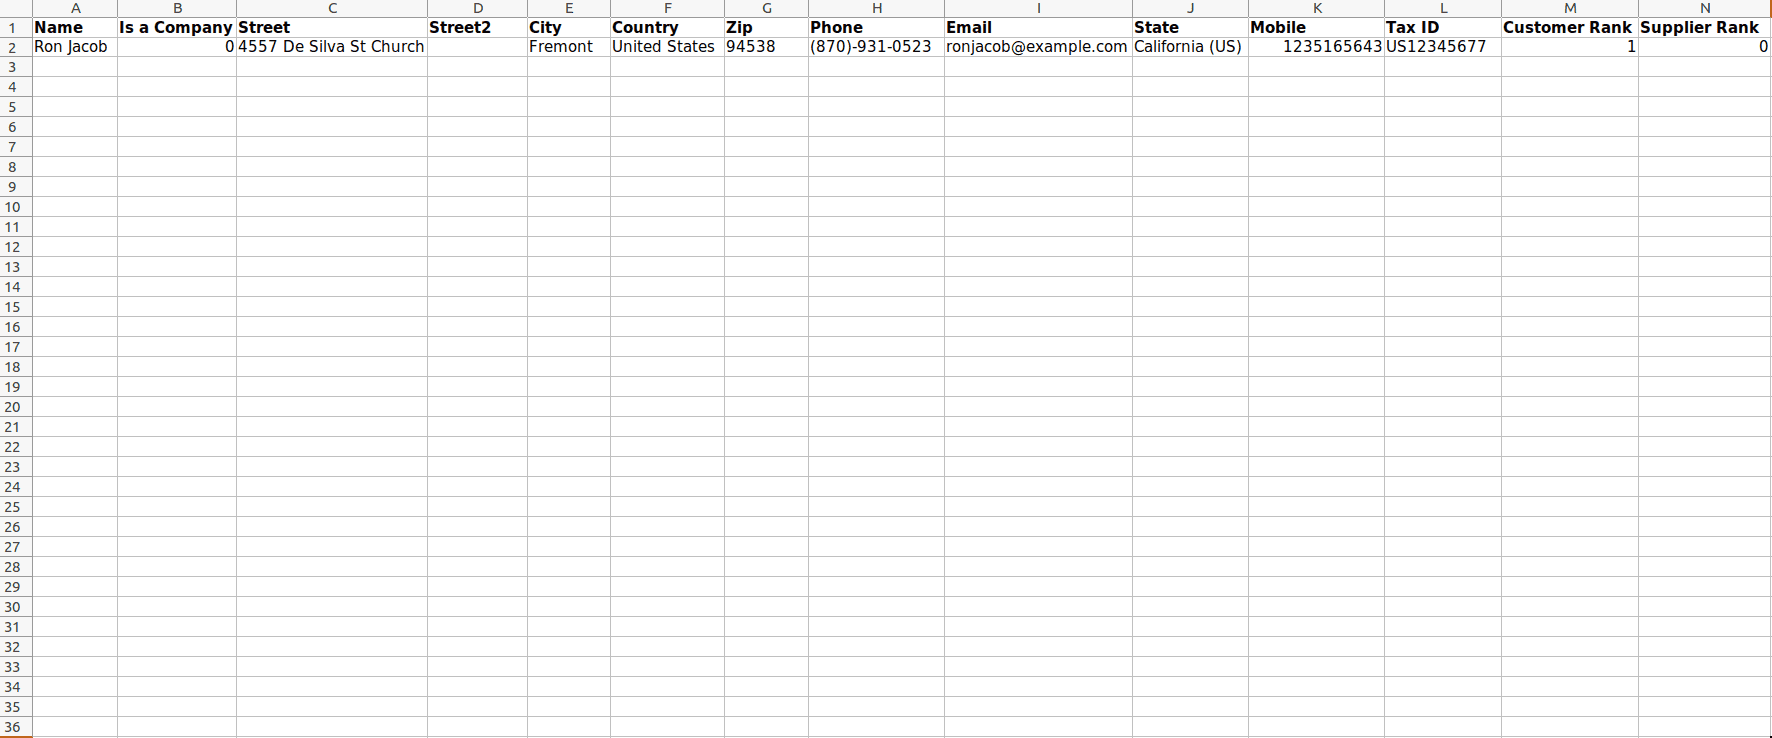
Here we are adding the following fields:
*Name: Display the name of the contact.
*Is a company: It is a boolean field, if it is true, that is, if it is a company, we can give 1, and if it is an individual we can give 0.
*Street: A Street of contact can be provided in this field.
*Street 2: Street 2 of the contact can be provided in this field.
*City: We can display the City of the contact in this field.
*State: State of the contact can be provided in this field.
*Country: The country of the contact can be provided in this field.
*ZIP: The zip of the contact can be given under this field
*Phone: The contact number of the contact can be provided in this field.
*Mobile: The mobile number of the contact can be provided in this field.
*Email: The email of the contact can be given in this field.
*Tax id: Tax id of the contact can be given under this field.
*Customer rank: We can give the customer rank as 1 if the contact we are importing is a customer.
*Supplier rank: We can give the supplier rank as 1 if the contact we are importing is a supplier.
After adding all the fields to export we can click on the export button to export the template. And update the template according to the need.
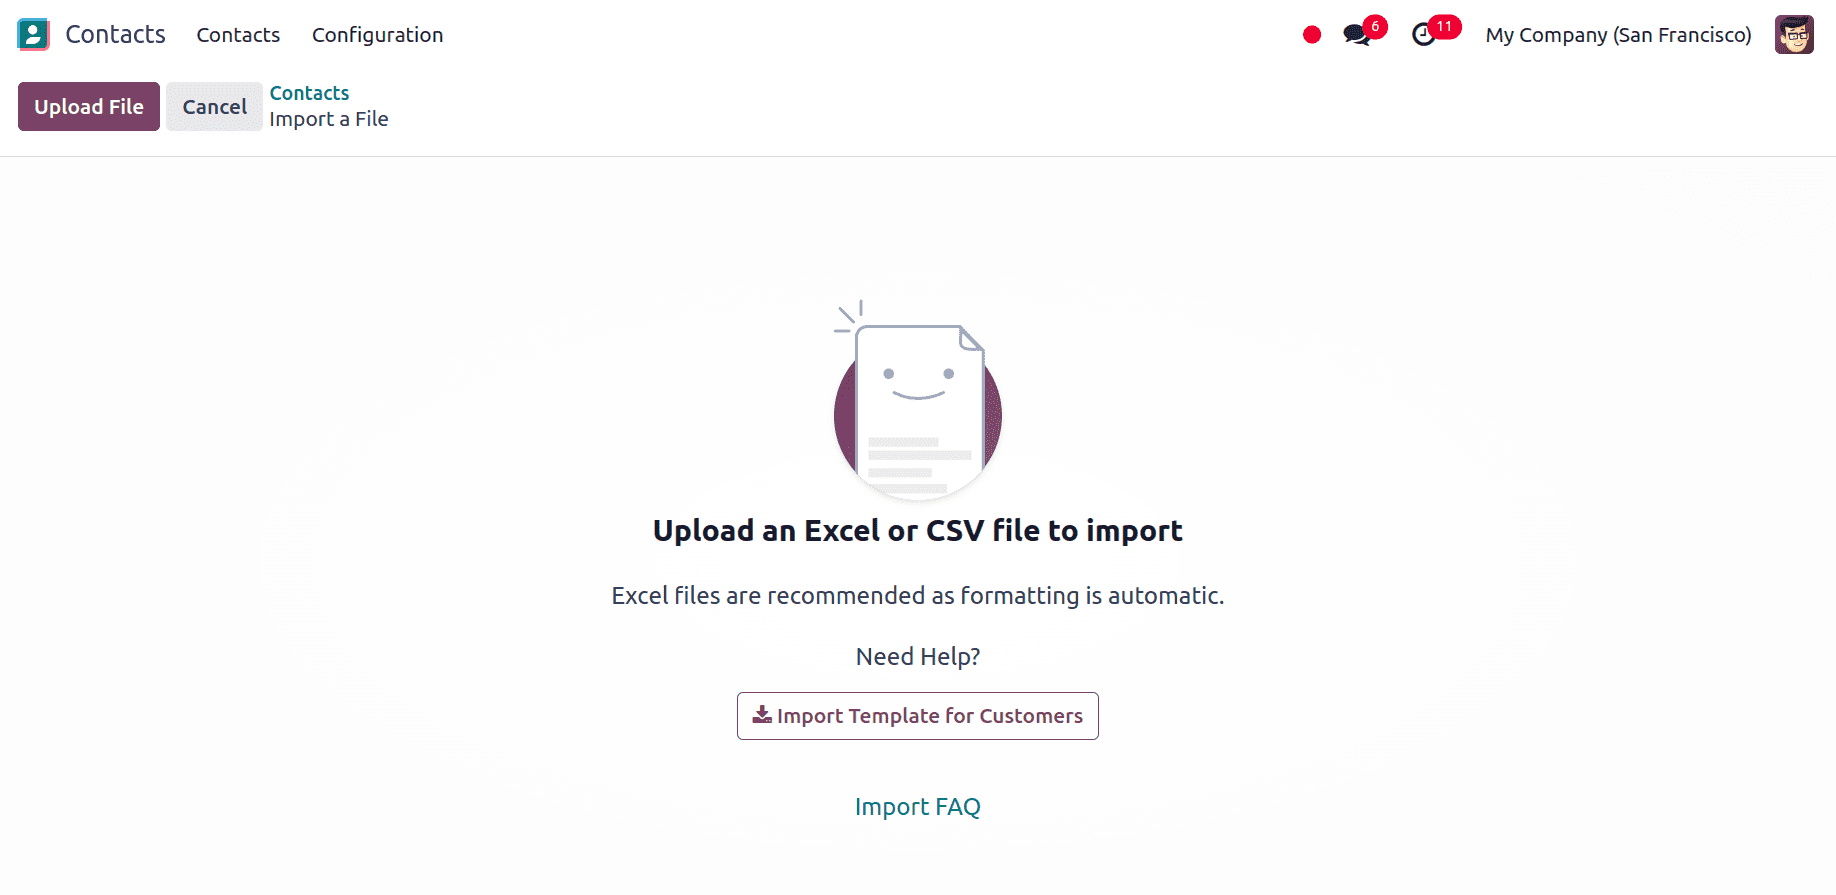
After updating the contact template spreadsheet we can go back to the contacts page, click on the gear icon ?? at the upper left corner of the contact page, and select import records.
At the top left we have an option to upload the file from our system.
A page displaying every component of the newly updated contacts template spreadsheet—separated by File Column, Odoo Field, and Comments—appears upon file upload.
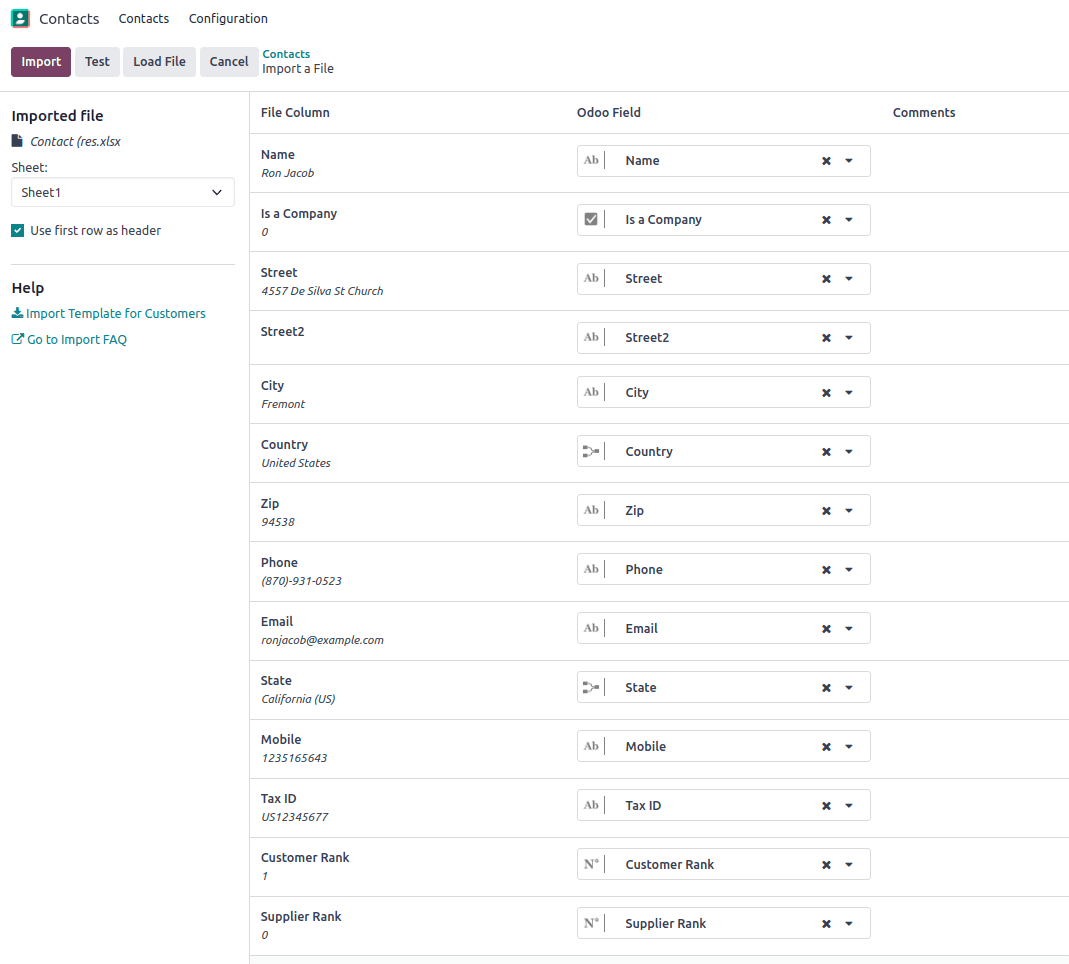
At this point, if required, the File Column can be manually allocated to an Odoo Field.
We can click on the Test button in the upper-left corner to check whether everything is appropriate, and if all the columns and fields are lined up accurately.
Odoo notifies the user that everything seems valid at the top of the page with a blue banner if everything is applied successfully.

If there are any mistakes, Odoo indicates them with a red banner at the top of the page that provides details on where to find each problem and how to resolve it.
Once all the errors are fixed we can click on the test button and then on the Import button to import the records. When the records are imported a pop-up message in the upper-right corner appears which informs the user how many contacts were successfully imported.
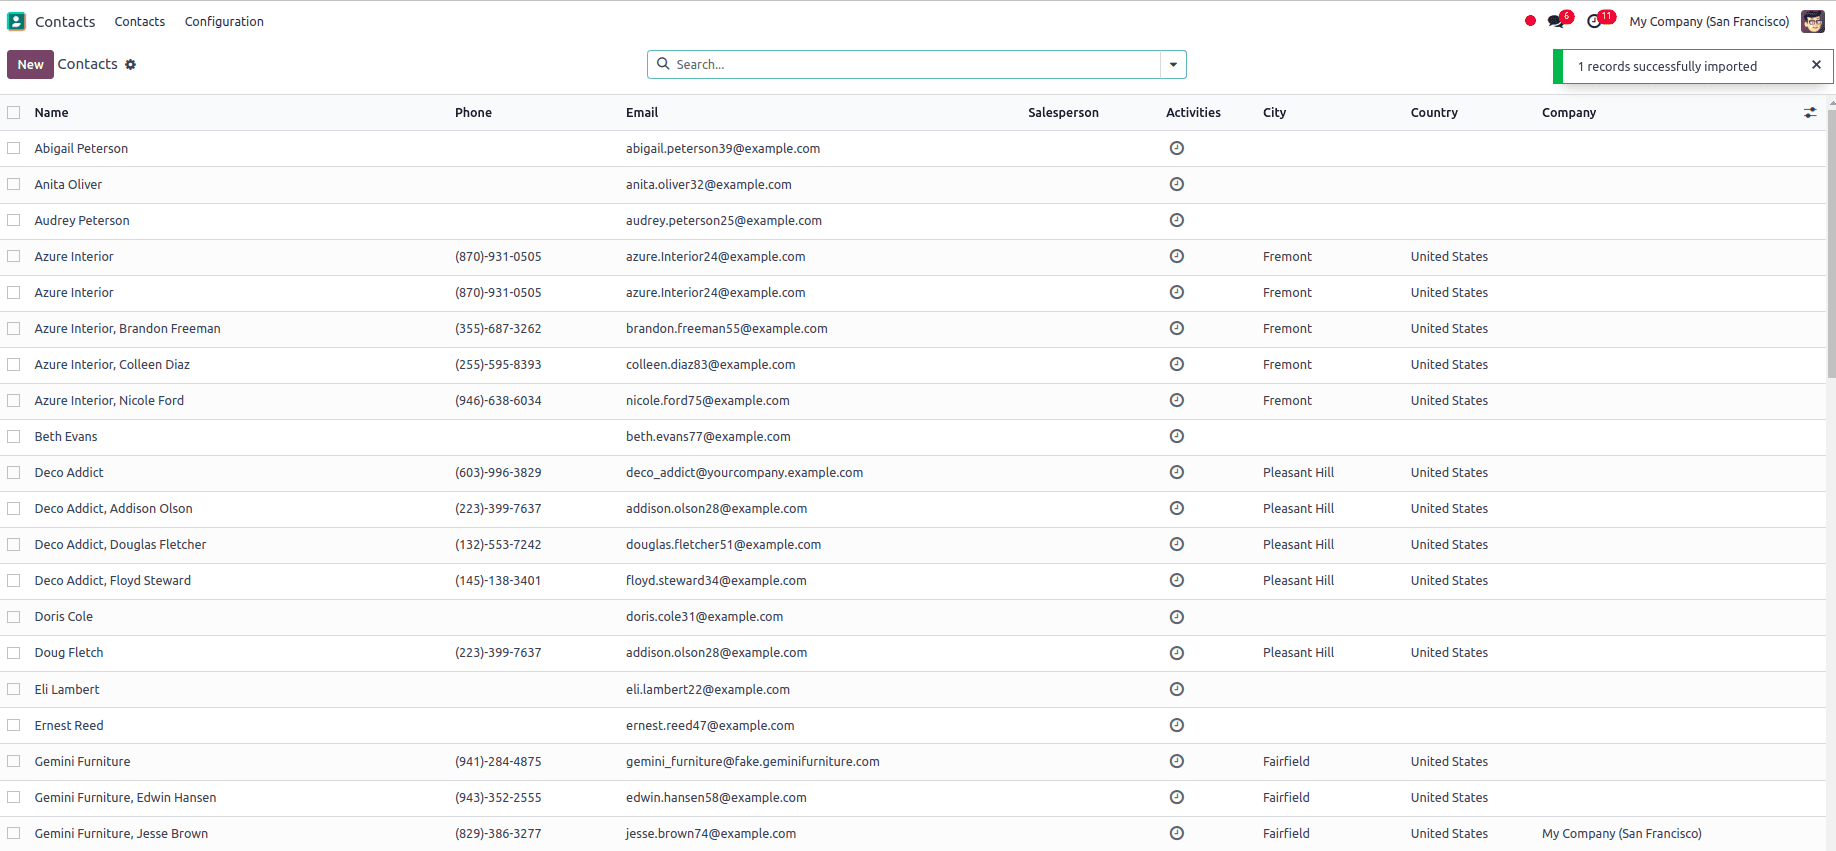
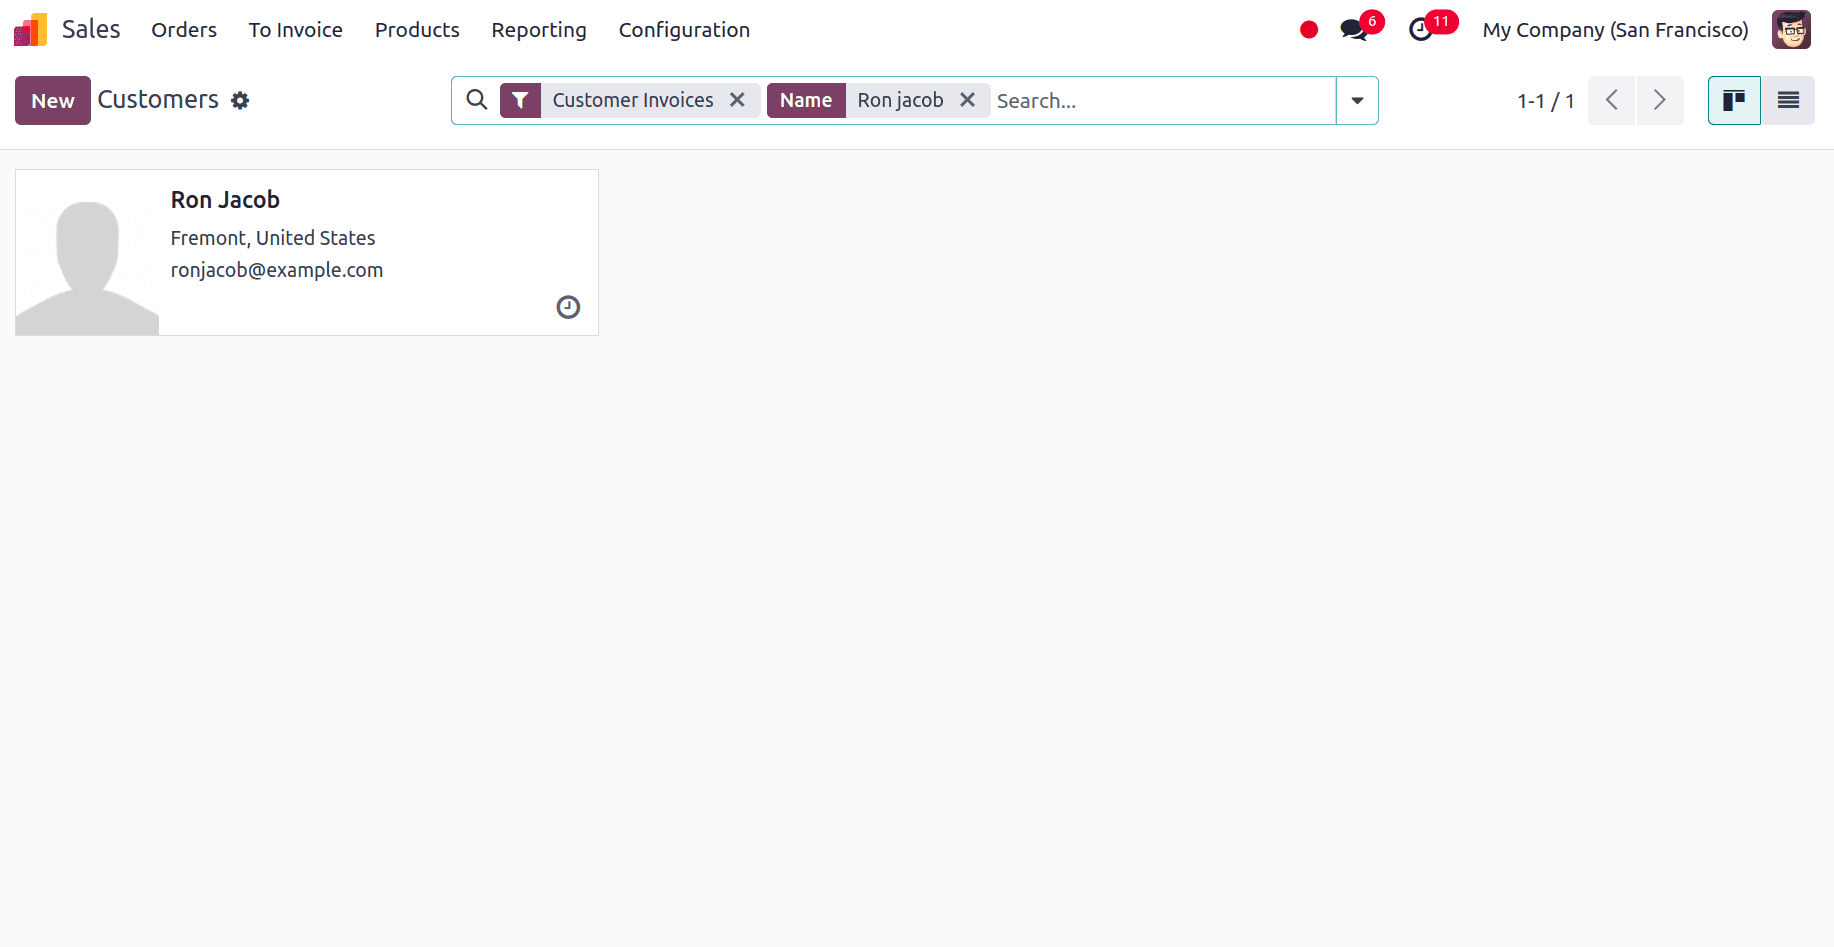
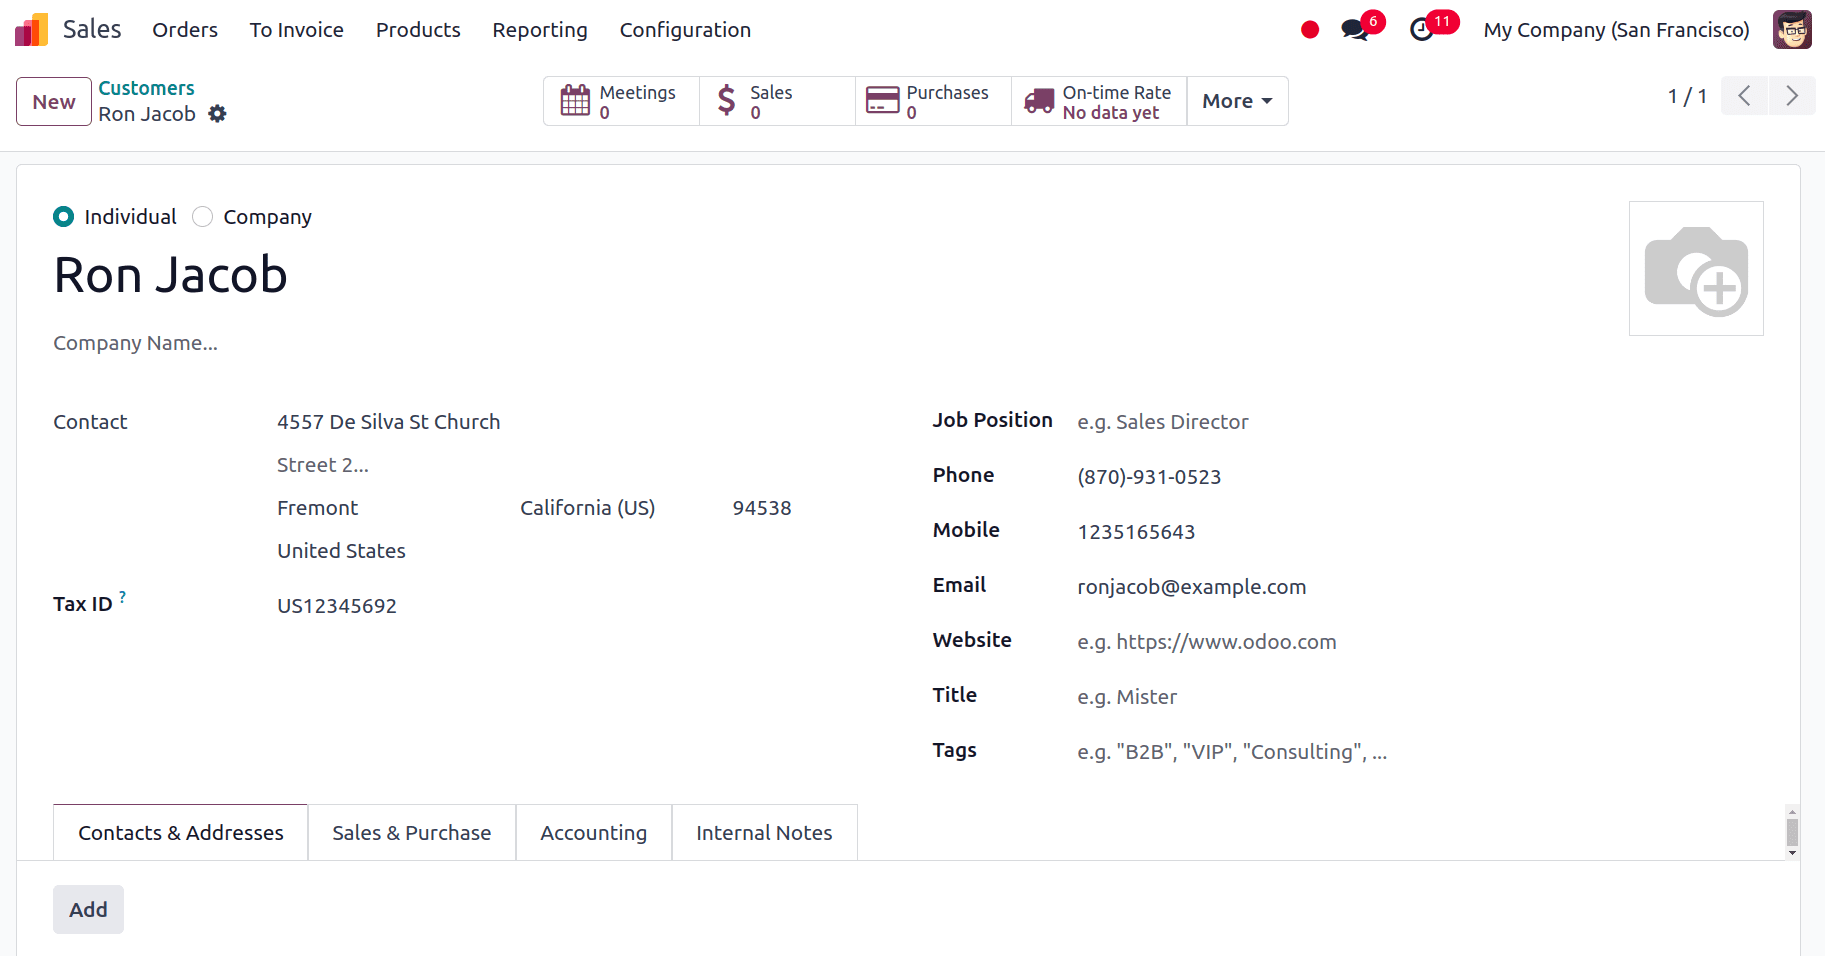
Since we have given the customer rank as 1 and supplier rank as 0, the newly created contact is considered a customer by Odoo and we will be able to view the newly-imported customer and we can access and edit them from the customers page.
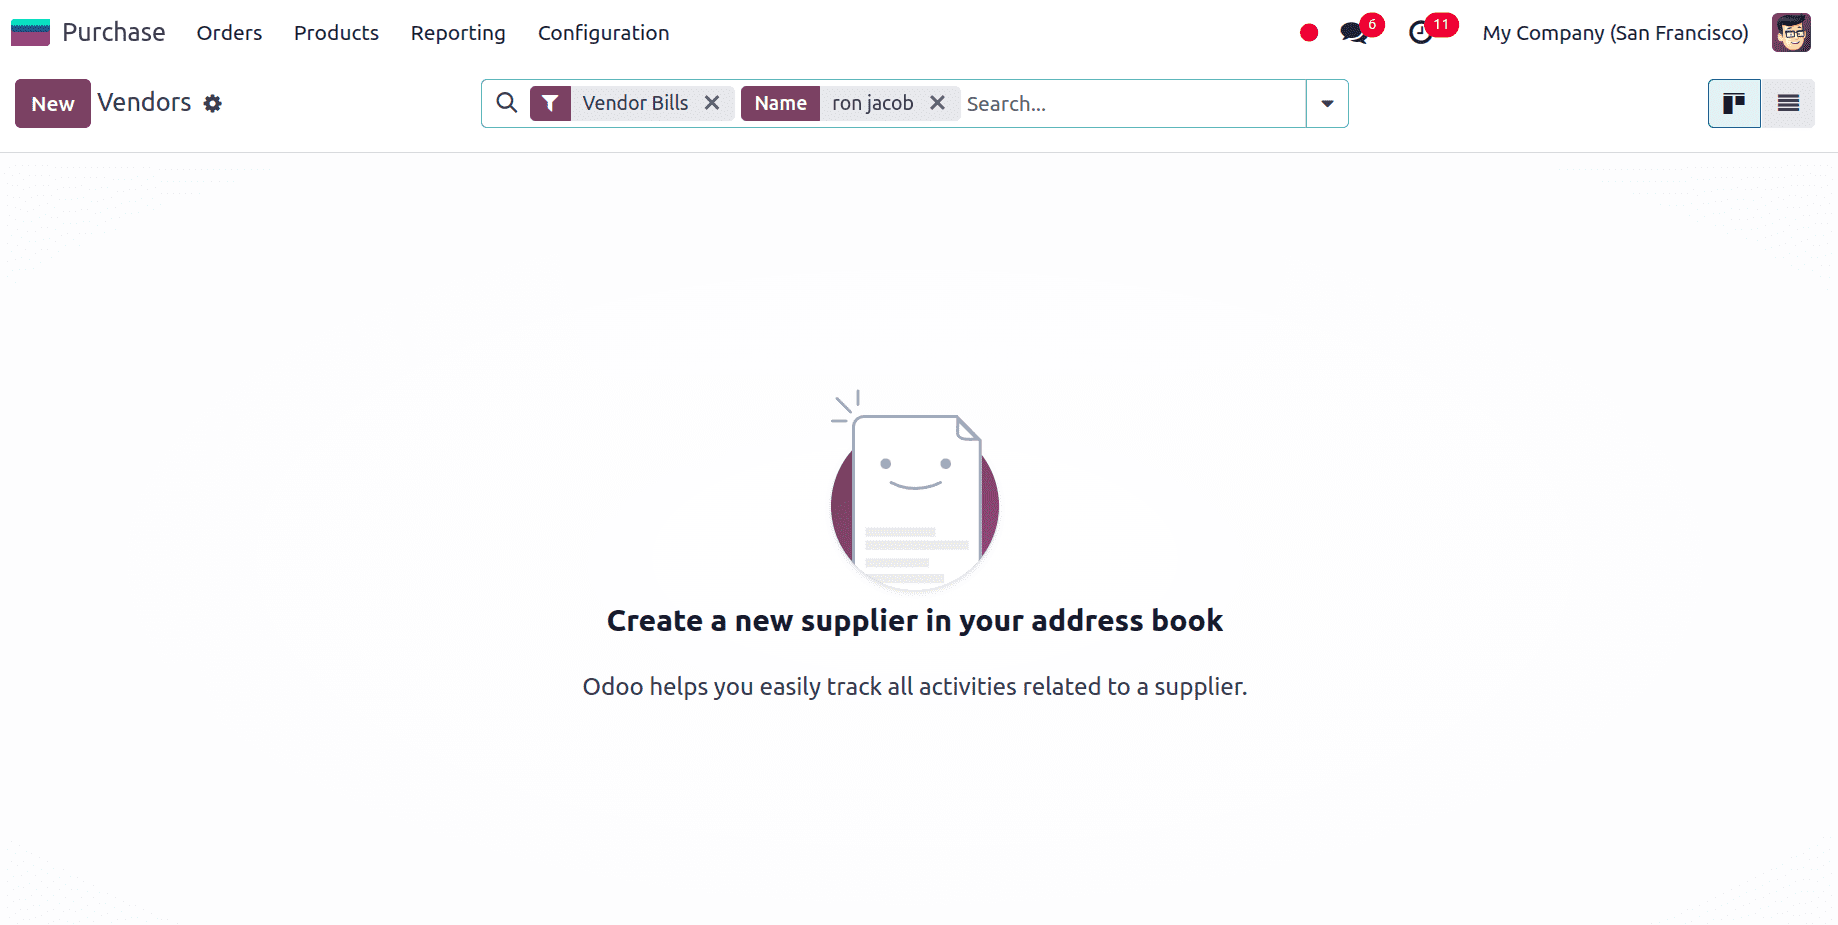
We can see in the below screenshot that the newly created contact is not accessible from the Vendors page since we have given the supplier rank as 0.
So we have seen the importing of customers and vendors inodoo 17. Rather than manually importing bulk data into the Odoo database we can import the data all at once by using the import option provided in Odoo 17. To read more about how to Import Customer Invoices & Vendor Bills in Odoo 17