DigitalOcean is a cloud infrastructure provider that enables business entities to scale by deploying applications across multiple cloud servers, ensuring parallel execution without compromising performance. It provides cloud computing services.
Odoo 16 spinning up a server on DigitalOcean fast with the 100€ free credits and destroying the droplet when you're done is one of the greatest ways to test it out.
Step 1: Create an account in Digital Ocean
Register a new account on Digital Ocean using Google, Github, and Email (https://cloud.digitalocean.com/registrations/new). Add payment information
Step 2: Create Droplets
After registration is completed, click on ‘Let make something’. It is redirected to create droplets. To access the Droplet Create page, navigate to the "Create" option in the upper right corner and select "Droplets."
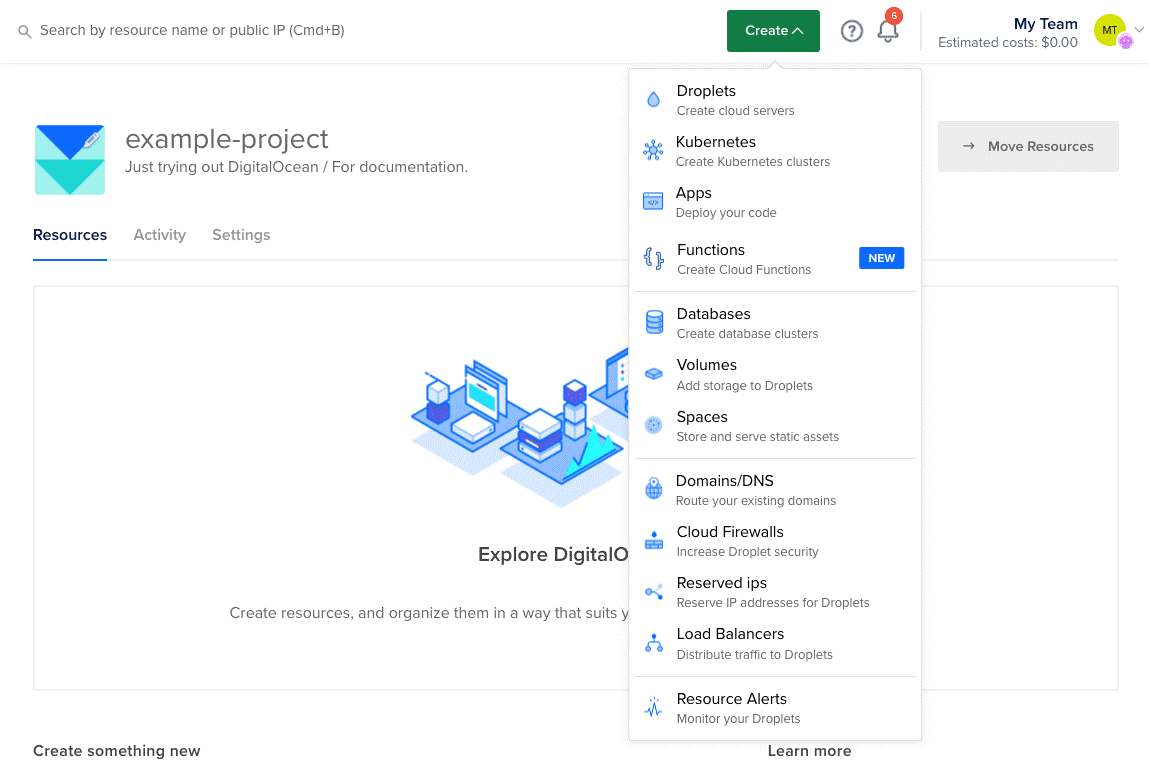
If you don't have any Droplets, the large, blue "Get Started with a Droplet" button on the Resources tab takes you to the same Droplet Create page.
On the Droplet creation page, you may set up your Droplet's operating system, RAM capacity, and which capabilities (including monitoring and backups).
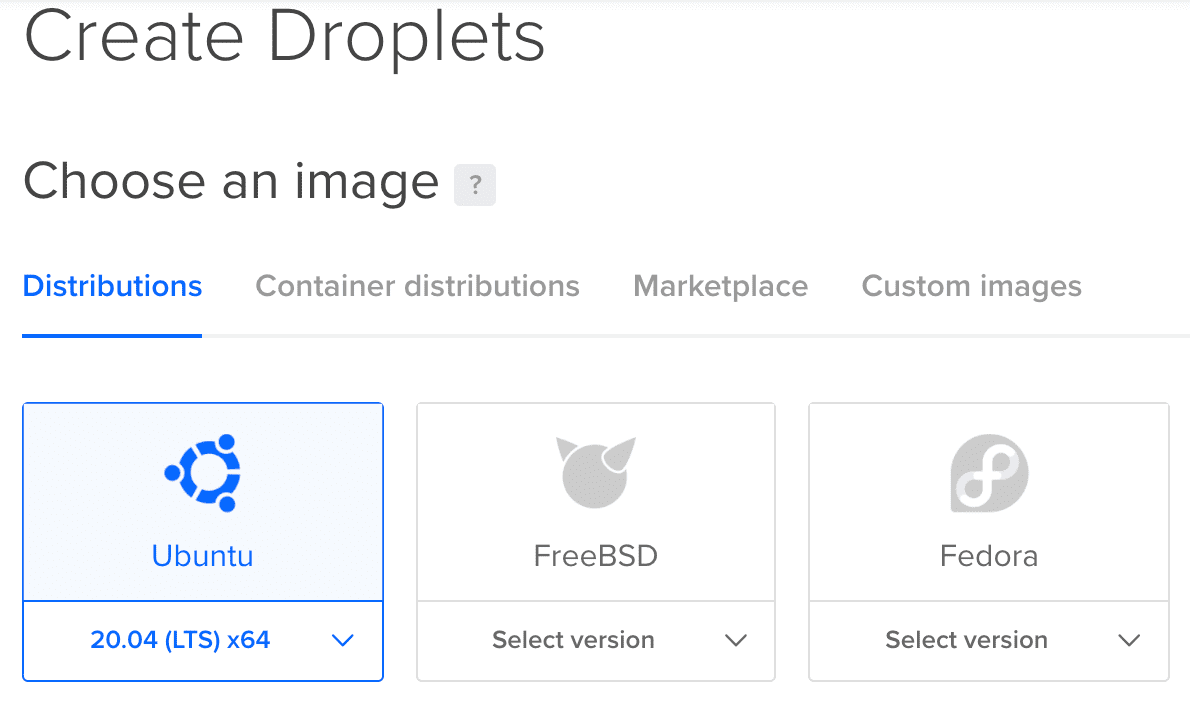
Step 3: Choose Image
Users must select an operating system image to operate their server in order to construct a Droplet. Five distinct Linux operating system distributions are available from DigitalOcean. Select Ubuntu 20.04 (LTS) x 64 since this guide explains how to set up an Ubuntu 20.04 system.
Step 4: Choose a Plan
You can select the RAM, storage capacity, and CPU core count of your Droplet under the Select a plan section.
Step 5: Choose a DataCenter Region
In the Select a data center region section, select the data center where you want to set up your Droplet.
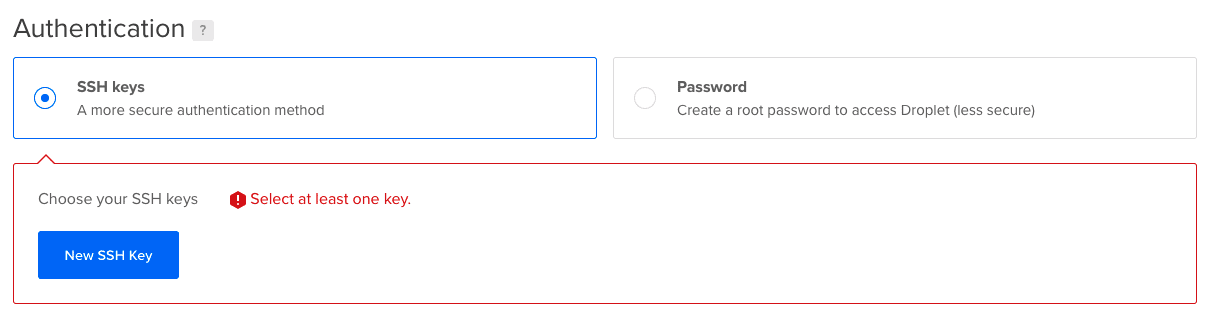
Step 6: Setting up SSH Authentication
Select the option to authenticate using SSH keys, which is a more secure method than using a password. Next, select "New SSH Key" from the menu.
You'll see a pop-up window asking you to copy and paste your public SSH key.
Next, name your key so that you may access it at a later time. After you're done, select "Add new SSH key." After that, you'll be taken back to the cloud panel, where you can confirm that your new key is chosen.
You can move on to the next stage when you've chosen your new key.
Step 7: Finalizing and creating droplets
Give the Droplet a name. You can either make your own name or utilise the one that is automatically created.
To make your Droplets more organized, use tags. If you want to, you may leave this option empty.
Assist with the organization by assigning your Droplet to a project. Here, a default folder will be generated and chosen. If you'd like, you can make more folders later.
Include backups. To aid in preventing data loss, this option allows a system-level backup of your Droplet
Once you have made all of your selections, select "Create Droplet." After that, a page with a Droplet creation process will be shown to you. The Droplet's IP address will be shown when it is ready.
Run the following command in your terminal after copying the IP address to establish a secure SSH root user connection with your Droplet.
ssh root@your_IP_address
Ubuntu 20.4 Packages
1. Update and Upgrade Packages
apt update
apt upgrade -y
2. Let's install a number of frequently used Linux tools and dependencies in preparation for our upcoming Python installation.
apt install -y build-essential libssl-dev zlib1g-dev libbz2-dev \
libreadline-dev libsqlite3-dev wget curl llvm libncurses5-dev libncursesw5-dev \
xz-utils tk-dev libffi-dev liblzma-dev python-openssl git libpq-dev libsasl2-dev libldap2-dev ccze node-less bash-completion
3. Installing PostgreSQL 13
wget --quiet -O - https://www.postgresql.org/media/keys/ACCC4CF8.asc | apt-key add -
echo "deb http://apt.postgresql.org/pub/repos/apt/ `lsb_release -cs`-pgdg main" | tee /etc/apt/sources.list.d/pgdg.list
apt update
apt install -y postgresql-13 postgresql-client-13
su - postgres
createuser --interactive -P odoo
Enter password for new role:
Enter it again:
Shall the new role be a superuser? (y/n) n
Shall the new role be allowed to create databases? (y/n) y
Shall the new role be allowed to create more new roles? (y/n) n
createdb -O odoo codingdodo_demo
exit
4.wkhtmltopdf
wget https://github.com/wkhtmltopdf/packaging/releases/download/0.12.6-1/wkhtmltox_0.12.6-1.bionic_amd64.deb
apt install ./wkhtmltox_0.12.6-1.bionic_amd64.deb -y
5. Create Odoo User
useradd -m -U -r -s /bin/bash odoo
6. Log in to Odoo user
su - odoo
7. Creating Virtualenv
pyenv virtualenv 3.9.2 odoo-16-env
8. Install Odoo from the Github Source
mkdir /home/odoo/odoo-16-custom-addons
cd /home/odoo/odoo-16-custom-addons
git clone https://github.com/Coding-Dodo/web_widget_markdown.git
cd ~/
git clone -b 16.0 --single-branch --depth 1 https://github.com/odoo/odoo.git odoo-15
cd odoo-15
9. Install Python Dependencies
pip install --upgrade pip
pip install setuptools wheel
pip install -r requirements.txt -e .
10. Create logs directory
exit
mkdir /var/log/odoo
touch /var/log/odoo/odoo-15.log
chown odoo: /var/log/odoo
chown -R odoo: /var/log/odoo/*
11. Create Odoo 16 Conf File
$ sudo nano /etc/odoo16.conf
12. Create systemd unit file
$ sudo nano /etc/systemd/system/odoo16.service
13. Run Odoo 16 Server
$ sudo systemctl daemon-reload
$ sudo systemctl start odoo16
14. Install Nginx
Refer this blog to install Nginx as a reverse proxy.
How to Configure Odoo with Nginx as Reverse Proxy?
15. Install Nginx
$ sudo systemctl restart ngin
You can now log on to the Odoo 16 server on DigitalOcean. After logging in, you can start and set up your Odoo instance.