When developing custom modules in Odoo 19, XML data files are one of the most reliable ways to load initial records into the database. Whether it is creating products, defining sequences, setting configuration values, or preparing demo data, XML files help ensure that required data is available immediately after module installation.
In this blog, we will go through how XML data files are loaded in Odoo 19, where they should be placed, and how they are linked to a module. Along the way, we will look at practical examples such as creating product categories, products, sequences, configuration parameters, and demo records.
Understanding XML Data Files in Odoo
Odoo modules often need predefined records to function properly. XML data files allow developers to define these records in a structured format so that Odoo can load them automatically during installation or upgrade.
Some common use cases include:
- Loading master data like products and categories
- Defining sequences for documents
- Creating default configuration values
- Adding demo data for testing or presentations
Module Structure for XML Data Files
XML files are usually placed inside the data or demo directories of a module.
custom_module/
+-- __init__.py
+-- __manifest__.py
+-- models/
¦ 	+-- __init__.py
¦ 	+-- sale_order_line.py
+-- views/
+-- data/
¦   +-- product_category_data.xml
¦   +-- product_data.xml
¦   +-- sequence_data.xml
¦   +-- config_data.xml
+-- demo/
    +-- demo_data.xml
- Files inside data/ are always loaded
- Files inside demo/ are loaded only when demo data is enabled
Adding XML Files to the Manifest
Odoo loads XML files only if they are declared in the module manifest.
{
    'name': 'Custom XML Data Demo',
    'version': '1.0',
    'depends': ['sale_management', 'product'],
    'data': [
        'data/product_category_data.xml',
        'data/product_data.xml',
        'data/sequence_data.xml',
        'data/config_data.xml',
    ],
    'demo': [
        'demo/demo_data.xml',
    ],
    'installable': True,
}
Basic Structure of an XML Data File
Every XML data file follows the same structure:
<?xml version="1.0" encoding="UTF-8"?>
<odoo>
    <data>
        <!-- Records go here -->
    </data>
</odoo>
Each record is defined using the <record> tag, along with the model name and fields.
Creating a Product Category
Product categories are often loaded before products, especially when products need to be grouped logically.
File: data/product_category_data.xml
<record id="product_category_electronics" model="product.category">
    <field name="name">Electronics</field>
</record>
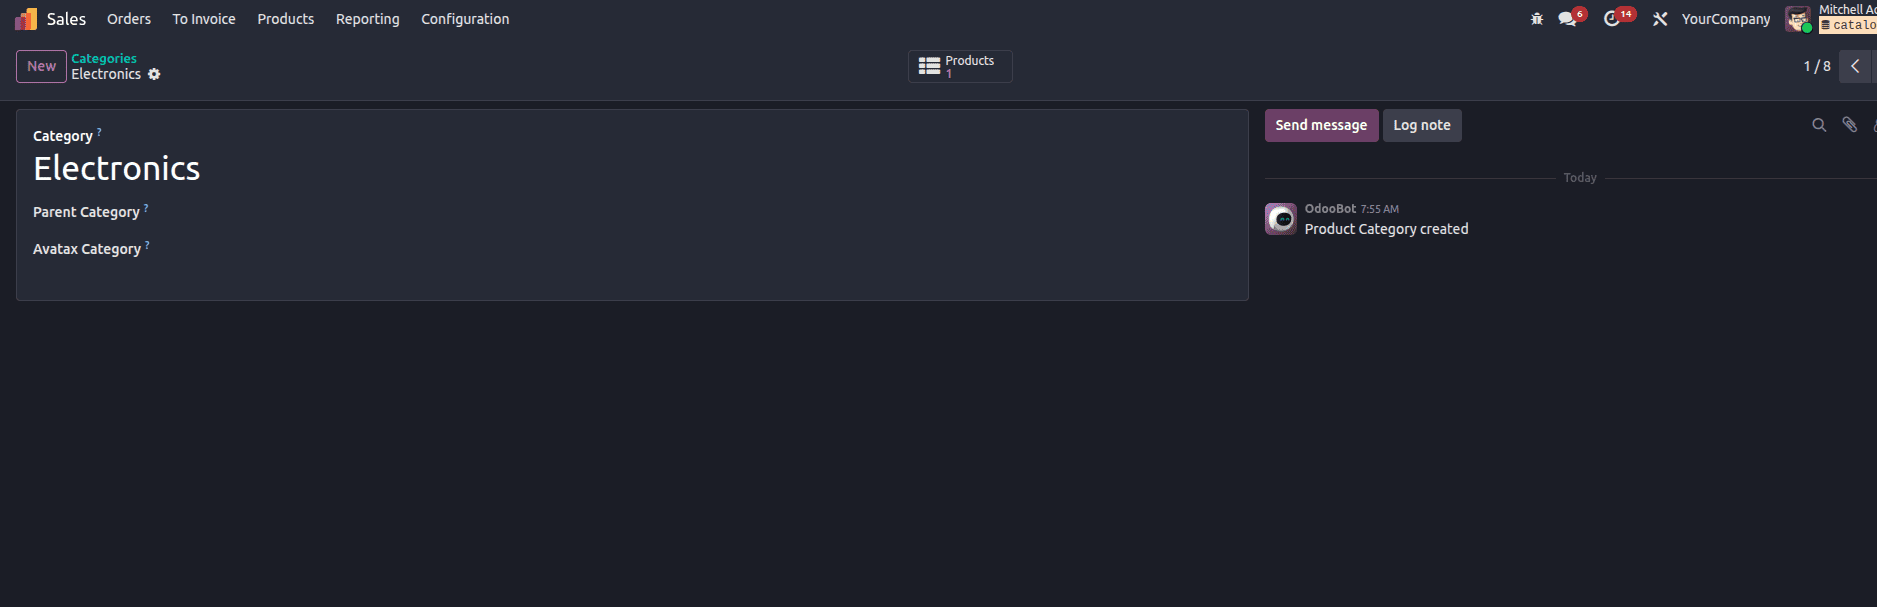
This creates a new product category that can be reused by other records. We can see in the image below the created product category in odoo
Creating a Product and Assigning a Category
Once the category is created, it can be linked to a product using the external ID reference.
File: data/product_data.xml
<record id="product_laptop_demo" model="product.product">
    <field name="name">Demo Laptop</field>
    <field name="type">consu</field>
    <field name="categ_id" ref="product_category_electronics"/>
    <field name="list_price">55000</field>
    <field name="standard_price">45000</field>
</record>
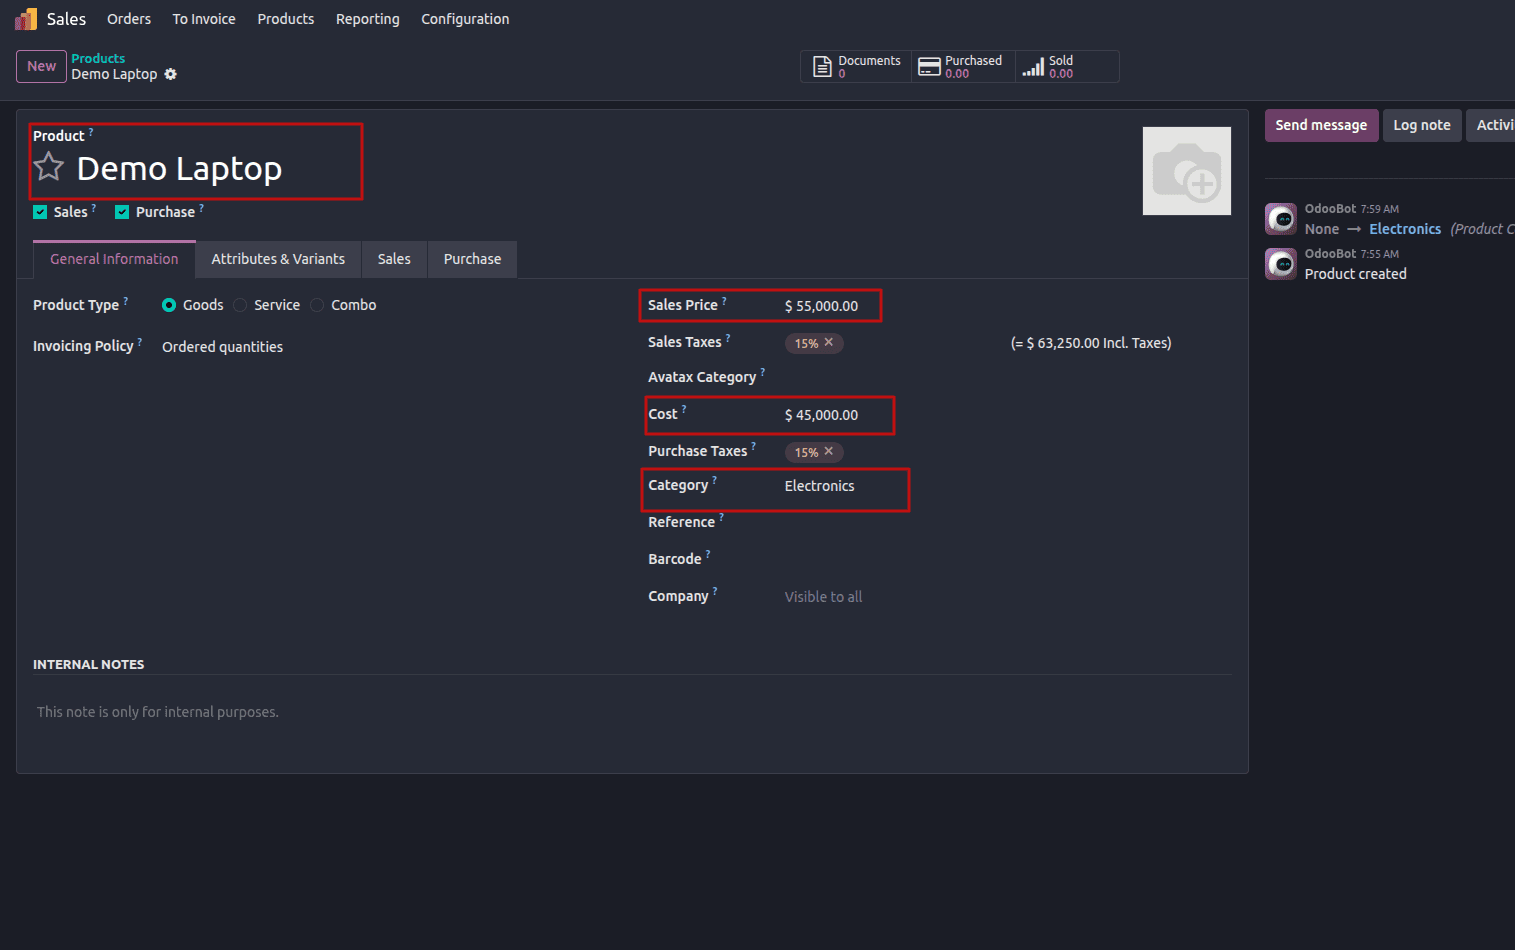
This shows how relational fields can be handled directly inside XML. Now we can see the created product, along with its category, in the image below.
Defining a Sequence Using XML
Sequences are commonly required for orders, requests, or any custom business document.
File: data/sequence_data.xml
<record id="seq_custom_order" model="ir.sequence">
    <field name="name">Custom Order Sequence</field>
    <field name="code">sale.order</field>
    <field name="prefix">CO/</field>
    <field name="padding">5</field>
    <field name="company_id" eval="False"/>
</record>
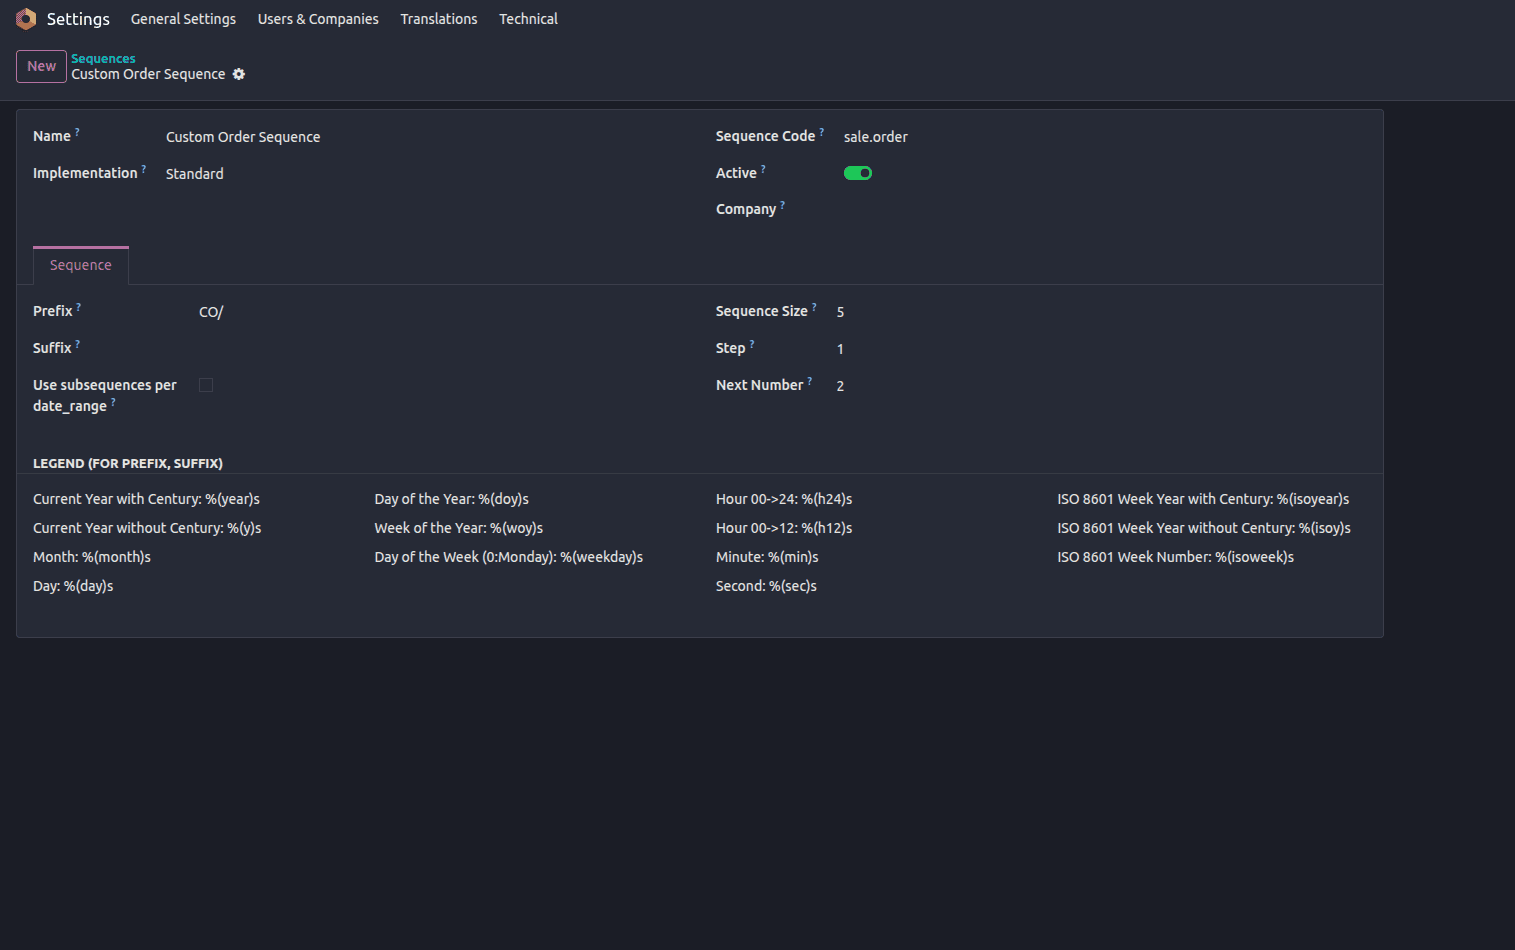
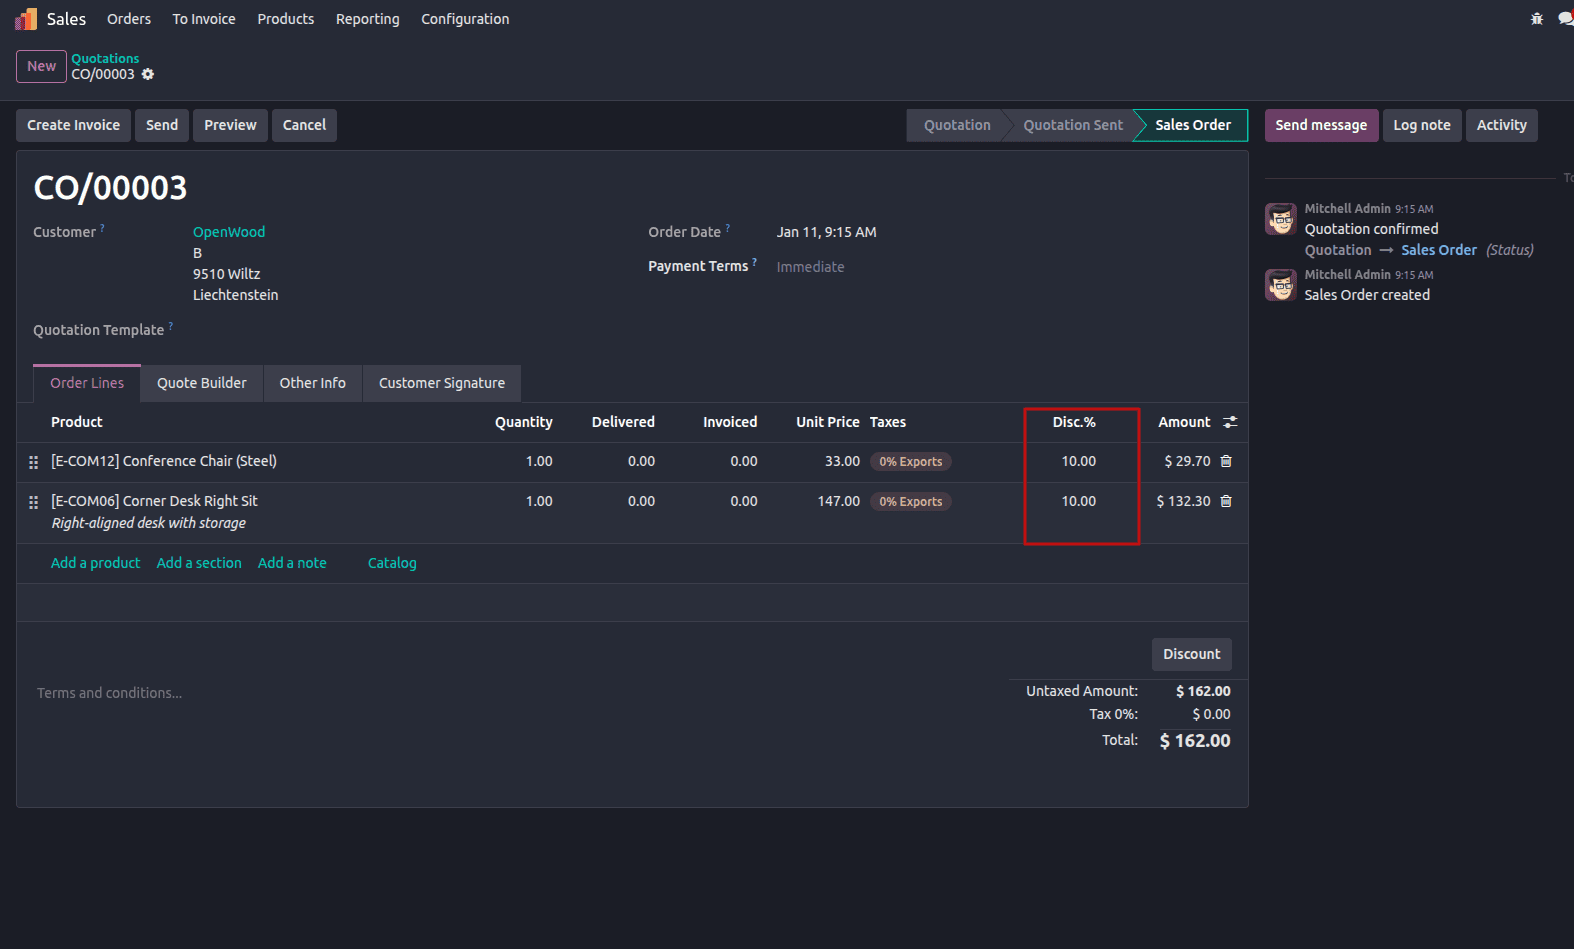
A common example is changing the sequence used for Sale Orders to follow a custom prefix or numbering pattern. This can be achieved easily using this XML data file.Odoo already provides a built-in Sale Order sequence, so simply defining a new sequence is not enough.
To make Odoo use a custom sequence, the existing Sale Order sequence must first be archived from Settings > Technical > Sequences. Archiving the default sequence ensures that Odoo does not continue generating numbers from the original one.
Once the default sequence is archived, a new sequence can be defined using an XML data file. By setting the code field to sale.order, the custom sequence is directly linked to the Sale Order model.
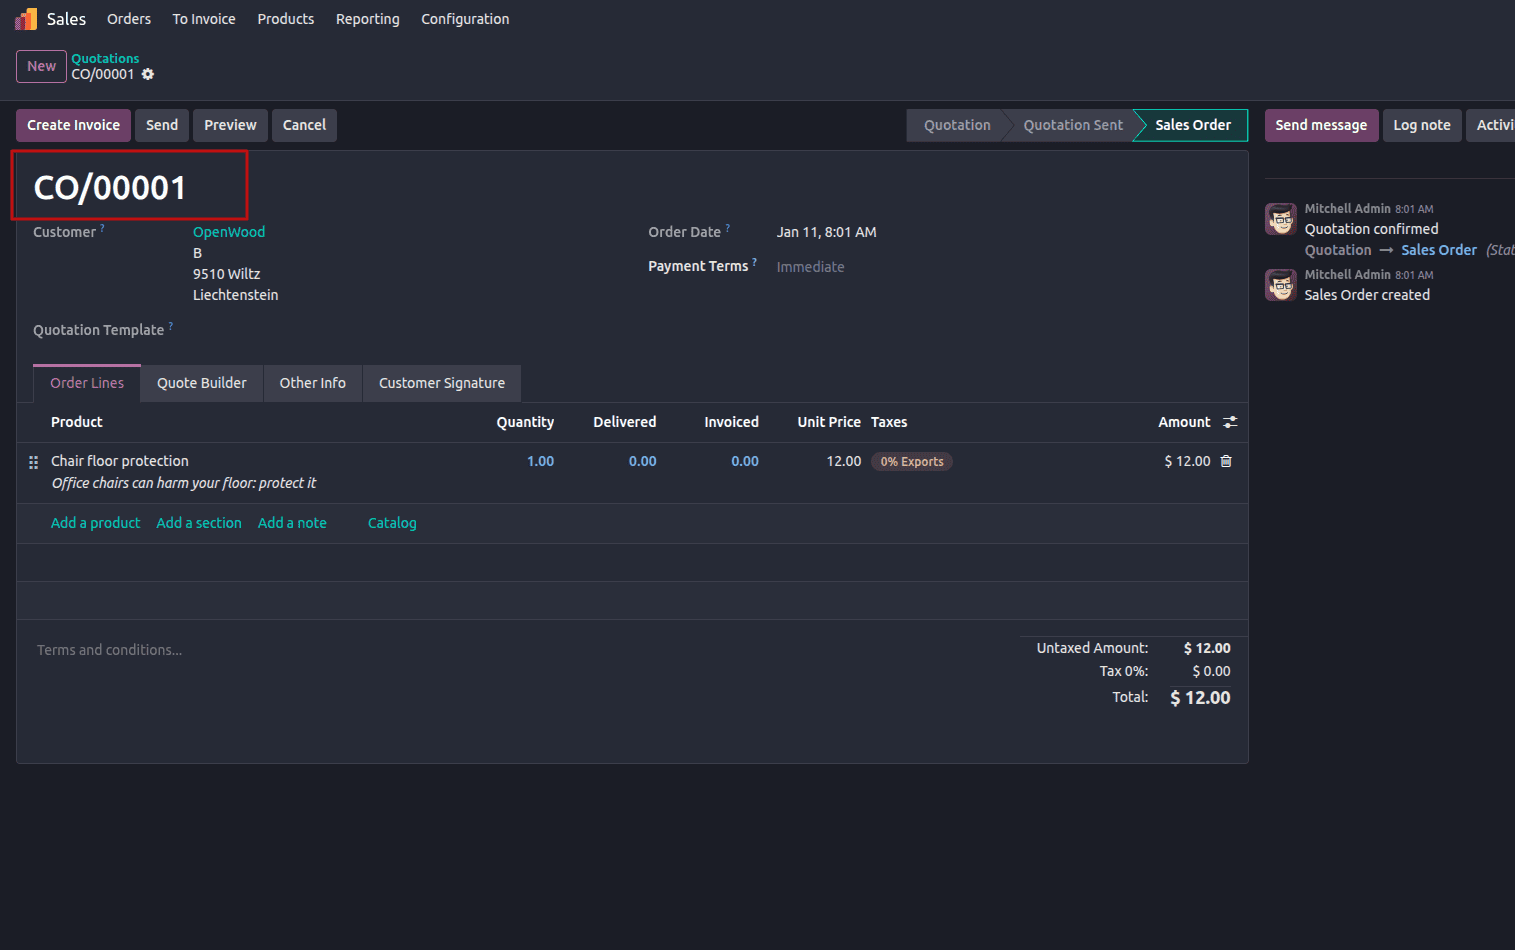
From this point onward, whenever a new sale order is created, Odoo will automatically pick this sequence and generate references based on the custom prefix and padding defined in the XML. We can see the example below in the image.
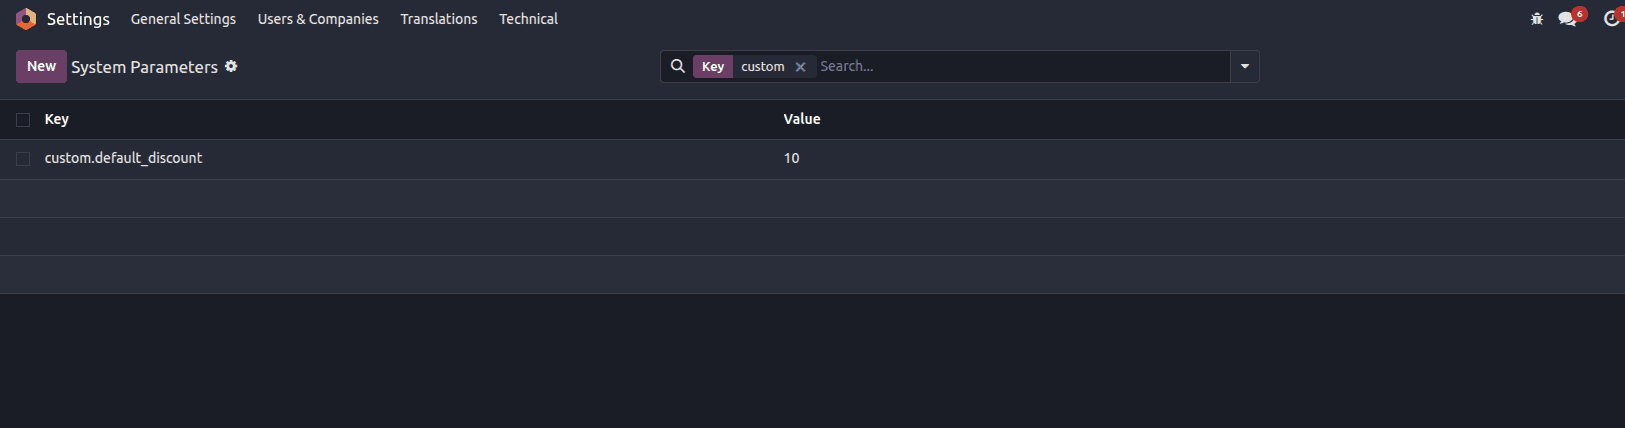
Loading Default Configuration Values
Configuration parameters are often used to store system-wide settings.
File: data/config_data.xml
<record id="config_default_discount" model="ir.config_parameter">
    <field name="key">custom.default_discount</field>
    <field name="value">10</field>
</record>
This ensures that a default value is available immediately after module installation. To see this, we can go to Settings > Technical > System Parameters. We will be able to see the records there.
Now if we want, we can use this config value in your code. Let's see an example of adding it by default to the sale order line.
File: models/sale_order_line.py
from odoo import models, api
class SaleOrderLine(models.Model):
   _inherit = 'sale.order.line'
   @api.onchange('product_id')
   def _onchange_product_id_apply_default_discount(self):
       if self.product_id:
           discount = self.env['ir.config_parameter'].sudo().get_param(
               'custom.default_discount'
           )
           if discount:
               self.discount = float(discount)
Now this will add the default discount to our sale order lines, as we can see in the image below.
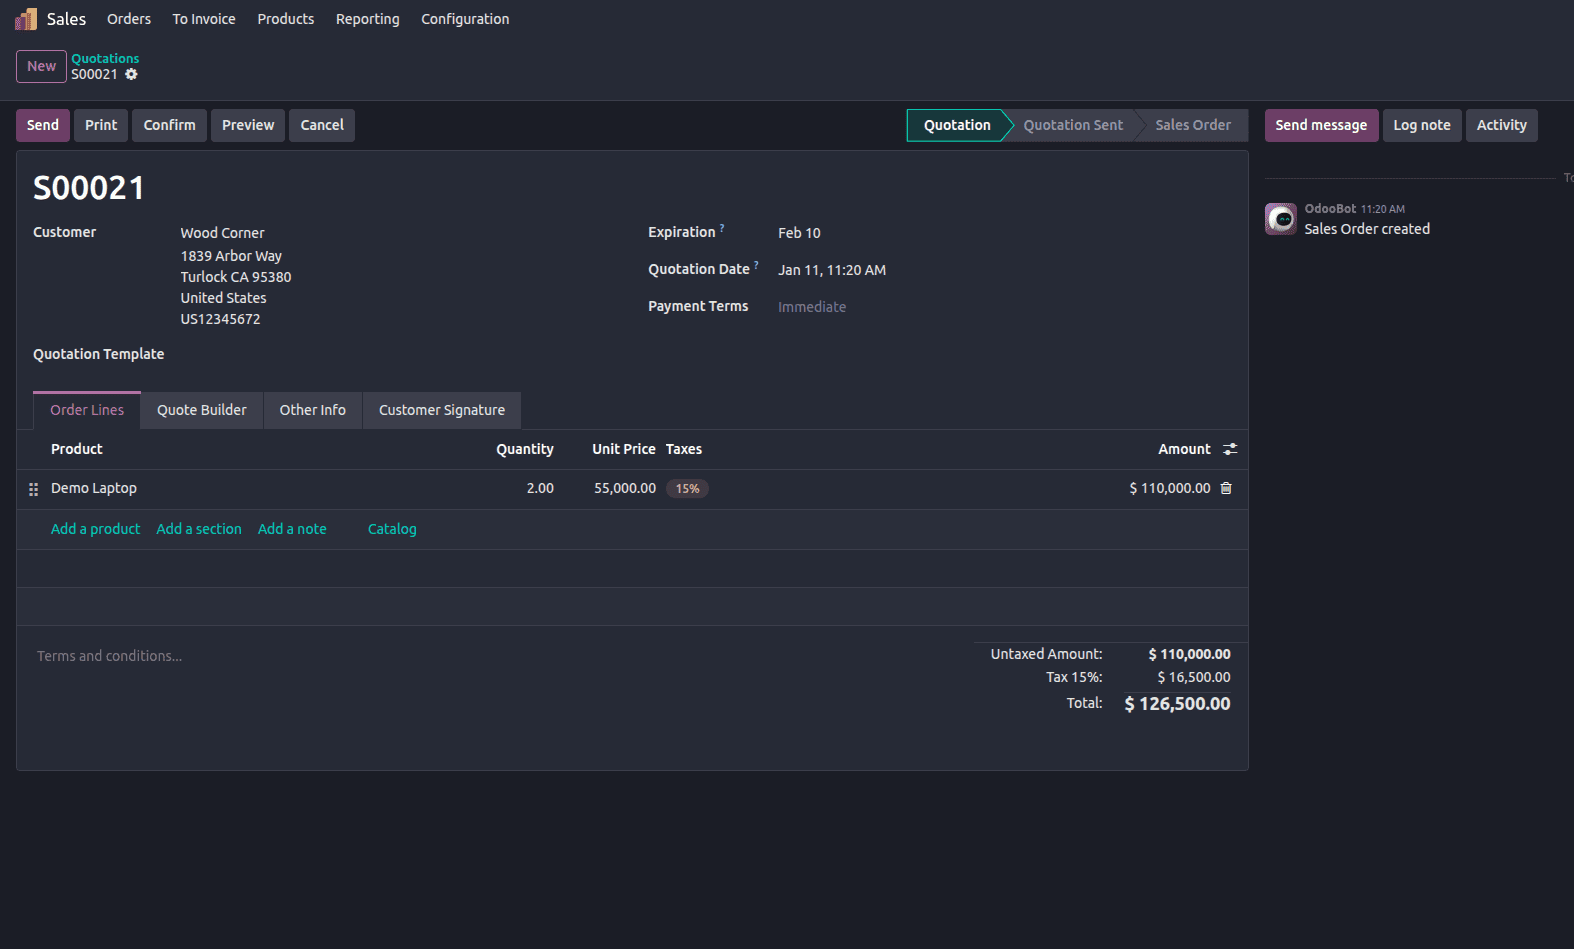
Creating Demo Data Linked to Existing Records
Demo data becomes more meaningful when it is connected to real records.
This data is defined inside the demo directory, which means it is loaded only when demo data is enabled at the time of database creation. In production databases, demo data is usually disabled, ensuring that these records do not interfere with real transactions.
File: demo/demo_data.xml
<record id="demo_sale_order" model="sale.order">
   <field name="partner_id" ref="base.res_partner_1"/>
</record>
<record id="demo_sale_order_line" model="sale.order.line">
   <field name="order_id" ref="demo_sale_order"/>
   <field name="product_id" ref="product_laptop_demo"/>
   <field name="product_uom_id" ref="uom.product_uom_unit"/>
   <field name="product_uom_qty">2</field>
</record>
Here in the example above. Once the module is installed in a database with demo data enabled, the demo quotation becomes visible directly in the Sales module. This allows developers and testers to verify that the XML records were loaded correctly and to understand how the module behaves in a real sales flow.
The image below shows the demo sale order created through the XML file, along with its order line linked to the demo product.
Using noupdate in XML Data Files
In some situations, certain records should remain unchanged even when a module is upgraded. This is especially important for data that may be manually adjusted by users after installation, such as configuration records, default products, or reference data. To handle this, Odoo provides the noupdate attribute.
<data noupdate="1">
    <record id="fixed_product_data" model="product.product">
        <field name="name">Fixed Product</field>
        <field name="list_price">1000</field>
    </record>
</data>
When noupdate="1" is set on a <data> tag, Odoo creates the records during the initial module installation. However, during subsequent module upgrades, Odoo skips updating these records, even if the XML definition has changed. This ensures that any manual changes made in the user interface are preserved and not overwritten by future updates.
Common Issues to Watch Out For
- XML files not added to the manifest
- Incorrect model or field names
- Duplicate external IDs
- Loading demo data in the data section unintentionally
Conclusion
XML data files are a fundamental part of Odoo 19 module development. They allow developers to preload essential data such as categories, products, sequences, and configuration values in a structured and maintainable way. By organizing XML files properly and linking them through the manifest file, modules become easier to install, test, and maintain.
Using practical examples like product creation, category assignment, and demo data helps bridge the gap between theory and real-world implementation, making XML data handling in Odoo both clear and effective.
To read more about How Data File Loading Works in Odoo 19, refer to our blog How Data File Loading Works in Odoo 19.