Customers and vendors lead a business nowadays, and most companies register the bill received by vendors in the accounting operations. It is a time-consuming process to run your business steadily. An invoice for services and products purchased by a company is a vendor bill. Individuals can access a clear picture of payment transactions within a vendor bill. Vendor management includes monitoring of goods and accounting operations. By imparting an Odoo ERP, you can remove the worries related to vendor management. Odoo 15 Accounting module is an adaptable way to register vendor bill data in your organization.
This blog gives an idea about vendor bill registration in Odoo 15 Accounting.
One of the expenses of the company is vendor bills. Users can manage the customers, vendors, assets, payments, and more using the Odoo 15 Accounting module. We can upload vendor bills quickly from the Odoo 15 Accounting module.
How to register a new vendor bill in the Odoo Accounting application?
Accounting Dashboard
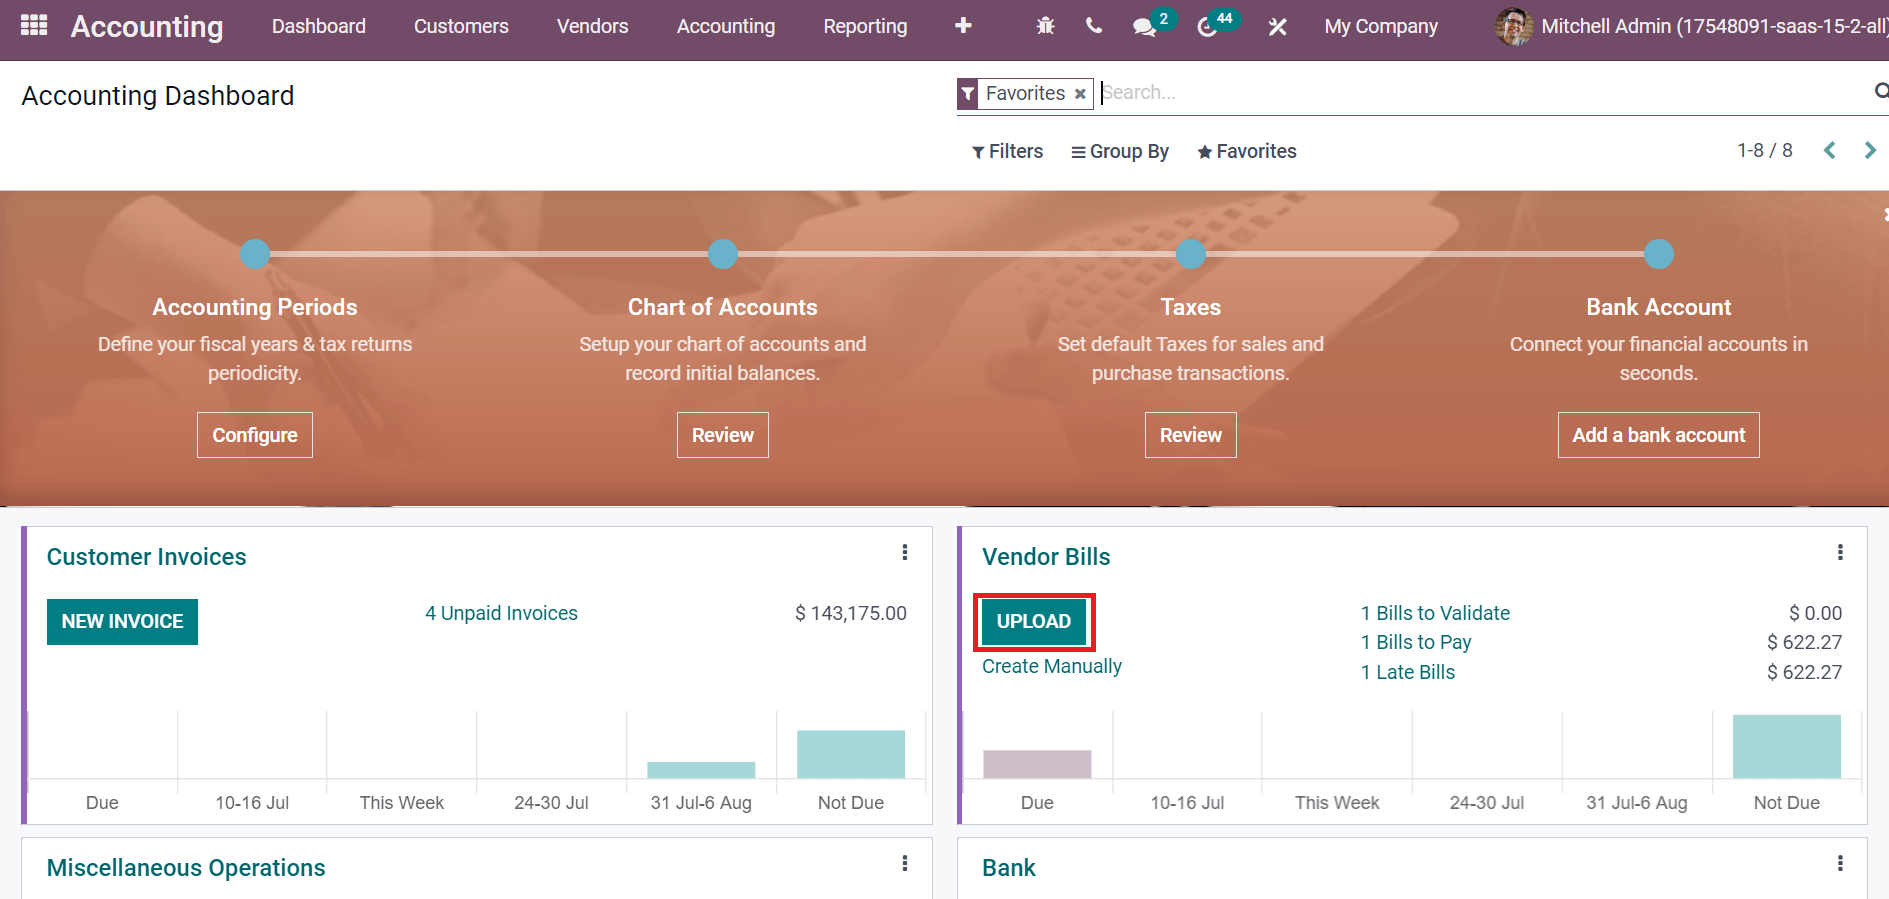
Users can configure accounting periods and review account charts, bank accounts, and taxes from the accounting dashboard. We can access details such as Customer Invoices, Bank, Vendor Bills, and other Miscellaneous operations journals. Below the Vendor Bills journal, you can access Bills to Pay, Validate, and Late Bills. Choosing the UPLOAD icon makes it easy to transmit a new vendor manually, as displayed in the screenshot below.
How to Generate a New Vendor Bill in Odoo 15 Accounting?
We can formulate a vendor bill in two ways on Odoo 15. The first one is to create the vendor bill manually, and another possibility is to send an email to the email alias associated with the purchase journal. In the second case, you must ensure that one email is always related to one pdf. In addition, users can upload the pdf directly to the journal and process a vendor bill draft. Now, we can view how to upload the pdf directly from your system into Odoo. Choose the UPLOAD button icon inside the Vendor Bills journal in Accounting Dashboard, as portrayed in the screenshot below.

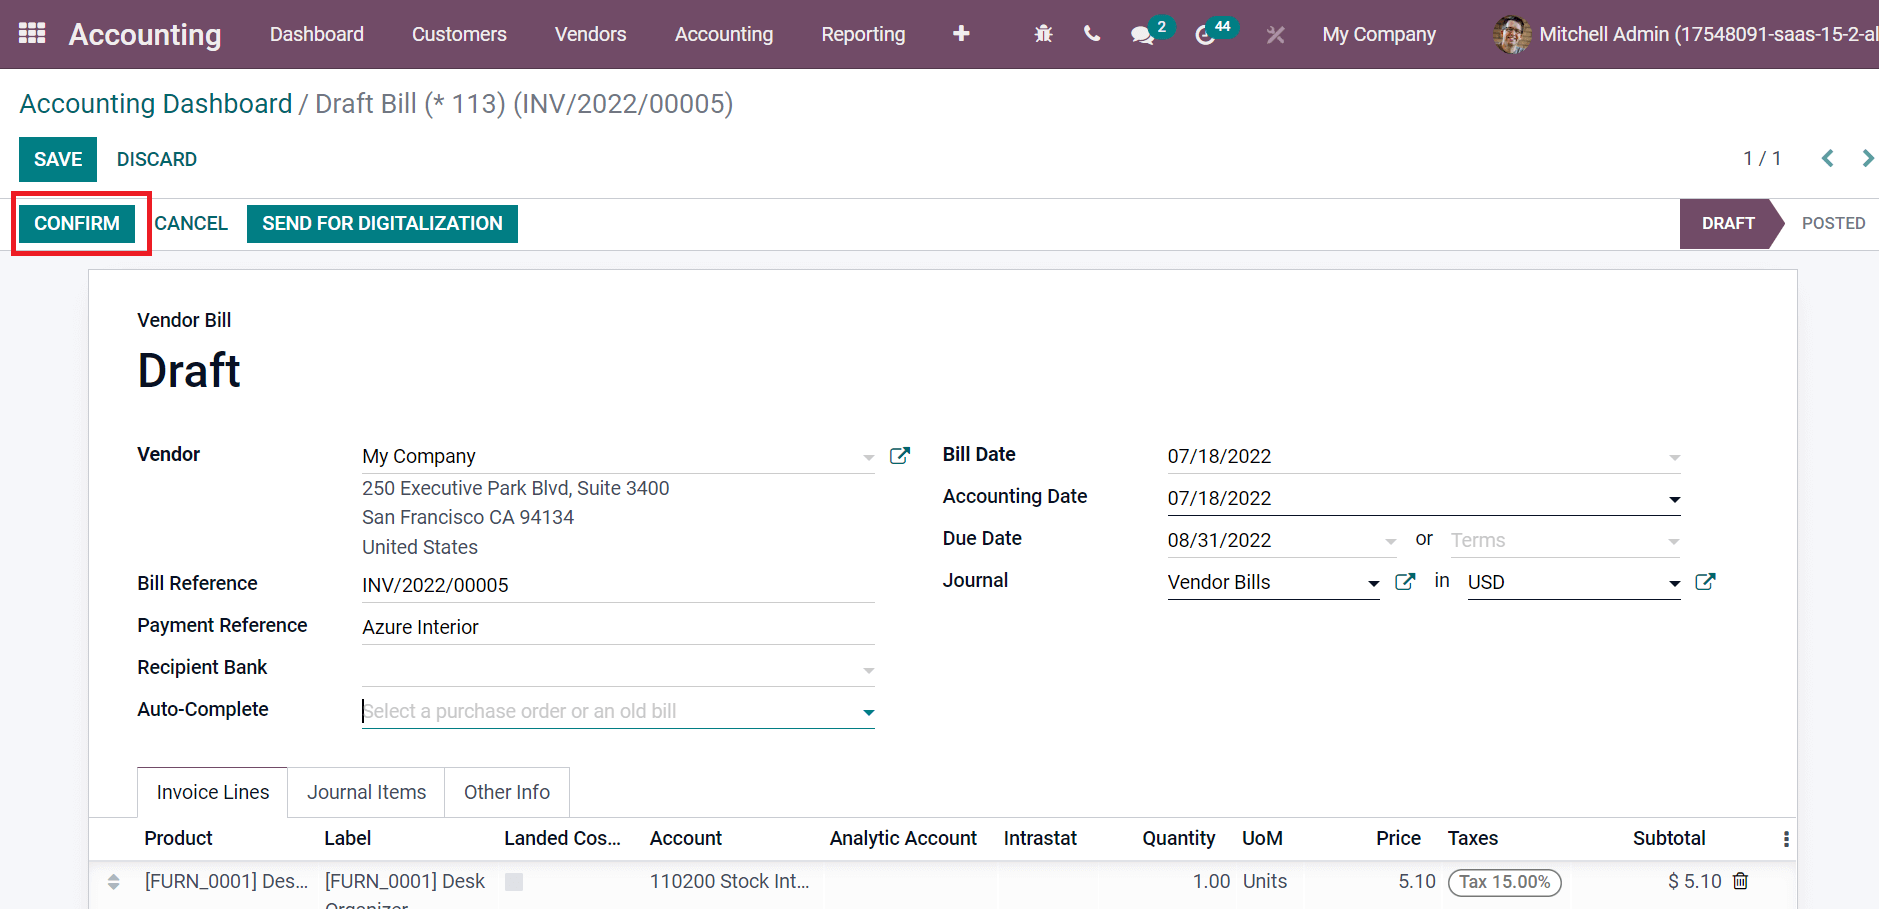
Later, select your vendor bill from the system. After choosing the pdf file, Odoo creates a new vendor bill automatically, and a draft bill page opens before you. We can change the vendor bill by selecting the EDIT icon as denoted in the screenshot below.

Users can generate the bill by clicking on the CONFIRM icon after entering the details in the screenshot below.
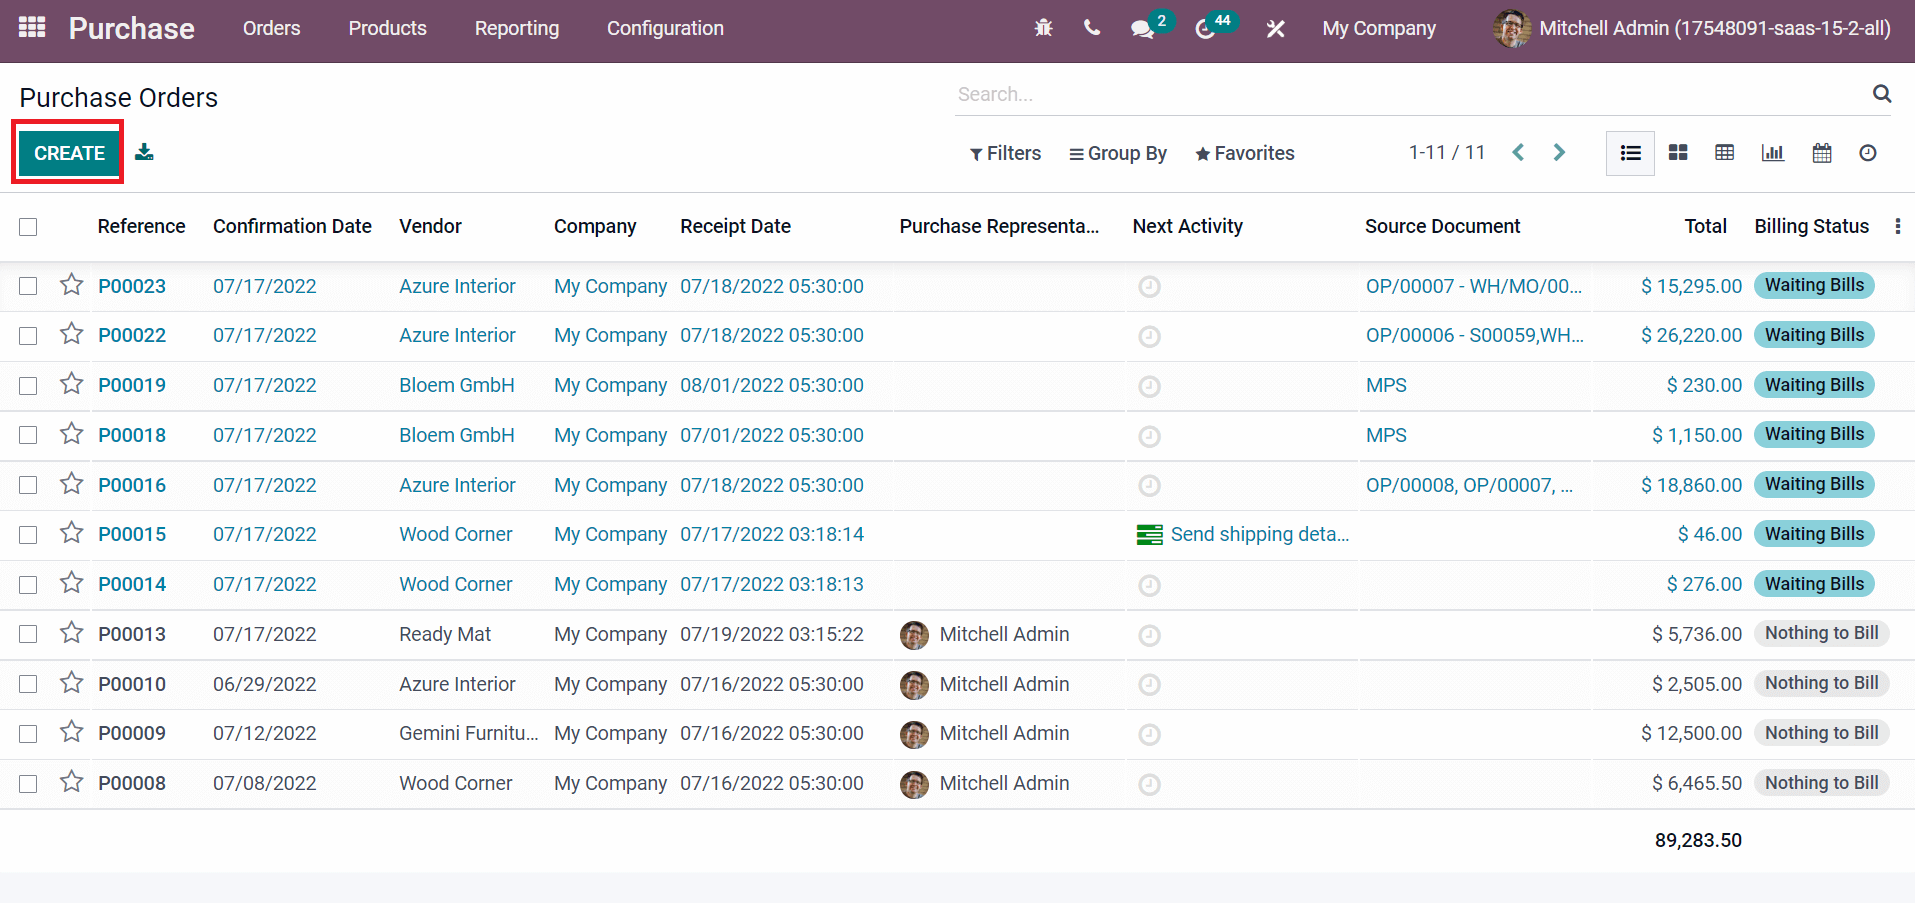
Let's take another instance where we create a bill from a purchase order in Odoo 15. Go back to Odoo 15 Purchase module and click the Purchase Orders menu. All purchased order lists are visible before you, and we can see the data such as Receipt Date, Vendor, Reference, Billing Status, etc., as marked in the screenshot below.
In the Purchase Orders window, add the name of the Vendor, Order Deadline, and Receipt Date. After that, choose the product by clicking Add a line option in the Products tab, as specified in the screenshot.
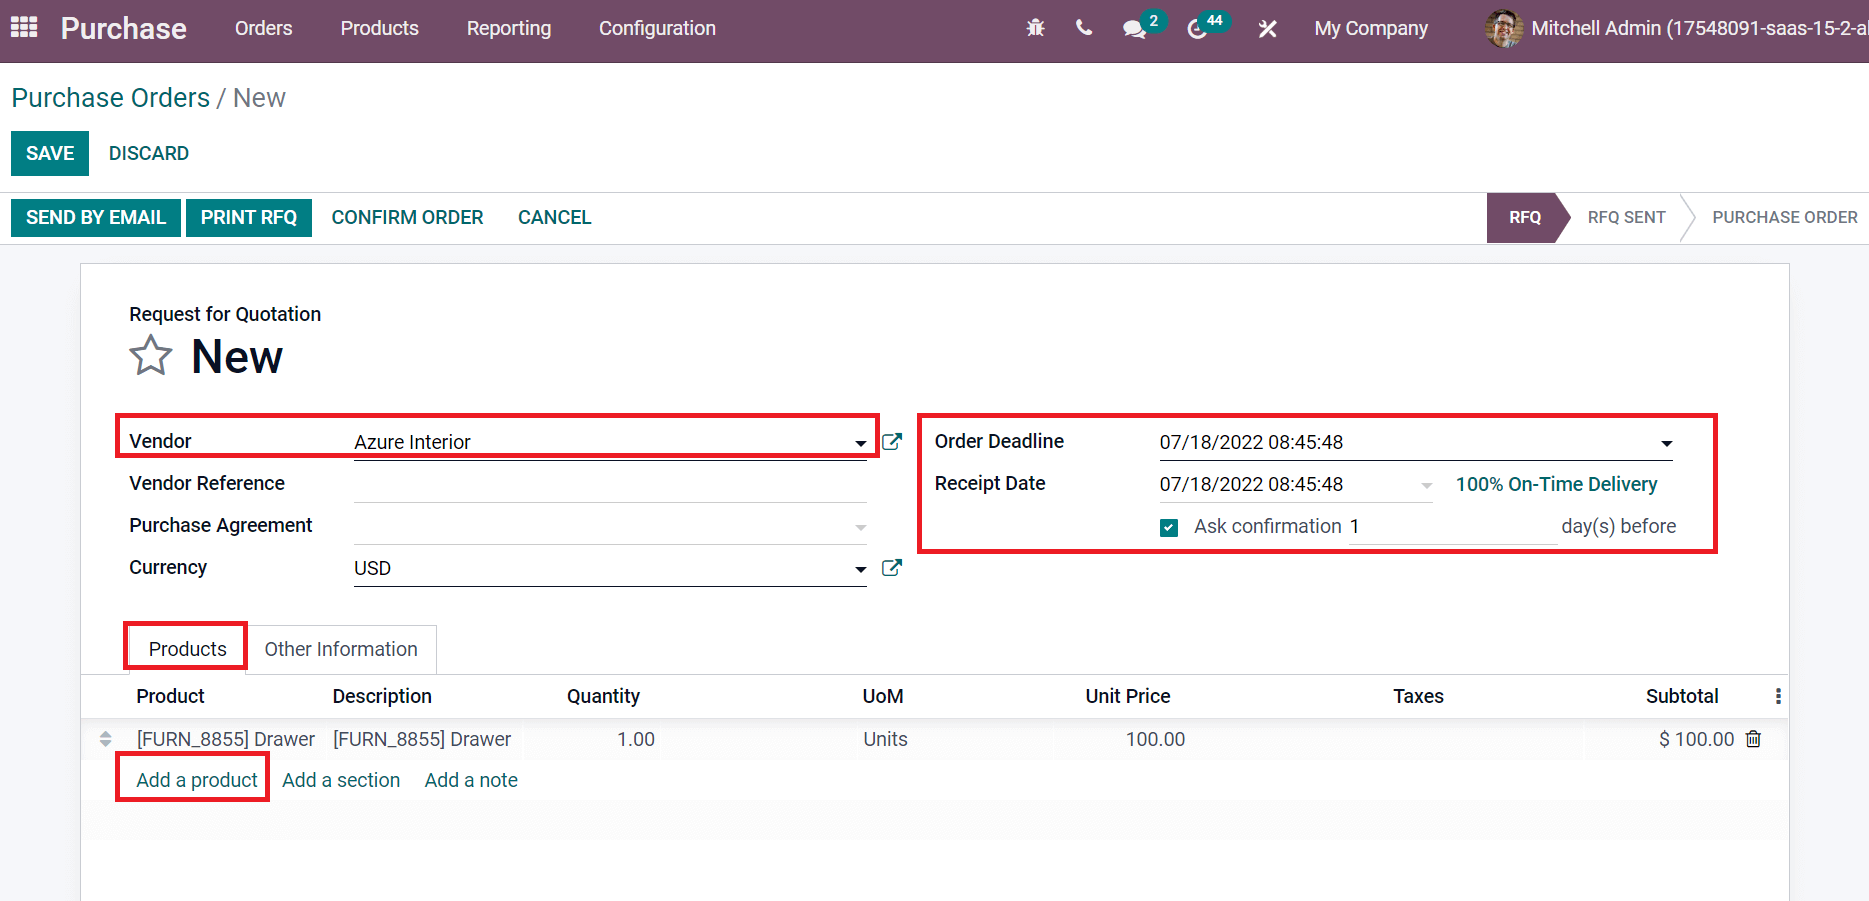
Choose the SAVE icon and validate it by selecting the CONFIRM button.
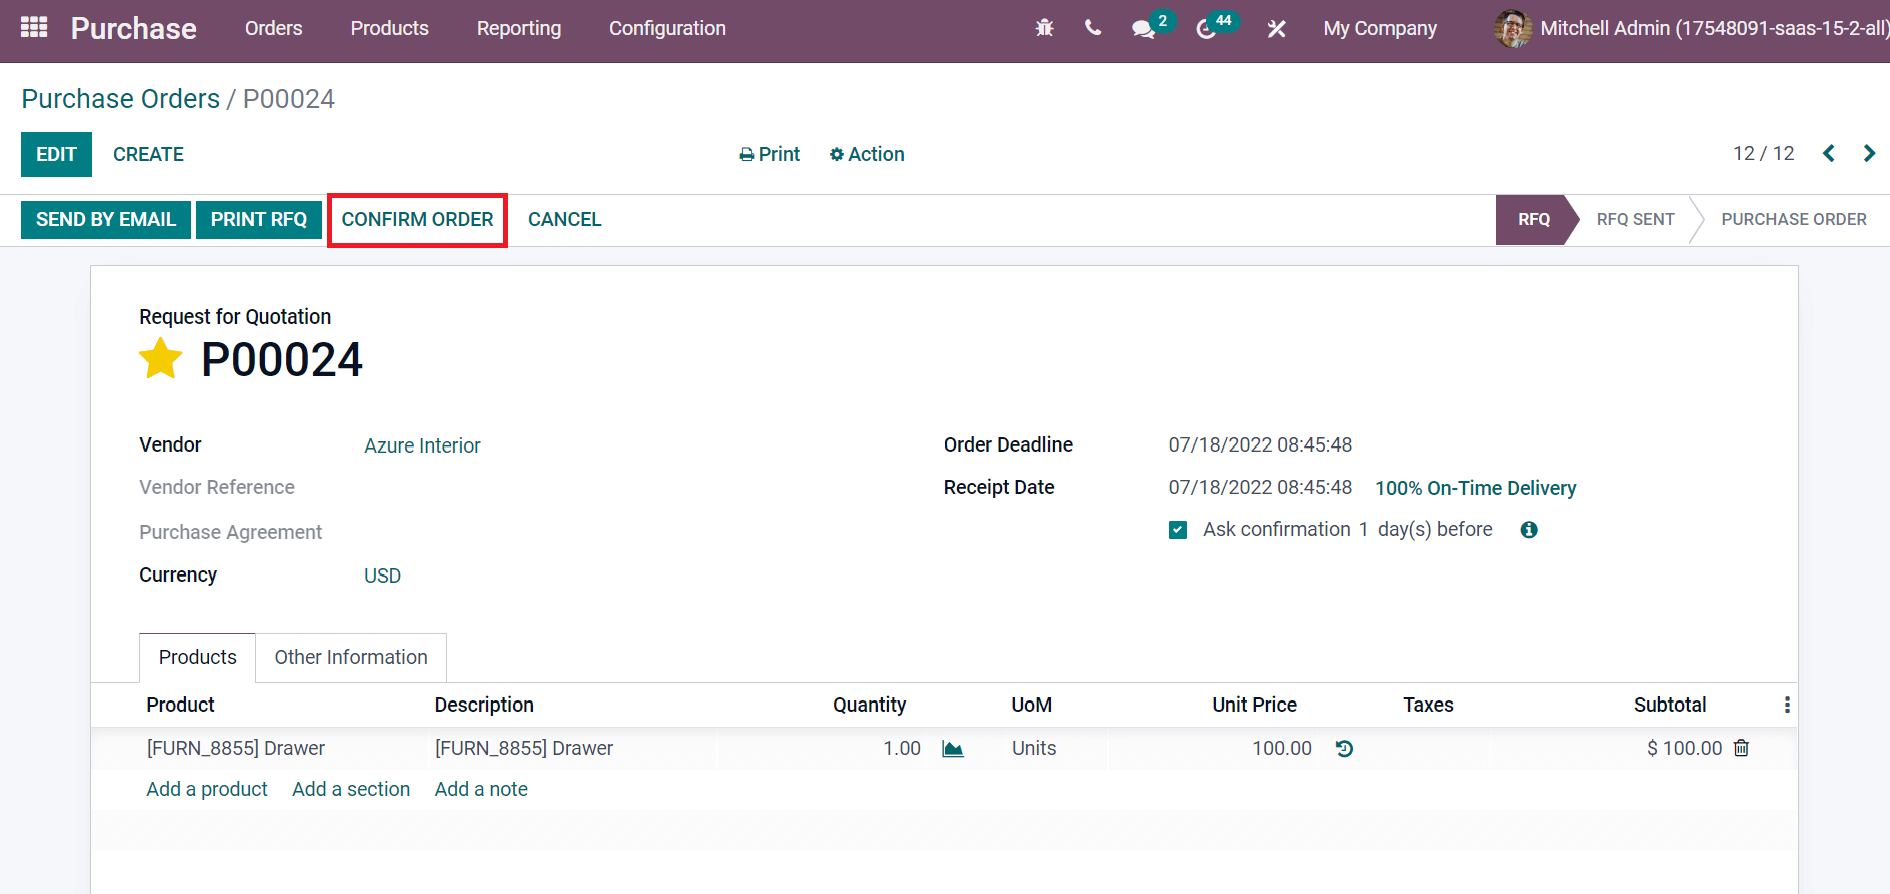
Now, we can access products by choosing the RECEIVE PRODUCTS button in the Purchase Orders window after the confirmation.

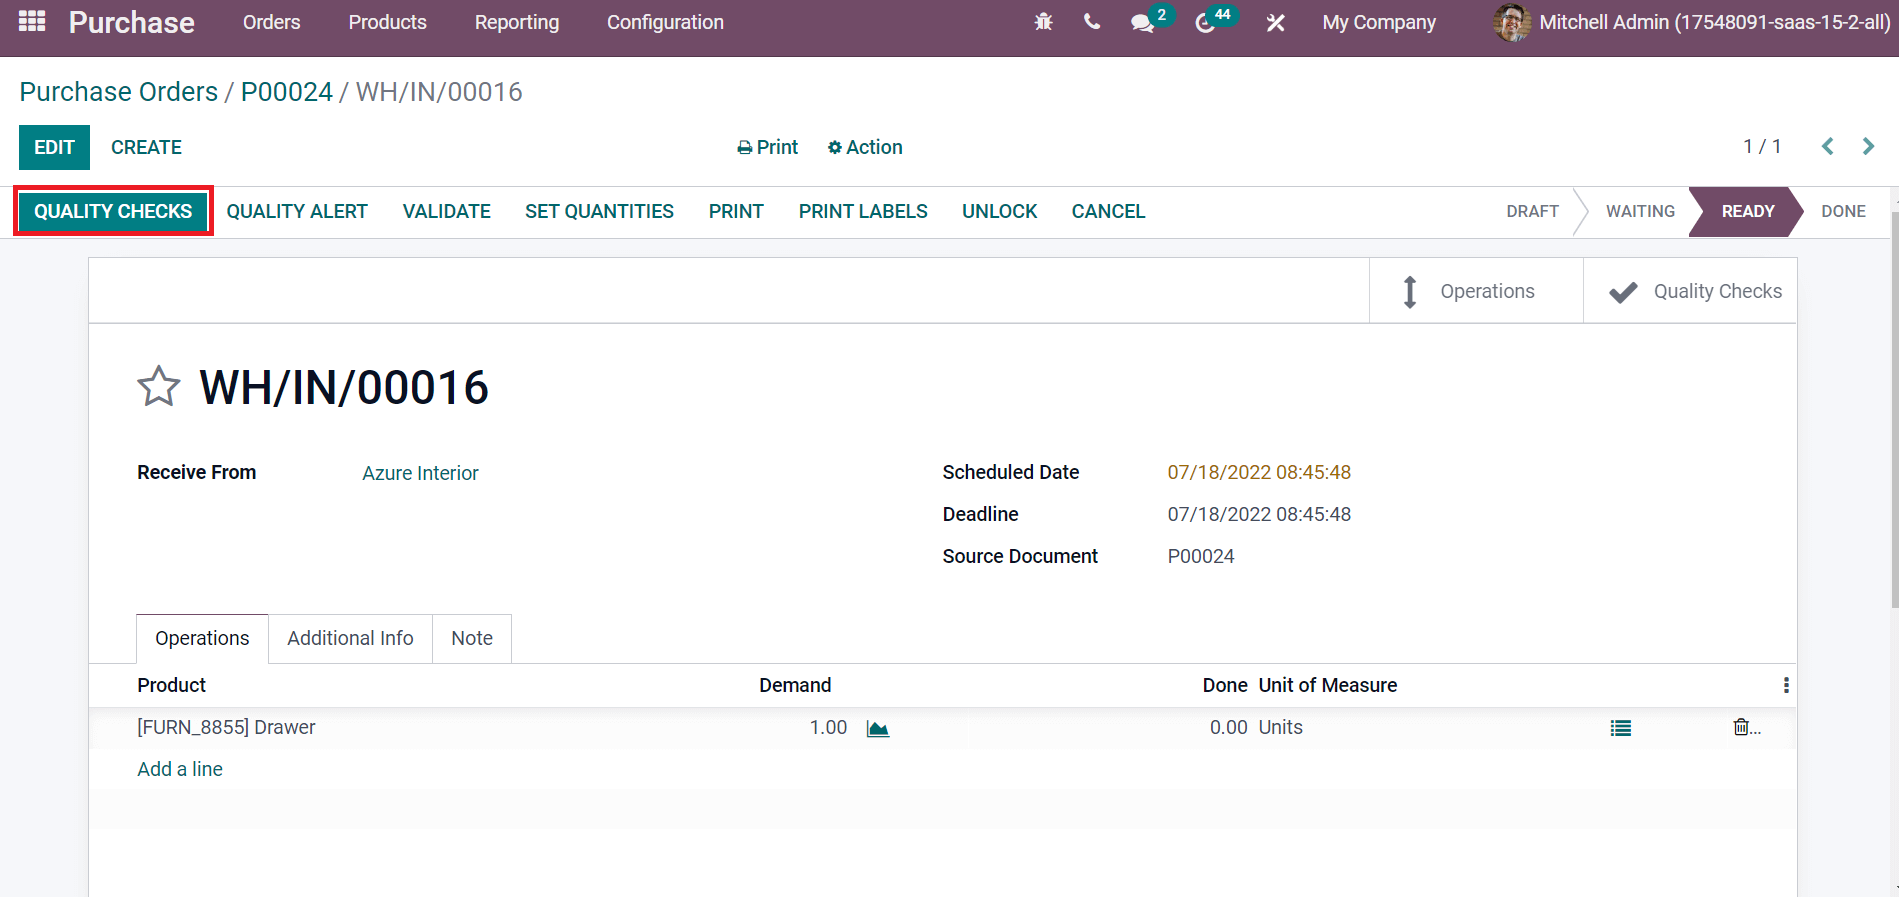
Then, we can check the product quality by clicking the QUALITY CHECKS button in the Purchase Orders window, as illustrated in the screenshot below.
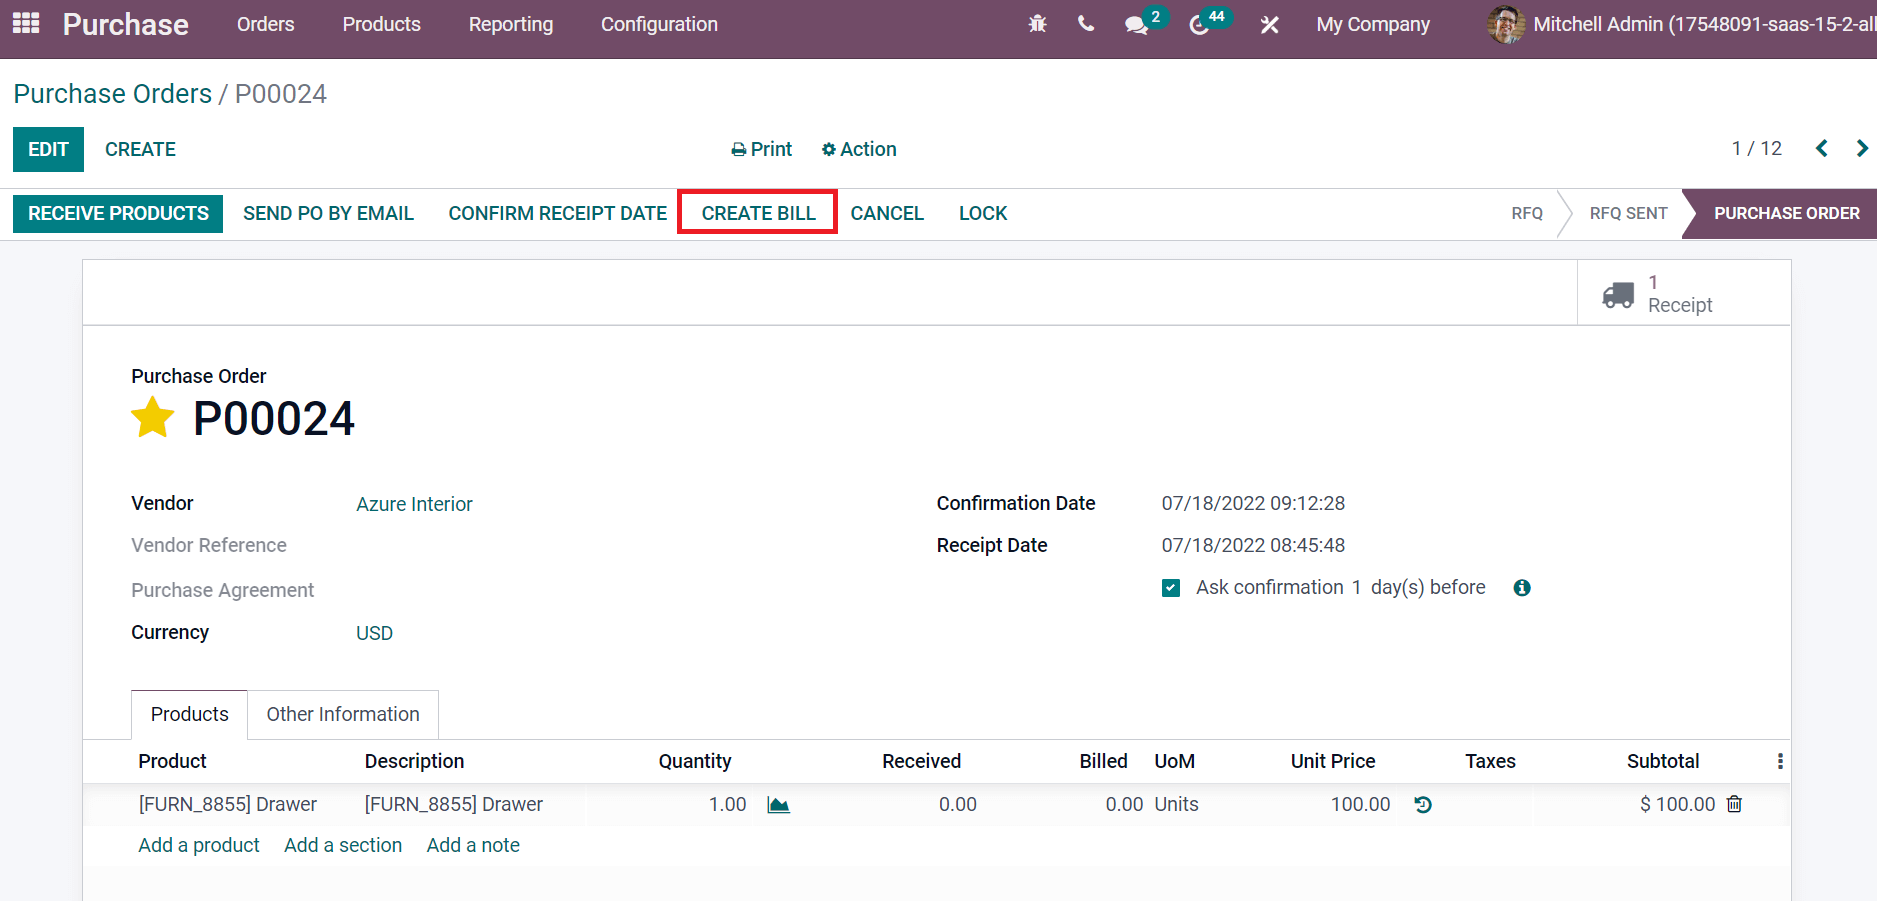
After validating the quality checks for your product, we can create the bill from a purchase order by clicking the CREATE BILL icon.
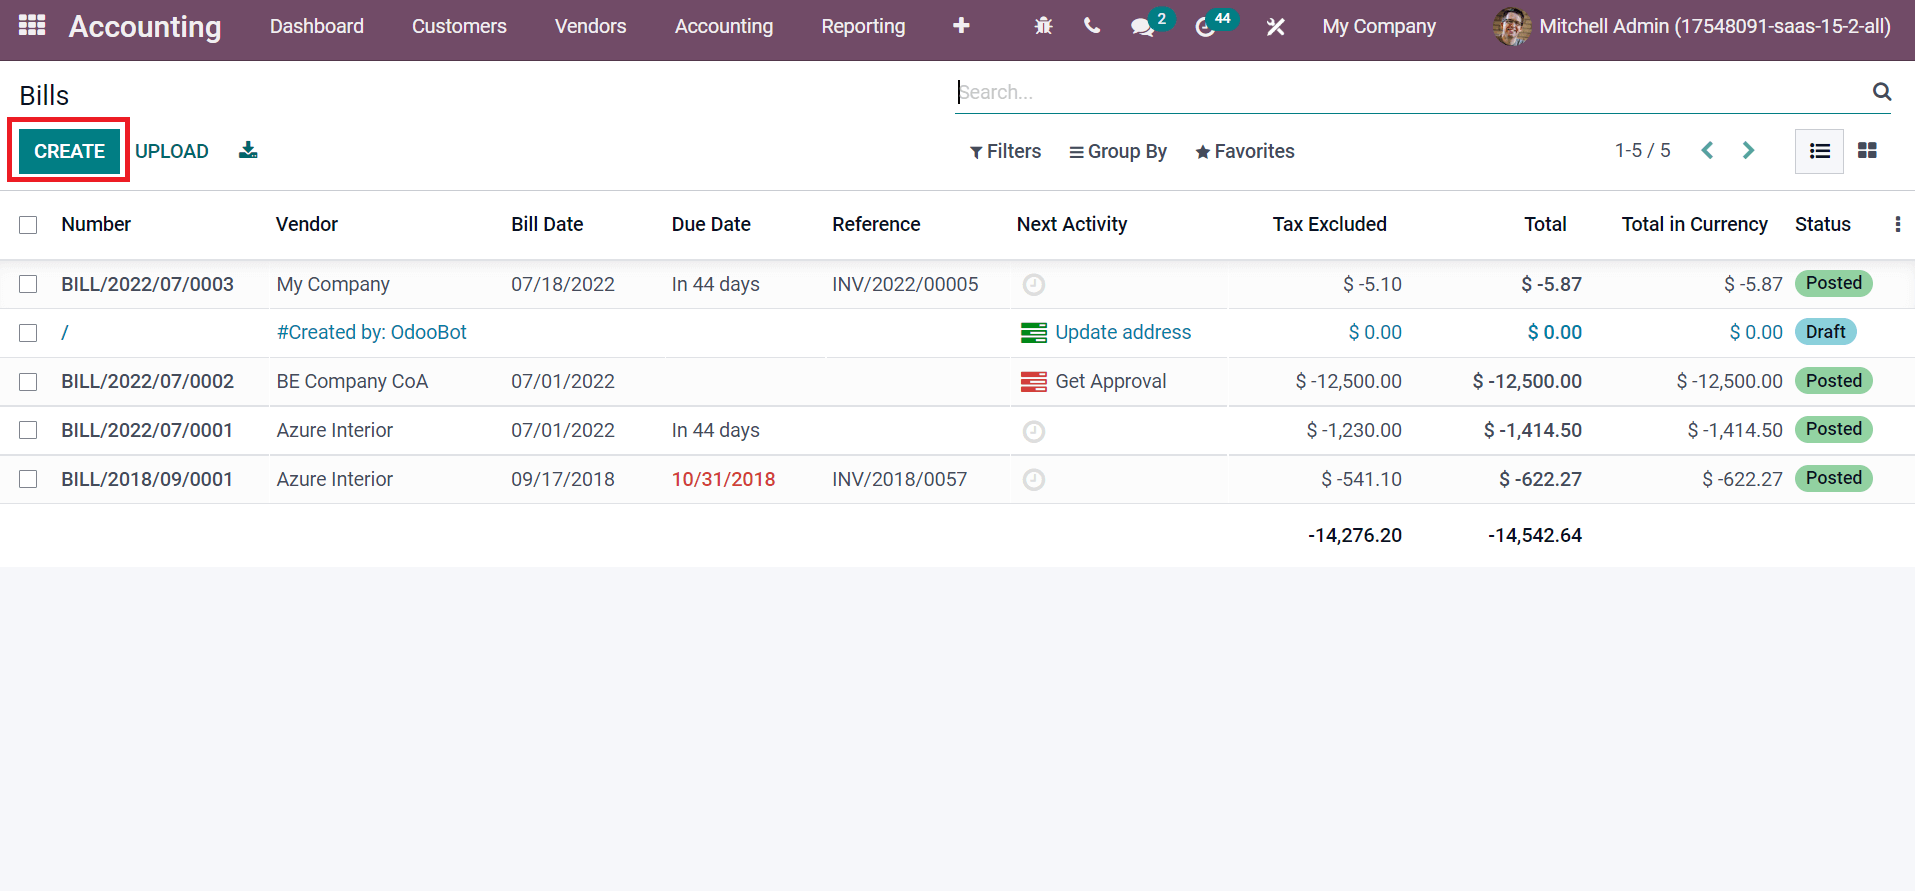
This way, the user can process a vendor bill from the purchase order. Another method is to develop the vendor bill by choosing the Bills button from the Vendor tab. In the Bills window, you can access the created list of bills, including details such as Number, Bill Date, Total, Status, Number, Due Date, etc. Users can formulate a new bill by selecting the CREATE icon as denoted in the screenshot below.
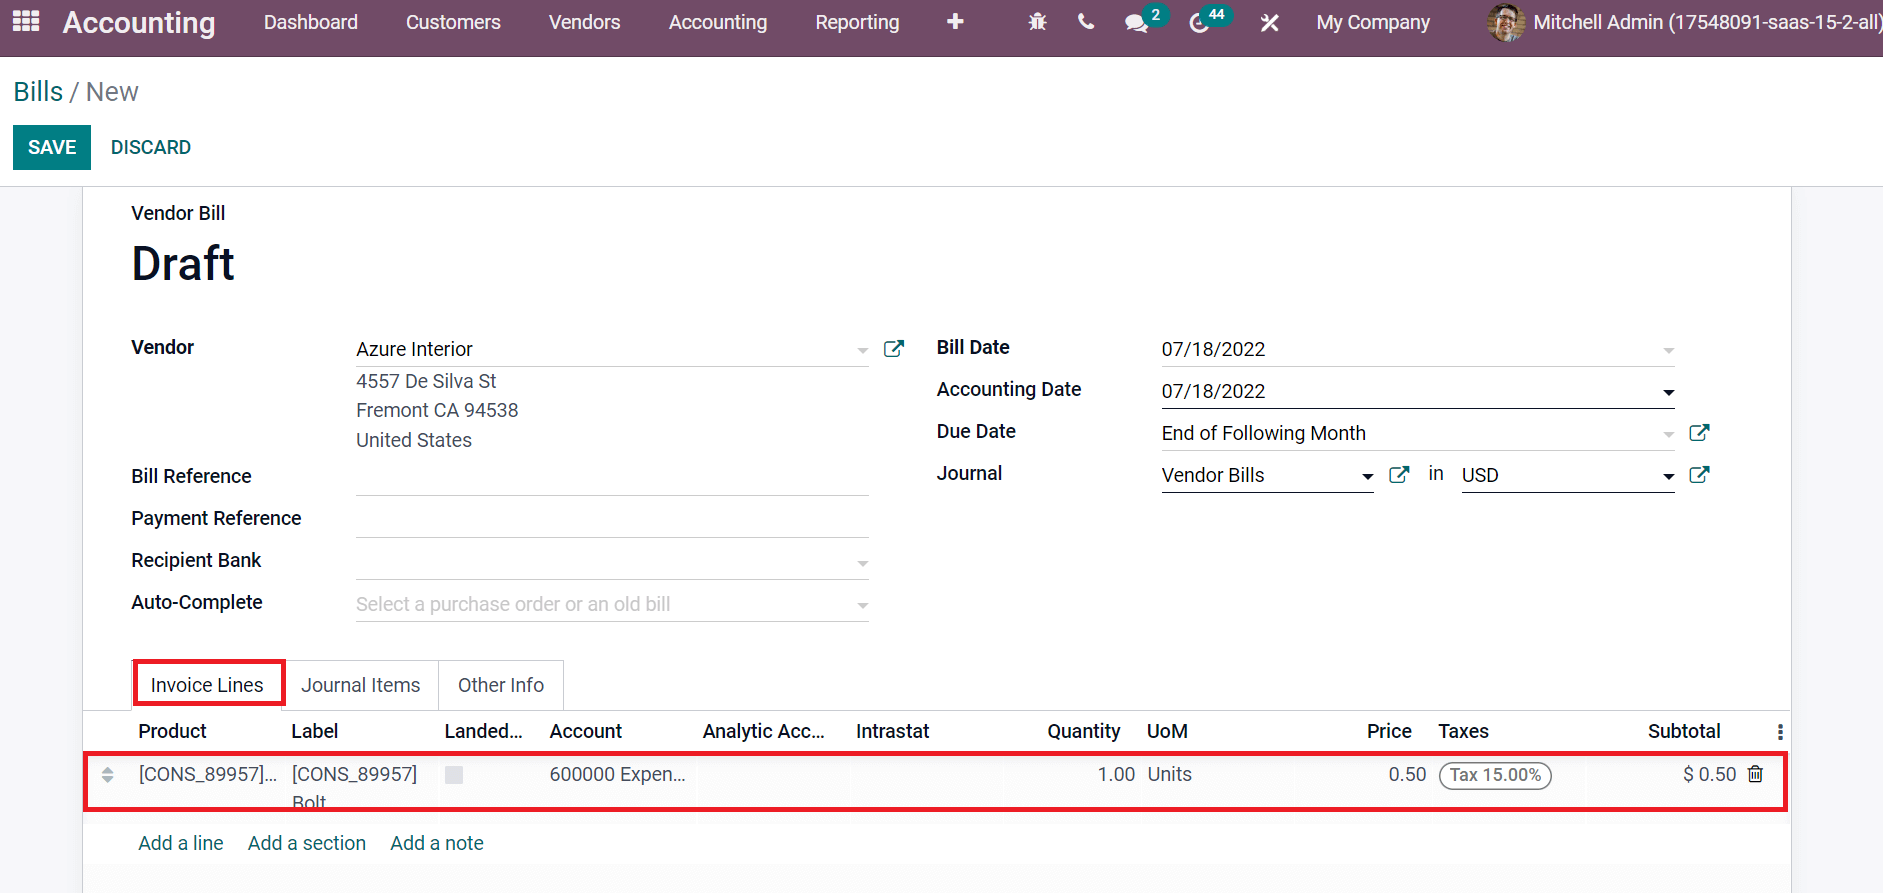
In the new window, enter the vendor's name in the Vendor field and select the invoice date inside the Bill Date field. Later, pick the Accounting Date, end day in the Due Date field, and choose your journal as indicated in the screenshot below.

We can pick the product inside the Bills window by clicking the Add a line option below the Invoice Lines tab. You can choose the product Bolt with one quantity inside the Invoice Lines tab, as marked in the screenshot below.
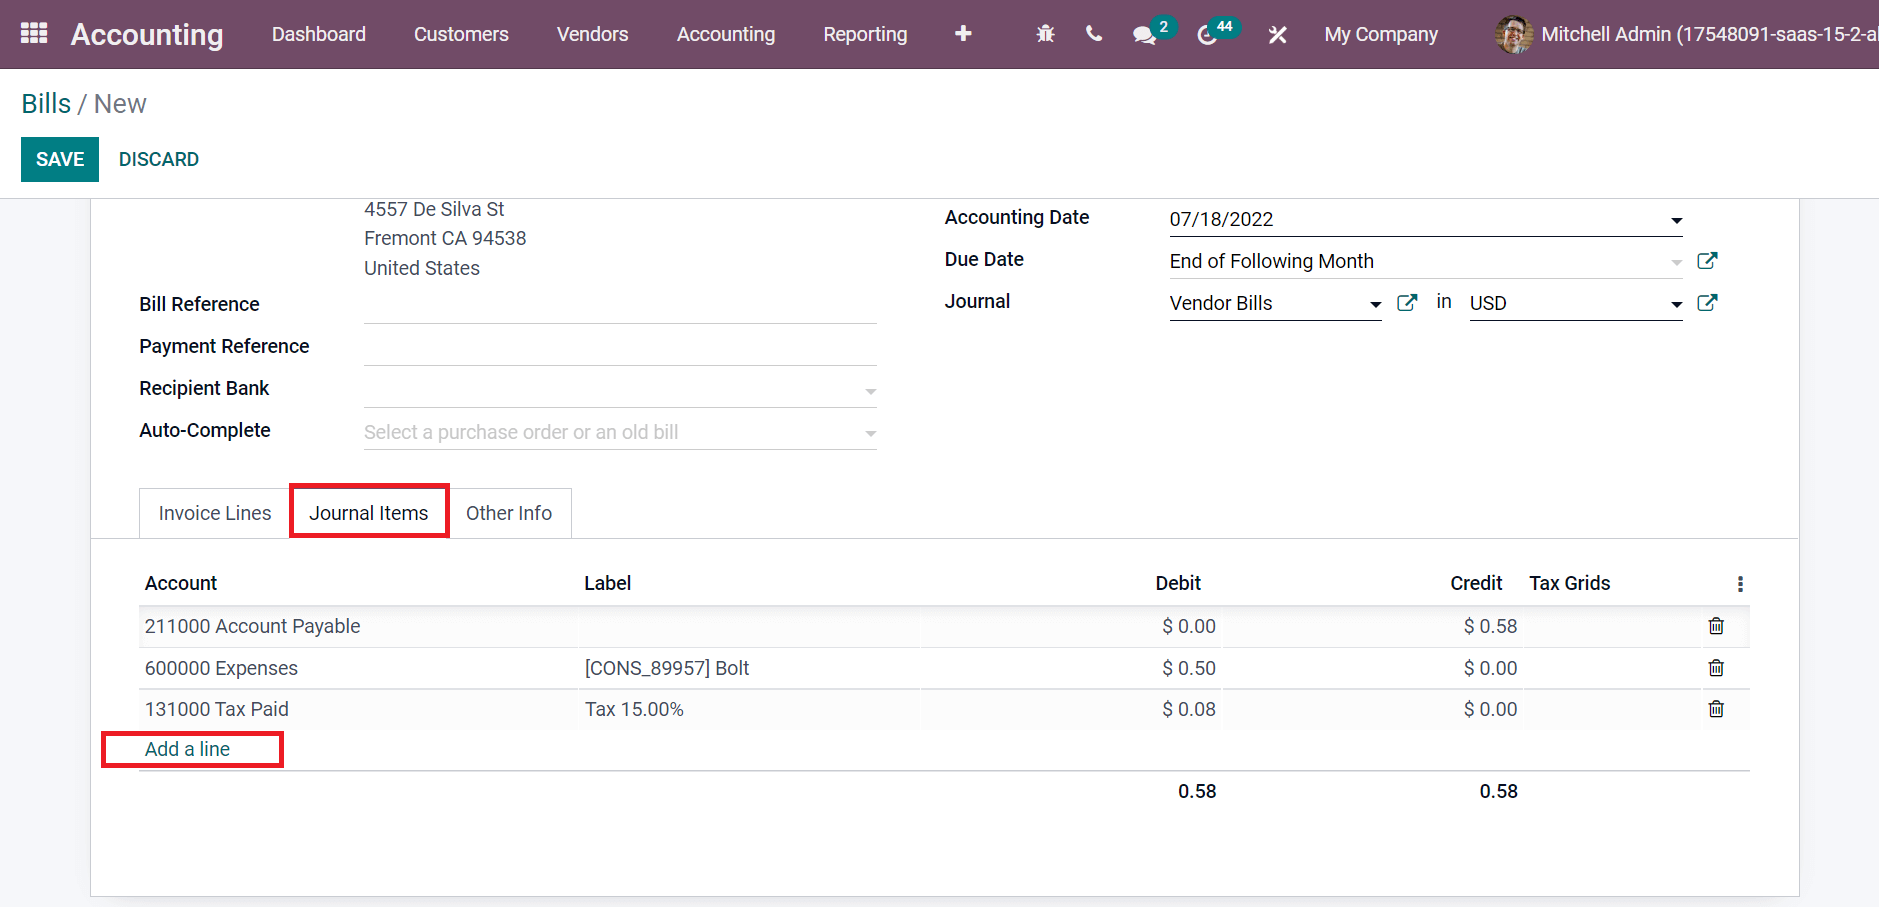
After selecting the product, click the Journal items tab, and you can access journals regarding the product Bolt. To add a new journal item, select the Add a line option below the Journal Items tab, as mentioned in the screenshot below.
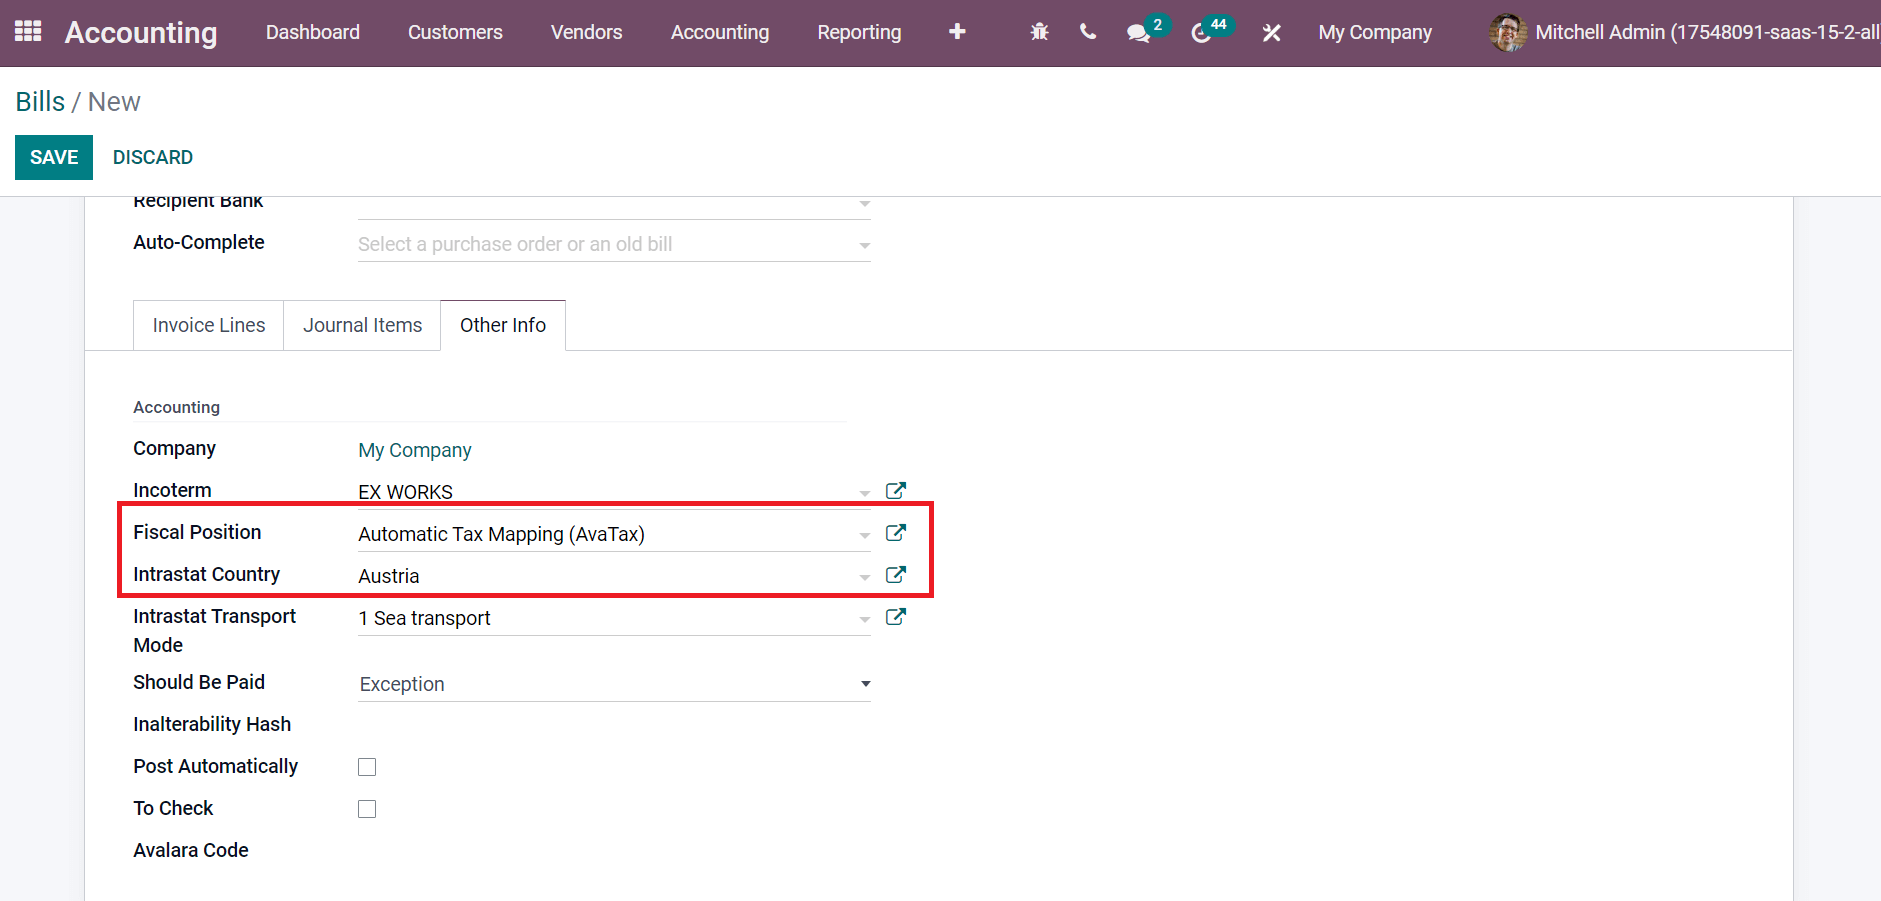
We can manage other accounting details below the Other Info tab. The sequence of predefined terms accessible in international transactions is an International Commercial Terms. You can choose that inside the Incoterm field below the Accounting section of the Other Info tab.
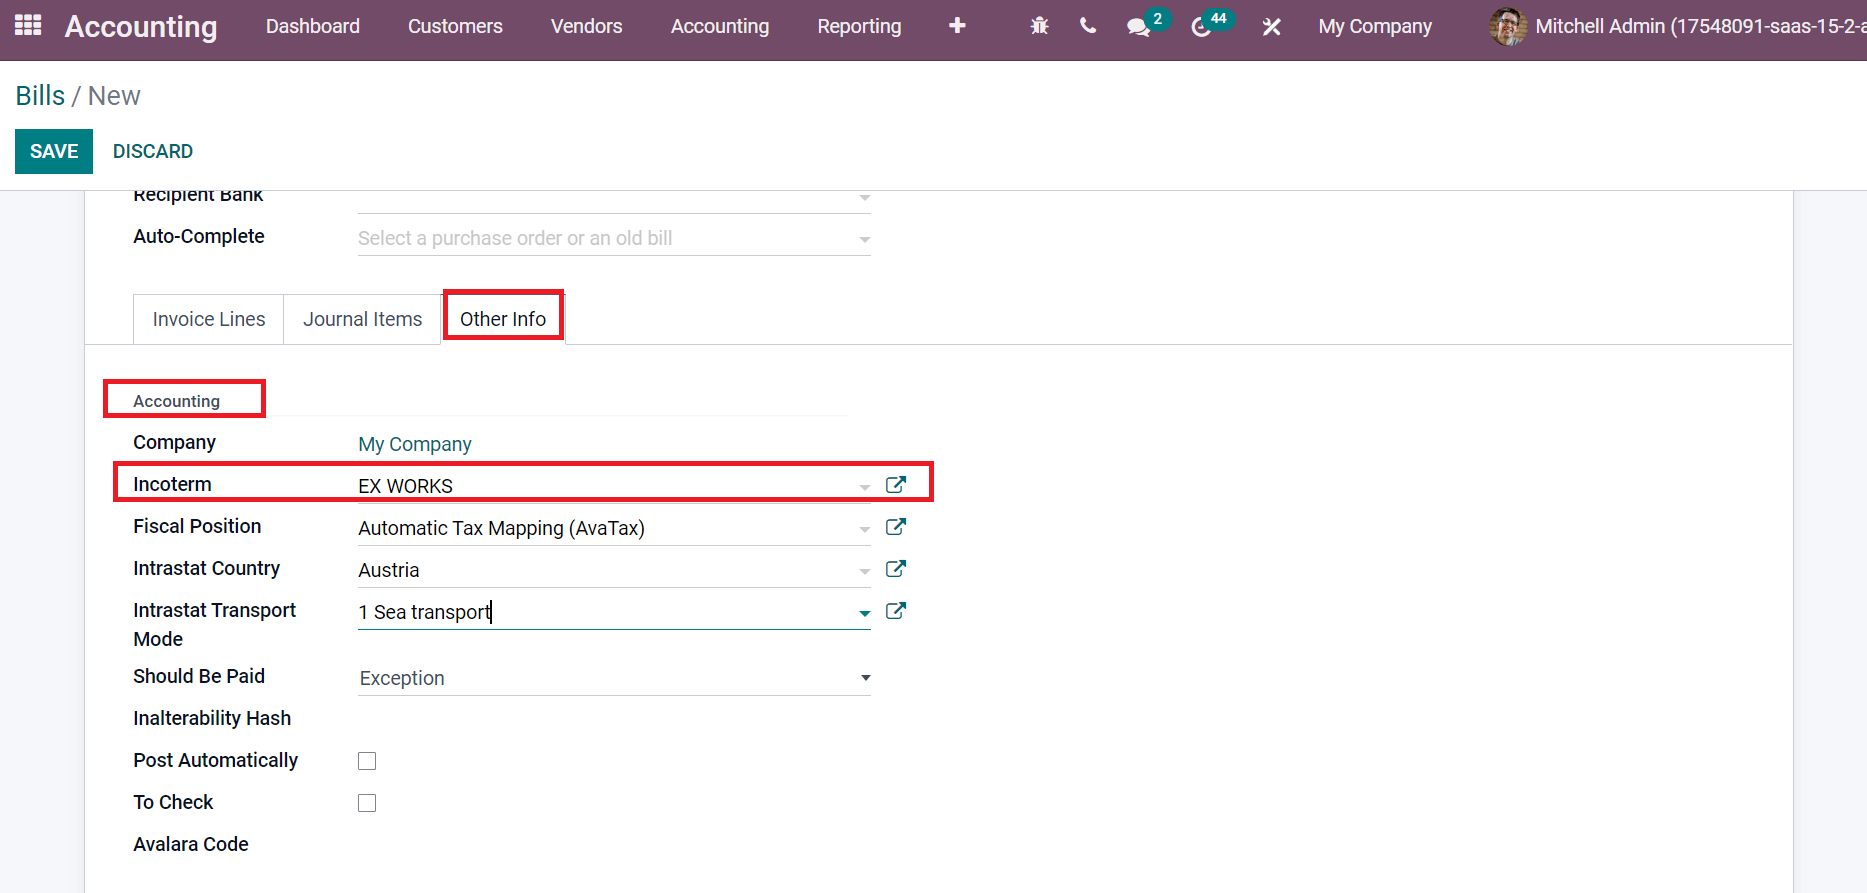
Using the Fiscal Position, we use accounts and adapt taxes for a specific customer. Users can select the Fiscal Position and arrival country in the Intrastat Country field as cited in the screenshot below.
After applying most details related to the vendor bill, save your changes and click the CONFIRM icon to verify the bill.
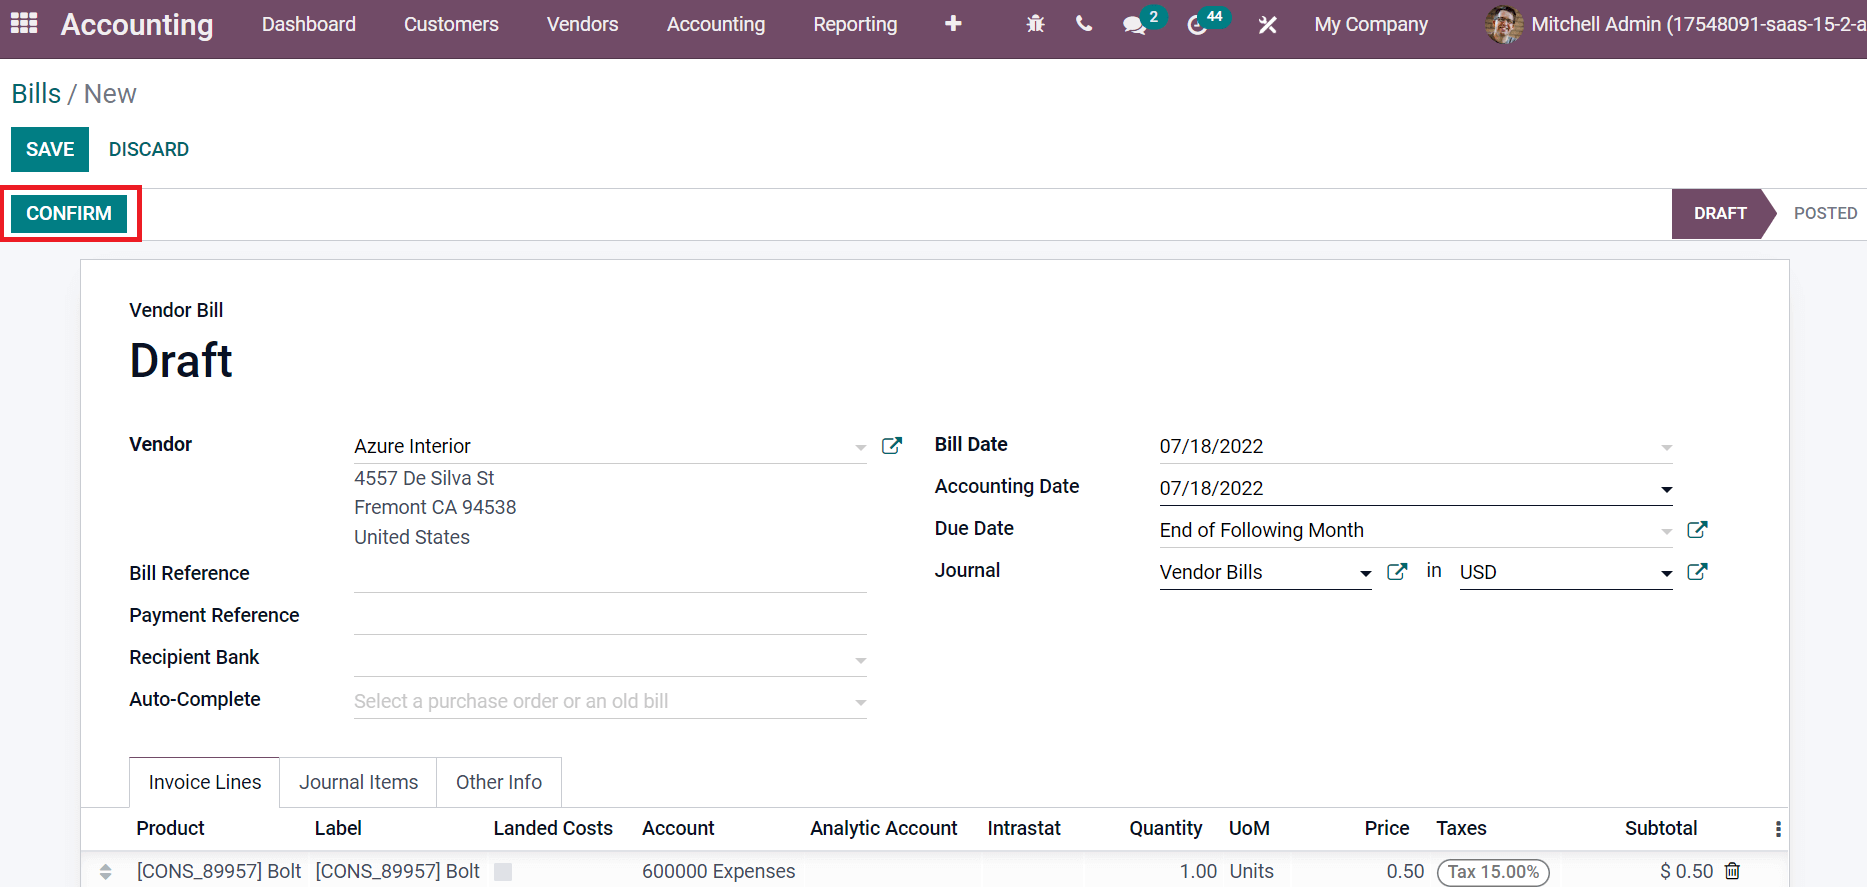
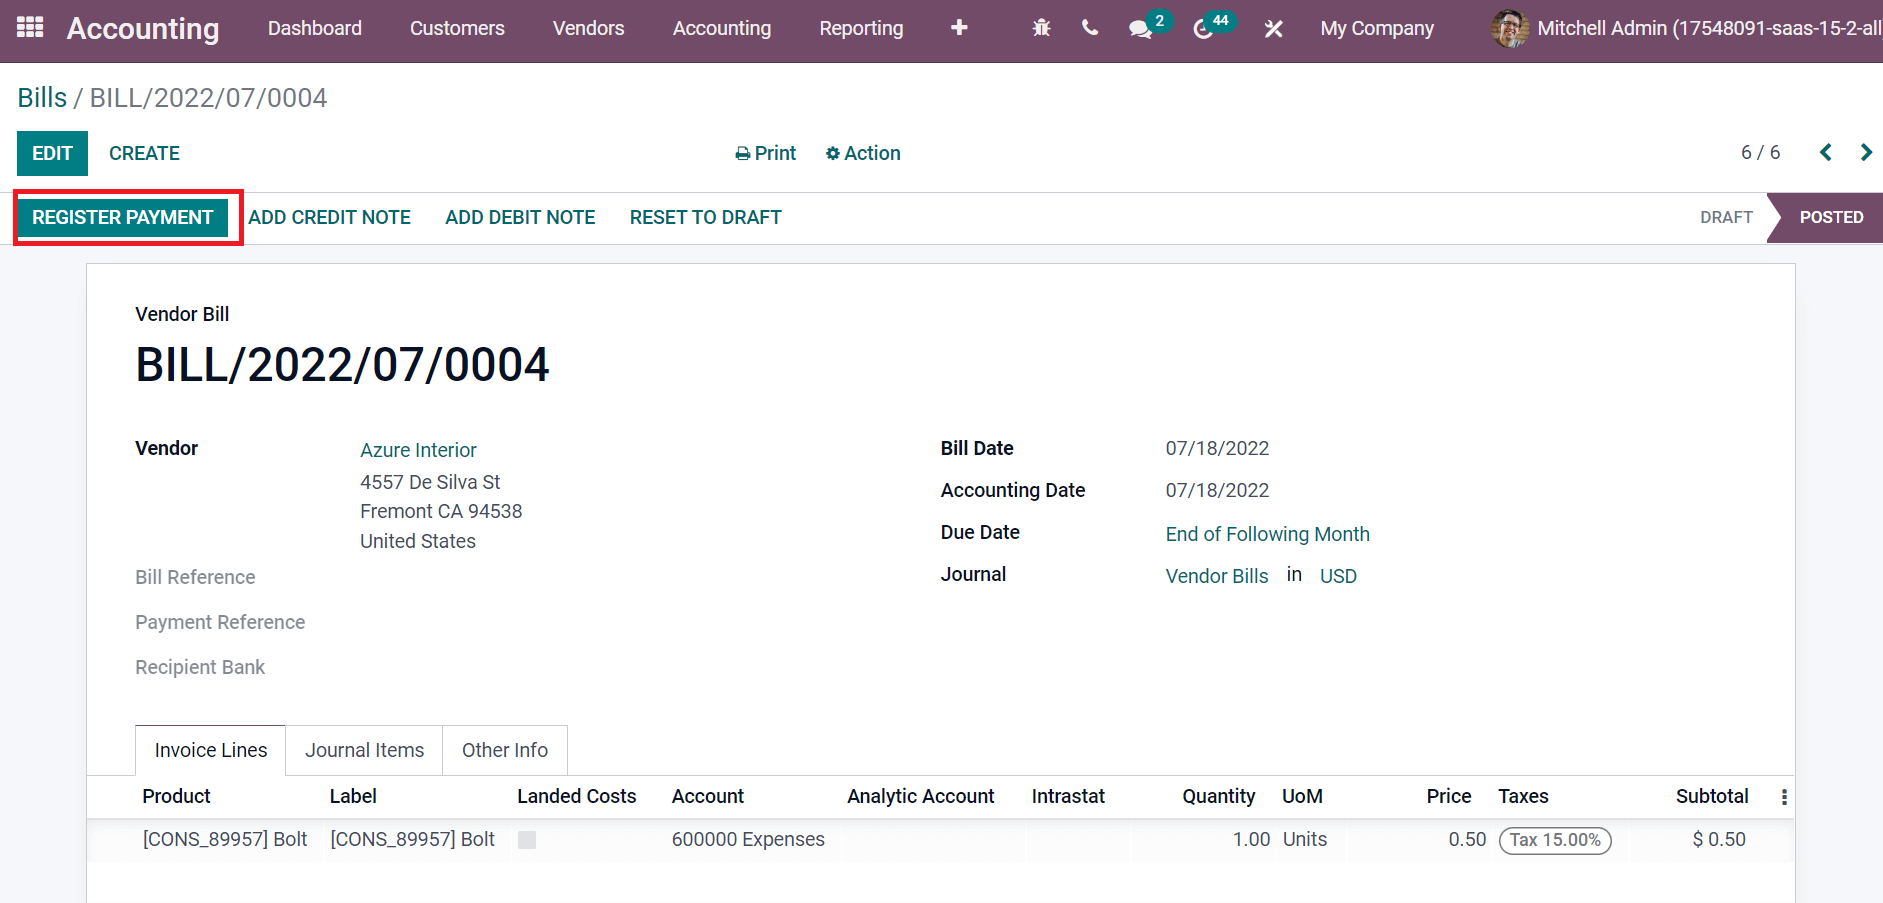
After confirming the bill, you can see that the status changes from DRAFT to POSTED. Now, we can record payment by clicking the REGISTER PAYMENT icon in the Bill window, as presented in the screenshot below.
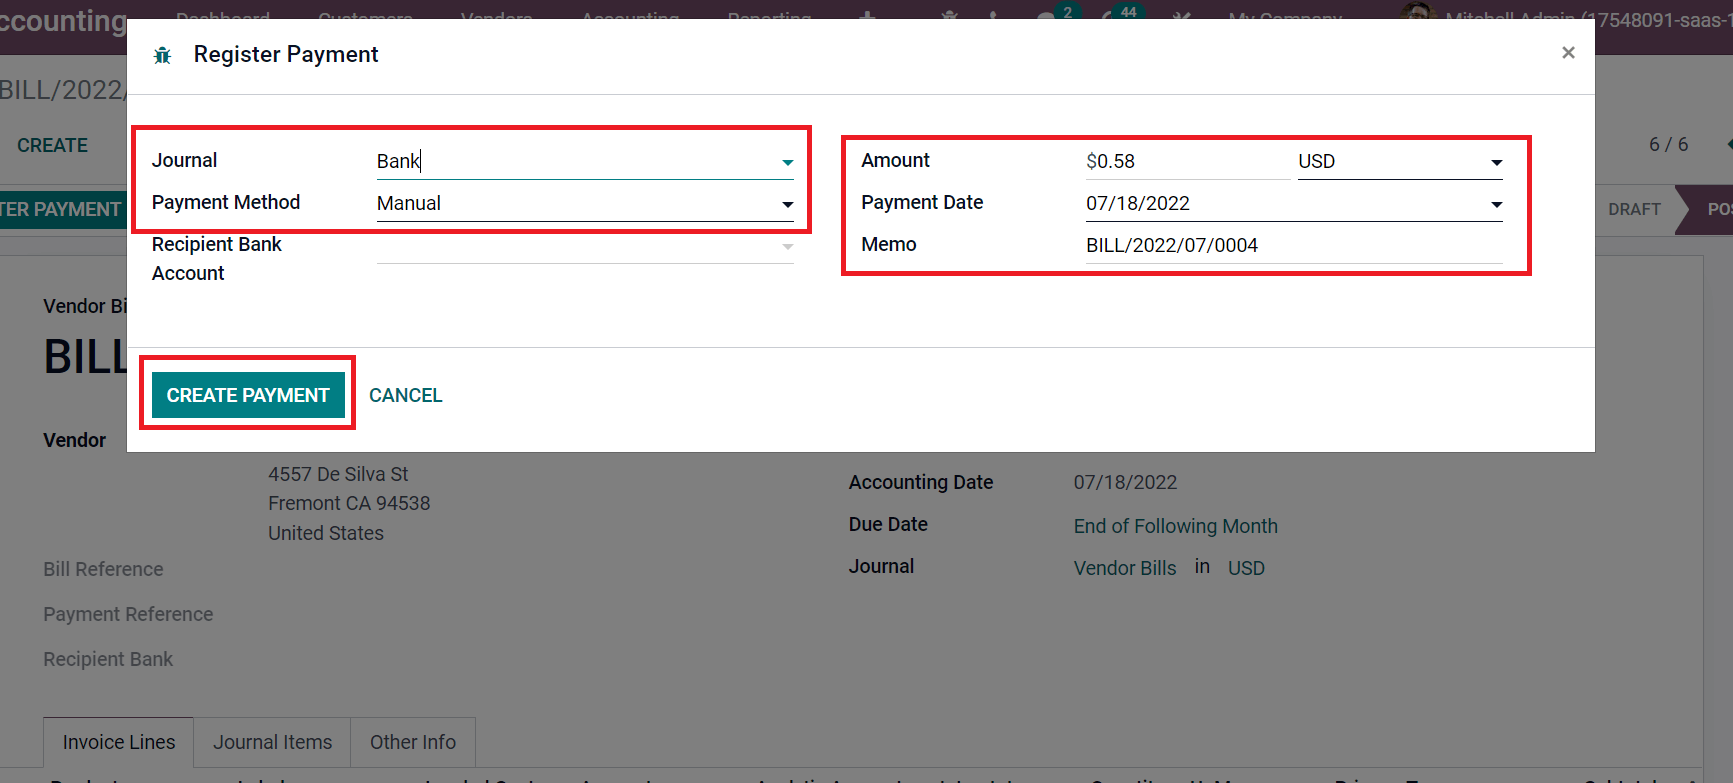
In the Register Payment window, choose your journal and select the Payment Method. Other details such as Payment Date, Memo, and Amount are automatically visible before you, as represented in the screenshot below.
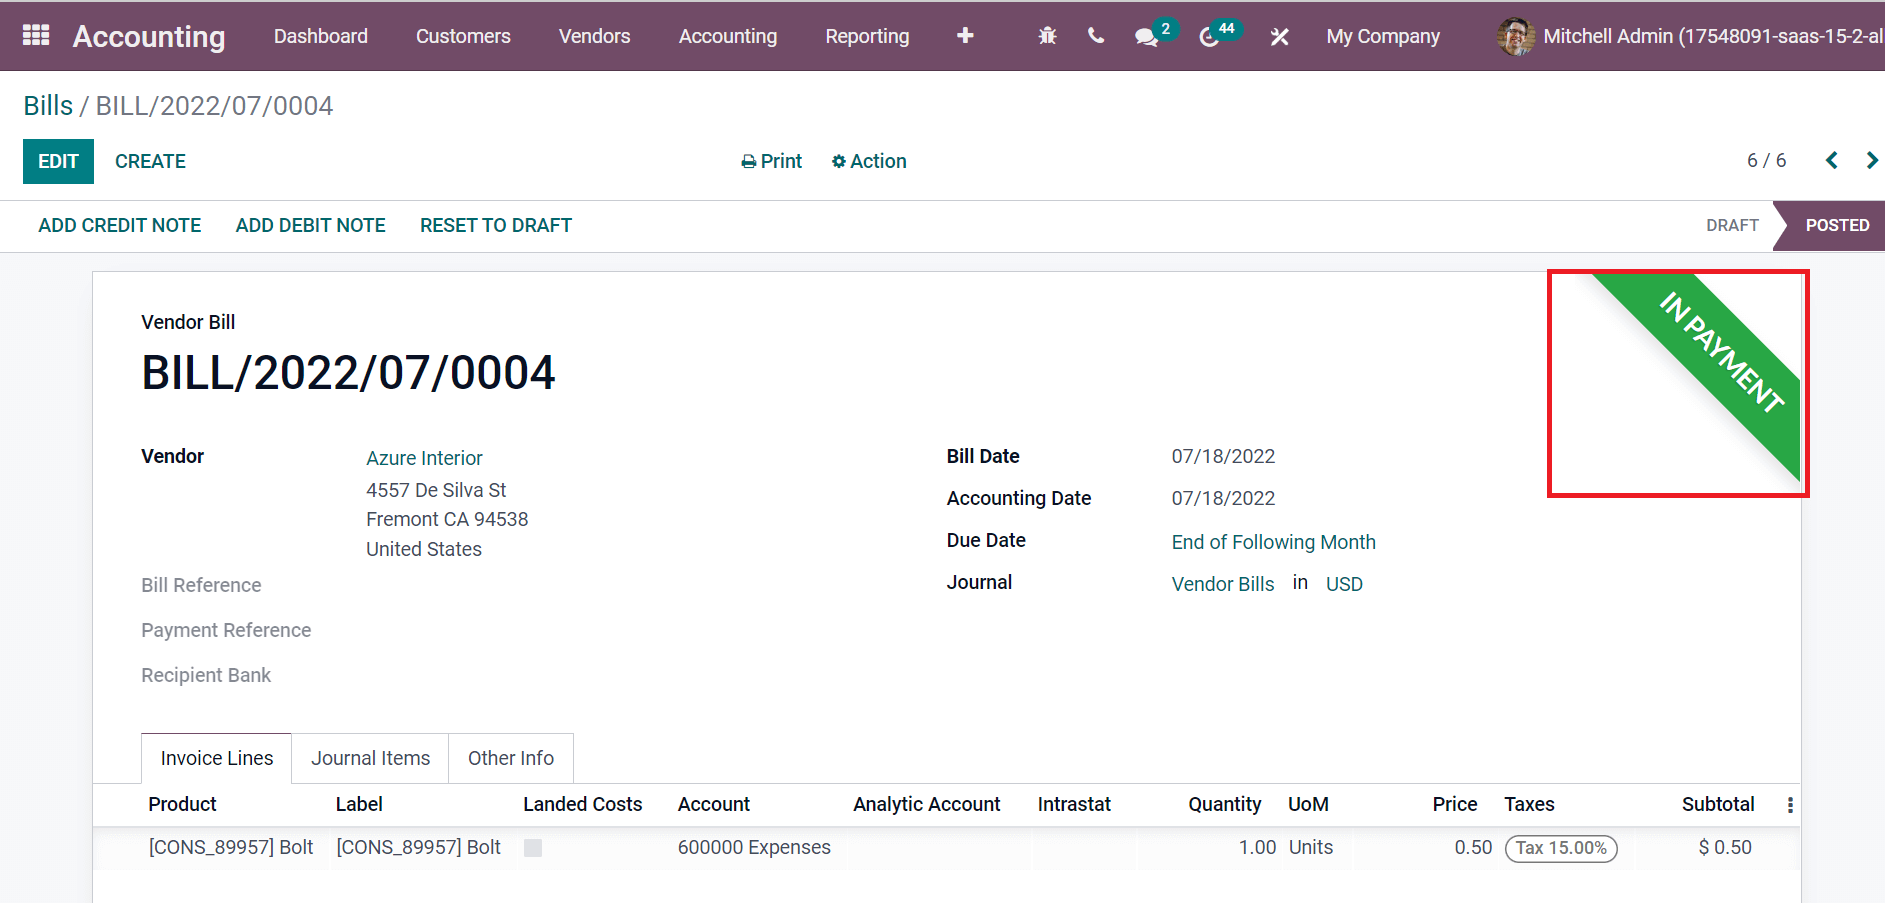
You can generate the payment by clicking on the CREATE PAYMENT icon, as shown in the screenshot above. An IN PAYMENT mark is visible after creating payment for the vendor bill, as notified in the screenshot below.
Hence, it is easy to register a vendor bill from Odoo 15 Accounting.
You can easily manage vendors' data and their bills related to the company using the Odoo 15 Accounting. Executing all accounting transactions regarding vendors within the Odoo ERP is possible. Refer to the below link to identify Vendor Management in Odoo 15 Accounting