Manufacturing
Manufacturing is a procedure of changing over crude materials or segments into completed merchandise or items. For an organization which handle enormous amount of Manufacturing items, they need to follow each manufacturing requests proficiently. The Manufacturing Module under Odoo helps the end user to deal with the intricacy of Production, Manage Bills of Materials, Plan Manufacturing Orders, Track Work Orders and so on. Manufacturing module is one of the fundamental application in Odoo. One need to install 'Manufacturing' application from Odoo Apps in order to avail the benefit of this module on your ERP. Since the Manufacturing module is exceptionally coordinated with Inventory Management, the end user can keep their stock automatically updated with each manufacturing procedure
Working methodology is extremely simple in Odoo manufacturing. One can make a Manufacturing Order of an item and pass it through your various stages in production line and complete creation. One may redo or customize the producing methodology matching your organization's procedure utilizing WorkCentre and Routing concepts. One can without much of a stretch oversee 'Scraps' amid any phase of Manufacturing procedure and 'Unbuild' a made item if necessary. Association may dole out different level users to overlook the entire manufacturing method for successful administration of whole procedure.
On the off chance, if we contrast Odoo manufacturing module and other ERP arrangement, as in every single other module, one can discover some unique features which Odoo alone have. For instance, highlights like byproducts, routing facility, single BOM for multiple product variant, MRP II scheduler, Master production scheduler, Kanban Planning, Production calendar, backward scheduling, Work orders, Repair etc. are not accessible in SAP ERP while Odoo execute every one of them. Also, against Microsoft Dynamics, Odoo have the upside of highlights like Equipment / Machine Management, Work Instructions on Work Orders, Maintenance Requests from Shop Floor Terminal, Production calendar etc.
Following features make Odoo manufacturing module an effective one.
Manage
Manufacturing order
Manage your items into assembling lines or manual gathering.
Work orders
Dispatch production of things required in the last assembling stage of products.
Repair orders
Oversee product repairs under guarantee or as a service.
Schedule and plan
Plan manufacturing
Get a reasonable view on your entire arranging and effectively reschedule manufacturing.
Organize work orders
Approach every single accessible asset and plan ahead with your generation.
Manage Bill of Materials
Monitor accessibility of things in stock and production time.
WorkCentre Capacity
MRP II scheduler utilizing limits and calendars of WorkCentre.
Define Flexible Master Data
Create multi-level Bills of Materials
Set a Bill of Materials inside another so as to manufacture parts of an item in another Bill of Materials.
Optional routing
Create new routings for work orders in order to sequence your production depending on the routing used. Make new routings for work orders so as to sequence your creation relying upon the routing utilized.
Version changes
Enable your items to advance and include configurable alternatives while creating orders.
Phantom of Bill of Materials
Create phantom BoM to manufacture and sell products in kits or to build replacement parts.
Quality
Control Points
Automatically trigger quality checks, helping the manufacturing department.
Quality Checks
Deploy your statistical process control easily with checks.
Quality Alerts
Structure your work utilizing Kanban view of quality alerts.
Maintenance
Preventive Maintenance
Trigger maintenance requests automatically dependent on KPIs.
Corrective Maintenance
Trigger corrective maintenance directly from control center panel.
Calendar
Schedule maintenance operations alongside calendar.
Statistics
Get all maintenance statistics computed for you: MTBF
WorkCentre Control Panel
Tablets
Set tablets on every work center to organize their work efficiently.
Record production
Register productions, scan products, lots or serial numbers.
Worksheets
Display worksheets directly on the WorkCentre with instructions for operator.
Misc. Operations
Scrap products, create quality alerts, and perform checks, right from the WorkCentre.
Alerts
Use alerts to show changes or quality checks to the operator.
Business Intelligence
Get definite examination report on your production line, investigate the exhibition of your work focuses and creation, plan elective generation methodologies and so on are a portion of the subjective measures Odoo BI motor can recommend to you in assembling module.
Framework Users
As a matter of course there are two types of users in manufacturing modules.
Manager: - He is the person who oversees everything, including Crete BOM, Work Order, Routing system and so on.
User: - Generally he can make an assembling request and procedure it. In any case, supervisor can concede more authorization to this client if necessary.
MANUFACTURING ORDER MANAGEMENT
Under Odoo manufacturing module, one can produce a product in two ways. Firstly, one can create a manufacturing order following simple default stages and complete the production. Secondly, one can create a product via customizing the work order by setting up work center and routing mechanisms.
Creating a Manufacturing Order in Simple Steps
Under, the simple steps, foreman can without much of a stretch, plan their manufacturing. He can check the components availability, plan product manufacturing and record production. He does not need to follow the level of granular control afforded by any work orders or routings.
Configuration
Go to Manufacturing > Operations > Manufacturing Orders > Create
- Choose a product from list (or you may create new one).
- Choose Quantity to produce.
- Choose Bill of Material either from the list or create a new one. Bill of Materials allows you to define the list of required raw materials to make a finished product. So while creating a manufacturing order for a particular product one need to select corresponding BoM either from the list or create new.
For creating new Bill of Material
Go to Manufacturing-> Master data->Bill of Materials->Create
Select a product from list.
- Go to Settings -> Manufacturing Order -> Product variant option to enable select product variant option. (In case you produce a product Variant)
- Reference field is used to distinguish Different BoM for same product.
- Specify the BoM Type-Manufacture this product/Kit.
- Click Add a line field and add the raw materials for your product.
Under the Miscellaneous tab in BoM,
- Sequence defines the order in which your BoMs will be selected for production orders, with lower numbers having higher priority.
- Manufacturing Readiness defines when a manufacturing order is considered as ready to be started.
- Operation: When a procurement has a ‘produce’ route with a operation type set, it will try to create a manufacturing order for that product using a BoM of the same operation type. That allows to define stock rules which trigger different manufacturing orders with different BoMs.
Note: - A BoM can be later Updated/Deleted from same menu i.e. Manufacturing > Master Data > Bill of Materials.
Coming back to the manufacturing orders,
- One can define the deadline for completing the production.
- You can add the Responsible for this manufacturing order.
Click on SAVE button after entering all details.
- Consumed Material Tab will show you the product, unit of measure, tracking, products to consume, reserved product, and consumed product.
- Finished product tab will show you the number of finished products.
Click “Check availability” to see the availability of raw materials in inventory. If the red turned black, it denotes that the system holds sufficient stock in the inventory so as to start the production of the product.
Since Odoo offers negative inventory support, one can start production even without ensuring the raw material availability.
Click “Produce” to start production.
You will be navigated to new wizard, like below:
Click RECORD PRODUCTION.
And once you start the production, the status bar will change as follows
You can see that, it is not automatically marked as done, and is still in progress.
Click “Mark as Done” to complete the production process.
Now you can see that the status bar has Chanded from In Progress To Done.
A manufacturing order will be automatically populated with BoM.
Here one gets the provision to avail the Traceability Report,
Inventory Moves
and Cost Analysis.
Create a Manufacturing Order (Advanced Method)
Comparing to simple method, advanced method provides each company to configure more detailed manufacturing process such as setting up Work Centers, Routing, Work Order management etc.
To enable this feature:
Manufacturing ->Configuration -> Settings
Enable ‘ Work Orders’. This will enable new menu in the dashboard to manage Work Center, Routing and Work Order.
Manufacturing > Operations > Manufacturing Order > Create
Fill the fields same as before.
- Choose a product from list (or you may create new one).
- Choose Quantity to produce.
- Choose Bill of Material
- Select a ‘Routing’ mechanism, this will be automatically filled once you choose the BoM.
- One can define the deadline for completing the production.
- You can add the Responsible for this manufacturing order.
Consumed Material Tab will show you the product, unit of measure, tracking, products to consume, reserved product, and consumed product.
Finished product tab will show you the number of finished products.
Miscellaneous tab will show you the operation type, the location where the system stocks the raw material and the location where the system will stock the finished products.
Upon entering all the details, click SAVE button to mark all changes.
Click “Check availability” to see the availability of raw materials in inventory. If the red turned black, it denotes that the system holds sufficient stock in the inventory so as to start the production of the product.
Manage Production
Once you have created and confirmed a Manufacturing order, you can start production. Odoo will list all the Manufacturing orders under Manufacturing > Operations > Manufacturing Orders.
You can view the status of all ongoing manufacturing order from here.
Select a Manufacturing Order from the list.
Status gets changed from CONFIRMED to PLANNED.
So once you start with the production, it further changes from Planned to In Progress.
To start the work order, click on the play button  on top right corner.
You will be navigated to a new window listing the work order.
Upon clicking the Work Order,
Under the Work Instructions tab, you can see the instruction to carry out in the production process.
One gets to see the work instructions, that has to be referred before going to the production.
Under Current Product Tab, it displays the current quantity to produce.
Uder Time tracking Tab, one can see the planned date, effective date, expecte duration,and real time duration.
If you click PROCESS, the work order will start.
It will stop upon clicking MARK AS DONE.
If you want to trigger any action on specific components of the work order. One can utilize the dropdown menu set on the left side.
Utilizing dropdown menu, One can PAUSE, BLOCK or even SCRAP,ask for MAINTENANCE REQUEST and trigger QUALITY ALERT on specific components of the work order.
If you click on BLOCK button, you will be navigated to a new wizard, where you will be asked to specify the lost reason for blocking the work center from carrying the work order. One can also add additional descriptions if any.
If you want to mark the products as SCRAP, click on scrap button and you will be navigated to new window:
Here you can specify the product, quantity, lot, package, owner, work order, manufacturing order, location and more.
Upon clicking MAINTENANCE REQUEST button, you will be navigated to new window requesting the type of maintenance: Preventive or Corrective maintenance. Here, one can specify several other details like manufacturer, equipment, manufacturing order and so forth.
Upon clicking QUALITY ALERTS, you will be navigated to new window like below.
Here one can specify the desired details and set quality alerts on components of the work order.
WORK CENTERS AND ROUTINGS
Utilizing Odoo manufacturing module, one can produce a product in two different ways. One is via creating a manufacturing order via following simple default stages and complete the production or via customizing the work order by setting up work center and routing mechanisms. To use this advanced manufacturing procedure, one needs enable the routing and planning in the manufacturing settings.
WORK CENTERS
As the name indicates, Work centers are the Physical place situated in one’s business firm, where different manufacturing processes can be done. One can create their work center details with all its performance indices. Later they can use this data to analyze the efficiency and other details of each work center.
Configuration
Manufacturing->Configuration ->Settings-> Operations->Work Orders
One needs to activate the option work orders. Click SAVE to mark the changes. The change will be reflected in the dashboard as you can see below. One can manage the work centers directly from dashboard. The user can perform actions and take reports directly from this dashboard.
One can either add the work centers via directly clicking the button WORK CENTERS or via going to
Manufacturing->Master Data->Work Centers
One can create a new work center via clicking the CREATE button.
A creation form will have the following attributes-
Work Center Name: The field defines the name of the work center.
Code: The field defines the code for particular work center.
Working hours: Define the schedule of resource. One can either change or modify the working hours via clicking the modify button.
Under General information tab
Time Efficiency: The field is used to calculate the expected duration of the work order at this work center. For example: If a work order takes one hour and the efficiency factor is 100%, then the expected duration will be one hour. If the efficiency is 200%, however the expected duration will be 30 minutes.
Capacity: Number of pieces that can be produced in parallel.
OEE Target: Overall Equipment Effectiveness Target in percentage.
Time before prod:Time in minutes for the set up.
Time after prod. :Time in minutes for the cleaning.
Cost per hour: Specify the cost of work center per hour.
Analytic accounting: Fill this, only if you want automatic analytic accounting entries on production orders.
So, once you start using this work centers, we can analyze what is happening in the work center via clicking any of the buttons shown below.
This helps in knowing on what’s going on and how efficient actually the work center is.
ROUTING
Routing have the records of the production operations or stages that one must follow in order to produce the finished product. During so, it enables the end user to record the time spend on each manufacturing action and know what the next step is. More than that, it adds a new view in which the end user can add different instructions related to the work, so that one can avoid any mistakes possible. This steps are usually done by the engineering manufacturing department. Thanks to Odoo features, that one can go into the details and keep track of everything, they did and what they need to do next, in order to make the process better. With an easy to use, intuitive interface, Odoo enables to set everything in few minutes and manage the manufacturing process.
Configuration
Manufacturing->Configuration ->Settings-> Operations->Work Orders
One can either create a new routing via directly clicking the button ROUTINGS or via going to
Manufacturing->Master Data->Routings
Normally manufacturing process is not a single step process. Each production process will have its own routes. That means each production will go through many work centers, and in every work center, we perform a part of the manufacturing process, and at the end of the route, the product is completed. Every company will have their own manufacturing route for each product. They can configure it in Odoo and carry out their operations.
Create a new Routing
Manufacturing -> Master Data -> Routings -> Create
Upon clicking the CREATE button, an ew creation form will appear like below.
One can provide a name for the routing and select the production locations. Click “Add a line” to add operations to work centers and time frame.
Under the wizard, enter the operation name, the sequence of the operation and select a work center. Here, the duration of an operation can be set in two ways:
Duration computation: In this method, one can calculate the time duration based on previous work orders.
Default Duration: in this method, one can enter the duration manually.
Next Operation: Set to schedule the next work order after the previous one. By default, there are two types: Once all products are processed and once a minimum number of products is processed.
Description and Worksheet Tab
Under the ‘Description’ tab, one can explain the process involved with each operation. And under the Worksheet, one can upload the process flow as an attachment file.
Linking ‘Route’ to a Manufacturing order.
Linking a created route to a product is done in BoM. Under the Bill of Materials (BoM) one can add the ‘routing’ for a particular product.
Since the manufacturing order is based on the BoM, the system will follow the route specified in, during the manufacturing process. See the figure of a routing enabled manufacturing order.
Check the availability of raw materials via clicking on the “Check availability” button. And click ‘Work orders’, button to create all the work orders according to the routing.
Upon clicking the work order button, one can see the work center specified in the routing.
Click the work order to execute it. You will get a window like below.
Click ‘PROCESS’ button to start the production. End user will be redirected to a new window like below.
Click Mark as Done to start a new work order.
UNBUILD A PRODUCT
Utilizing the Odoo Manufacturing Module, the end user can seamlessly unbuild the products. One can unbuild the products that are built by themselves or can unbuild the products that are received.
Let us take the primary case, where you are manufacturing items by yourself. In case, that one of your products shows some imperfection/defect, you may need to unbuild it as opposed to rejecting it totally, enabling you to reuse a few components of the product.
In the second case, you are purchasing products for the sole purpose of unbuilding them and reusing them.
How to Unbuild Order?
Configuration
Manufacturing->Operations->Unbuild Orders->Create
While making a new unbuild order, the end user can either choose a MO in the event that you are unbuilding something that you made or select an item in the event that you are unbuilding something you received.
Once you are done, Click on “unbuild” button to make the process complete.
In the event that you unbuild an item that you made previously, you will recover the parts from the MO in stock.
On the off chance that you unbuild an item you bought, you will recover the parts from the BoM in stock.
SCRAP ORDERS MANAGEMENT
One of the most useful features of Odoo is that, it provisions the end user to create scrap at any stage of production line. One will be enabled to view a Scrap button almost in all the stages of the production line. Upon clicking the SCRAP button, Odoo creates instant scrap entry in the inventory. However, one can create the fresh scrap entry from going to
Manufacturing -> Operations -> Scrap Orders -> Create
Under the creation form one can specify which product should be scrapped, the total number of quantities, lot number, product location, scrap location, source document if any and expected date by when the process shall be completed.
Fill the fields and Click “ VALIDATE”. It will automatically get inserted to the inventory.
However, one can make a quick entry by clicking on Scrap button available on almost all forms of production.
While creating the manufacturing order.
While MO is planned.
While the work order is processed.
PRODUCT LIFECYCLE MANAGEMENT
Product lifecycle management(PLM) under Odoo deals with engineering change orders (ECO). As the name implies, Engineering Change Orders (ECO) are the procedures carried for applying changes in the product components, documents or assemblies. Changes can be with respect to processes, work instructions or changes in the specifications.
For Instance, if the existing BoM for a product is not available in the market, and one has to update the BoM. So here, one has to use the ECOs.
Configuration
Install the Manufacturing module as well as PLM module.
The available options under PLM includes:
Overview: Here, one can see all the engineering change order types and number of changes going on in each ECO.
Changes: Here, one can view all the engineering change orders in different formats such as kanban, list, calendar, pivot, graph. Also group them on the basis of product, state, and stage or a custom group.
Master Data: Products, Bill of materials of products, Routings, and Work centers come under this section.
Reporting: Analyse all ECOs by reporting.
Configuration
Under the section, one can edit ECO stages, create ECO types and ECO tags.
Creating ECO Types
Enter the name and email alias. Go ahead and Save.
If you go to overview, you can see different ECO types created.
Enter the ECO changes via clicking ENGINEERING CHANGES BUTTON. You will be redirected to a new page like below:
One can add stages of the ECO type via adding columns.
Here four stages are specified:
New: For creating new engineering change orders.
In progress: For the ECOs which are in progress.
Approvals: This stage is for setting approval for a change for the corresponding officials. Approvals for stages can be set in stage settings. Here one can add both officials and approval types.
Effective: This stage is used for confirmed ECOs. Here one can apply changes and this stage will be marked as the final stage in the stage settings, also select allow to apply changes for applying ECO changes.
Creating an Engineering Change Order:
Under the field, one can see different stages through which ECO passes.
Short summary: Under the option, one can give a short summary of the ECO.
Type: Here one can choose the ECO type.
Apply on: Utilizing the option, one can decide where the order has to be applied. Apply on BoM or routing or both for a product or for one product only.
Effectivity: Date on which the changes should be applied.
One can add tags for the ECO, description related to the change and its reason under the note tab. Later save the changes and confirm start new revision.
Upon the action, one has the new revision for the BoM. Consider an ECO for the modification of BoM for a product,
If you refer to the above image, you can see the engineering change order which is in progress. However, one can change the BoM and add any attachments if required. Number of revisions will be notified there. Let’s add some modifications to the existing BoM.
Here, two components are added and the quantity of the existing component is updated. All the changes made are reflected in ECO under BoM changes tab.
Now the ECO is moved to the approval stage via simple drag and drop. In this case, we assigned the manufacturing dept. administrator to approve the changes. Please note that one can’t switch over the ECO to the next state without getting the approval. So the corresponding official has to approve the ECO prior to its move.
The effective stage is the final stage and every change can be applied from that stage only. After getting the approval, one can drag the ECO to the final stage and apply the corresponding changes.
This is the engineering change order of BoM in PLM module. Like this, one can create ECO in routing and BoM. ECO in the product will allow the end user to update the documents related to that product. One can find the updated documents as the attachments of the product. Also if the product undergoes engineering change order based on the product, it comes under the components of another product. However, in this case, one can find the updated attachments in the BoM section.
QUALITY MANAGEMENT
In a business, it is necessary that you provide your customers with good quality products. In order to offer good quality products, the business has to conduct several quality checks, prior to bringing final. The products must be evaluated in different stages so as to assure its standard compliance. This concept is more relevant to the manufacturing business, as the industry is involved with the production process. Utilizing Odoo, one can set quality check at different stages in different ways.
For that install Quality module.
First view of the quality module is a Quality Overview, it is a kanban view of the Quality Teams.
If a company has multiple teams for quality check, Odoo allows to create multiple quality teams.
In order to create a Quality Team, go to
Quality -> Configuration -> Quality Teams -> Create
Here, you would find two fields -Name and Email Alias. Upon entering them, click on the SAVE button to mark changes.
Now, one can see 2 Quality Teams in the Overview.
From the Overview, the user can analyze the overall status and the work progress of each quality team.
QUALITY CONTROL POINTS
Under quality control points, user can define when the product has to be checked, how it should be checked and what to be checked. In order to set control points, go to
Quality -> Quality Control -> Control Points
Under control points, one can see different products that are already set with control points. In order to create new control points, click on the CREATE Button.
The above is the create form of the control points. The form includes:
Title: Title for the control point.
Product: Choose the product for which quality has to be checked.
Product Variant: If the product has multiple variants, choose one variant.
Operation: Operation denotes to the time of quality check.
There are mainly 3 types of operations.
- Receipts: When a product receive to business (which means receives purchase order)
- Delivery Orders: At the time of delivering a product ( which means delivery of a sales order)
- Manufacturing : Quality check at the time of manufacturing.
NOTE: If user is involved with multi-companies, it is embedded with 3 different other options as displayed in the picture.
Control Type: This field defines the interval of the quality check. There are three options under this:
- All Operations: Quality check for every operations.
- Randomly: One can set to check quality at randomly. When choosing randomly, there will be shown an other field Control Frequency. Quality check can be generated on the basis of this Control Frequency.
- Periodically: Quality check can be done periodically. Here we have 3 options to set an interval: Day, Week and Month.
Type: Quality will be checked on the basis of selected type. There are two options:
- Pass - Fail: This option have 2 buttons at Quality Check. Quality team can click either the pass button or fail button based on the quality of the product.
- Measure : Quality team can set a standard measure for the product in any unit, also can set a range. Upon the action, the product within that range will be validated.
- Team: Assign a quality check team.
- Responsible: Select a user as responsible person for the quality check.
Let us go through an example.
Here configured a quality control for Coca-Cola at the time of delivery. Just added some instructions to understand.
Create a sales order for the corresponding item. Click on Delivery button.
Now in the delivery stage, one can see Quality Checks Button as Active. Click Quality Checks.
A window will pop-up with product name and instructions as mentioned earlier. Also there comes 2 button Pass and Fail.
The status of this quality check will avail in Quality Check Smart Button in the delivery order.
Or
Quality -> Quality Controls -> Quality Checks
All Quality Checks will be shown here with the Status.
If a product happens to notice with a damage or mistake, mark it as failed. Upon the action, Quality Alert button will be activated. Quality Alert directly notifies the Quality Team. And Quality Check smart Button transforms to red colour.
One can also set them from Quality module.
Quality -> Quality Control -> Quality Alert
Let us see how to create Quality Alert for Quality Team.
If a product has Lot Number/Serial Number, set them in Lot. A user can add or create tags for understanding the quality issues.
Root Cause: The reason of occuring quality issue.
Priority: Quality Alert will be shown on the basis of priority. Alert of high priority will be shown first.
Description: Mention any description about quality issues.
Corrective Actions: Under Corrective Actions, set actions for correcting quality issues.
Preventive Actions: Preventive Actions is to take precautions against type of quality problems.
These 3 notes displays on the Quality Alerts. The Quality Team can refer these notes and take actions based on these descriptions.
Created Quality Alerts will be shown in the overview for each Quality Team.
Quality Alerts will be shown in different stages based on current status of the alert.
As we already mentioned, alerts will be listed on the basis of priorities. Solved stage is folded. When a Quality Alert reaches Solved state, quality alert will be removed from the overview of the Quality Team.
REPORTING
There are two types of Quality Reporting In Odoo
- Quality Alerts
- Quality Checks
Quality Checks
Quality Alerts
MAINTENANCE MANAGEMENT
While manufacturing a product, it is the prime responsibility of the manufacturing department to assure the product performance. Product quality should be assured in each stage of its production so as to bring in qualitative and high end- performing products.
In order to assure the same, Odoo has brought in maintenance module. Odoo computes standard statistics to provide you with maintenance protocols like tracking equipment and maintenance request. Utilizing Odoo, product maintenance can be carried in two ways:
Preventive maintenance is a support that is routinely performed on an equipment so as to decrease its probability of coming short. It is performed while the equipment is still working. It is carried prior to equipment notifying any fault/failure. Preventive maintenance in other words can be called as servicing of equipment, carried in regular intervals.
On the other hand, corrective maintenance is a support task performed to distinguish, segregate, and redress an issue so that the faulty equipment can be reestablished to an operational condition.
The prime motto of conducting equipment maintenance is that it reduces the downtime as well make the manufacturing process more proficient. Via servicing the equipment over regular periods, the risk of equipment failure can be brought down to a great extend.
Firstly, install the Maintenance module:
Under this, one can seamlessly create an equipment.
To create equipment,
Go to Equipment -> Machines and Tools -> Create.
The creation form will have the following fields:
- Equipment Name: Name of the equipment.
- quipment Category: Category of the equipment.
- Company: Company who owns the equipment.
- Used By:
- Department: Choose department, if this equipment is used by a specific department.
- Employee: Choose employee, if this equipment is used by a specific employee.
- Other: To choose an employee under a department. One can select both department and employee if chose the option-other.
- Maintenance team: One can create/choose the maintenance team.
Creating a maintenance team,
Configuration >> Maintenance Teams>> Create.
Here, one can add team members and choose a company for creating maintenance team.
Coming back to creating an equipment,
- Technician: Technician who is undertaking the equipment.
- Assigned Date: One can add assigned date if any . For instance, if the equipment is used by an employee, one can add the specific date on which the equipment was assigned to that employee.
- Scrap date: One can add scrap date based on its durability.
- Used in location: Location where equipment is used.
- Work Center: One can add the work center of the equipment if any.
Under Product information tab,
One can add details pertaining to the equipment, for instance when it was bought.
Here, one can add the vendor associated to the equipment, vendor reference, the equipment model, serial number, equipment cost and warranty expiration date. Effective date is the date on which the equipment became effective.
Under Maintenance tab,
Details pertaining to the maintenance are displayed.
- Preventive maintenance Frequency: One can set the frequency of preventive maintenance in number of days
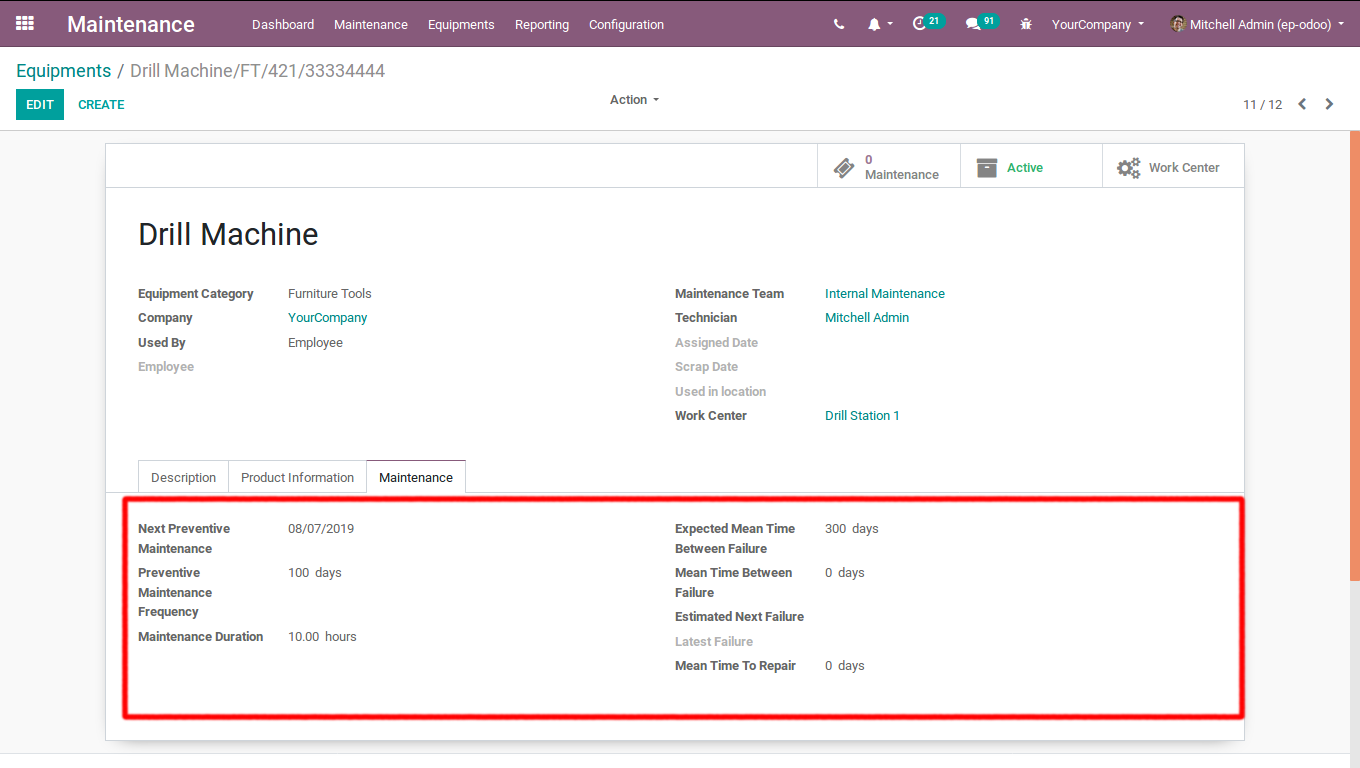
- Next Preventive maintenance: Once preventive maintenance is set, following preventive maintenance will set automatically based on that .ie when is the next preventive maintenance of that equipment. In the initial case, it will be calculated based on the effective date.Here, I have given preventive maintenance frequency as 100 days. You can see the next preventive maintenance after 100 days, based on the frequency set.
- Maintenance duration: Duration of maintenance in hours.
- Expected mean time between failures: One can set the expected mean time between failures in days.
- Mean time between failures(MTBF): It is calculated based on the corrective failure. Suppose an equipment failure happens on 06/04/2019(6th April 2019), and next failure happens on 10/04/2019(10th April 2019), mean time between failures will be 4 days . However the first failure is calculated based on the effective date.
- Expected Next Failure: Expected failure date will be generated based on the mean time between failures. In the case of first failure of the equipment, it is calculated based on the effective date.
- Latest failure: Last failure date will be updated automatically.
- Mean time to repair(MTTR): Mean time between maintenance and repair in days. If the maintenance started on 2nd May 2019 and equipment got repaired on 3rd may 2019.In that case, mean time to repair will be 1 day.
CREATE MAINTENANCE REQUEST FROM THE MAINTENANCE MODULE.
Go to Maintenance>>Maintenance request.
- Name: One can give name for the maintenance request.
- Created By: Employee who create maintenance request.
- Company: Company that request for maintenance.
- Equipment: Choose the equipment for maintenance.
- Request date: The date on which maintenance request is created. It will be generated automatically by the system.
- Close Date: Date on which maintenance is completed.
- Maintenance type: Maintenance is of 2 types, Corrective and Preventive.
- Manufacturing order: When equipment failure happens in between manufacturing order, one can choose the manufacturing order here.
- Teams: Choose a maintenance team for the maintenance.
- Responsible: Responsible person of the maintenance request.
- Scheduled date: Date on which the maintenance team plans the maintenance. It should not differ much from request date.
- Duration: Duration of the maintenance.
- Priority: Priority can be set to maintenance request.
Note: Maintenance request can be created/viewed from the calendar. For that, go to Maintenance>>Maintenance Calendar.
Here, one can choose the date and create maintenance request. For that click on a date>> edit.
It will take you to create maintenance request, which I had explained above.
Let us see the flow of maintenance request.
At first, let’s see the maintenance request of type -corrective:
Once the maintenance is in progress, state gets changed to INPROGRESS. Once the equipment gets repaired, state automatically gets changed to REPAIRED. If the equipment is scraped, state gets changed to SCRAP. Once the state is repaired or scraped, close date will be automatically added. Also Expected Next Failure date over equipment correspondingly changes.
Mean time between failures(MTBF) is 10 days and failure happened on 05/09/2019 ie Expected Next Failure on 05/19/2019.
Estimated Next Failure = Requested date of maintenance request + Mean time between failures.
Latest Failure: Latest failure date will be updated based on the maintenance request date.
Here, Mean time to repair(MTTR) is 0 days as the maintenance request and repairing happened on same date.
Now, lets see the preventive maintenance request.
When preventive maintenance request is saved. Corresponding to that, the next preventive date will be automatically set as maintenance requested date in the equipment . Here maintenance requested date is on 05/09/2019.
Let's check in equipment Drill Machine.
When preventive maintenance gets resolved, the next preventive date will be automatically calculated on the basis of preventive maintenance frequency set in the equipment . So let's check in Drill Machine.
Here, the next preventive frequency is after 100 days and the maintenance close date is on 05/09/2019.So, the next preventive maintenance will be on 05/09/2019 + 100 days ie, 08/17/2019.
If the equipment failure happens, one can create maintenance request from manufacturing order and work order. For that Go to >> Manufacturing Module.
While creating manufacturing order or in case in between the manufacturing order, if the equipment fails, one can create maintenance request.
It will allow you to create a maintenance request.
If the equipment fails while the process is on the run, then also the maintenance request can be created from the work orders. For that, click on the menu as shown below.
Upon clicking the menu, one can see an option maintenance request as shown in the below image.
This option will allow you to create a maintenance request.
REPAIR MANAGEMENT
The Odoo Repair application enables the end user to fix products you have made or manufactured, in case that they present a defect/imperfection.
Creating a Repair Order
As soon as you enter the module you will get list of existing repair orders.
When a client sends you a product for fix, create another Repair Order.For creating new repair order click CREATE.
A create form will appear like below:
Fill it in with all the data you may need, for example, product to repair, product quantity, Lot/Serial, the customer,Invoicing method whether it must be invoiced after or before the repair, the parts you may require, and so forth.
Once everything is done, the end use can send across the repair quotation to its customer. In the event, the repair quotation gets approved, one can confirm the repair. Eventually the end user shall be able to start and later end the repair upon its completion.
Later invoice the repair.