Product Variants
Under the Product variants tab, one can deal with the products having distinctive varieties, similar to measure, shading, and so on. It permits dealing with the product at the template level (for all varieties) and at the variant level (specific attributes).
In the event that you click on the attributes button, you will get a drop down rundown with attributes. One can likewise include new characteristics or attributes via clicking the choice CREATE AND EDIT.
One can without much of a stretch set the attribute type, attribute values, and variants in Odoo.
Adding Vendors to the product
There are two different ways of adding merchants to the product.
- If you issue a sales order for first time, Odoo will consequently connect the seller and its cost to the product.
- Secondly including the merchants manually.
Setting Multiple Vendors on a Product
On the off chance that you end up with the need to purchase from numerous sellers for one product, Odoo can let you directly link them with a solitary product/item.
Add vendors in a product
To utilize this feature, go to Purchases ‣ Products, at that point select a product.
From that point you can add existing merchants to your product or make another one on the fly.
Note that every first time the product is obtained from another seller or vendor, Odoo will automatically link the contact and cost with the product.
When you're adding a seller to an item, you're able to include the merchant, product name and code also the minimal quantity, cost and legitimacy period.
Useful Tip:
This Odoo feature favors the product variants, such as one t-shirt of variant sizes!
Handling Products in Different Units of Measure
Now and again, dealing with products in various unit of measures is vital. For instance, in the event that you purchase items in a nation where the metric measuring standard is of utilization and sell them in a nation where the imperial framework is utilized, you should change over the units. Odoo empowers to work with various units of measure for one item. Odoo comes in favor of working with different units of measure for one product.
Configuration
Under Inventory application, go to Configuration ‣ Settings. And under the Products section, tick the option Units of measure.
Setting up units on your products
In Inventory Control ‣ Products, open the product which you might want to change the purchase/sale unit of measure, and click on Edit.
In the Unit of Measure area, select the unit in which the item will be sold and in which internal exchanges will be executed.
In the Purchase Unit of Measure area, select the unit in which you buy the item. When you're set, click on Save.
Upon clicking the edit button you are provisioned to create new unit of measures in Odoo.
Transfer from one unit to another
While doing inter- unit exchanges, the rounding adjustments are consequently done by Odoo.
The unit of measure can be changed all through the entire procedure. The only condition is that the unit of measure is a piece of a similar class.
In this model, we are in the egg business:
- We purchase eggs by plate (30 eggs)
- We check all eggs exclusively while getting it (quality control)
- We pitch eggs by the dozen to the clients
Note:
The Sale price is communicated in the Product unit of measure. The cost is communicated in the Purchase Unit of Measure
Note:
All internal transfers are communicated in the Product Unit of Measure.
Procurement
While doing your procurement demand, you can in any case change the unit of measure.
The unit of measure can likewise be changed even in the purchase order.
Quality Control
The quality control is done by unit. The fundamental unit of measure for our item is Unit. In this manner the quality check is done by unit.
Note:
The unit of measure must be changed when the transfer status is Draft.
Delivery process
The eggs are sold by the dozen. You can pick the unit of measure on the sales order archive. While doing it, the cost is automatically figured from the unit to the dozen.
In the delivery order, the initial interest is carries in sales order unit of measure:
Be that as it may, the transfer is done in the product unit of measure. Everything is changed automatically:
Vendor management
Monitoring your vendors or merchants can be a tedious task in everyday business life. Costs can change and you may have a few providers for one item. With Odoo you have the likelihood to straightforwardly interface or get linked with merchants with the corresponding item and indicate the costs consequently the first occasion when you purchase them. Since Odoo Sales and Purchase module is related with CRM, there is no different vendor management in purchase, rather it gets to Partner management subsystem simply like in the Sales module. Utilizing this module, one can add people or substances to their framework whom can act either as Customer or Vendor or Both. In purchase module one can get to this feature under Purchase - > Vendor tab.
Creating Vendor
Go to Products submenu under Purchase, and click CREATE.
A creation form like below will appear:
Odoo gets you with two types of vendors:
Contact and Address Tab: Here you have the option to completely configure a new vendor of yours via adding his name, address, phone, mobile, email id, website, his preferred language( to send RFQ) , tags( specializations) to make it more specific etc.
Internal Note Tab: Internal note is a functional feature that you put comment without disturbing followers. If you want to notify a particular seller, rather than disturbing all others, you can insert an internal note in the customer form.
Sales and Purchase Tab:
- Customer: Check this box, if this contact is a customer or vendor. It can be selected in a sales order.
- Vendor: Check this box if this contact is a vendor. It can be selected in purchase order.
- Delivery method : The delivery method will be used when invoicing from picking. Based on the delivery methods, Odoo enables flexible payment terms. The options are like: Immediate Payment, 15 Days, 30 Net Days, 45 Days, 2 Months, End of the following Month, 30%Advance End of the following month.
- Payment Terms: This payment term will be used instead of the default one for sales order and customer invoices.
- Fiscal Position: The fiscal position determines the taxes/accounts used for this contract.
- Barcode: Use a barcode to identify this contract from the point of sale.
- Loyalty Points: These are the points that user won as a part of loyalty program.
Accounting Tab: Enables to add the basic accounting details pertaining to the customer. The creation form will look like:
- Bank: The name of the bank, where the customer holds the account.
- Account number: The customer’s registered account number.
- Account Receivable: This account will be used instead of the default one as the receivable account for the current partner.
- Account Payable: The account will be used instead of the default one as the payable account for the current partner.
Vendor Pricelists
Importing the vendor pricelists can be of great advantage when it comes to staying abreast with p roduct pricing for a business organization.
Configuration
To enable the feature, go to Purchases ‣ Configuration ‣ Settings and tick the box in front of "Vendor Pricelists" under Products option.
Make sure that you save your settings via clicking SAVE button in the top left corner.
Importing a pricelist
For importing a pricelist, go to Purchase ‣ Vendor Pricelists
Firstly load the relevant file via clicking LOAD FILE. Make sure everything is right. Upon confirming, click IMPORT.
The below image displays the template of the columns utilized here.
Request For Quotation and Purchase Order
Create a request for quotation
Any purchase procedure begins from a purchase order and finishes with the gathering of good/service. In Odoo you can either directly make a purchase order (PO) or you can demand for a quotation and make PO only upon confirming the quote by the merchant. You can go for Purchase Tender if there is a case of competitive bidding. Be that as it may, in each purchase, you will have a purchase order and the PO will produce an invoice, and relying upon the agreement with your provider, you will be required to pay the receipt before or after the delivery.
A Request for Quotation (RfQ) is utilized when you intend to buy a few products and you might want to get a quote for those products. In Odoo, the Request for Quotation is utilized to send your rundown of wanted or desired items to your provider. When your provider has answered your quotation, you can proceed with the offer and purchase or to turn down the offer.
Configuration
Go to the Purchases module, open Purchase ‣ Requests for Quotation and click on Create.
Soon you click on CREATE button, the end user will be moved to a new window with Request for Quotation/New.
The creation form will look like:
Vendor: Under the option, one can select the Supplier/Vendor. One can find a vendor by its Name, TIN, Email or Internal Reference. One can select the supplier from the Vendor menu,
or create it on-the-fly via clicking on Create and Edit.
Vendor Reference: It is the reference of the sales order or offer sent by the vendor. The vendor reference is typically composed on the delivery order sent by your seller and is for the most part used to do the matching of your items while you receive it.
Purchase Agreement: A purchase agreement is a kind of legal document illustrating the diverse conditions and terms that are identified with the sale of products. It makes a legally binding contract between the purchaser and the vendor. By default, the Purchase Agreements isn't initiated in Odoo. To utilize the purchase agreement, one should initially initiate the choice. To initiate the Purchase Agreements-In the Purchases module, open the Configuration menu and click on Settings. In the Order section, find the Purchase Agreements and tick the box, and click on Save.
Under the Agreement Type field, the end user would find two options: Call for Tender and Blanket Order.
Call for Tender: A Call for Tender is a unique method to demand offers from various merchants to get the most fascinating cost.
Blanket Order: A Blanket Order is an agreement between you (the client) and your provider. It is utilized to arrange a limited cost. The provider is profited by the economies of scale inalienable in a substantial request. You are profited by being permitted to take numerous littler conveyances over some undefined time frame, at a lower cost, without paying for the substantial request right away. Every little occasional delivery is known as a release or call-off.
- Order Date: The purchase order date is the date that the buy request or a purchase order is produced by the purchaser, yet it can likewise mean the date that the vendor gets the purchase order. In the Order Date field, select the date to which you wish to continue to the actual order
- Product: Under Products, click on Add an item. Select the product you wish to order in the Product menu.
- Description: A description specifying the characteristics of the selected product.
- Scheduled Date: Add the expected delivery date in the Scheduled Date field.
- Analytic Account: The analytic accounting can be used for several purposes like – to analyze the costs of a company or to analyze the performance of a service or a project
Analytic Tags: Allows to tag analytic entries and to manage analytic distributions.
Quantity: Specify the Quantity by inserting the number and selecting the unit of measure.
Product Unit of Measures: In the Unit of Measure section, select the unit in which the product will be sold and in which internal transfers will be done.
Unit Price: In the Unit Price field, specify the price you would like to be offered (you can also leave the field blank if you don't know what the price should be)
Taxes: Under the field, one can set the tax applied to the particular transaction.
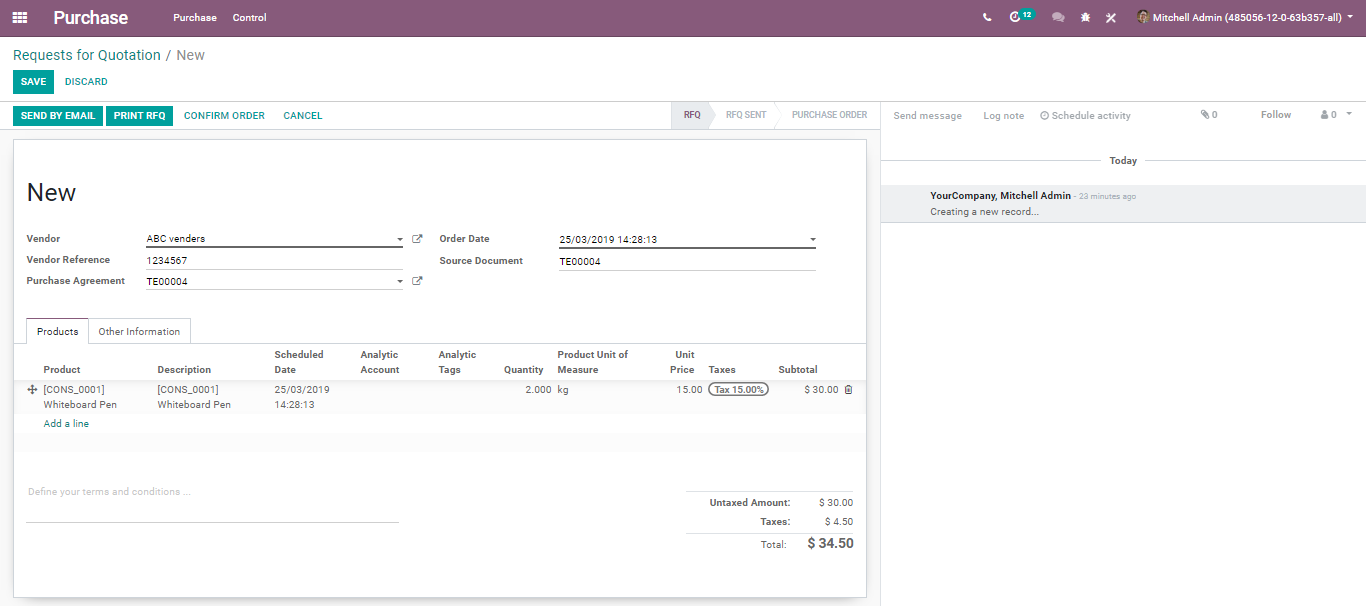
Click on Save, then Print Rfq or Send Rfq by email (make sure you have specified an email address to the supplier).
Upon clicking Send, RFQ's status will switch over from RFQ to RFQ Sent.
Send requests through the post or email
Under Odoo, one can either send their request for quotation via email or as print, sending them later by post, all in just one click.
Upon clicking the option SEND BY EMAIL, Odoo will automatically compose an email using it’s default template.
Upon clicking the PRINT RFQ button, one can get a print of the same which can be later send via post to the customer.
Personalize your message in RFQ
Odoo provisions to add various custom messages to your suppliers for the request for quotation that you send across.
Creating Purchase Order
Soon after getting the reply(with offer) from the supplier, update the RfQ via clicking on Edit in order to fit the quotation (prices, taxes, expected delivery lead time, payment terms, etc.), Later click on Save for issuing a Purchase Order.
In order to proceed with the same order, click on Confirm Order. The action sends the order to the supplier. The RfQ's status will switch to Purchase Order.
Lock a Purchase Order
Upon confirming the order, the end user can lock their purchase order from further interruptions.
Configuration
To avail the feature, go to Purchases ‣ Configuration ‣ Settings and activate the Lock Confirmed Orders feature
Lock an order
While working on a purchase order, when you affirm it, you would then be able to lock the request forestalling any further adjustment on the order.
Odoo automatically lock the purchase order. You can see the changes in status bar like shifting from Purchase order to Locked
Note:
Odoo provisions to unlock the document any time to make further amendments.
Cancelling a Purchase Order
Because of false impressions, human blunders or change of plans, it is once in a while important to drop or cancel the purchase order sent to providers. Odoo enables you to do it, regardless of whether a few or even the majority of the ordered goods touched base in your distribution center or warehouse.
In the event that you affirmed the purchase order and did not receive your goods yet, you can essentially cancel the PO by tapping the cancel button
Odoo consequently cancels the outstanding shipments associated to this particular purchase order. Change occurs in the status bar from Purchase order to Cancelled.
Creating automatic Purchase Order from Sale Order in Odoo
Configuration
Configure the product for which you want to create the purchase order from a sale order.
Go to Sales > Products
Select a product.
In inventory tab, tick Routes Buy and Make to Order.
Later select a vendor for the product from vendors tab.
One can add multiple vendors if they want. While the system generates the purchase order, it will select the first vendor in the list by default.
Create a sale order for that product
Once you have created a sale order go to the delivery part of the sale order i.e. click the Delivery super button.
You can see there, the delivery is waiting for Another Operation.
That Another Operation is the Purchase Order that is automatically created by the system while you created the sale order.
Automatically created Purchase Order
Go to Purchase -> Requests for Quotation
There you can find the generated Purchase quotation against respective sale order. The purchase order will be created against the first vendor in vendors tab of the product.
Note:
If the vendor already has a purchase quotation, the new item will be added to the purchase order.
The Source Document field indicates the related sale order.
Now confirm the purchase order
Receive the products.
Validate the stock picking.
After completing the purchase order, go the corresponding sale order. The state of the sale order will be changed from Waiting for Another operation to Available state. Now you can proceed with the sale Order as usual.
Requesting Managers Approval for Expensive Purchase Orders
In case of expensive purchases, it is mandatory that you get the approval of the concerned authority in order to validate your orders. Odoo embeds this provision under the configuration setting and one can easily set that up.
Configuration
For this feature to work, go to Purchases ‣ Configuration ‣ Settings and activate the Purchase Order Approval feature under Order Section.
One can set the base sum or minimum amount required to initiate this feature.
While dealing with another new quotation request, if the request is made by a client and not the manager and the order amount is exceeding the minimum amount you determined, a new To Approve status will be presented all the while.
Approve the order
In the event that you are purchase manager, you would now be able to go to the purchase order and approve them if everything is ok in it. Giving you full control of what your clients can or can't do.
When affirmed, the purchase order pursues the ordinary procedure.
Setting Warnings on Purchase Orders
Odoo enables warning feature in purchase module in order to raise warnings or blocking messages on purchase orders based on a vendor or a product.
For example, if you often face problem with a vendor, you might want to raise a warning when conducting a purchase from that vendor.
Secondly, if a product is about to be discontinued, in that case you may want to raise a blocking message on the purchase order with respect to that product.
Configuration
For availing this feature, go to Purchases ‣ Configuration ‣ Settings and activate the Warnings feature under the orders category.
Add a warning on a vendor
Upon activating the feature, you get a new option under the Internal Notes tab on vendors. One can inscribe a simple warning or a blocking message here.
Buying with warnings or blocking messages
If the end user tries to validate a Purchase Order from a vendor or with a product that comes along with a warning, the action will trigger a message. The end client can ignore the message via clicking the OK button.
However, if it is a blocking message, the end user cannot ignore them simply.
Setting Purchase Agreements
A purchase agreement as said earlier is a sort of authoritative report laying out the diverse conditions and terms that are identified with the sale of merchandise. The goal behind setting the purchase agreement is to legally bind the agreement between the purchaser and the dealer.
By default, the Purchase Agreements isn't actuated in Odoo. To avail the feature of purchase agreement, one must first activate the option.
Configuration
Go to Purchases ‣ Configuration ‣ Settings and activate the Purchase Agreements under the orders category.
Upon clicking the Agreement Types link, the end user will be moved to a window running down Purchase Agreement Types.
In the Agreement Type field, you would find two options: Call for Tender and Blanket Order.
Call for Tender: A Call for Tender is an extraordinary system to demand offers from different sellers to get the most fascinating cost.
Blanket Order: A Blanket Order is an agreement between you (the client) and your provider. It is utilized to arrange a limited cost. The provider is profited by the economies of scale inalienable in a vast request. You are profited by being permitted to take small periodical delivery over some undefined time frame, at a lower cost, without paying for the huge request right away. Every little occasional conveyance is known as a release or call-off.
In the two cases, one can pick the Agreement Selection Types:
- Select just a single RFQ(exclusive): When a buy request gets affirmed , drop the rest of the buy request.
- Select different RFQ: Allowing various buy request. On affirmation of a buy request, it doesn't drop the rest of the request.
Lines:To copy the lines of agreement and to do not create RFQ lines automatically.
Quanties: To Copy the use quantities of agreement or to set the quantities manually.
Managing Blanket Orders
Configuration
For this feature to work, go to Purchases ‣ Configuration ‣ Settings and activate the Purchase Agreements feature
As the blanket order is a contract, it will have some prearranged conditions. These usually include:
- Total quantity of each product to be delivered
- Completion deadline, by which you must take delivery of the total quantity
- Unit price for each product
- Delivery lead time in days for each release
To Create a Blanket Order
To create a new blanket order, open Purchase ‣ Purchase Agreements.
In the Purchase Agreements window, click on Create. A new Purchase Agreement window opens.
In the Agreement Type field, choose Blanket Order.
Choose the Vendor with whom you will make the agreement.
- Set the Agreement Deadline as per the conditions of the agreement.
- Set the Ordering Date to the starting date of the contract.
- Leave the Delivery Date empty because we will have different delivery dates with each release.
- Operation type
In the Products section, click on Add an item. Select products in the Product list, then insert Quantity. You can add as many products as you wish.
Click on Confirm.
Presently click on the New Quotation. A RfQ is made for this seller, with the items picked on the buy delicate. Repeat this activity for each release.
Be mindful so as to change the Quantity field on the RFQ. As a matter of course, the RFQ amount will be for the whole outstanding amount. Your individual discharges ought to be for some littler amount
Upon delivering and getting paid, you can click on Validate and Done.
Managing Call for Tender
A Call for Tender is an exceptional strategy to demand offers from various sellers to acquire the most intriguing cost.
Configuration
To avail the feature, go to Purchases ‣ Configuration ‣ Settings and activate the Purchase Agreements feature.
Create a Call for Tender
To use avail the feature go to Purchases ‣ Purchase Agreements.
Make another purchase agreement, via getting into the Agreement Type drop down menu. Select Call for Tender.
When you are happy with your purchase agreement, affirm it will move from Draft to Confirmed and another RFQs/Orders showed up in the upper right corner of the report.
Request new quotations from the Call for Tender
From the Call for Tender, Odoo will auto-fill the RFQ with the product(s) from your Call for Tender.
Select the best offer
The different RFQs and requests connected to the Call for Tenders will be under the RFQs/Orders button, where you can choose and affirm the best offer.
Close the Call for Tender
When you're finished with your Call for Tender remember to close it.
Bill Control
With Odoo, you can characterize a setting to help the control of your bills. Bill Control gives you a chance to pick if the provider sends you the bill previously or after you get the products.
Configuration
To avail the feature, go to Purchases ‣ Configuration ‣ Settings and select the mode you want to control your bills under the option Invoicing.
Odoo enlists with two different options:
- Bill controlling based on Ordered Quantities
- Bill control based on Delivered Quantities
Change the control policy
While the setting above will be your default technique for bill control, you can generally choose which way you need to receipt your item on every item page under the Purchase tab.
You should need to utilize diverse settings for various sorts of items.
Depending upon the billing strategy characterized previously. In case you should be billed dependent on ordered quantity, Odoo will propose a bill for the quantity of units ordered. In case you should be billed dependent on the received quantities, Odoo will recommend a bill for 0 as appeared as follows.
3 Way Matching-Purchases, Receptions and Bills
In certain enterprises, you may get a bill from a merchant before receiving ordered products. However, the bill ought to perhaps not be paid until the items have really gotten at your work area.
To characterize whether the merchant bill ought to be paid or not, you can utilize what is known as the 3-way matching. It alludes to the comparison of the data showing up on the Purchase Order, the Vendor Bill and the Receipt.
The 3-way matching encourages you to abstain from paying erroneous or deceitful vendor bills.
Configuration
Go in Purchase ‣ Configuration ‣ Settings and activate the 3-way matching.
Would it be a good idea for me to pay this seller bill?
When this setting has been enacted, another data shows up on the vendor bill, characterizing whether the bill ought to be paid or not. There are three conceivable values:
Use case 1: I have received the ordered items.
Use case 2: I haven’t received the ordered items.
Use case 3: the quantities doesn’t match along with Purchase Order, Vendor Bill and Receipt.
Useful Tip:
The status is characterized automatically by Odoo. However, if you need to characterize this status manually, you can tick the box Force Status and after that you will most likely set physically whether the merchant bill ought to be paid or not.
Reporting
Analyze the performance of my vendors
In the event that your organization normally purchases items from several providers, it is indeed helpful to get insights on your buys. There are a several reasons to follow and analyze your seller's performance: From Odoo Purchase reporting function, the end client can without much of a stretch see all the appropriate advancement and happenings in business operation. Odoo reporting empowers you to get adaptable reports on merchant performances.
Configuration
Purchase-> Reporting
Useful Tip:
By clicking on the + and - symbols, you can drill up and down your report so as to change the manner in which your data is shown. For instance, that I need to see every one of the items purchased for the present month, I have to tap on the + symbol on the vertical hub and after that on "Items".
Depending upon the information you need to feature, you may need to show your reports in an increasingly visual view. Odoo encourages you in changing your report in only a tick in 3 diagram perspectives: a Pie Chart, a Bar Chart and a Line Chart: These perspectives are available through the symbols featured on the screen capture underneath.
Customized reports
Under Odoo, one can likewise effectively modify their purchase reports relying upon the business needs. To do as such, utilize the advanced search view situated in the right hand side of your screen, by tapping on the magnifying glass icon towards the finish of the search bar button. This capacity enables you to feature just chosen information on your report. The filter option is valuable so as to show a few classes of pieces of information, while the Group by option improves the intelligibility of your reports. Note that you can filter and group by any existing field , making your customization truly adaptable and incredible.
You can save and reuse any customized filter by tapping on Favorites from the Advanced search view and afterward saving current search. The saved filter will at that point be available from the Favorites menu.
Drop shipping
Drop shipping is a technique in which the seller does not keep items in stock but rather exchanges the items directly from the provider to the client. Drop shipping permits to deliver the goods directly from the provider to the client. It implies that the products/items do not travel through your stock.
Drop shipping is a strategy in which the seller does not keep items in stock but rather exchanges the items straightforwardly from the provider to the client.
For activating the feature,
Go to Purchases ‣ Configuration ‣ Settings and select Drop shipping under Logistics section.
Presently a new route Drop shipping has been made. You can go for an item and tick the drop shipping route. You likewise need to characterize to which vendor you will purchase the item. Now, each time this item will be sold, it will be drop shipped.
If you want to avoid drop shipping of this product every time, you can go to Sales ‣ Configuration ‣ Settings and tick the box next to Order-Specific Routes.
When you make a quotation or sales order, you would now be able to choose, order line per order line, which products ought be drop shipped by choosing the drop ship route on the SO line.
Drop ship a product
When a sales order with products to drop ship is affirmed, a request for quotation is created by Odoo to purchase the item from the seller. In the event that you confirm that demand for quotation into a purchase order, it will make a transfer from your vendor straightforwardly to your client. The items don’t go through own stock.