Users may keep an eye on staff attendance marking and evaluate reports using an efficient Odoo 18 attendance management system. These days, keeping track of attendance is essential for any business. Odoo assists the HR and police departments with a method for monitoring employee attendance. You may find out when employees arrive and depart a company by using an attendance management system. Paying employees based on their attendance during work hours is made simple by the Odoo 18 Attendance module.
The Odoo 18 Attendance Module is a feature-rich application for managing attendance that works well with mobile devices, allowing staff members to simply record their attendance through the mobile app. The employee can access the mobile app by just entering their Odoo ERP login credentials.
Among the Odoo 18 Attendance application's features are:
- Employees can register their own attendance directly on their mobile device.
- There are records on employee attendance.
- Obtain alerts regarding significant occurrences.
- Show the vital information about the employees.
Employees have the ability to arrange their information by month and check their attendance history. You should only view the additional hours for the day and the total amount of additional hours when checking out if the number is positive. Employees can choose their preferred login method, such as scanning a barcode or identifying themselves via a camera, when in kiosk mode.
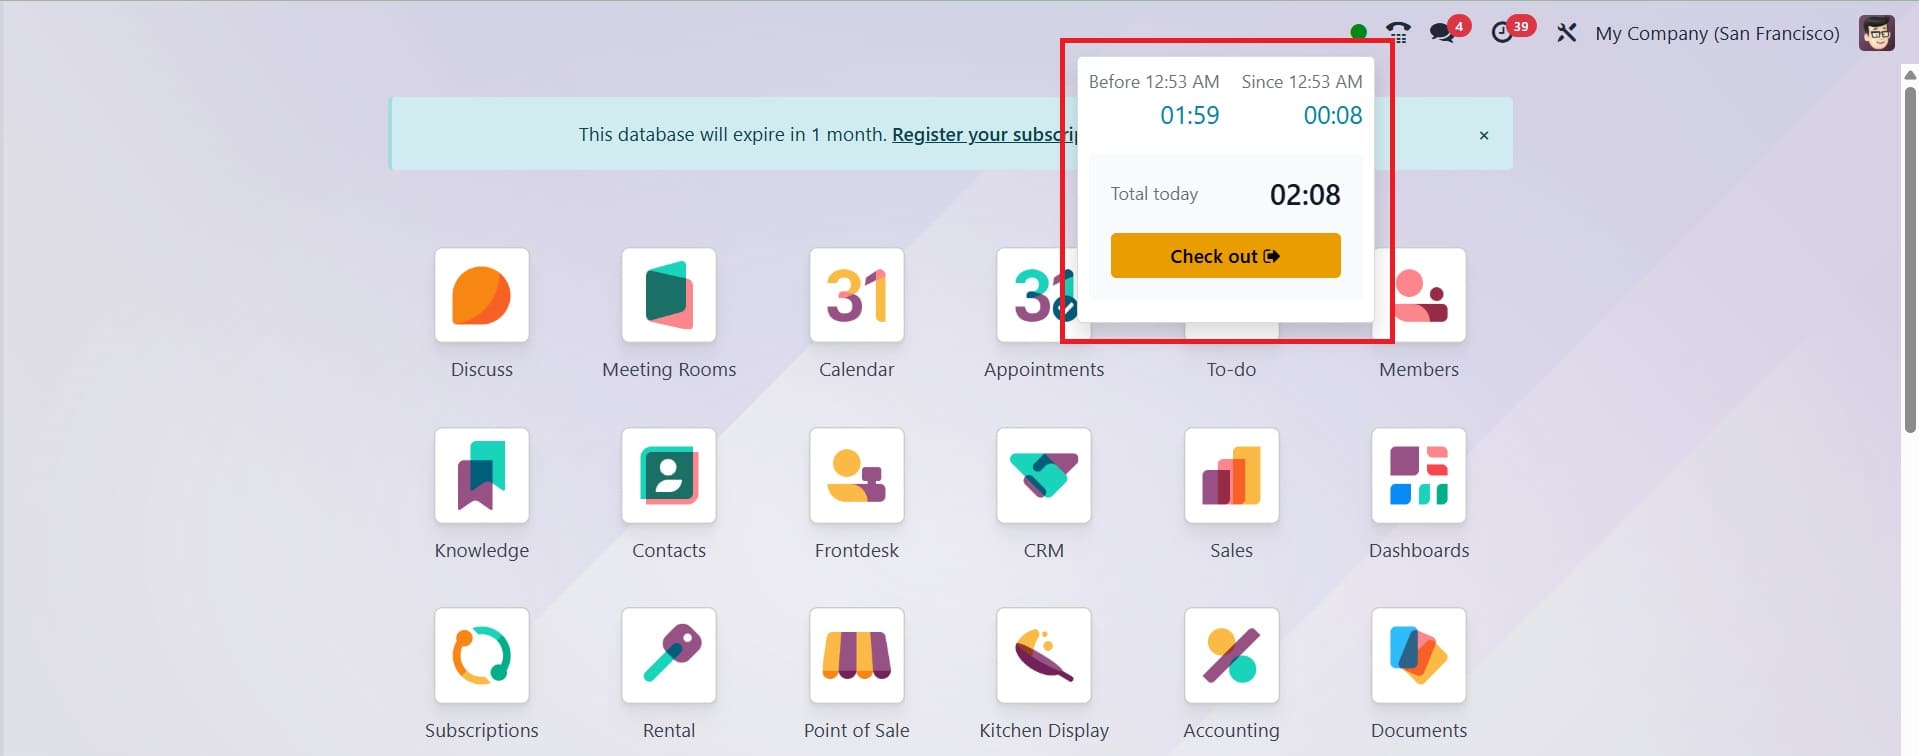
As seen in the screenshot below, it is now possible to access the Odoo 18 employee check-in feature from outside the app. The check-in time is prominently shown. After that, an employee can use the Check Out button to complete their checkout. The Systray Check-In and Check-Out feature was introduced with Odoo 18. As soon as the application is launched, the "Check In/Checkout" menu homepage appears, along with menu items including "Kiosk Mode," "Attendance," "Reporting," and "Configuration."
To learn more about employee attendance, utilize the Odoo 18 Attendance module.
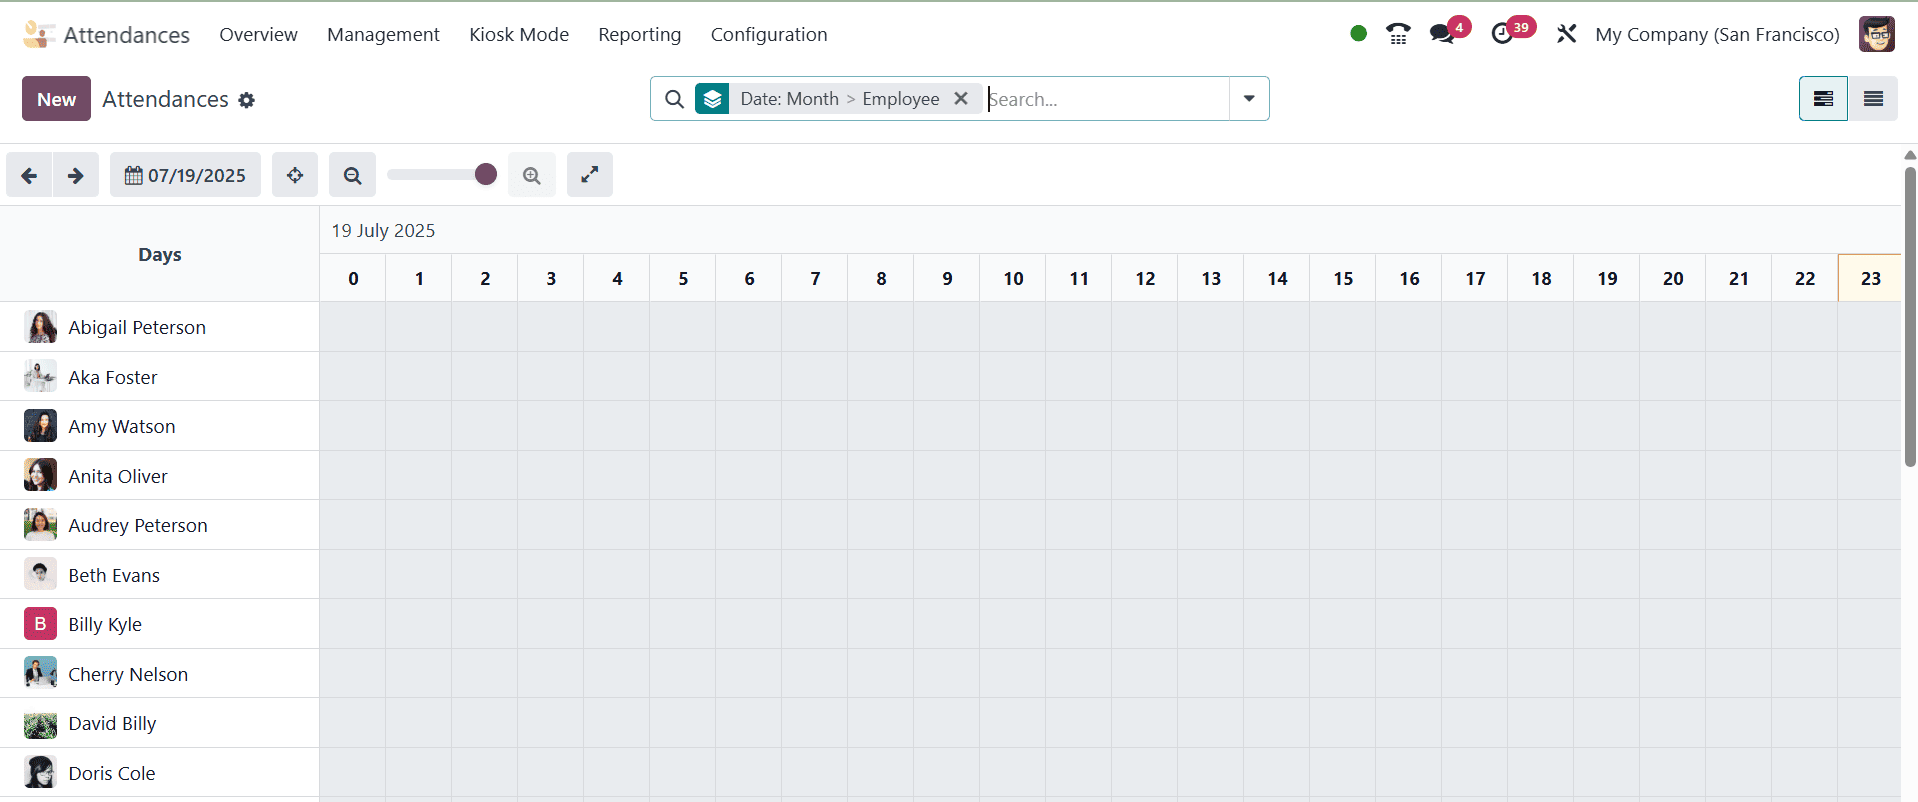
This is the dashboard view that is shown. The Attendance dashboard lets you choose a time period to analyze and switch between Gantt and List views. Below provided is the Gantt view. For real-time attendance records, the current period is automatically marked in yellow, and clicking the "Focus Today" button immediately brings the dashboard back to the current day. The view can be customized by day, month, or year. Use the two positioned arrows to navigate to the previous and next Day, Month, or Year. The Filter, Group, and Favorite choices are situated beneath the search bar on the dashboard.
A welcome message appears on the homepage of the check-in page. By selecting the "Check In" button, staff members can manually record their attendance. The check-in window displays the login time.
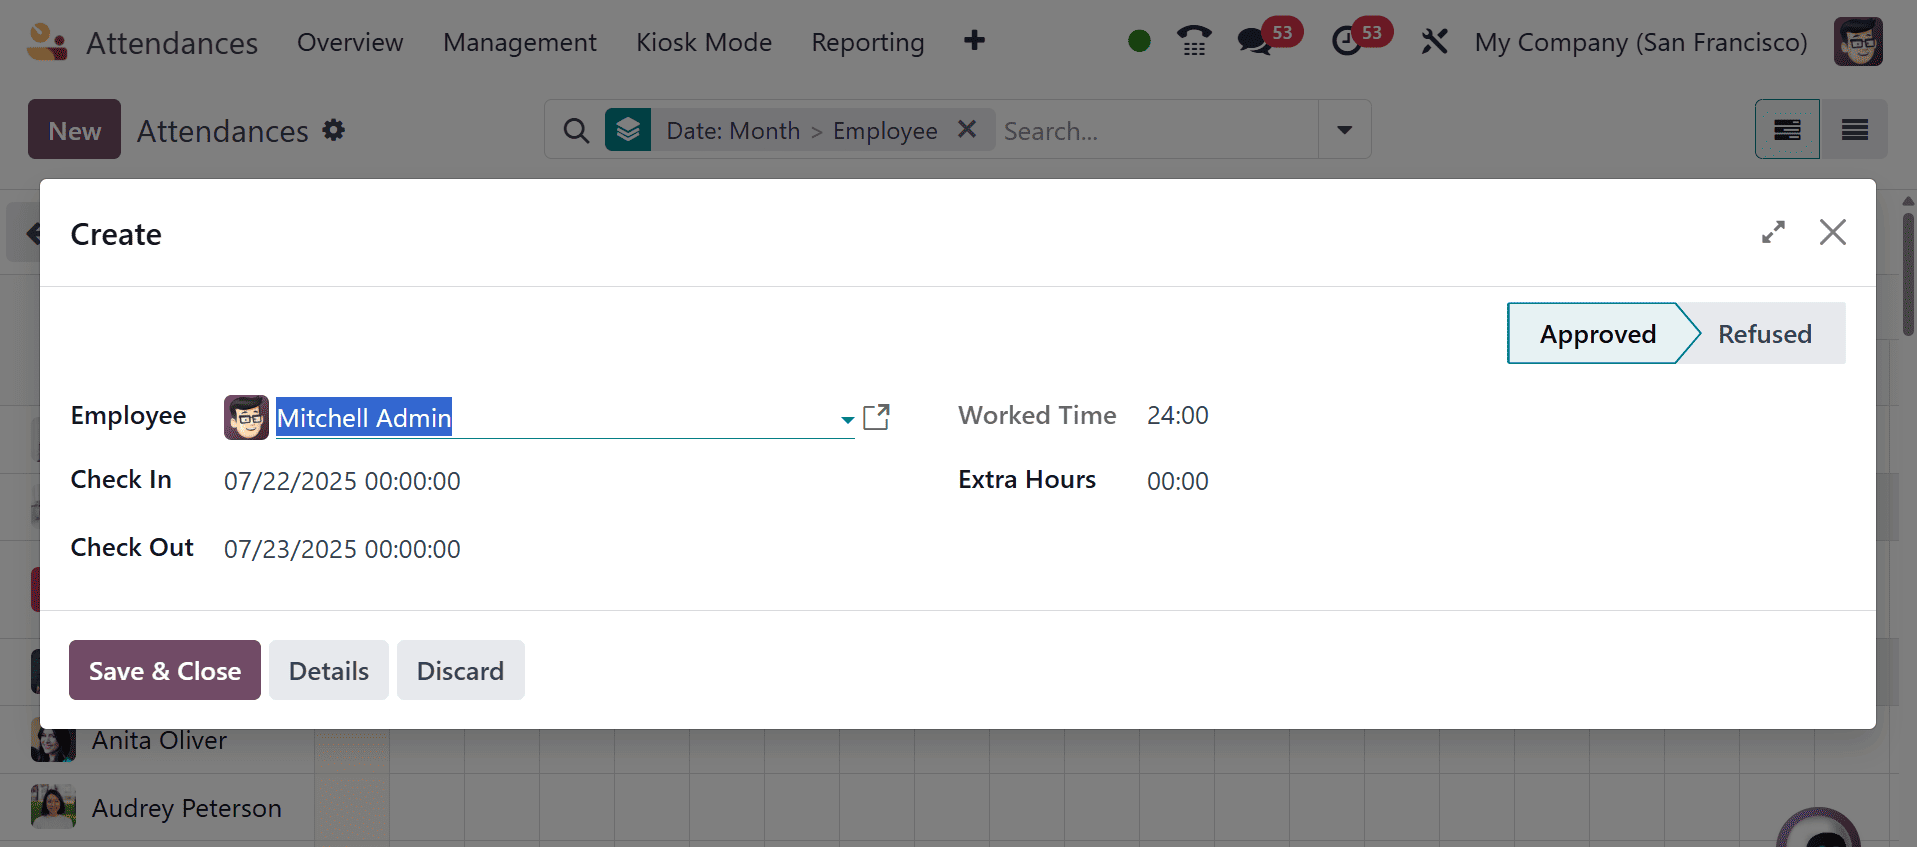
We may control each employee's attendance in a corporation by using the Attendance Menu. You may view the entire pre-made list of employees from the "Attendance" site, and you can find attendance data such as "Employee," "Check In," "Check Out," and "Work Hours" in the List view.
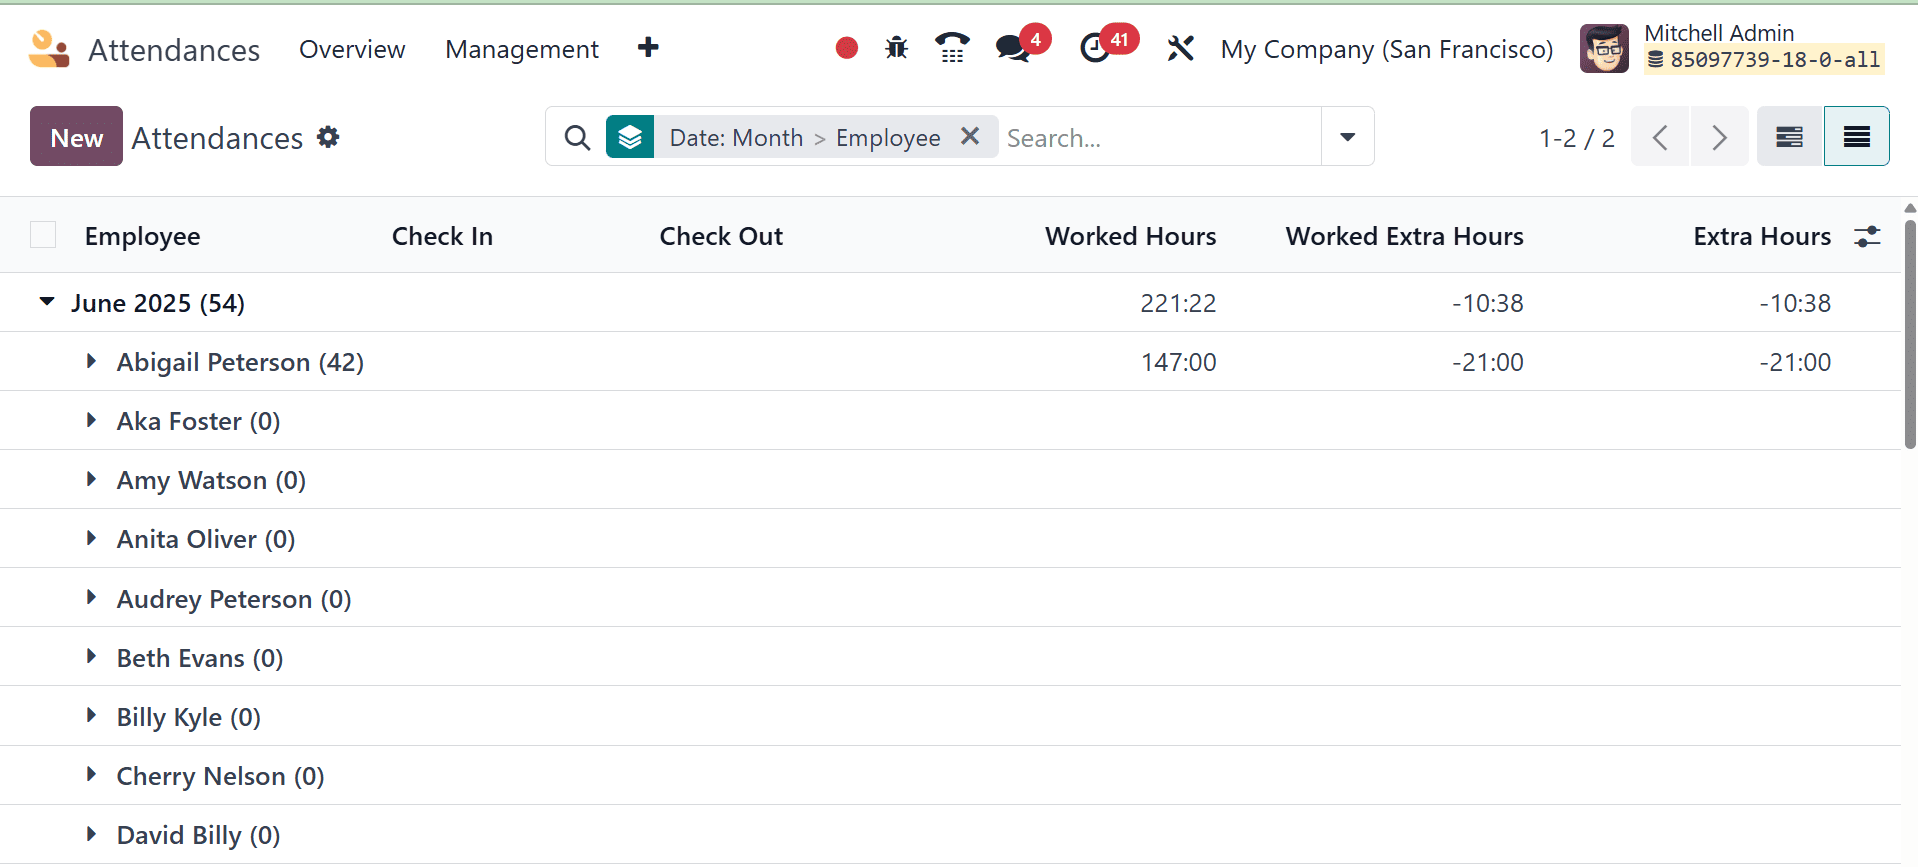
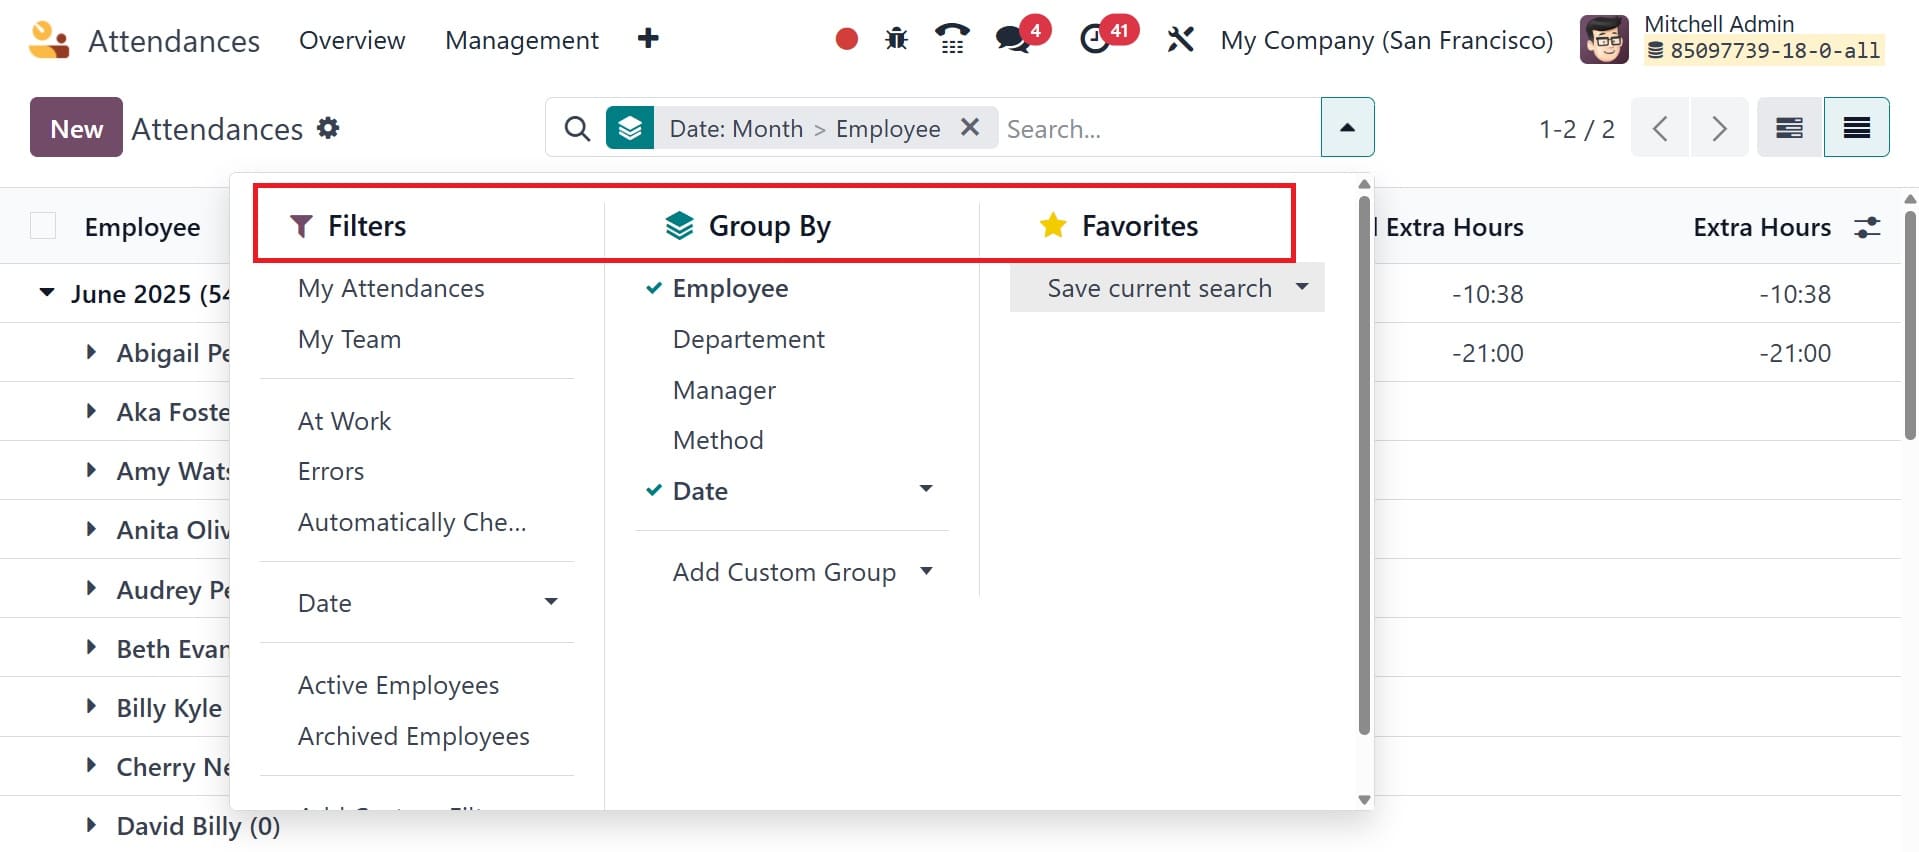
The necessary employee attendance information can be sorted using the "Filter," "Group By," and "Favorite" sorting options. The preceding seven days, check-in, errors, team, and my attendance are the parameters that can be used to filter the attendance. By using the filter Errors, the user may easily find and confirm the attendance errors. Attendance can be grouped according to employees, check-in, and check-out. A custom filter and group by options are also available in the list view.
When an attendance is opened, the employee's information is shown, including name, hours worked, extra hours, and check-in and check-out timings. The browser, IP address, check-in mode, localization, and GPS coordinates are examples of extra check-in data. Viewers can easily determine the precise positions of the staff by choosing View on Maps, which takes them to another map page.
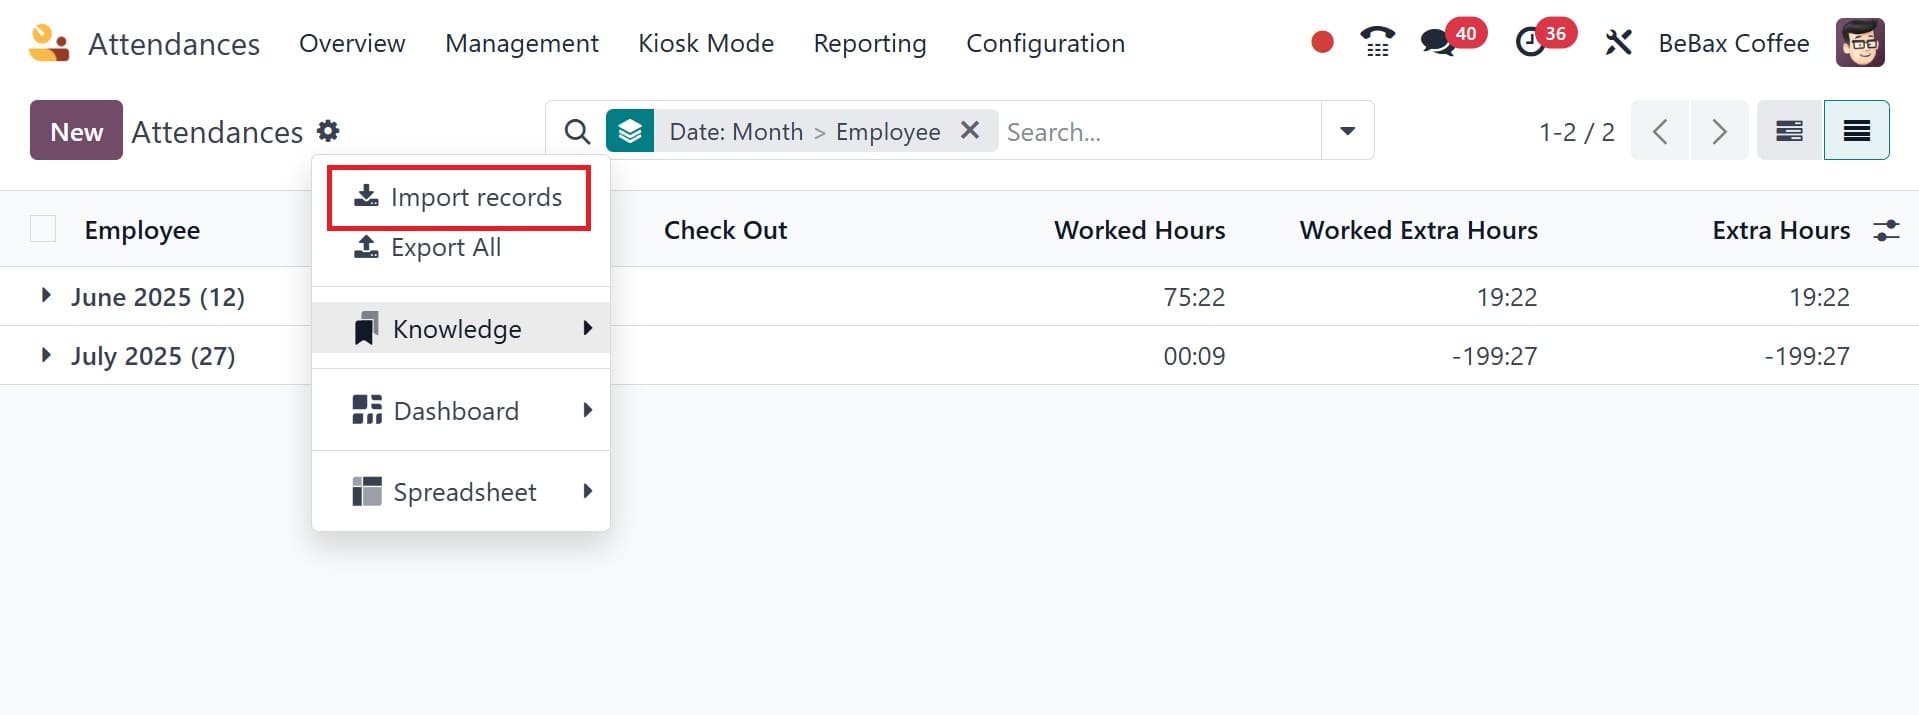
You can import attendance by manager using the import records option in the gear icon, as in the image below.
Kiosk Mode
With Odoo18's kiosk mode, you may interact with your business in a new way. By selecting the Kiosk Mode option in the Attendance module, you can access this method. Employees can check in and leave work more easily and conveniently with the Odoo Attendance module's Kiosk Mode. Usually, a shared device, such as a computer or tablet, is used to set it up at the workplace entry. Employees can quickly and securely log their attendance by identifying themselves with a PIN code or a badge (with RFID capability). This mode reduces errors, does away with the need for manual data entry, and is perfect for workplaces where several employees clock in from the same location. To further increase automation and efficiency, Kiosk Mode also includes facial recognition (with suitable hardware).

Selecting the kiosk mode brings up a new page.
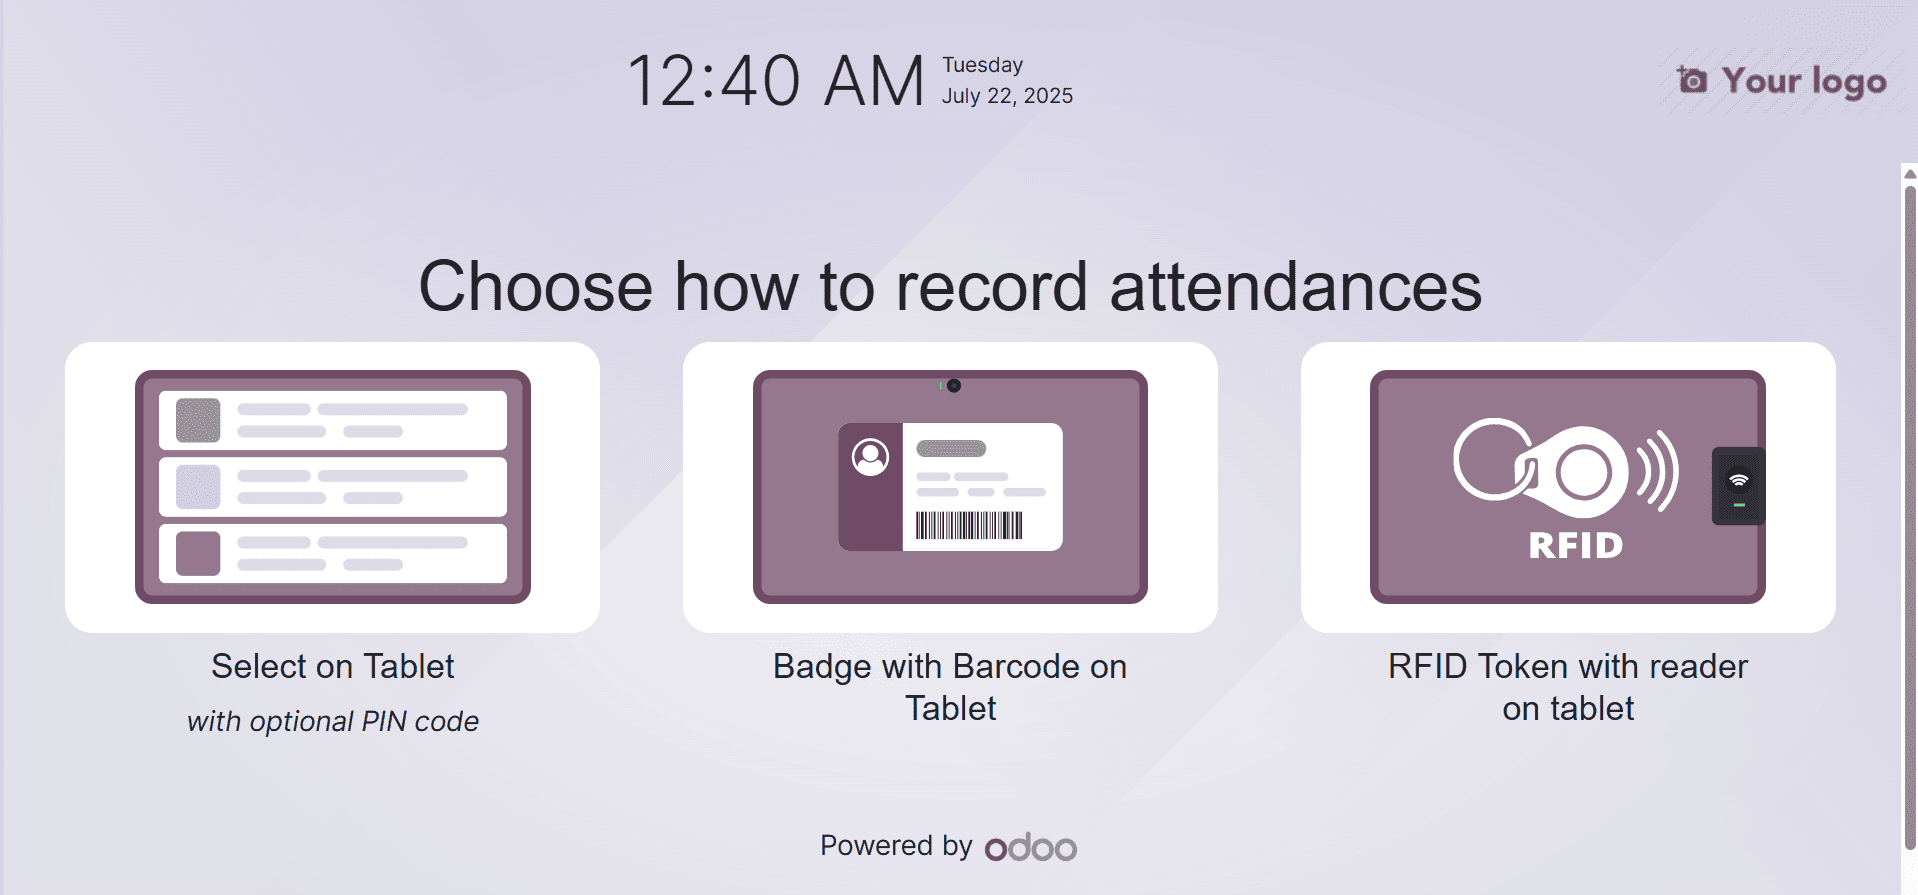
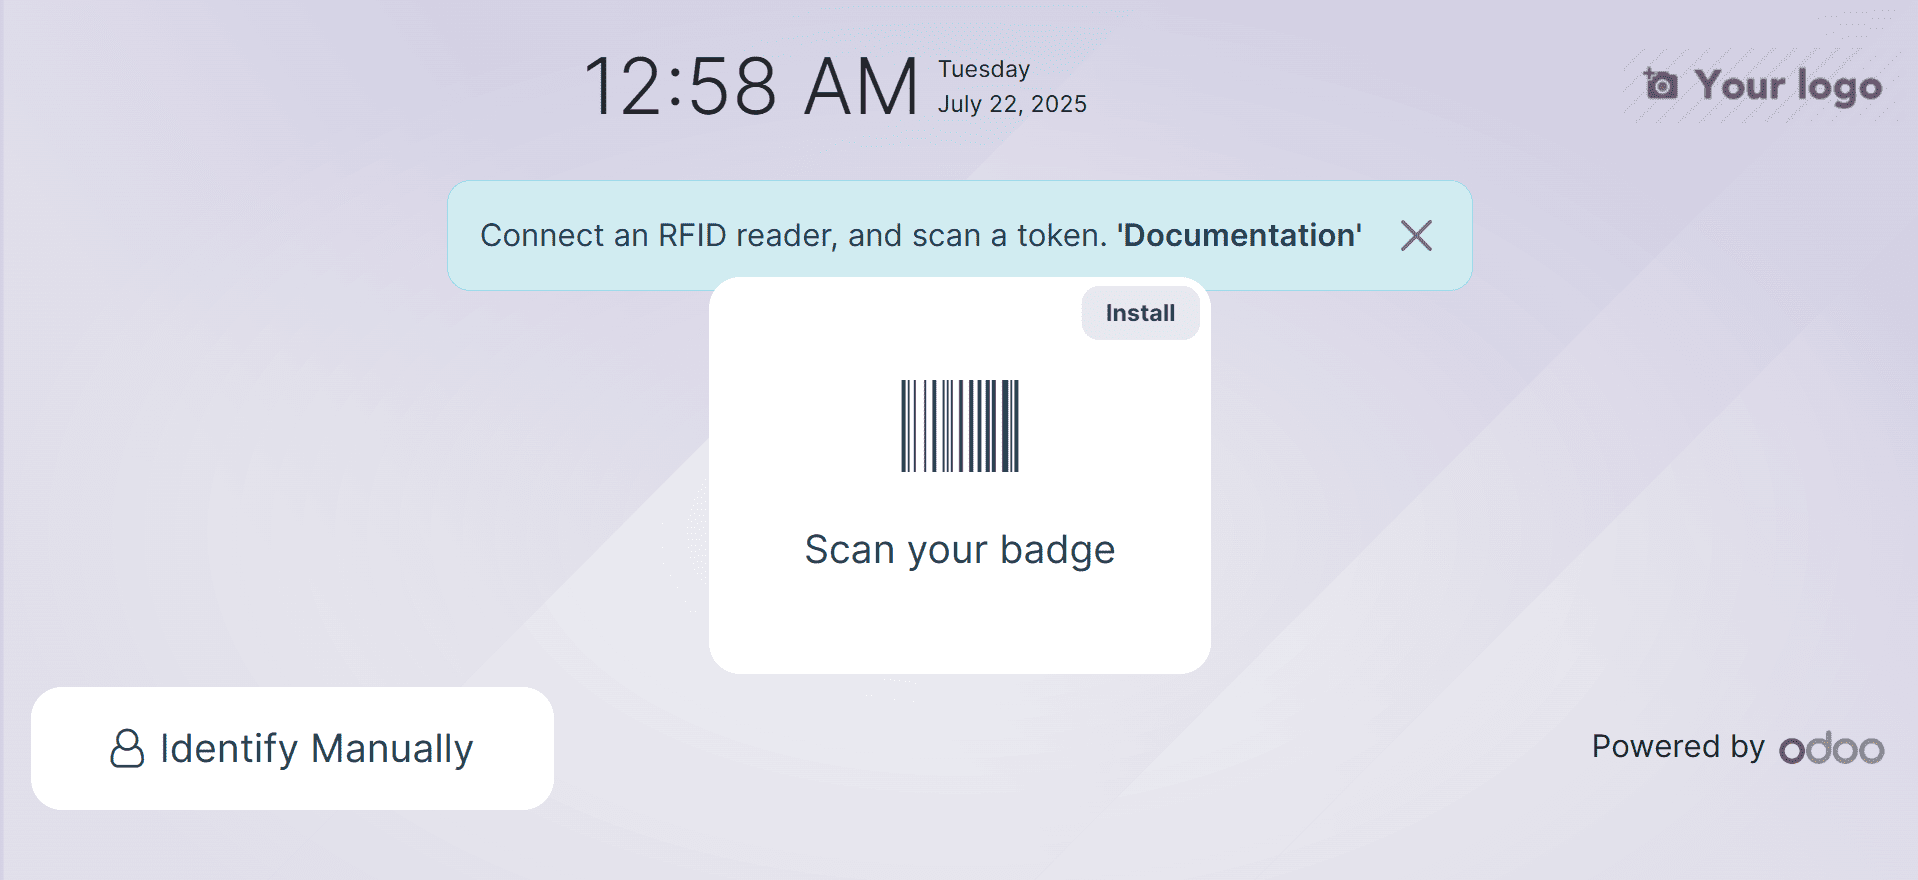
Here, you have three options: like select on tablet with optional pin code, badge with barcode on tablet, and RFID Token with reader on tablet as well. Under the badge with barcode on tablet, options like TAP TO SCAN and identify manually are visible. It's easy to scan your badges with the TAP TO SCAN button.
Barcode integration helps the Odoo18 system in several phases of business operations. A barcode can be added to the employee ID card that is used to access and exit the platform. An employee can use the reader to scan the barcode after logging into the window. The Employee window allows you to specify the employee barcode. For example, select your employee in Odoo 18's Employees module. By choosing the Settings tab, the user can access the Badge ID option on the open page.

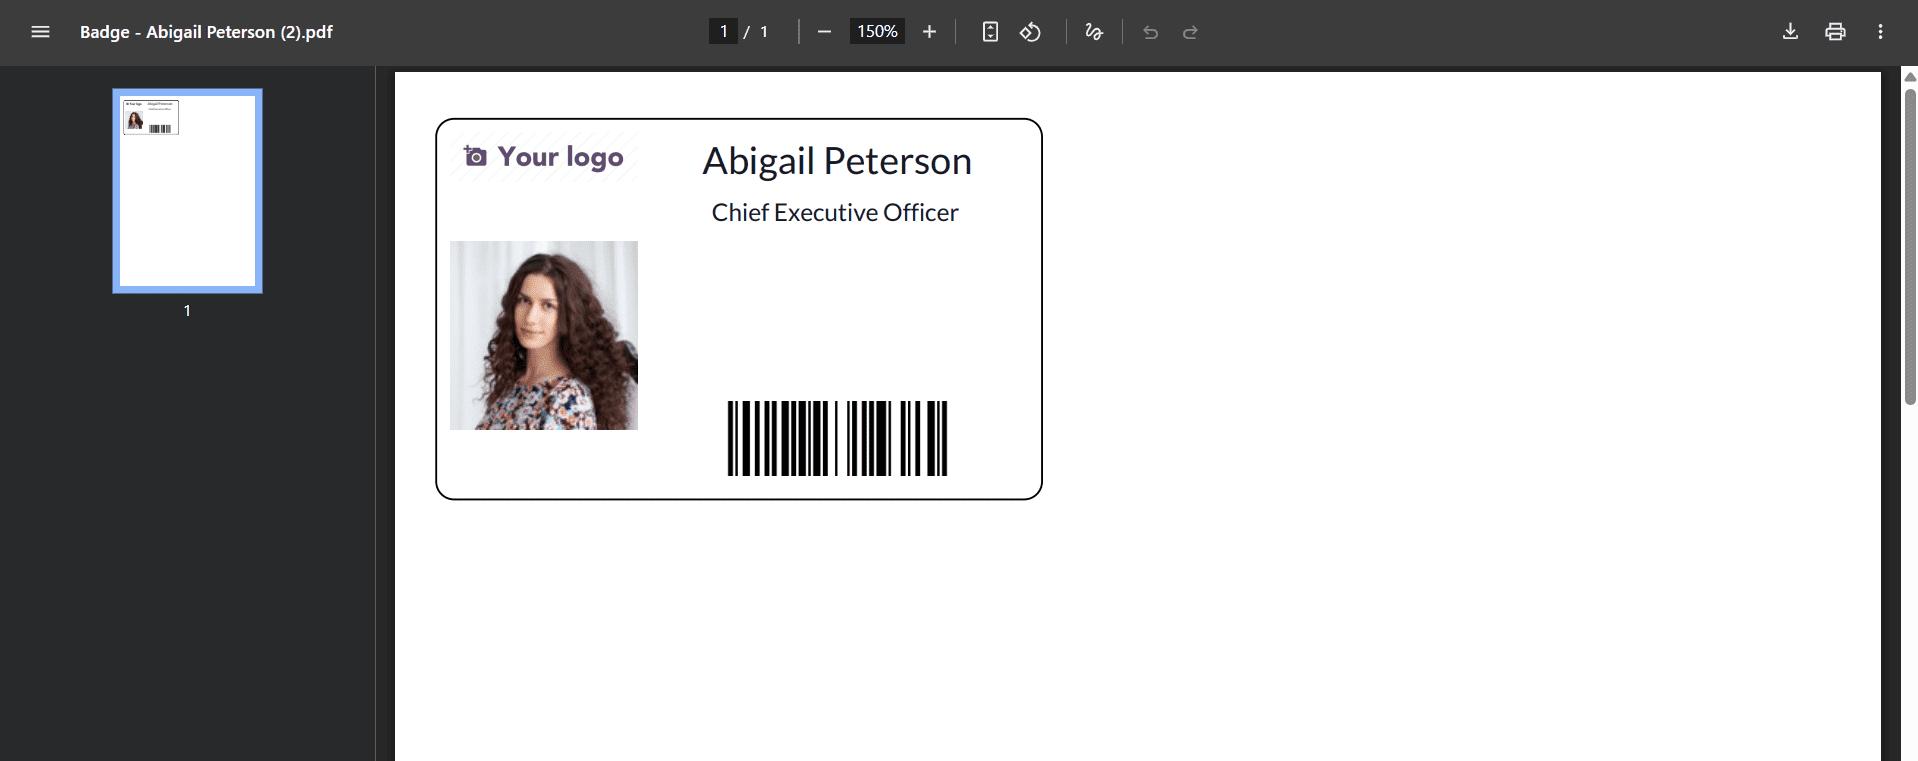
To have the Badge ID generated automatically, click the Generate button in the Badge ID field. Consequently, the automatically generated Badge ID appears in the Badge ID field. Select Print Badge to get the employee badge details later.
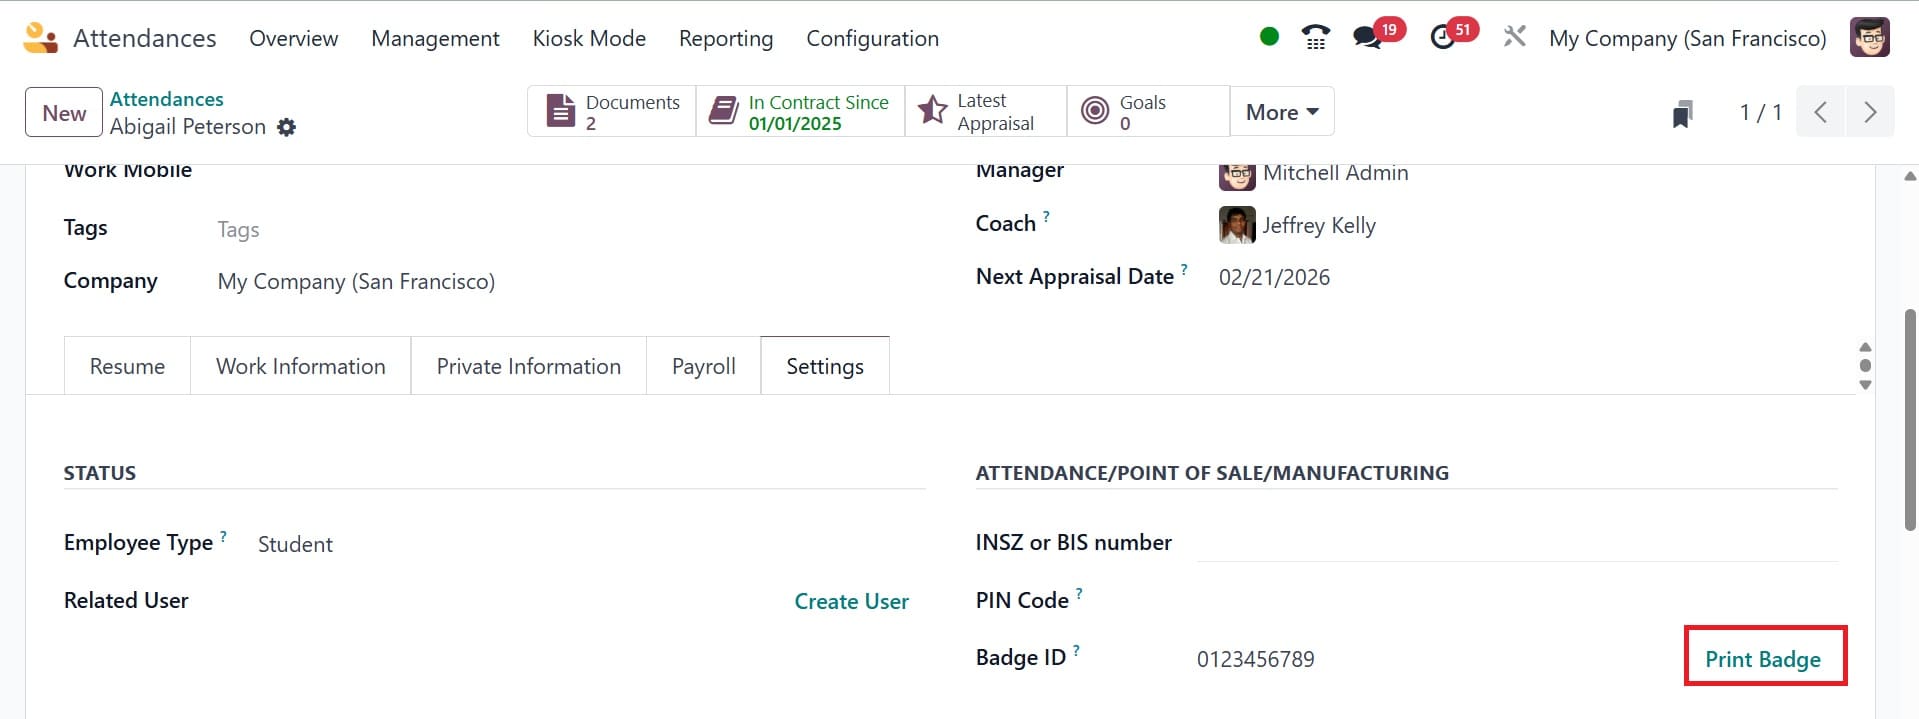
The badge ID is printed into your system when you select "Print Badge." This allows us to give a badge ID to every employee in a corporation.
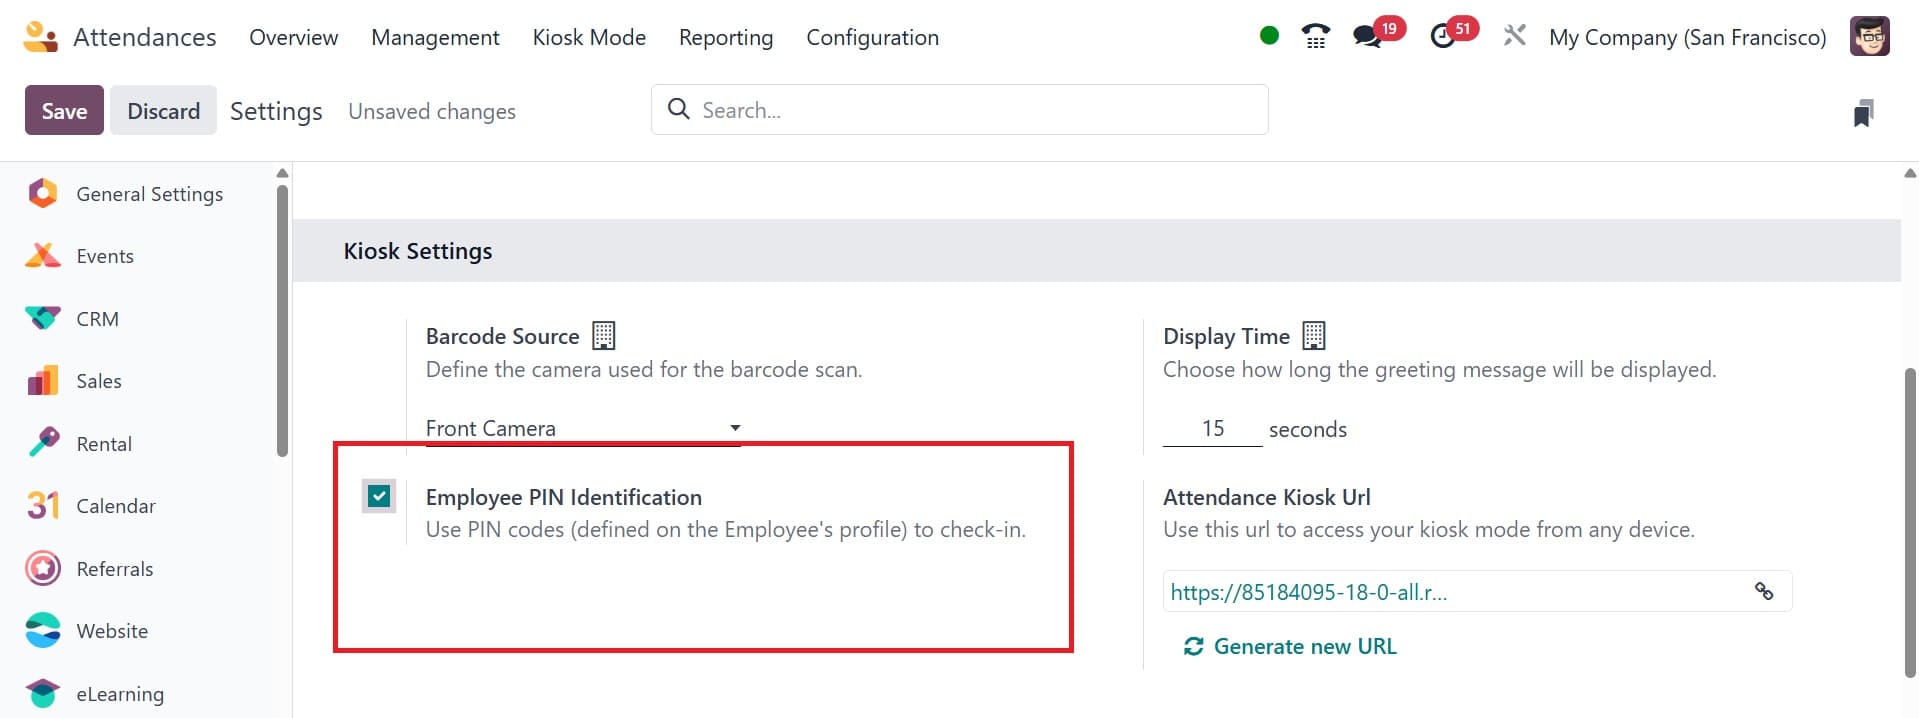
In a similar vein, we may assign a PIN to every employee in a company. You must enable the Employee PIN option in the Configuration > Settings box of the Attendance module in order to do this. It ensures that in order to access your employee profile, you must input a PIN. Click the "Save" button under Settings after activation.
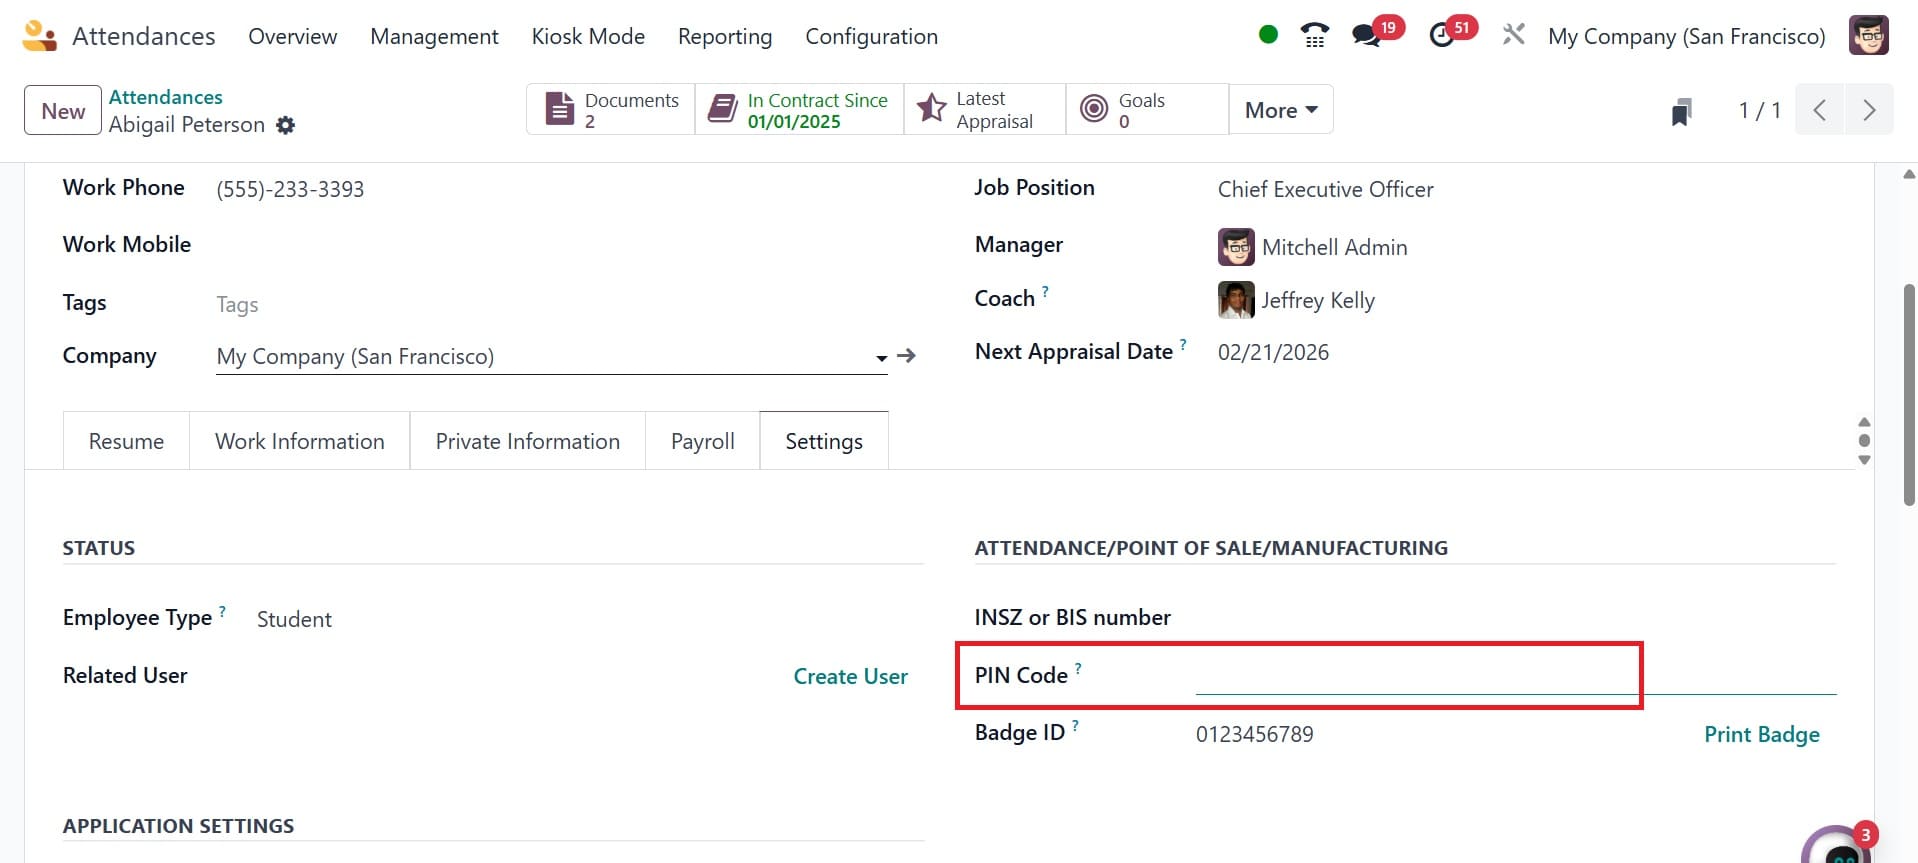
You can assign each employee a unique PIN number after entering their information in Odoo 18. The PIN Code option is located on the settings tab of the Employees window.
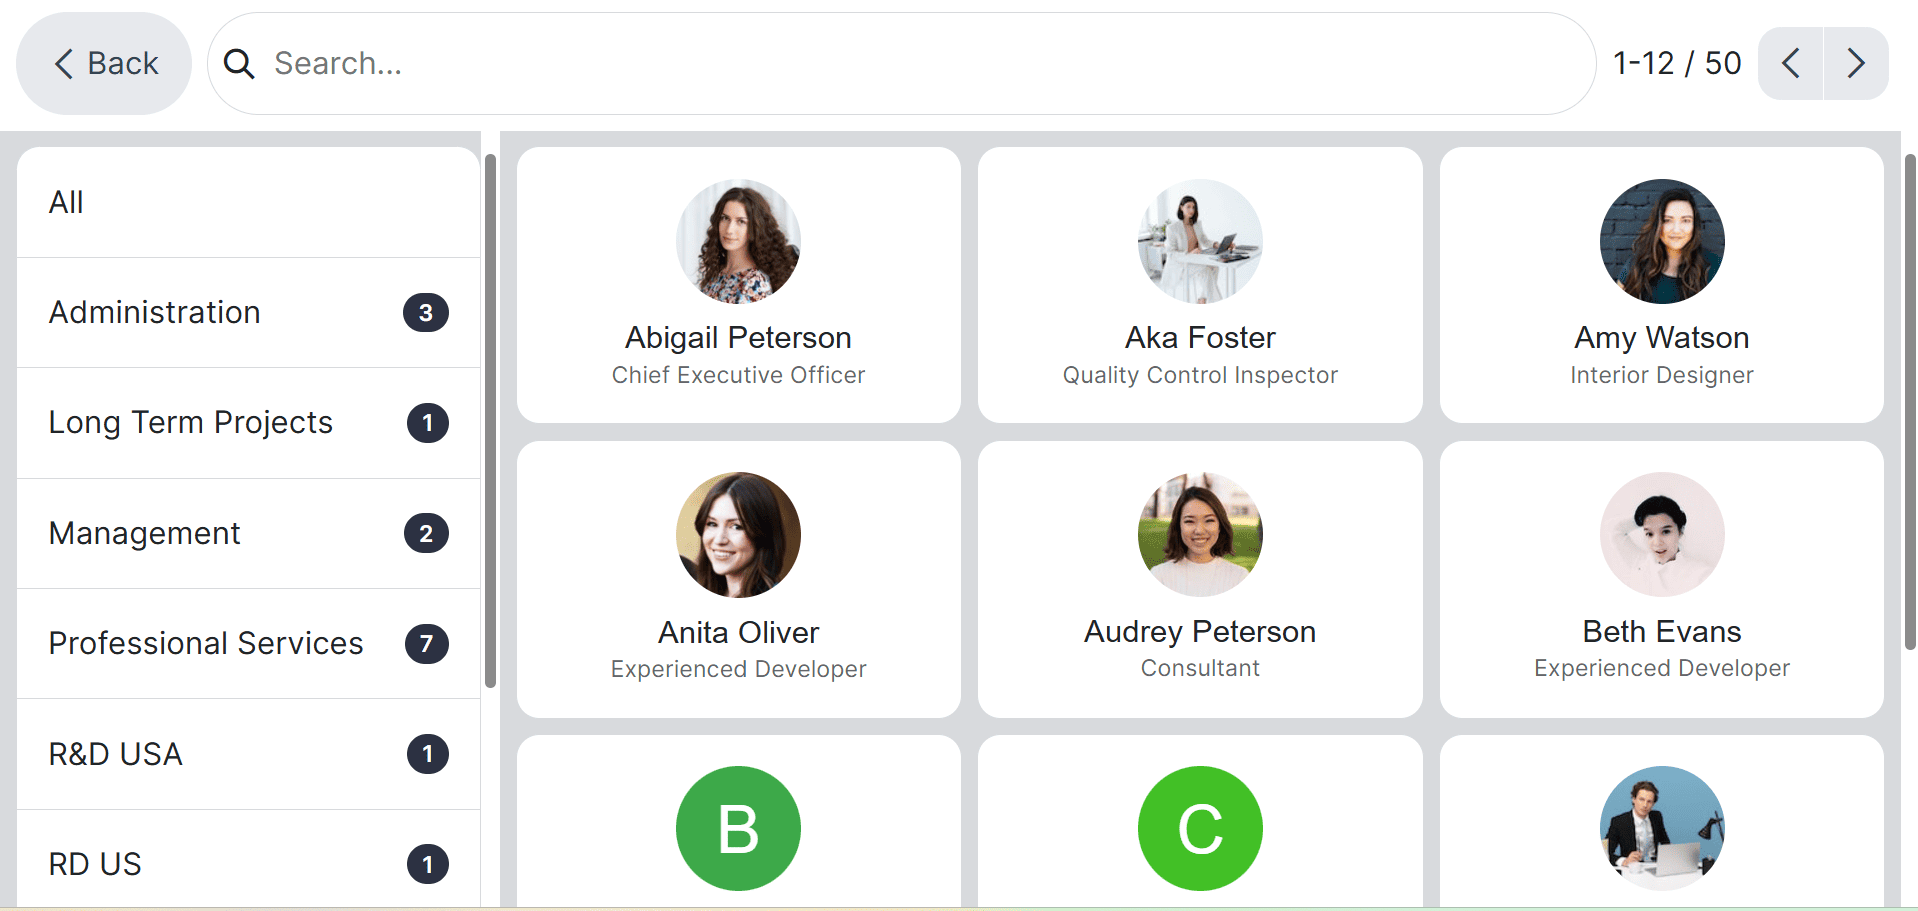
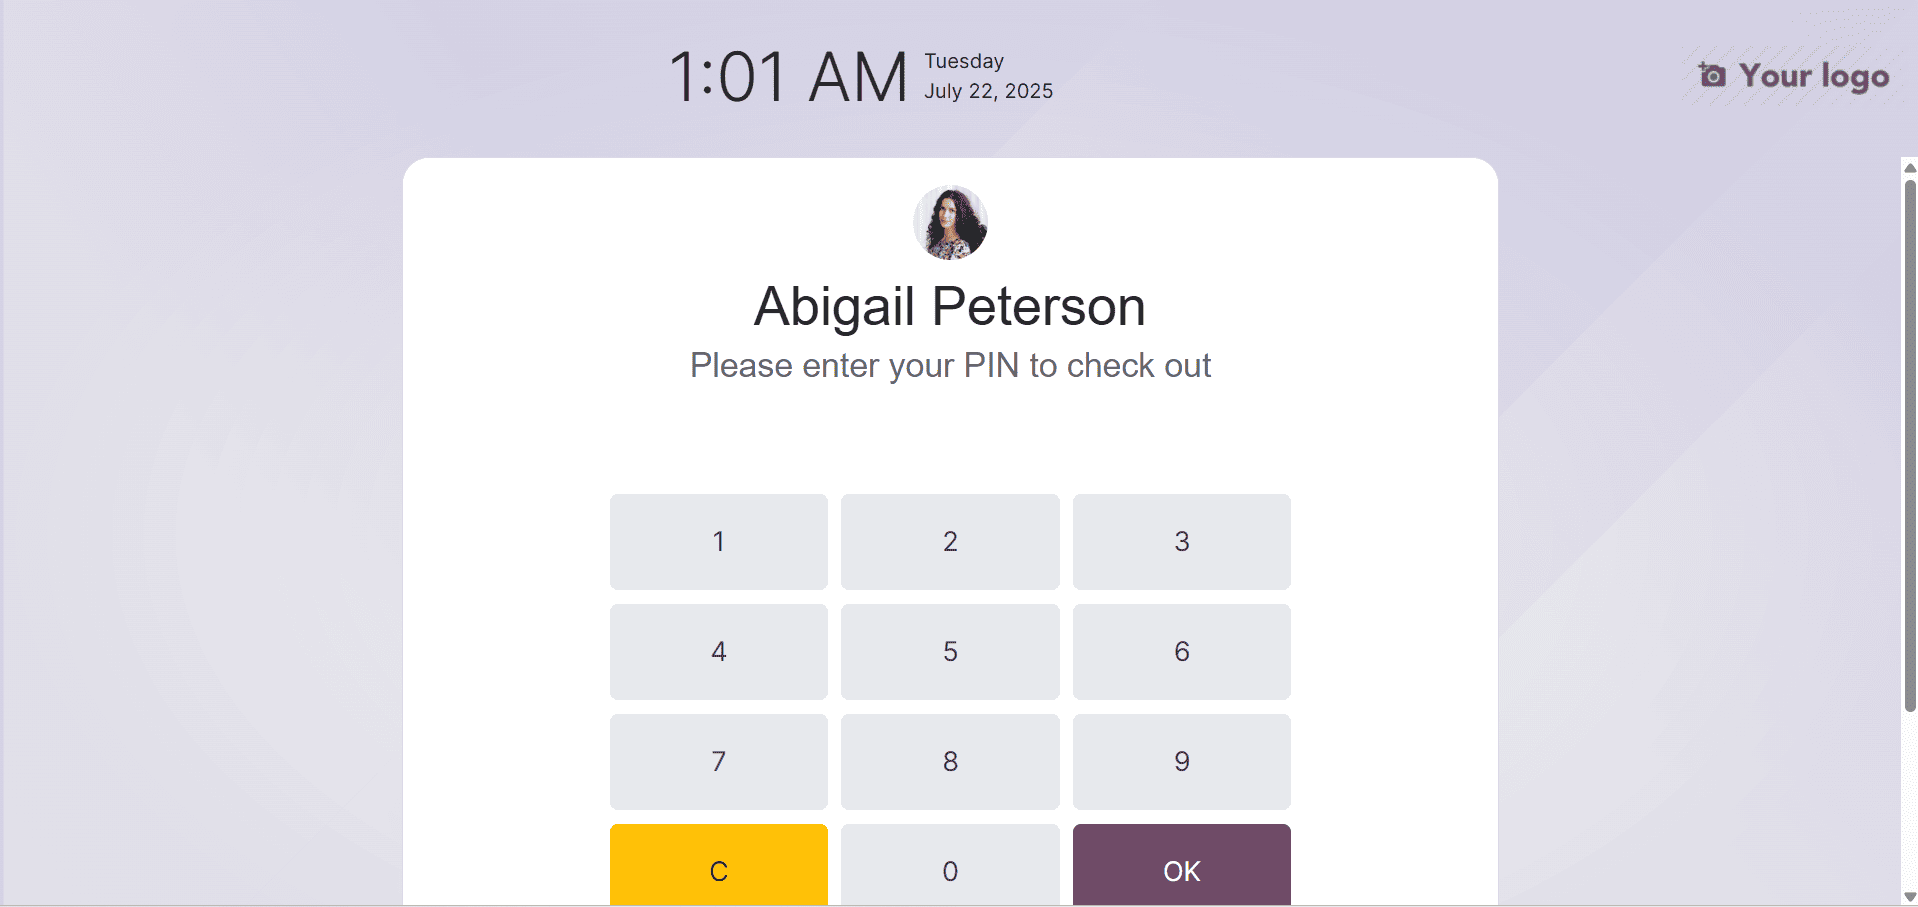
Odoo18 shows a pin code entry option when an employee attempts to access the platform after you've established a pin action. Now let's examine the operation of the Identify Manually option in Kiosk mode. The list of employees is shown to users that choose the Identify Manually option. You can use the grouping and filtering tools and choose the right staff names. You can choose the desired employee from the Employees pane.
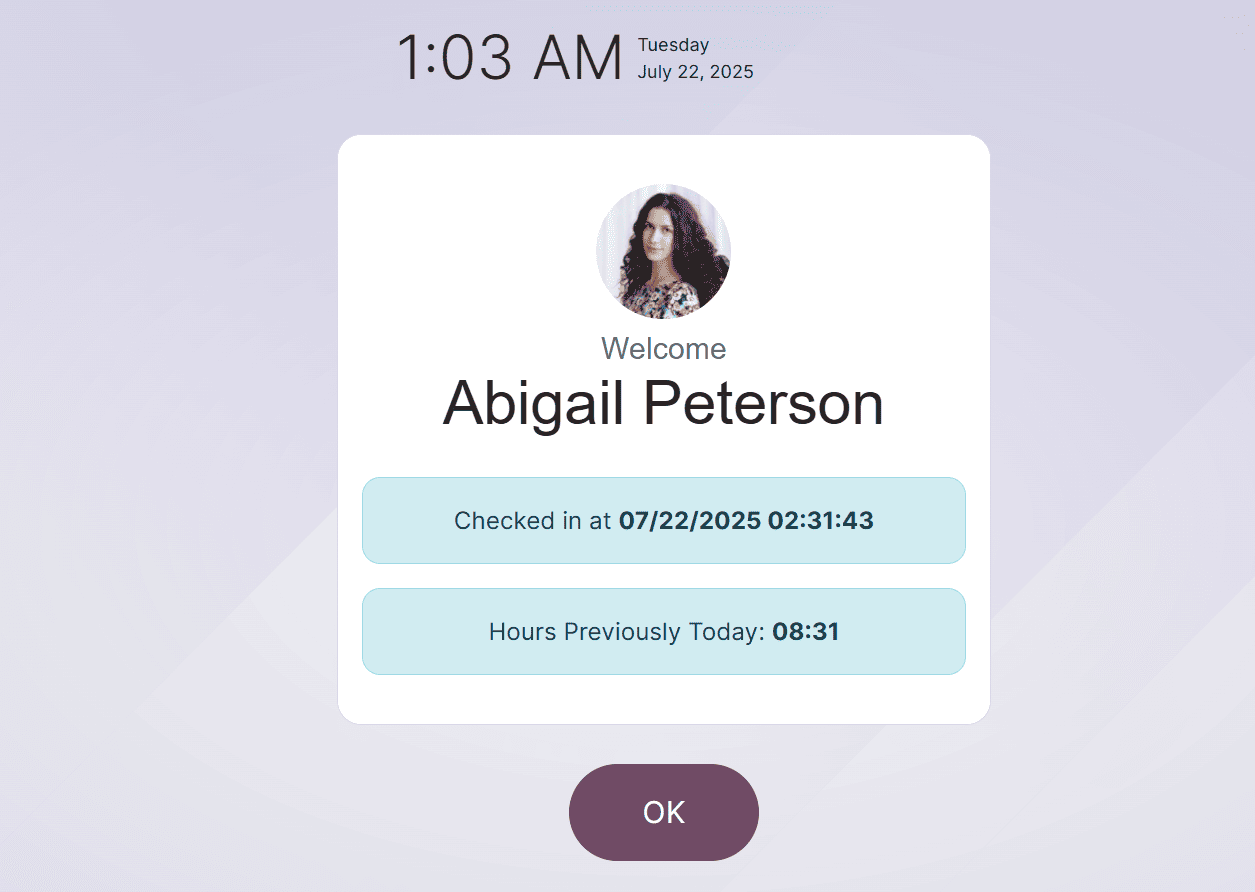
The system shows the employee profile in kiosk mode so you can check in once you enter your PIN and select your employee record. You can log in to work after entering the PIN.
A welcome message is then displayed in a window, as seen in the screenshot below.
An employee can record their attendance using their PIN and badges that have been manually enabled via Kiosk Mode in Odoo18 Attendance.
Configuration
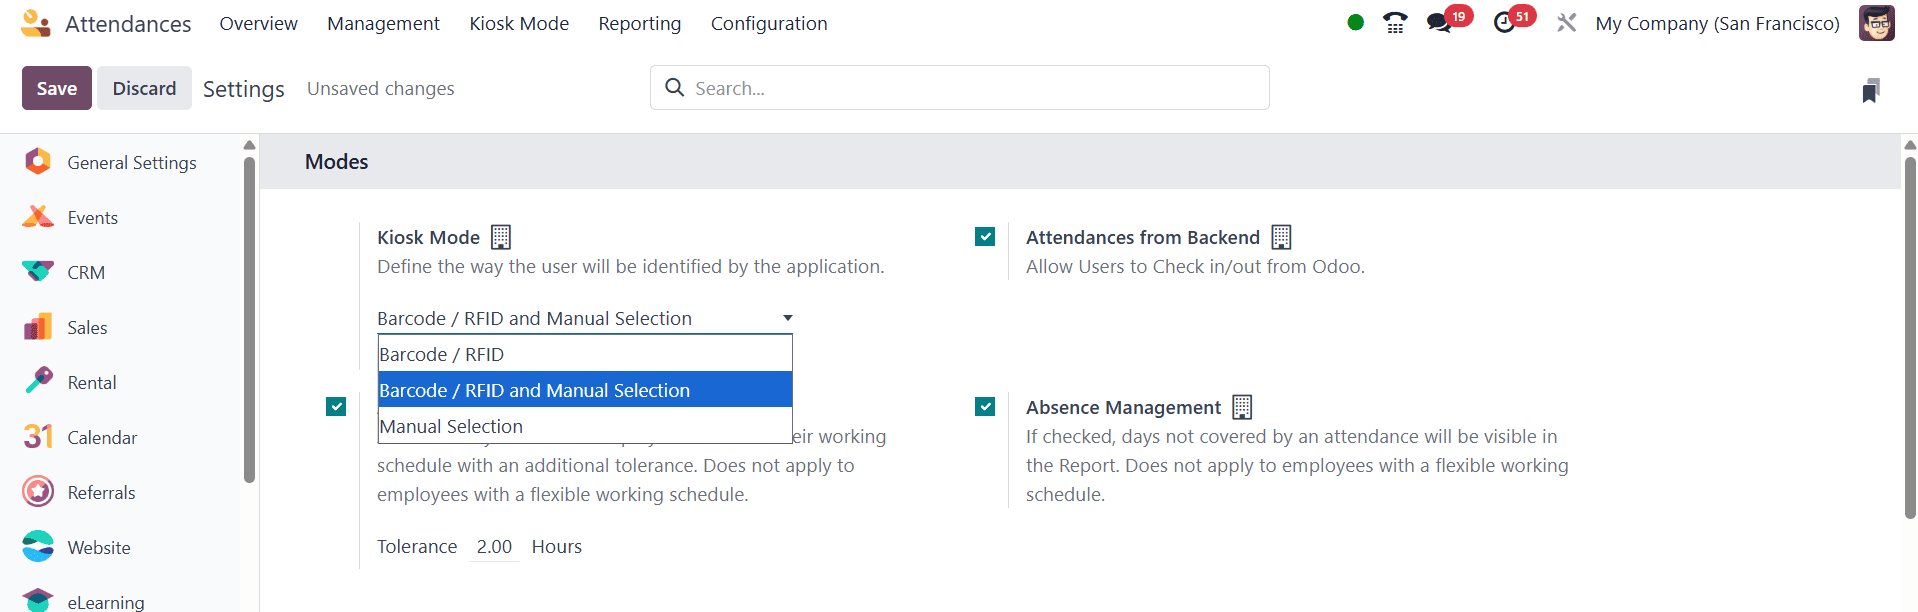
Users can manage extra settings related to employee attendees with Odoo 18 Attendance's Configuration feature. A Settings window appears after the user selects the Configurations tab. Modes, Kiosk Settings, and Extra Hours are the three sections that the user can view in the Settings window.
Mode:
After choosing a Mode, users can customize how the kiosk application will identify them in the Kiosk Mode area. After that, users can utilize the Attendances From Backend capability to check in and out of Odoo.
Next, you have the automatic checkout option, attendance form backend, and absence management, respectively. Using a customizable tolerance time, automatic check-out guarantees that workers get checked out at the end of their workday, even if they forget.
The backend attendance form enables manual check-in and check-out via the Odoo interface, which is helpful for fixing mistakes or in the event of technical difficulties. By tracking absences beyond regular time off requests, absence management inside the attendance settings offers a more thorough picture of employee presence.
This feature facilitates the addition of backend attendance data and allows managers and HR administrators to manually amend or correct employee records due to missed check-ins or technical issues.
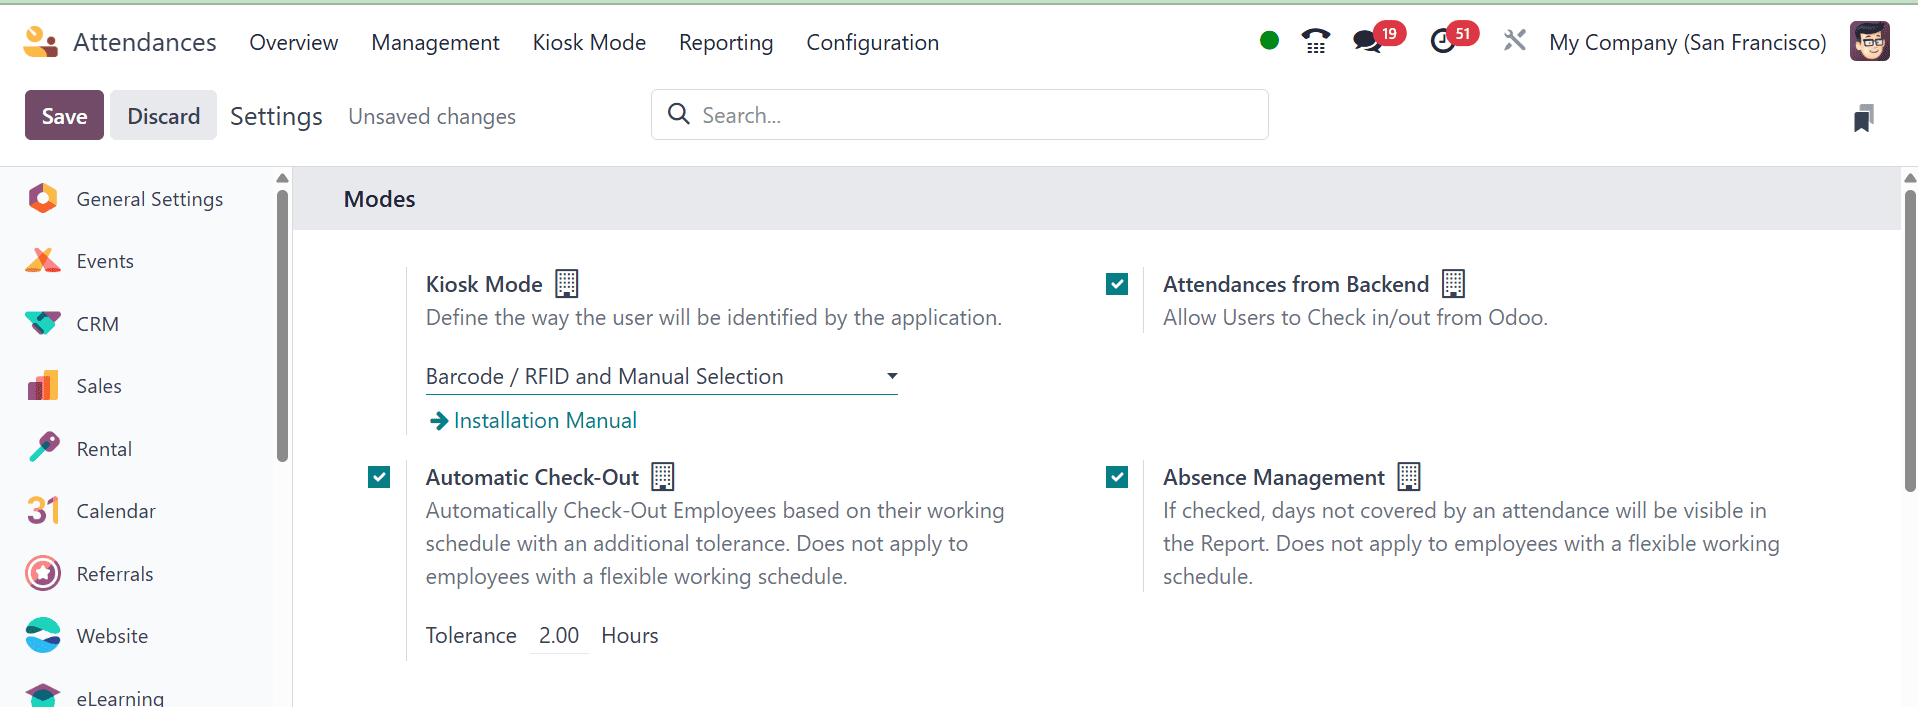
Then, in accordance with the employee's work schedule, the "Automatic Check-Out" and "Absence Management" choices assist in automatically checking out of the system and managing the absence days checked; the report will display the days that are not covered by an attendance. Days that are not covered by an attendance will be shown in the report if they are checked.
Kiosk settings:
Users are able to recognize each application as soon as they access the Kiosk Settings section. Under the Barcode Source option, you can discuss the camera that was used to scan the barcodes. You can set the number of seconds that a greeting message will play in the Display Time option. An employee can use PIN codes to log in to work after the Employee PIN field has been activated. After entering all check-in and check-out information in kiosk mode, click the SAVE icon.
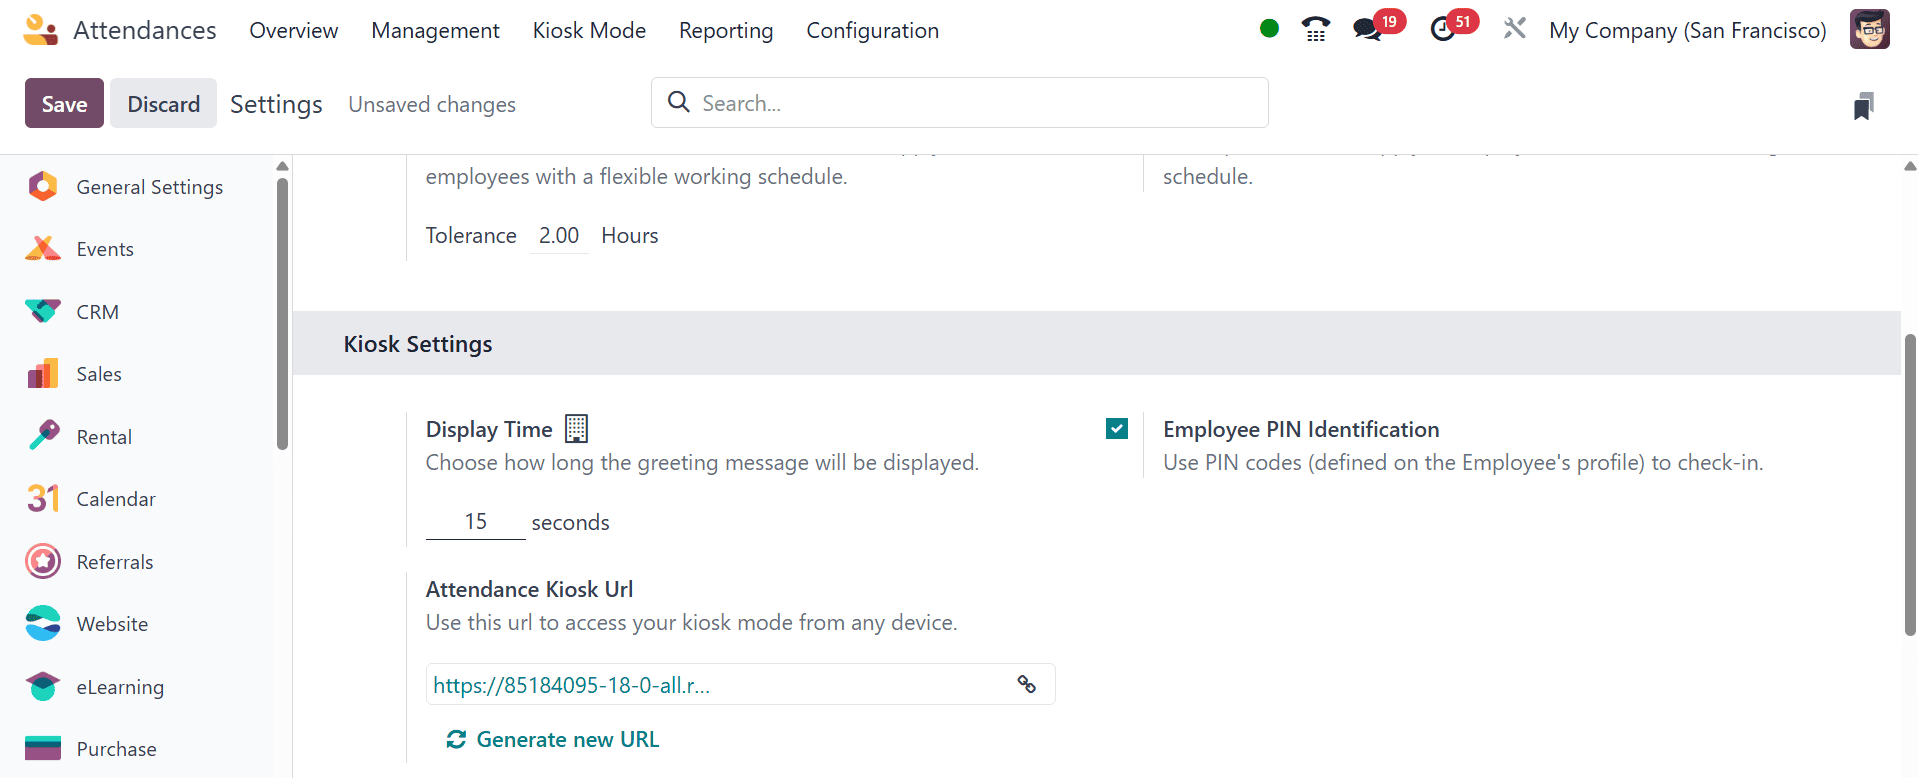
Participation accesses your kiosk mode on any device by using the URL supplied in the Attendance Kiosk Url section. Note that your kiosk is open to anybody with a connection. In the event that your address has been compromised, you can create a new one by refreshing it. Once the "Employee PIN Identification" feature is activated, workers can utilize PIN codes to gain access to their workplace. Click the Save icon once the check-in and check-out details have been entered.
Extra Hours:
Employee overtime can be tracked with the Odoo Attendance Module. In the Extra Hours Tab section, select the Count Extra Hours option and set a start date to begin tracking over time. Establish tolerance periods for both the employer and the worker, figuring out if the extra time is included in the employee's regular working hours or not.
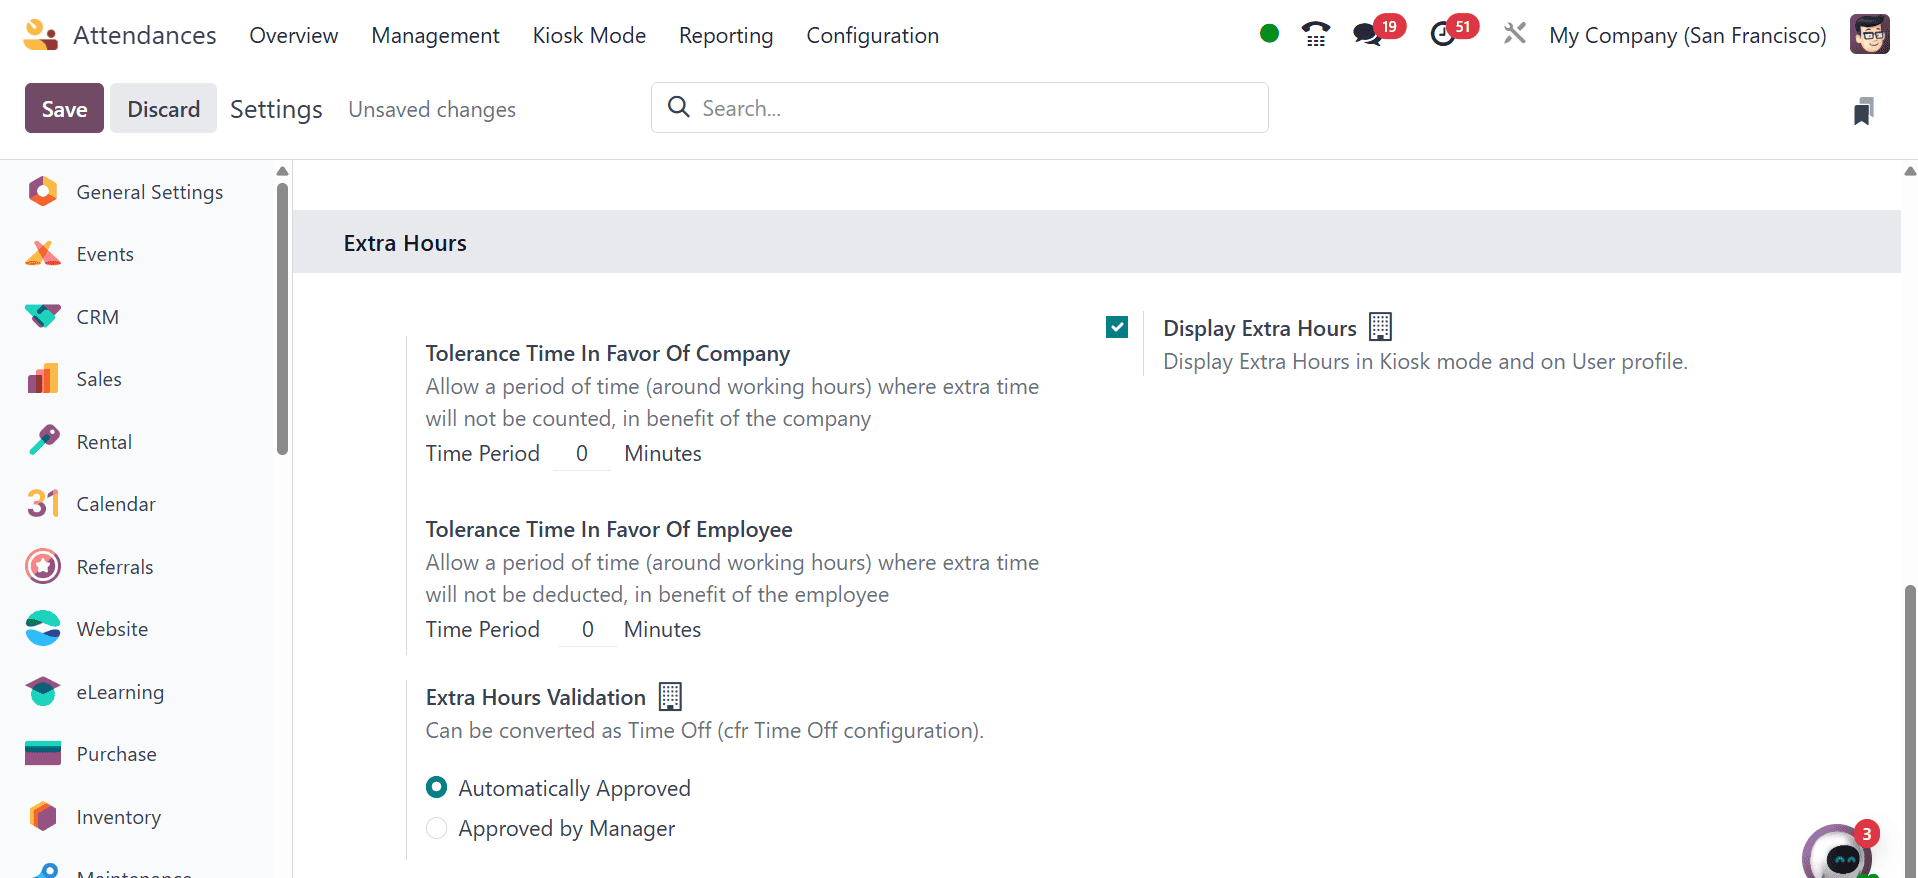
- Tolerance Time in Favor of the Company: This setting establishes a grace period during which additional time put in by staff members is not immediately considered overtime. For instance, it won't be recorded as overtime if an employee arrives early or leaves late within this tolerance. This keeps little departures from set hours from being penalized.
- Tolerance Time in Favor of Employee: This setting provides a grace time that benefits the employee. An employee's work hours will not be reduced, nor will their attendance record be adversely affected, if they arrive late or leave early within this tolerance.
- Display Extra Hours: When this option is selected, workers can view the overtime they have accrued, typically right after they check out. Employees may find it easier to keep track of their overtime thanks to this transparency.
- Extra Hours Validation: This setting determines how extra hours are handled. You can select in Odoo whether more hours are accepted automatically or if management approval is needed. This function is essential for overseeing overtime and making sure it is appropriately recorded.
The settings, which can be verified by selecting the Save symbol, ensure fair tracking and a balance of extra time for the business and its staff.
Reporting
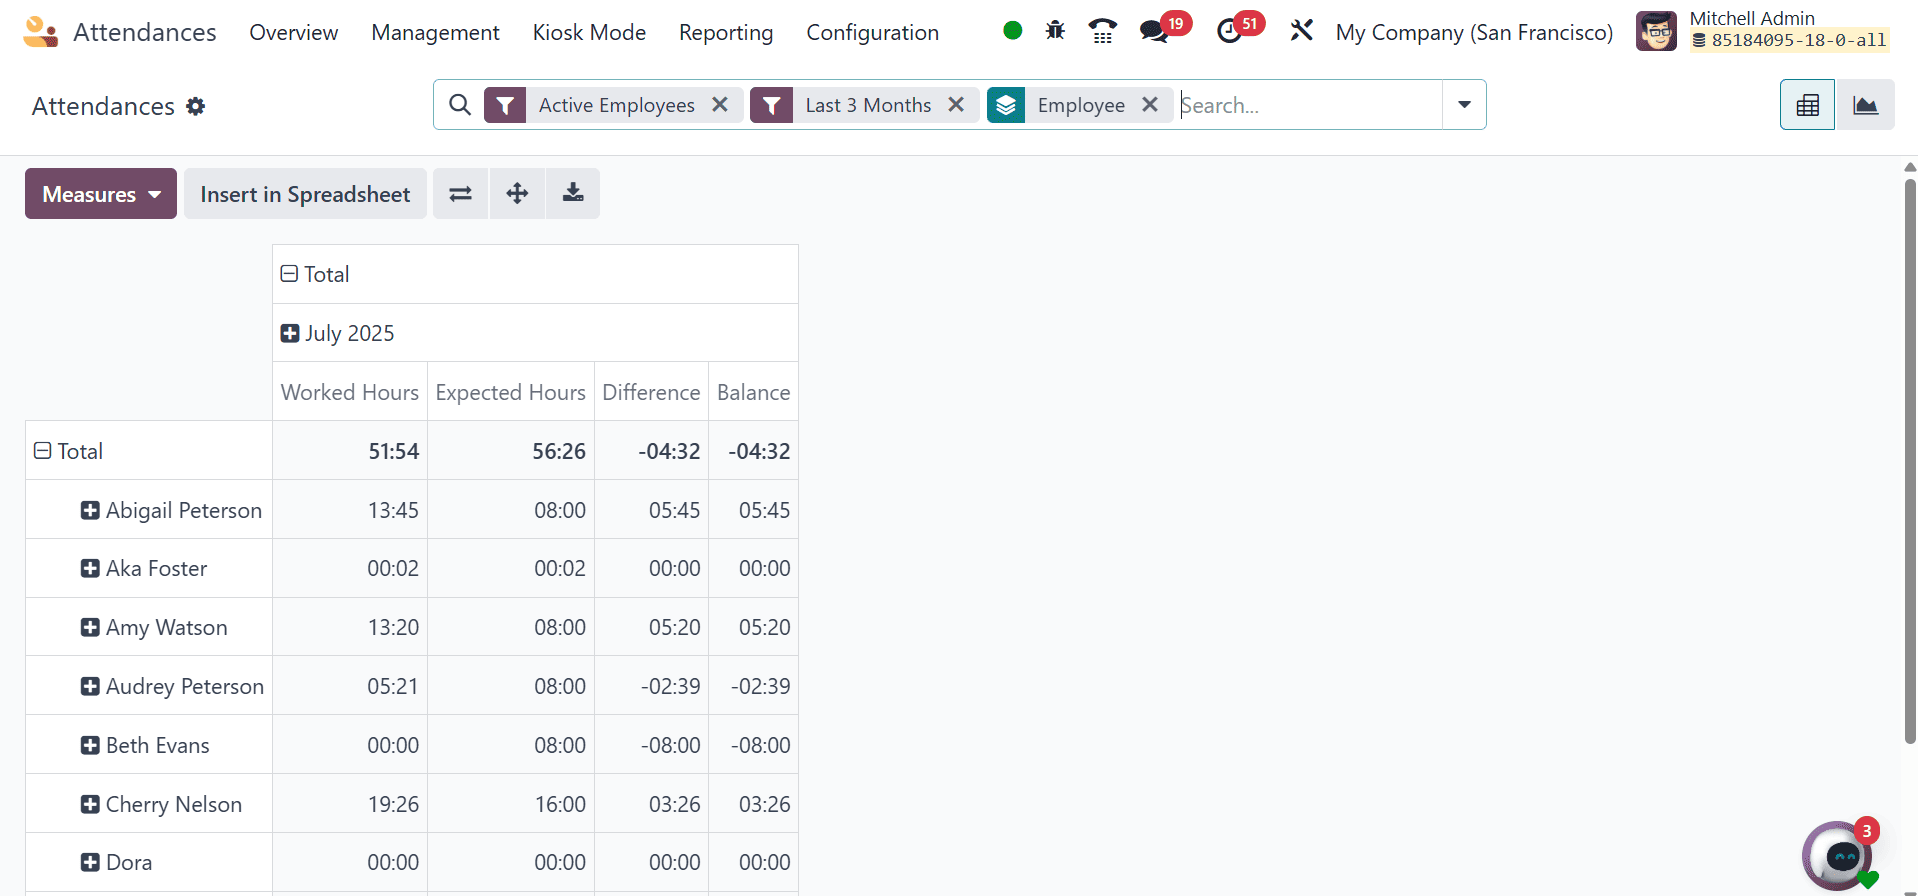
Users have the option to create weekly, monthly, or annual employee attendance reports. To view attendance analysis reports in Odoo 18 Attendance, choose the Reporting tab. The graph of the Attendance Analysis window shows the count on the Y-axis and the employee check-in data on the X-axis. Users can view each employee's check-in details in a range of colors on the graphical representation. By choosing the MEASURES icon, we may add particular figures to the graph, like the number of hours worked and employee overtime.
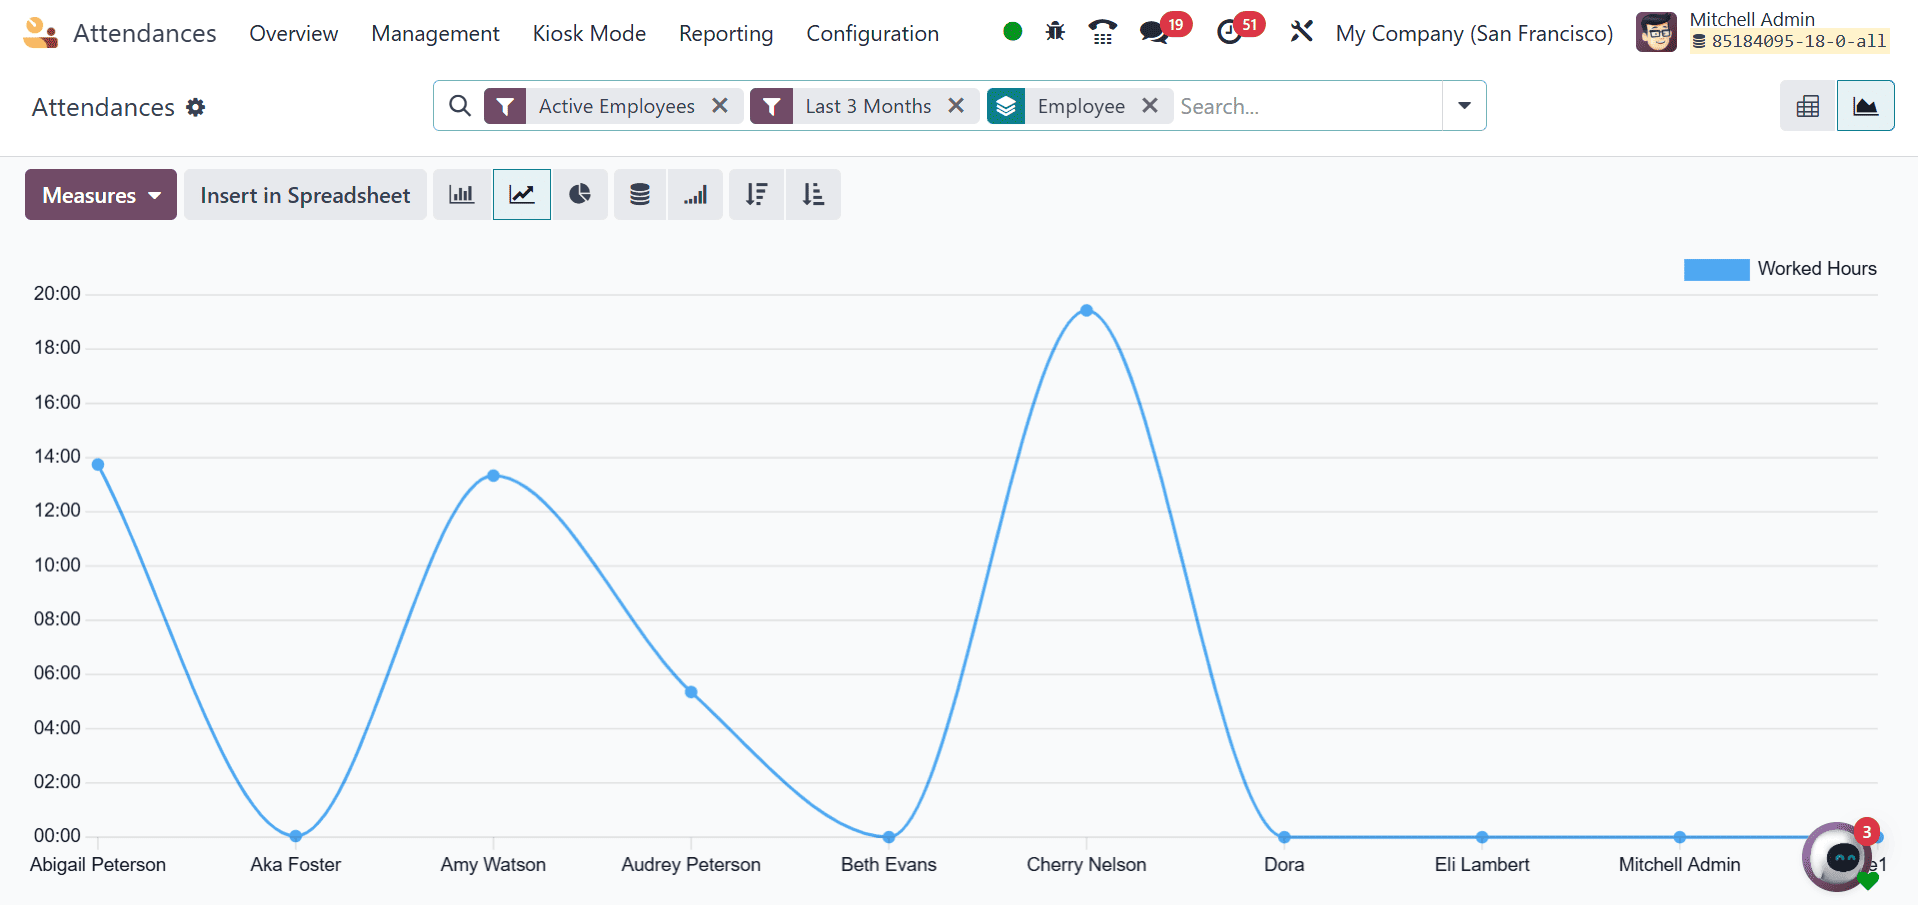
The total number of working hours for each employee can be seen independently by the user in the pivot table. Based on each month, the user can ascertain an employee's actual working hours within the company.
Managing an organization's employees' actual working hours is made simple with the Odoo 18 Attendance module. Reports can be evaluated by a business to better understand employee performance and make future plans.
To read more about How to Manage the Attendance of Employees in Odoo 17 Attendance App, refer to our blog How to Manage the Attendance of Employees in Odoo 17 Attendance App.