This blog discusses the Odoo 13 development environment configuration using Pycharm in Ubuntu 20.04 LTS. If you are looking for Odoo 13 installation in the Ubuntu server you can refer to this blog How to Install Odoo 13 on Ubuntu 20.04 LTS.
Step-1: Install Pycharm
Installing Pycharm System needs the following requirements.
Requirement
| Minimum
| Recommended
|
Monitor resolution
| 1024x768
| 1920×1080
|
RAM
| 4GB of free RAM
| 8GB of total system RAM
|
Disk space
| 2.5GB and another 1 GB for caches
| SSD drive with at least 5 GB of free space
|
Operating system
| 64-bit of Linux distribution that supports Gnome, KDE, or Unity DE, Microsoft Windows 8 or later, and macOS 10.13 or later. | Latest 64-bit version of Windows, macOS, or Linux.
|
Before installing Pycharm you have to up to date your system. For that open Terminal, you can use Ctrl + Alt + T to open a Terminal.
sudo apt-get update
sudo apt-get upgrade
Next, we need to install Pycharm. You can install Pycharm using different methods. Here we are using the snap packages to install Pycharm Community Edition.
sudo snap install snap install pycharm-professional --classic
Step 2: Installing Packages and libraries
After the successful installation of Pycharm we need to install some Python libraries for installing required python packages of odoo.
sudo apt-get install -y python3-pip
sudo apt-get install python-dev python3-dev build-essential libjpeg-dev libpq-dev libjpeg8-dev libxml2-dev libssl-dev libffi-dev libmysqlclient-dev libxslt1-dev zlib1g-dev libsasl2-dev libldap2-dev liblcms2-dev
Next install wkhtmltopdf
sudo wget https://github.com/wkhtmltopdf/wkhtmltopdf/releases/download/0.12.5/wkhtmltox_0.12.5-1.bionic_amd64.deb
sudo dpkg -i wkhtmltox_0.12.5-1.bionic_amd64.deb
sudo apt install -f
Then install web dependencies.
sudo apt-get install -y npm
sudo ln -s /usr/bin/nodejs /usr/bin/node
sudo npm install -g less less-plugin-clean-css
sudo apt-get install -y node-less
Step: 3: PostgreSQL Installation and Configuration
Install PostgreSQL:
sudo apt-get install postgresql
We need to create a PostgreSQL user for the odoo databases.
sudo su - postgres
createuser --createdb --username postgres --no-createrole --no-superuser --pwprompt odoo13
We need this user and password in the later steps. Provide password for the user.
use the command to change the created user as a superuser.
psql
ALTER USER odoo13 WITH SUPERUSER;
Then exit from the psql and exit from the postgres user. You can use ‘\q’ and ‘exit’ respectively to continue the installation
Step 4: Clone Odoo from git
In the next step, download the source file of Odoo. So let’s clone from the Odoo Repository in GitHub. For that, first, we need to install git in our system.
sudo apt-get install git
Next we can clone Odoo 13 from git using the following command.
git clone https://www.github.com/odoo/odoo --depth 1 --branch 13.0 --single-branch .
The source files will clone to the home directory. If you want to clone to any other location, you can use the path instead of ‘.’
Step 5: Install Python dependencies for Odoo 13
The required dependencies of Odoo 13 are listed in the file requirements.txt. You get the file in the odoo directory. So you can go to the Odoo directory. Then use the following command to install Python dependencies.
sudo pip3 install -r requirements.txt
or
sudo pip3 install -r <path>/requirements.txt
Step 6: Configure Odoo
After completing the installation of Python dependencies you have to create an Odoo configuration file. For that you can open Pycharm IDE. Select Open project and select Odoo directory as a project. Create a new text file ‘odoo.conf’
You can copy this following configuration to the conf file
[options]
   ; This is the password that allows database operations:
   ; admin_passwd = admin
   db_host = False
   db_port = False
   db_user = odoo13
   db_password = False
   addons_path = /home/user/odoo/addons
   xmlrpc_port = 8013
In the above parameters you have to provide db_password of the user Odoo13. And also change the addons path with the proper path of addons directory.
If you have custom modules, create another directory and specify the absolute path of the directory in the addons_path separated by comma. If the directory is custom_addons then you can set like this.
addons_path = /home/user/odoo/addons, /home/user/odoo/custom_addons
Odoo using 8069 as default port number. You can change this using xmlrpc_port If you want.
Step 7: Add Configuration in pycharm
Next we need to add configuration for pycharm. Click the Add Configuration button on the top right side of the IDE
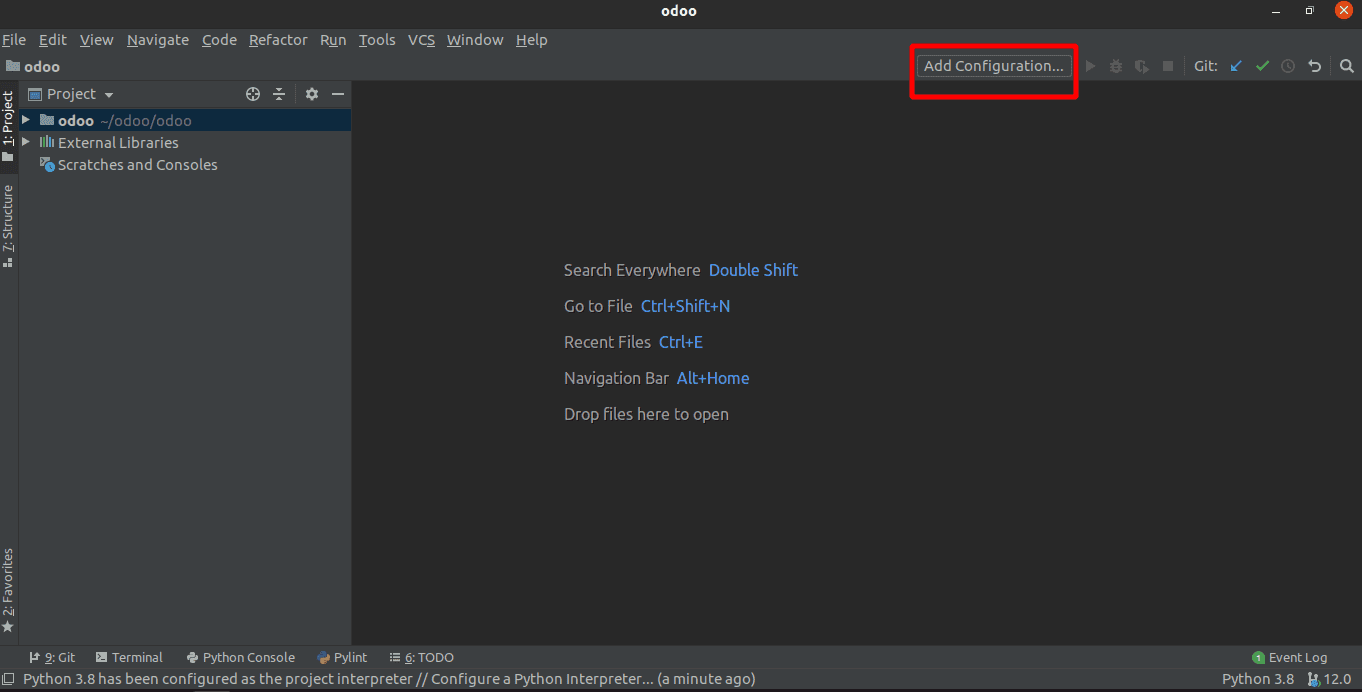
It will open another dialog box. Click the + button and select Python. Configure the following settings.
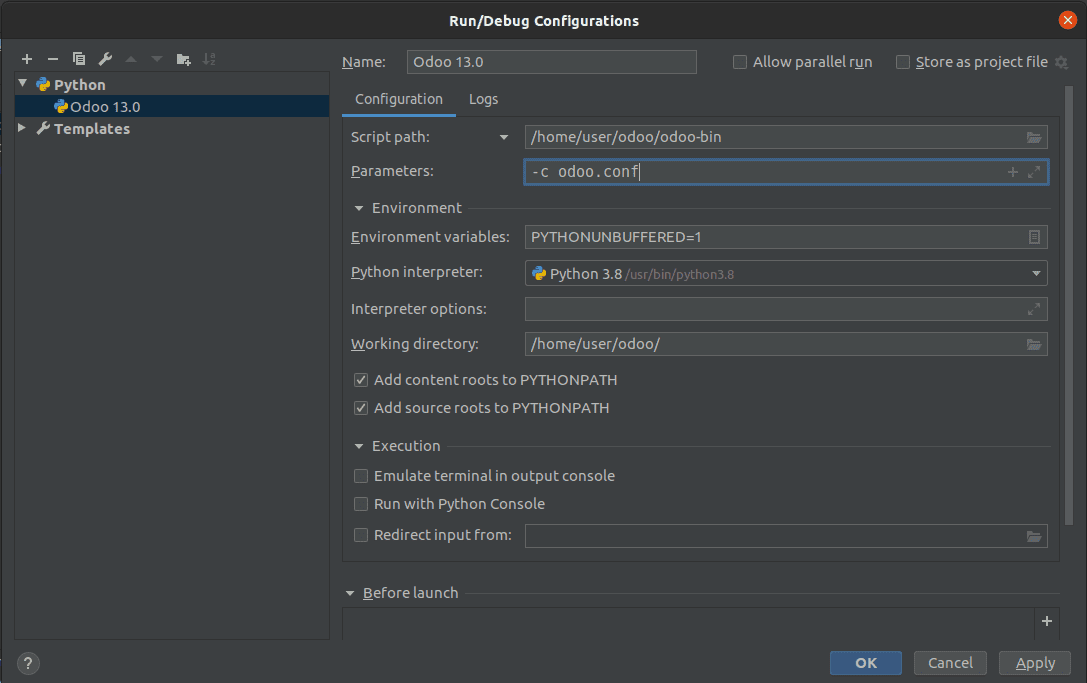
Name: You can give name for the Configuration
Script Path: Here you have to select the ‘odoo-bin’ file from odoo directory.
Parameters: Here at least provide the conf file using -c parameter.
Python Interpreter: You have to select Python Interpreter here.
Test Odoo Installation
Now we have configured everything. You can now test the configuration by clicking the run button. If Odoo runs without any error or issue the log should be like this
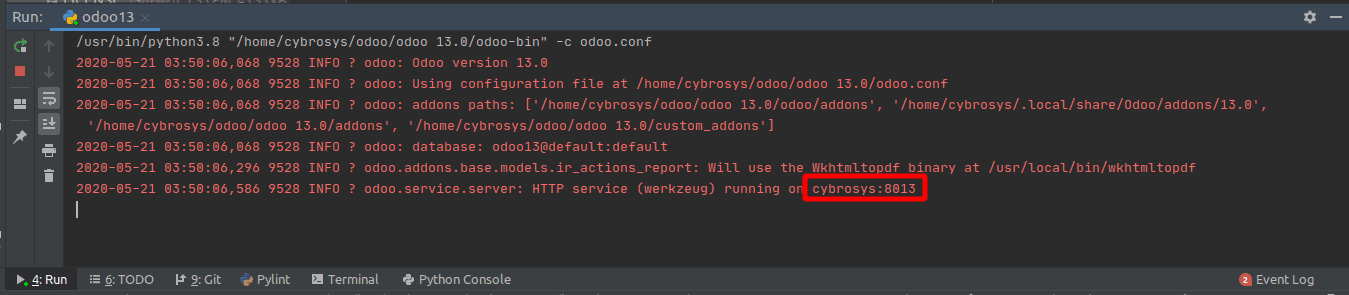
Here the cybrosys is the username of the system. Now you can access Odoo in a web browser by localhost:8013.
You can refer to our Odoo Development Course to know and Learn more about Odoo
Have a look at the following blog to explore more about Odoo 16 Ubuntu 22.04. Odoo 16 Ubuntu 22.04