The header, status bar, and buttons are operations tools that help with the functionality of the company and its operational activities of the Odoo platform. Moreover, this will provide a simplification to the operations of the Odoo platform to run your company with more efficiency.
In this blog, we will look at how we can define a header, Statusbar with buttons in Odoo v12.
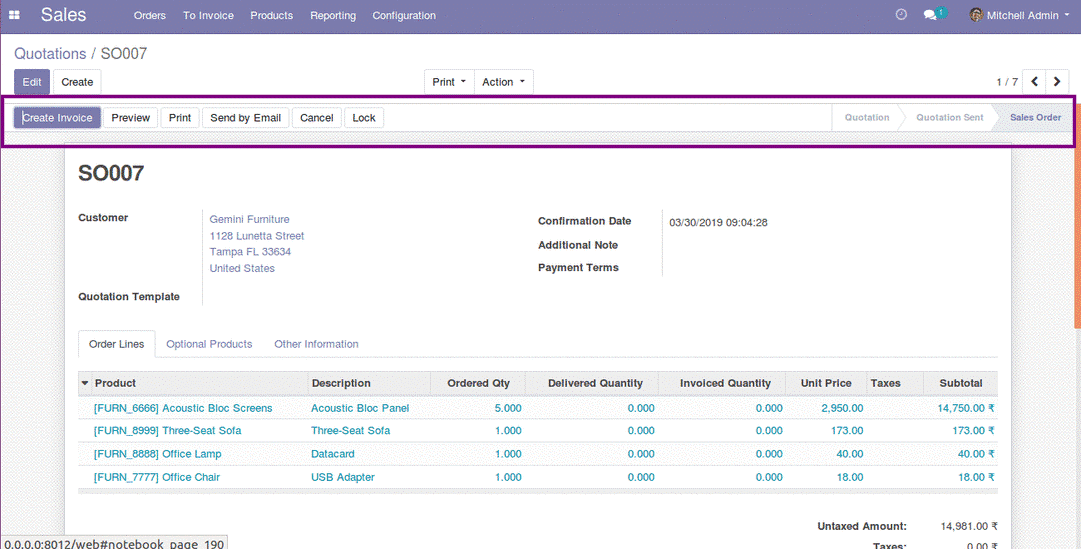
In the following screenshot, you can see the header of the sale order form. Furthermore, it encompasses different buttons and a status bar that represents the record status in the right end.
Therefore, we will look at how one can add a similar one in our student's form the view that we have already created as depicted in the following image.
Here we will continue with the editing of the original file that we have already created, also I will explain how to inherit and do the same in the later part of this blog.
So let us have a look at the existing form view code first which is depicted in the following screenshot. Here, initially let us add the status bar on the right side of the header.
Moreover, in the python file and in the corresponding model, ie, student. student, we have to add a new field which has to be shown. In the following image, you can see the model student. student, a new field name state is added, which is a selection of fields with values draft, done, and canceled as depicted in the following image.
In addition, set the default value as draft, so that the newly created records will come in the draft state as done in the following code.
state = fields.Selection([('draft', 'Draft'), ('done', 'Done'),
   ('cancel', 'Cancelled'), ], required=True, default='draft')
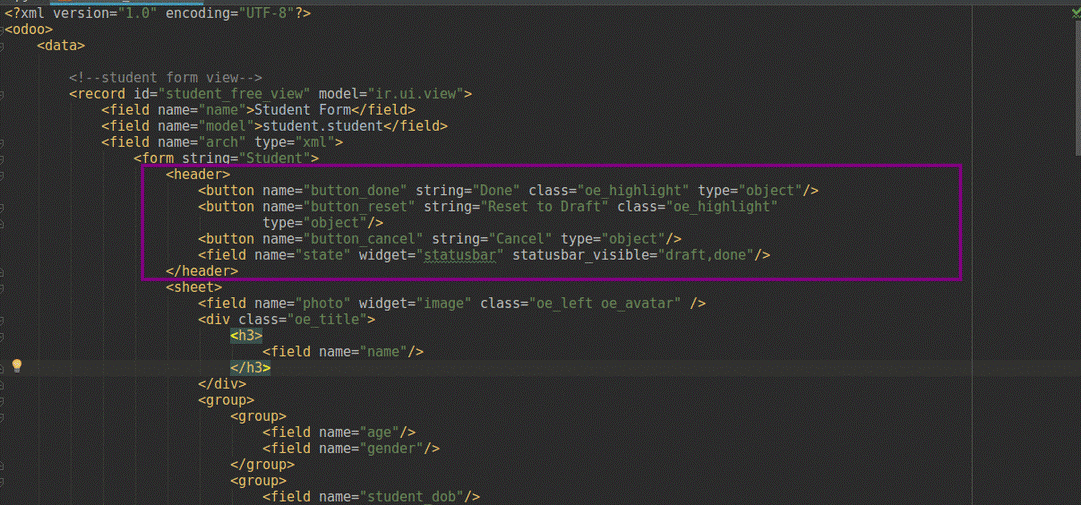
Using the above code we have defined the field, now we have to add the field in the XML file which is done as depicted in the following image.
In the above image, inside the form tag and before the sheet tag, you can see a new tag named header is added, and the field we have added in the python.
<header>
   <field name="state" widget="statusbar" statusbar_visible="draft,done,cancel"/>
</header>
widget=”statusbar” has to be given for this field, if you remove this widget you can see the difference in the view, so have a try without giving the widget. Moreover, in the statusbar_visible we can specify which all fields have to be displayed in the statusbar, we can specify the statusbar_visible as below,
<header>
   <field name="state" widget="statusbar" statusbar_visible="draft,done"/>
</header>
Make sure that the python file is called in init and the XML file is called in the manifest.Restart the service as we have made changes in python and install/upgrade the module.
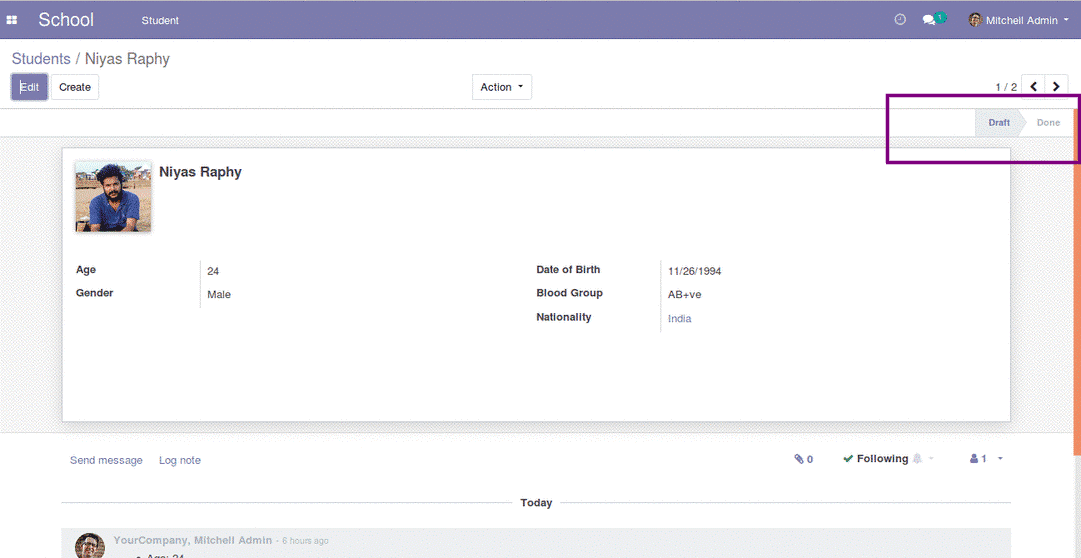
After upgrading the module, you can see the status bar getting added in the header. And the status bar only showing the Draft, or the Done state, hope you understand the reason why canceled is not shown over there? Because in the statusbar_visible we haven't given cancel. Moreover, if statusbar_visible is empty we can see all the states there. As of now, you will be clear on adding a status bar to the dashboard therefore, let's now move onto the next section where the button is added to the header.
Adding Button in the header:
Let us add three buttons to the form, for moving the student records to different states.
1. Done- for moving the record to the done state.
2. Cancel- For moving the record to cancel state.
3. Reset to draft- For resetting the record to draft state.
Now let us make changes in the XML file to add the buttons.
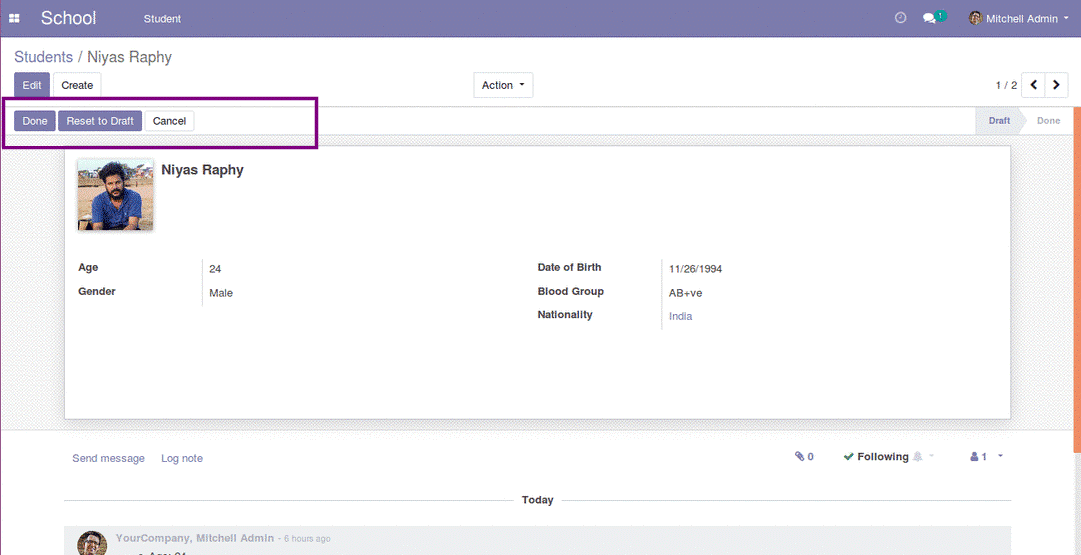
As shown in the following image three buttons are added to the form, the button is defined using the button tag, we have to specify a name for the button, as well as a string for the button which will the end-user see, class=”oe_highlight” is given to add CSS to the button so that the button will be depicted with a blue color.
The following code demonstrate the operation:
<button name="button_done" string="Done" class="oe_highlight" type="object"/>
<button name="button_reset" string="Reset to Draft" class="oe_highlight"
       type="object"/>
<button name="button_cancel" string="Cancel" type="object"/>
Let's now move on to understanding the types of buttons in the next section.
Types of Button:
Using a button we can call an XML action or a python function. If we are going to call a python function on a button click, the type has to be given as an object. On the contrary, if the type is given an action, the code will look for the action in the name of the given button.
Here in our case, we have given the type as an object so that on clicking the button python function with the given name of the button in the corresponding model and gets executed.
So let us upgrade the module and see the changes, after upgrading the module, you can see that buttons given in the code have appeared in the form as depicted in the following image.
Now click on those buttons and see what you get. You are getting an error message right? This is because the system is looking for a function in the name of the button in the student.student model and we have not defined it yet, that is the reason for getting the error message as provided in the following image.
The error message depicts that the student.student model has no attribute/function named button_done. So let us define those functions in the model.
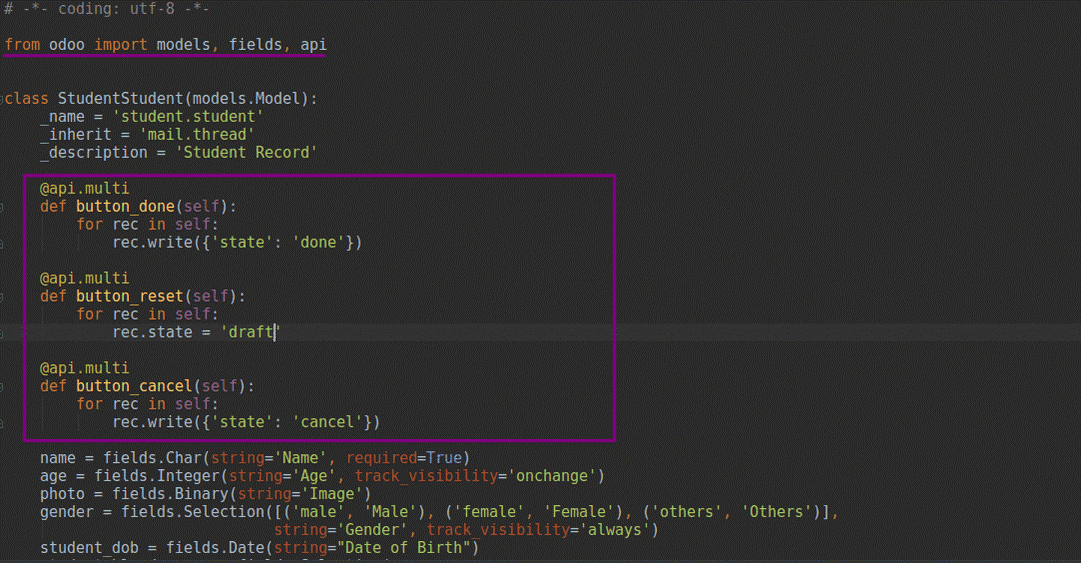
In the above image, you can see we have defined three functions in the name of the buttons as we have added in the XML using the following code.
@api.multi
def button_done(self):
   for rec in self:
       rec.write({'state': 'done'})
So let us look at what the button_done does, on clicking the done button in the XML file, the function button_done will get called inside the function, what we are doing is changing the field value of the state to do.
Similarly, you can see what the Cancel button and Reset to Draft button do. Moreover, you can write the values to the field either by using the write method or by calling the operator. Furthermore, you can check the difference between the button_done function and the button_reset function. In these two functions - two different ways are used to write the values to the field.
The self is iterated over the for loop is to avoid the singleton error, which you will understand later.
As api.multi decorator is used above the function, therefore, we have to update the import line so as to import the API from Odoo import models, fields, and API.
So as of now, we have defined the three functions, so let us restart the service and see them working.
Changes in python never need the module upgrade, now just click those buttons and see the changes. Upon liking each button, you can see the state in the status bar getting changed.
Here in the form as depicted in the following screenshot, the Done and Reset to Draft buttons are in Blue and Cancel Button is not colored, this is because we haven't given the class=”oe_hightlight” for the cancel button.
If you look at the form you can see all the buttons are appearing at the same time. Moreover, the Reset to the Draft button when the record is already in the draft state, this button has to show only when the record is in the other two states. Similarly, the Done button has to show in the Draft state only. Let us look at how to achieve it.
As shown in the above image, along with the button, we can specify states in which the button has to be visible, this can be done by specifying the states inside the state's attributes.
<button name="button_reset" string="Reset to Draft" states="done, cancel" class="oe_highlight"
       type="object"/>
Now the Reset to the Draft button will be visible only in the done and cancel state. For that, you have to upgrade the module and see the changes.