Marketing is an important branch of business. Odoo is equipped with the most advanced tools for marketing. Marketing Automation is an advanced module in Odoo designed for improving marketing efficiency. The module is strongly linked with the other marketing modules of Odoo. All of the marketing modules work together to form a common working ground to generate maximum efficiency in marketing management.
This blog will give you a complete overview of the Odoo 15 Marketing Automation module
It is easy to set up or configure this module in Odoo 15. The module allows you to have an advanced working environment for you to manage and work on marketing procedures easily. Marketing Automation is necessary to nurture and motivate your leads to become active customers. The intelligent module allows you to send the right promotional program information to the right party at the right time.
Configuration and usage
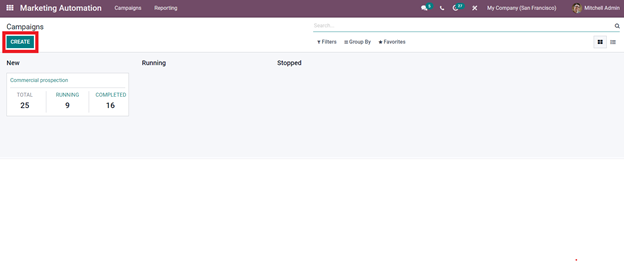
Go to your Marketing Automation module and click on the Create button as shown below to create a new marketing campaign to nurture your new leads.
Before creating the new campaign program it is essential that you must go to the Odoo CRM application to view the proceedings on the leads and the customers and look at the review of your sales team to effectively send campaigns to the right leads.
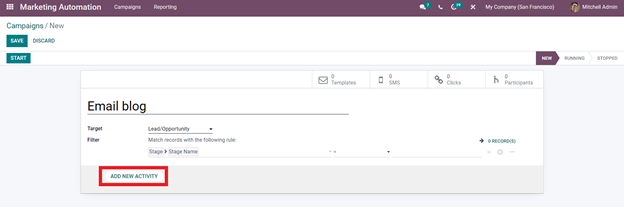
After clicking on the create button a configuration page for you to configure the campaign will be paper as shown below.
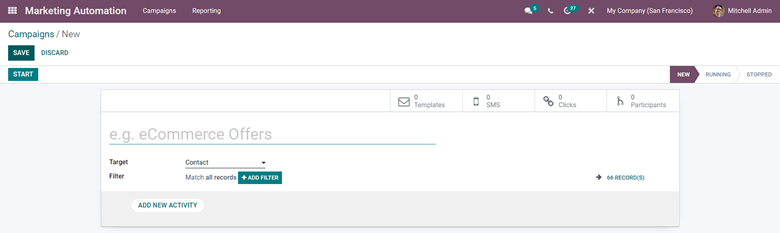
You can configure the whole campaign from here. Start from naming the campaign, make sure that name is gripping, and will let your leads check out more about the campaign. The next part is to choose Target. To choose the Target from the dropdown options select the target to apply it. If you want to target your leads or opportunities select them from the list as shown below
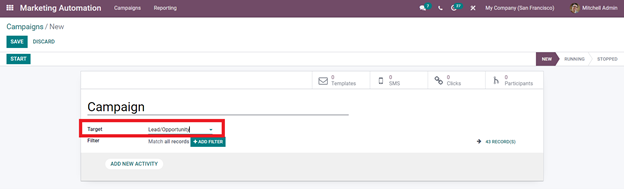
As the module is highly integrated with the CRM module of Odoo, the platform will automatically recognize the leads and will arrange them accordingly. The campaign will be sent to the targeted leads after configuring the Targets option. Note that there are many options under Target to which you can choose to send the campaign to. Choose according to the nature of your campaign to proceed with the process. After this, you can add a filter for the Leads that you wanted to add to the program. Click on the Add filter option and add a filtering option from the drop-down options as shown below.
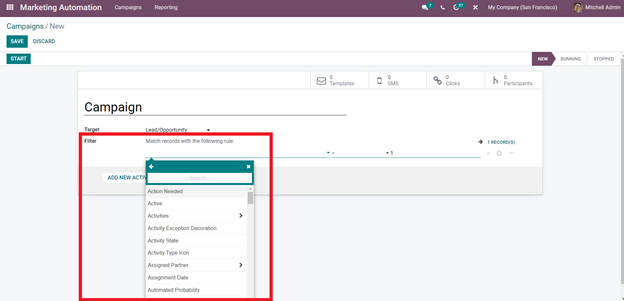
Click on the filtering option that you want. You can search for the filtering option by using the search bar. Search for the filter and apply it and after that click on the Add new activity key as shown below to proceed.
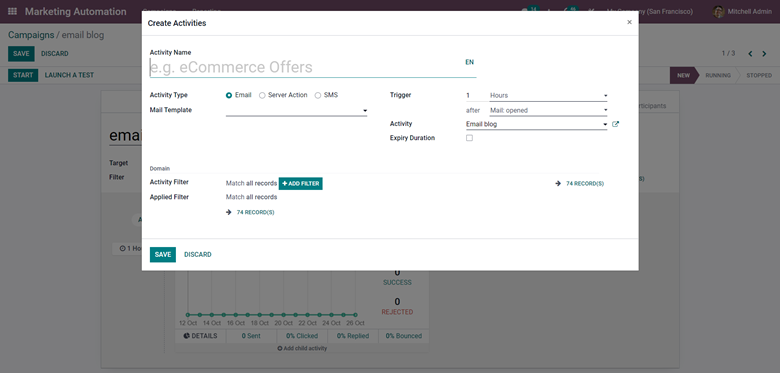
The key will allow you to add a new activity, according to your marketing strategy based on the data collected from the CRM module on the new Leads. The Add New Activity key will take you to the configuration section to configure the activity as shown below.
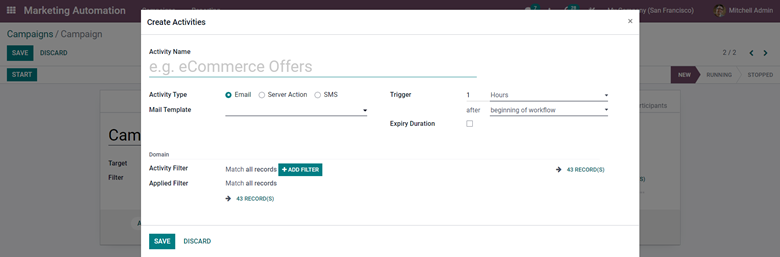
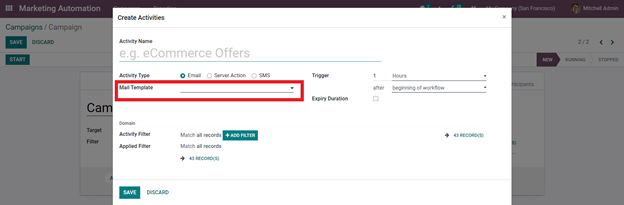
Enter the Activity name and select the type of Activity. There are three activity types which include Email, Server action and SMS. The template option will change according to the type of activity that you have chosen. If you have chosen Email then it will be Mail template, Server action and SMS template. For the sake of explanation let’s continue with the Email template as shown below.
Create Emails with Odoo Templates
Click on the Mail template option and click on the Create and Edit option as highlighted below.
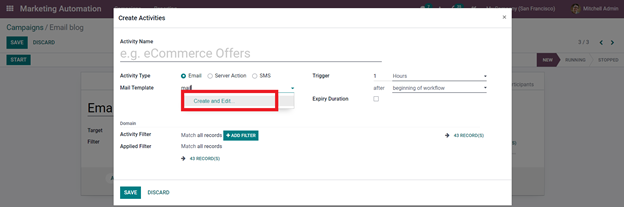
A new configuration page for creating a new template as shown below.
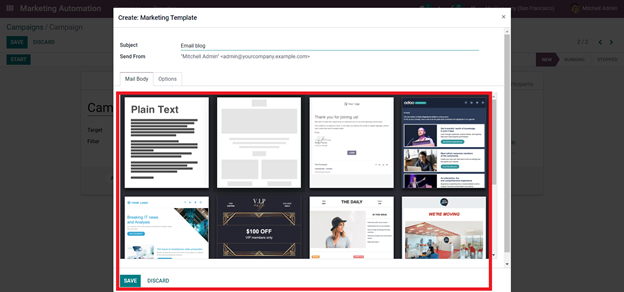
Here in the image given above the highlighted section depicts the templates that you can use to create and design your Emails. Give the Subject select a body from the templates given to use it. Click on the template to configure and use as shown below.
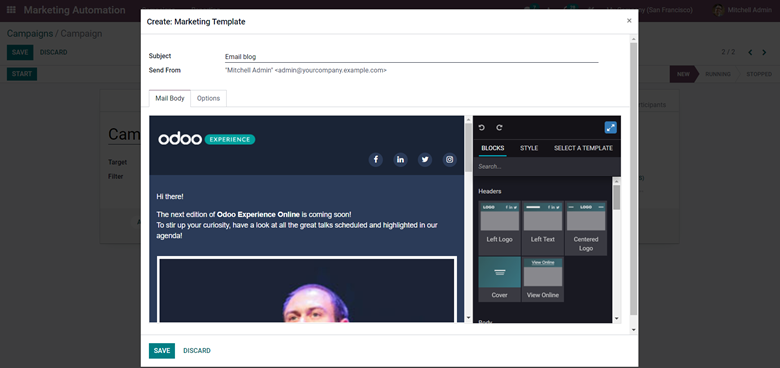
You can configure the body of the mail with respect to the chosen template. You can also notice that a new section has appeared on the screen towards the right as shown below.
The section is filled with advanced configuration options for creating the mail body that you envisioned. The section is filled with Blocks, a feature unique to Odoo that you can drag to the mail body to apply it to the mail. The blocks contain functions and features that range from Logo to Marketing contents and other intricate options that your leads can access directly from a single mail.
Blocks
- Structure: The structure blocks concentrate on providing the basic structure of the website. You can consider them as basic building blocks with functions to add the basic relevant information. The sections include
1. Banner: The banner block will allow you to add a banner to your website. A banner is a form of an advertisement on the website. You can use this block to include additional information on the featured content.
2. Cover: The cover block allows you to include catchy headlines and subtitles relating to the headline. Use this block to attract customer attention.
3. Text-Image and Image- Text: This block allows you to add an image and text. You can use this block to write about products and services and add an image in relation to the written content.
4. Heading: Heading block basically allows you to give the tilt of your site.
5. Text: This block allows you to add text content. You can write about products or anything under this block.
6. Numbers: You can use the numbers clock to display products on numbers or contents under numbers.
7. Picture: The picture block will allow you to add a picture along with subtitles and catchy headlines on the pictures.
8. Columns: The columns block will allow you to add three features. You can use these blocks to add three major features to your products or services.
9 Big Boxes: You can use these blocks to highlight important contents or products in two major-sized columns.
10. Features: With the feature block you can add three important features to anything.
11. Masonry: With this block, you can have an image and four sections to add the content.
12. Image Gallery: With this block, you can add multiple images as a gallery for the users to view.
13. Images wall: Use this Block to display a set of images on the website together.
14. Carousel: You can use this block to present content on your website in a slide shown format.
15. Media list: With this block, you can add media heading or event headings.
16. Showcase: You can use this block to showcase products and product features.
17. Parallax: This block allows you to make the contents of the website move at different speeds when the user scrolls down or up.
Features: The set of ‘Features’ blocks will allow you to add additional features to your website to make it easy for your visitors to have a better look at the products or the contents on your website. The blocks in this section are listed below.
1. Comparisons: The comparisons block will allow you to add products or services of similar nature or plans for the visitors to compare and choose from.
2. Team: Give a shout-out to your teams with this block. You can add the People who are responsible for new products or the company.
3. References: This Block will let you add references.
4. Call to action: The call action Block comes with a Call now button which the visitors can use to contact your business.
5. Accordion: You can use this block to include the Terms of services alongside the links of other websites and Cookie usage.
6. Features grid: This feature allows you to list features. Two sections will be given and you can write the Slogans and also change the icons to list the features.
7. Table of contents: As the name of the Block suggests you can add a table of continents for your products or services and the features supporting it.
8. Pricelist: This block allows you to add products and their price list.
9. Items: This Block is used to Display your products and items along with their features and functions.
10. Tabs: You can use this to add one or two sentences about your product and services along with the contact information.
11. Timeline: You can use this feature to display timelines of important upcoming marketing events or product releases.
12. Steps: This block allows you to display Steps to buying your product or services or any other function that requires to be represented in a step-by-step format.
13. Quotes: This block allows you to add quotes. You can add the quotes of the CEO or the quotes as the core ideas that your company is based on or believe in.
Dynamic content: This set of blocks will allow you to add content that possesses a dynamic nature to the website.
1. Form: The form block allows you to collect important t data on the visitors including the contact details which they can enter directly using the forms.
2. Map: This block will display the locations of your business.
3. Products: This block allows you to display products in a slide format that the visitors can browse through to choose from.
4. Search: This Block will allow you to add a search bar to the website for the visitors to search for products or services.
5. Blog posts: This Block will allow you to add Blog posts directly to the website for the visitors to choose and read from.
6. Events: The events block will allow you to give information on major upcoming events.
7. Newsletter block: The newsletter block can be sued to collect emails ids from the visitors to let them know of the new products’ news and other marketing information.
8. Newsletter popup: This block will act as a popup to collect user emails to send them news on new vents.
9. Popup: This block will act as a random Popup with important info on offers or other details.
10. Facebook: This block will allow you to display your Facebook link which the users can use to directly go to your Facebook page.
11. Countdown: This block will allow you to set a countdown clock on the website for a new event or product launch or anything like that.
12. Discussion group: This allows you to display a discussion section on your website.
13. Twitter scroller: You can use this feature to provide a live feature for Twitter to the website for the user to view.
14. Donation: The donation button will let you set a donation key for your visitors to donate to your new initiatives or charities.
Inner content: The inner content blocks as the name suggests concentrate on the inner contents. The blocks under this section are listed below.
1. Separator: The separator block will act as a basic line that will allow you to avoid content clutter in the website.
2. Alert: The alert block can be used to add alerts to the website. Note that you must not write about the products or services in the alert block instead right the solutions.
3. Rating: The rating block allows you to set ratings to products, content, or services.
4. Card: A card block ascites as a flexible content box that you can use to write in the content. The blocks have headers and footers required to craft the contents.
5. Share and Search Blocks. The share Block will display all of the popular social media and other platforms for the visitors to share your web address with. And the Search Block will allow you to enable a search bar in the website for customers or visitors to search for content or products.
6. Text highlight: This block will allow you to add text that needs to be highlighted to get visitor attention. You can give a highlighted text and subtext in relation to that.
7. Chart: This block will allow you to add charts to the website in relation to product sales or anything that increases the values of your products.
8. Progress bar: You can include a progress bar on production or events with this block.
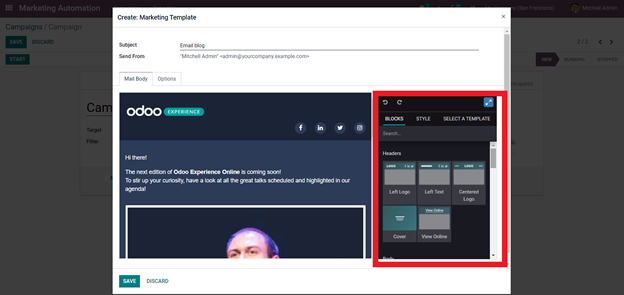
To apply any of the blocks to your mail body just drag the block from the Blocks section to the mail body. After that, you will be given advanced styling features to configure the contents in the blocks with respect to the nature of the mail you are sending as shown below

You can use the style feature to configure the selected block. There are multiple options and settings under the feature that you can use by simply clicking on them. Note that you can use the options from the style section to customize the blocks as much as you want with respect to your companies or products theme that will help your leads to get an instant connection towards the business. The next step is to select a template that will allow you to choose the elements of another template to your chosen template, which is optional and can be applied if your mail demands it.
After creating the Mail body you can avail yourself of more options on Email from the Options tab as marked in the image given below.
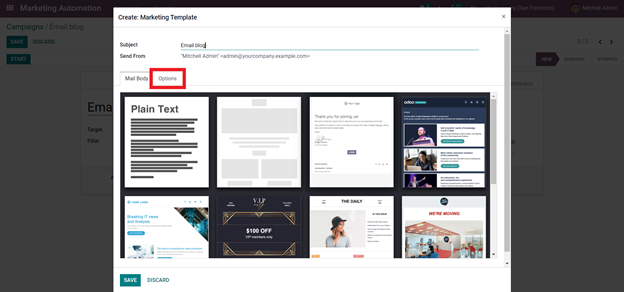
The options tab will take you to a configuration section that you can use effectively to configure your mails even further as shown below.
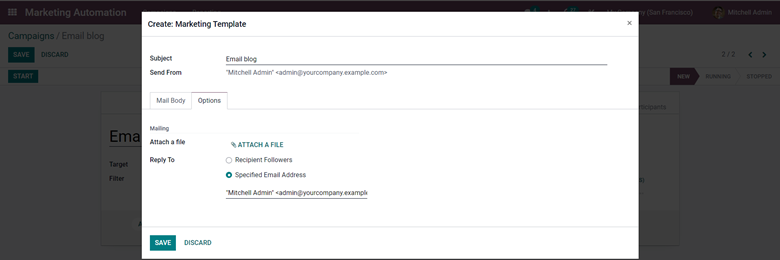
You can use these sections to Attach a file to your mail and Reply to options. You can configure the reply mail address to Recipient followers or Specified email. For the Specified Email, you can enter the Email address as the Reply-to address. After the configurations click on the save button to save the Email.
Create and send campaigns
After the initial configurations on the mail templates, you can continue to configure the Campaign. Note that the newly created email template will be available to add in the campaign section under the Email templates section. After selecting you can configure the Trigger option. The trigger option is highlighted below in the image given below.
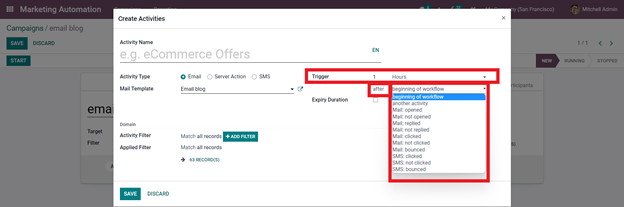
The trigger option allows youtube to set a trigger for your newly created email campaign. There are multiple options under the Trigger option for you to set. You can also set when the trigger should be activated and there are multiple options for you to set as highlighted in the image given above. You can also set the time for the trigger to activate. That is If a lead clicks on the promotional mail that you have sent to them you can set the automated mailing system to trigger automatically after an hour of opening or a day and so on. It is recommended that you should be gentle towards the leads and don't flood them with emails that will create a negative impact on them about your business or products.
After setting the trigger you can define the Expiry Duration by activating it as shown before
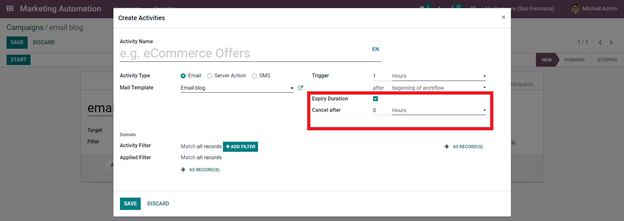
The Expiry option will allow you to set time-bound promotional activities and after the Expiration date, all of the promotional activities will be stopped instantly. After this, you can configure the Domain to filter out your leads even more efficiently. This also allows you to review the previous purchase nature or the consumer nature of the leads to send them with Promotional emails accordingly. This is an efficient way to lure the targeted leads into your business.
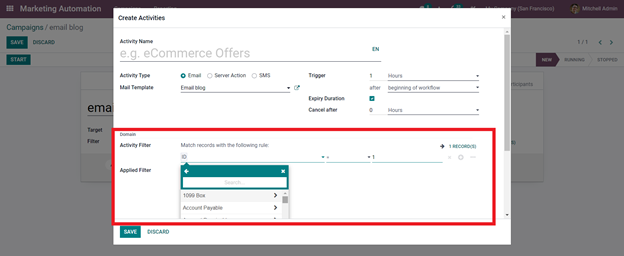
Click on the space next to Apply Filter under the Domain section to see the options as shown above. Choose from the options to narrow down your leads based on the selected options. Under the Applied Filter sections, it will show the filter that you have applied. After the configuration click on the Save button to save the entire procedure.
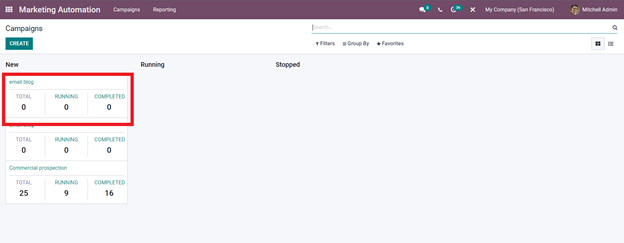
The saved campaign will be available in the Campaign section as shown below.
Click on the Newly created campaign and it will open up for you to view and edit as shown below.
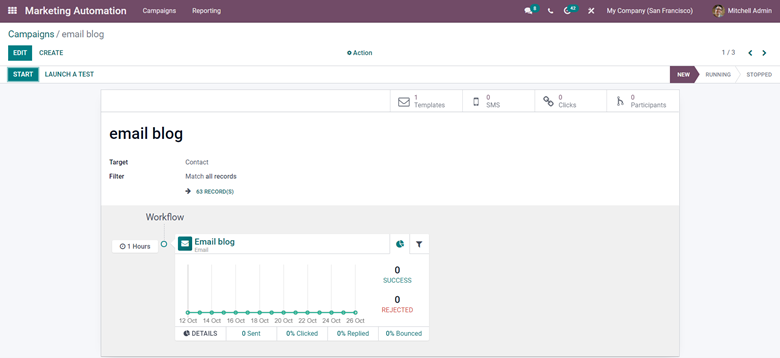
You can see the Workflow represented below the page. You can have an advanced configuration on this by clicking on the Edit button from the same page and the editing options will be available to you.
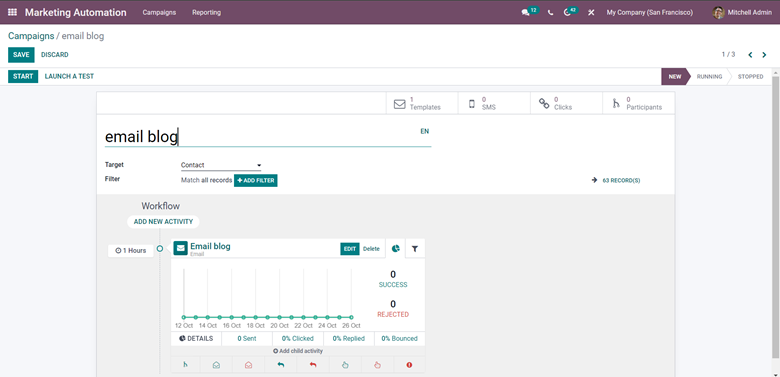
You can perform configurations on your Campaign form here. Under the Workflow sections, you have the options to add a new activity and under the current activity you can see an option called Add child activity as shown below.
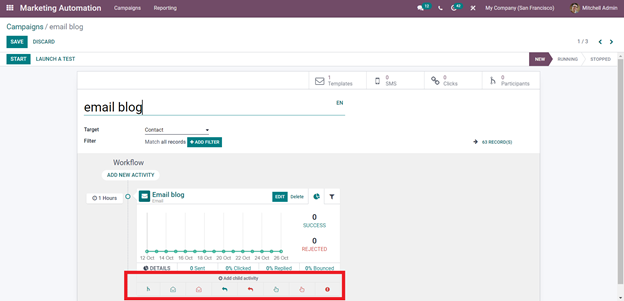
Clicking on it will give you a new set of options as shown above. All of these options constitute campaign and advanced mail management. Understanding these options is necessary for you to configure and use the features efficiently. All of the features are concentrated on the activities of your leads on the emails or messages that you have sent them.
You can consider this as a command section for activity management. This section allows you to track the activities of your leads on the campaign information that you have sent. And for each possible activity there are each possible options such as Add another activity, Opened, Not opened, Replied, Not replied, Clicked, Not clicked, and Bounced. Each represents the possible activities that your mail went through with the leads. You can configure the automated mailing system on how to behave in each of the activities. From the options click on the one that wants to be configured and a configuration page will be given as shown similar to the activity creation page.
You will have all of the configuration options as mentioned in the activity create a section. Configure the mail and note that the mail will be sent to them with respect to the activity that the lead has performed. Enter the name of the Promo and then select the activity type. The trigger option is available over here too. As mentioned earlier, select the trigger time and what causes the trigger. You can see the name of the activity that you have selected. Set the Expiry duration and proceed to the Domain section to configure it. Similar to what you have done earlier you can narrow down the leads under this too. Note that narrowing down your leads to the maximum allows you to have a better view on them and will help you to send the promotional program to them individually more effectively. After applying, click on the save button to save the activity.
After saving the activity it will be displayed under the already created activity as shown below.
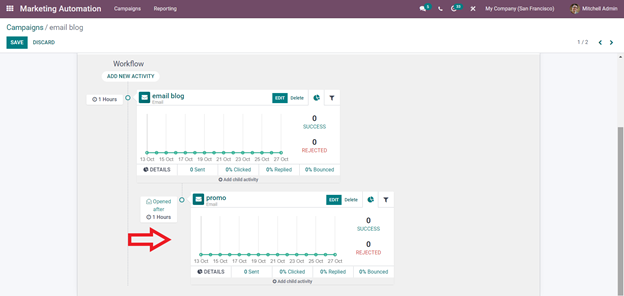
The arrow mark above points at the newly created activity. Both of the activities are concentrated on the leads and to create an activity for your database click on the Add New Child Activity tab and select from the options. This is to configure a new activity to your database. The usual configuration tab will be given as shown below.
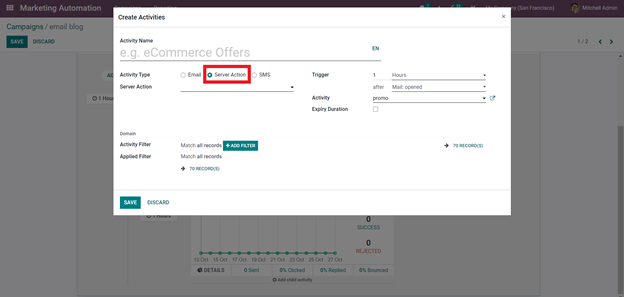
From the configuration tab click on the Server actions button to consider the newly created activity as server action and it will not be sent to the leads or the customers. Fill the rest of the information with respect towards your businesses or companies policies on marketing as shown below
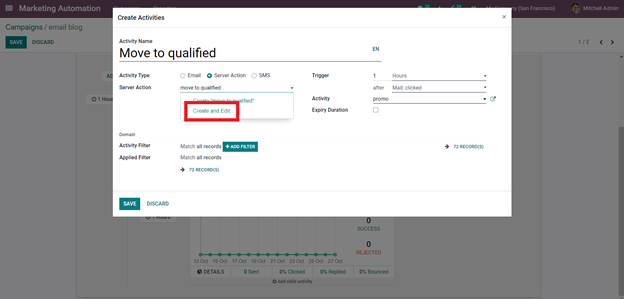
After giving the name of the new activity select the activity type as Server action as the activity is internal and not meant for the customers. Under the server, action section click on to Create a new server action. A new configuration page will open up as shown below to configure the server.
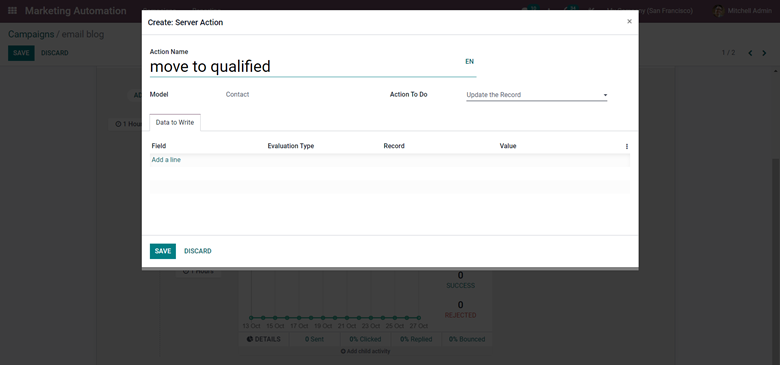
Configure the entire server action form here. For the configuration sections Give the name of the server action. From the Action to do option select the nature of the action form the drop down list and proceed to Data to write. Under field click on the Add a line option to add a field to the segment as shown below.
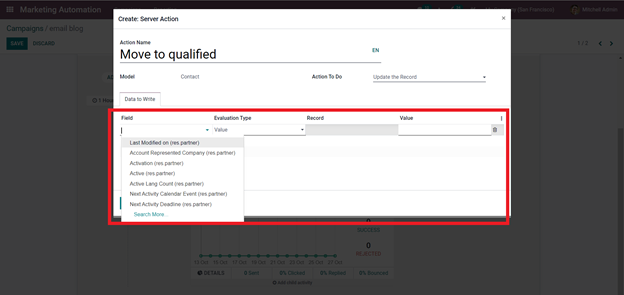
Click on the Field to add from the drop-down options as shown above. The fields can be used to define the purpose of the newly created Server action for example if the server action is for stage change then select stage change from the dropdown options. Enter the Evaluation type from the drop-down options and set the record with respect to your server action purpose. If the purpose is stage change you can give the option, Reference under Evaluation and Under record select the qualified option to apply it to the field. After the configuration click on the Save button to apply the configurations.
You can configure the Domain again if you want, but at this point, it is completely optional and as internal server actions require less narrowing down it is not necessary to use the filter here. After the configurations click on the Save and Close button to save the entire process.
After the configurations, you can carry out the activity as a Test to review the newly created activity by clicking on the Launch a test button as shown below.
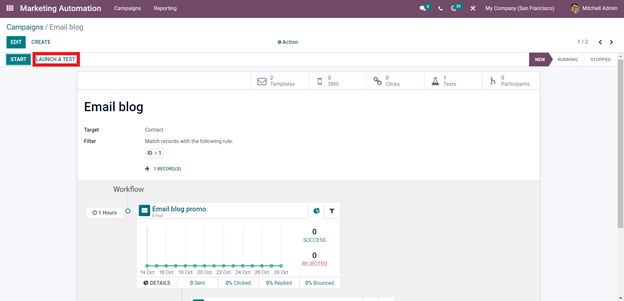
Click on it to run the campaign as a test before releasing it to the customers. After clicking on the Launch test button you will be given a confirmation page with the activity to select the customer and run the test as shown below.
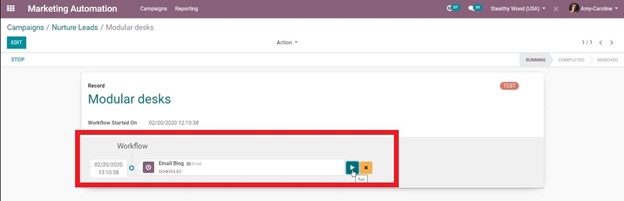
Click on the Run button as shown above. Soon after this an email will be sent to the customer which you can confirm form here as it will be displayed a sthe mail is opened over here.
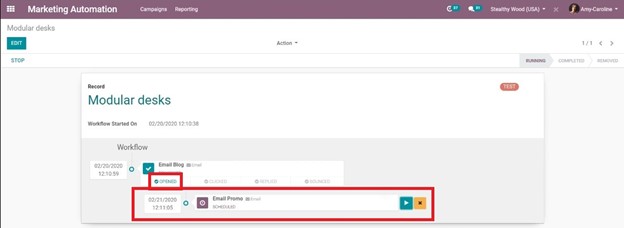
The opened button will light up to show that the customer has opened the mail. Note that all of these procedures are carried out with respect to the rules that you have set in the configurations. The next step will be automatically opened up for you to run as shown below.
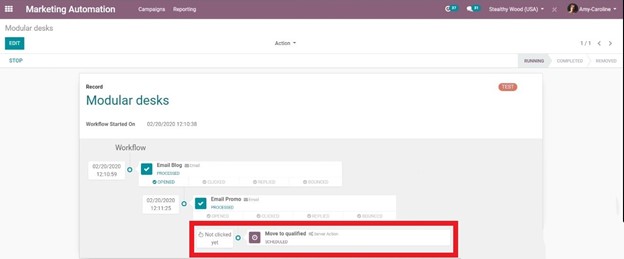
After the send mail is opened the option will change as shown below.
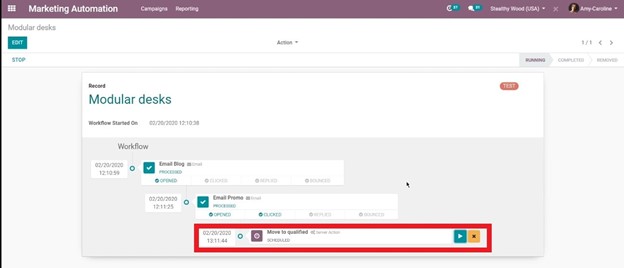
You can notice that when the customer clicks on the mail and the option has changed from Not yet clicked to the date and the time of the customer's mail acceptance. Click on the run button again to finalize the process. You can continue with the process with respect to the number of activities that you have created in the activities section. After the procedures, you can view the updates from the dashboard of the Marketing Automation module under the newly created campaign. You can have a detailed and complete review of the lead management from the CRM module and you can look at your leads and effectively communicate with them using the CRM module to preserve a strong bonding with the lead to convert them into customers.