Odoo is a powerful and comprehensive business management software suite that offers a wide range of applications for various business needs. In Odoo 16, Accounting is a crucial module that helps businesses manage their financial transactions efficiently. One essential aspect of accounting is managing purchase receipts, which document the receipt of goods or services from vendors.
In this blog post, we will explore how to activate and create purchase receipts in Odoo Accounting.
In Odoo, a Purchase receipt and a Purchase Bill serve different purposes within the context of accounting and procurement. Understanding the differences between these two documents is crucial for effective financial management and inventory control. First, let us discuss what a purchase receipt is and how it differs from a purchase bill.
A purchase receipt, often referred to as a goods receipt or goods inward, is a document used to record the physical receipt of goods or services from a vendor. It acknowledges the delivery of products or services to your company.
But a purchase bill, also known as a vendor bill or supplier invoice, is a financial document used to record the amount that you owe to your vendor for the goods or services received. It represents the vendor's request for payment.
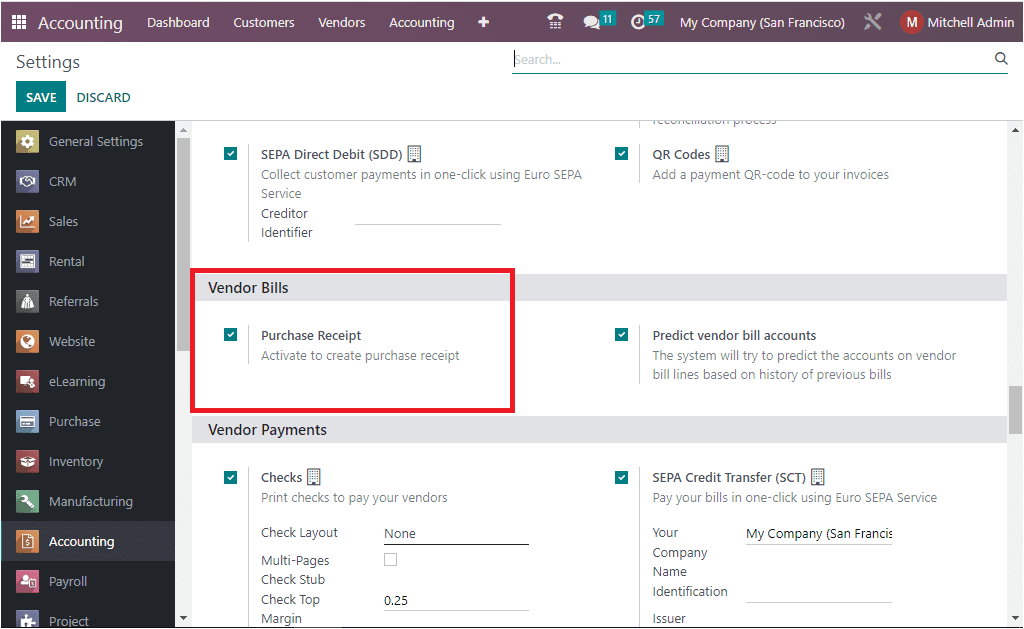
To create Purchase receipts in Odoo 16 Accounting, you can get into your Odoo Accounting module. Under the Configuration tab, you will find the Settings menu. By clicking on the Settings menu, you can navigate to the Settings window, where you can see the Purchase Receipt option in the Vendor Bills section, which should be activated to create purchase receipts.
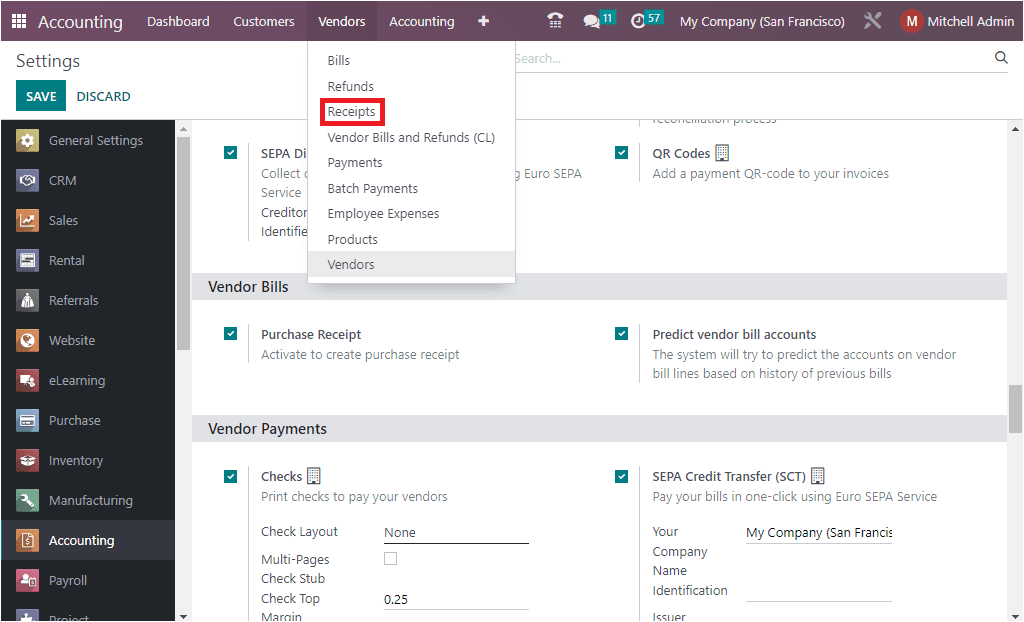
Now, the system will display the Receipts menu under the Vendors tab of the Odoo 16 Accounting module.
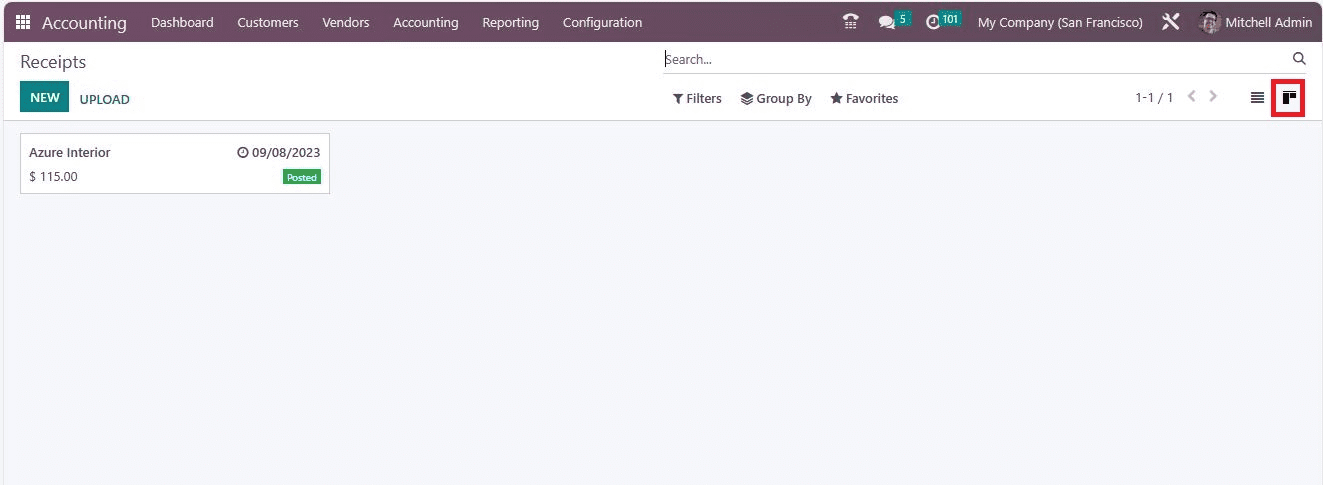
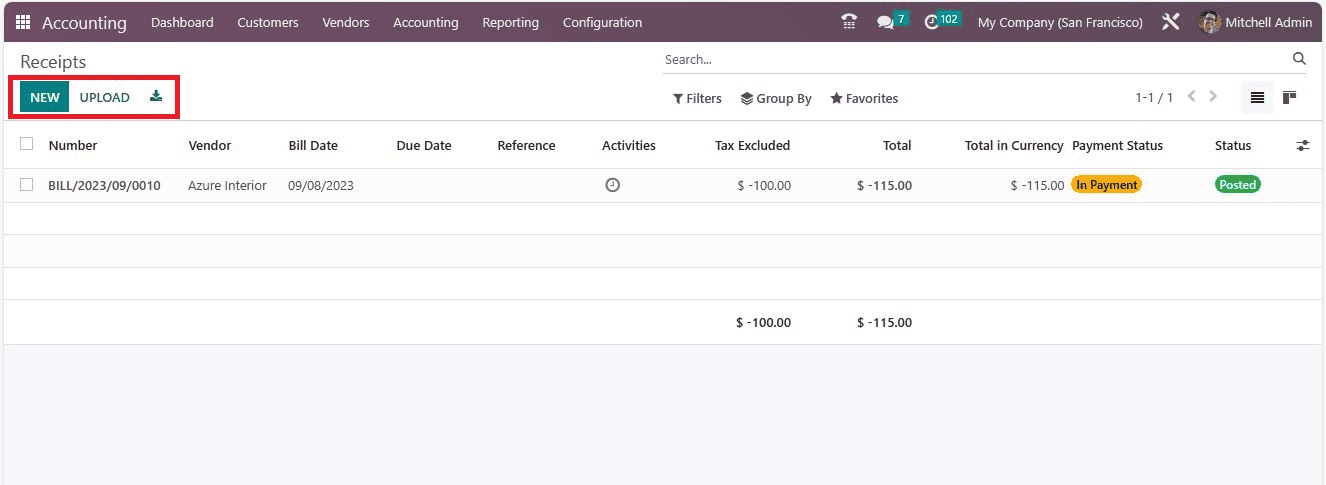
Right at the time you select the Receipts menu, you will sail into the Purchase Receipt window, as shown in the image below.
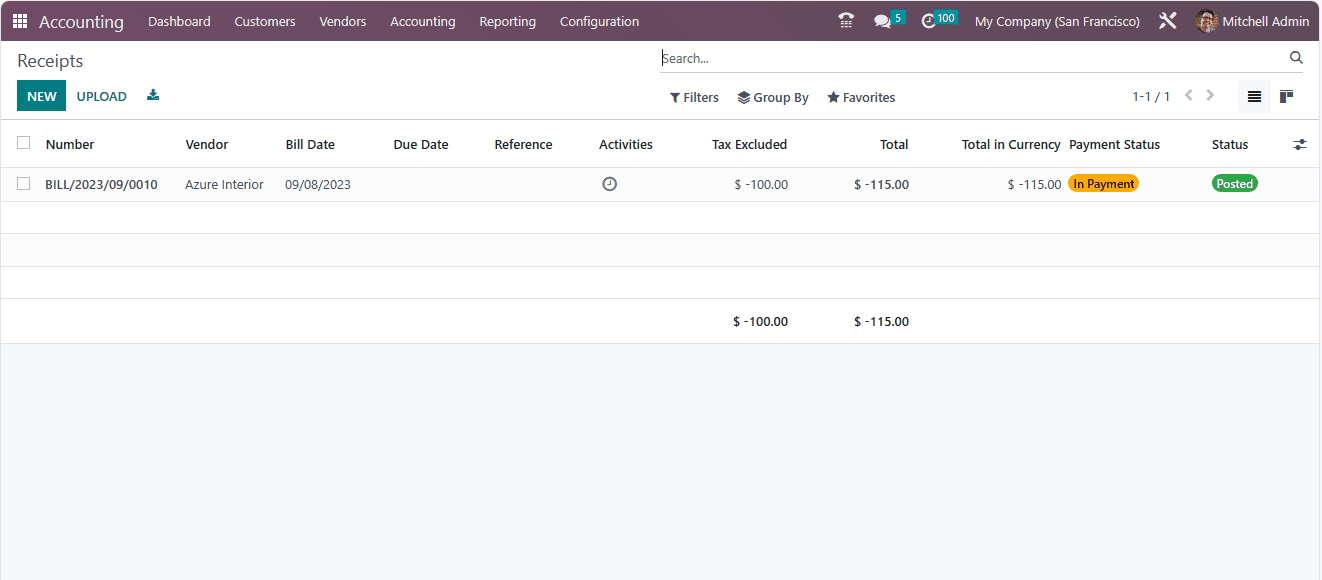
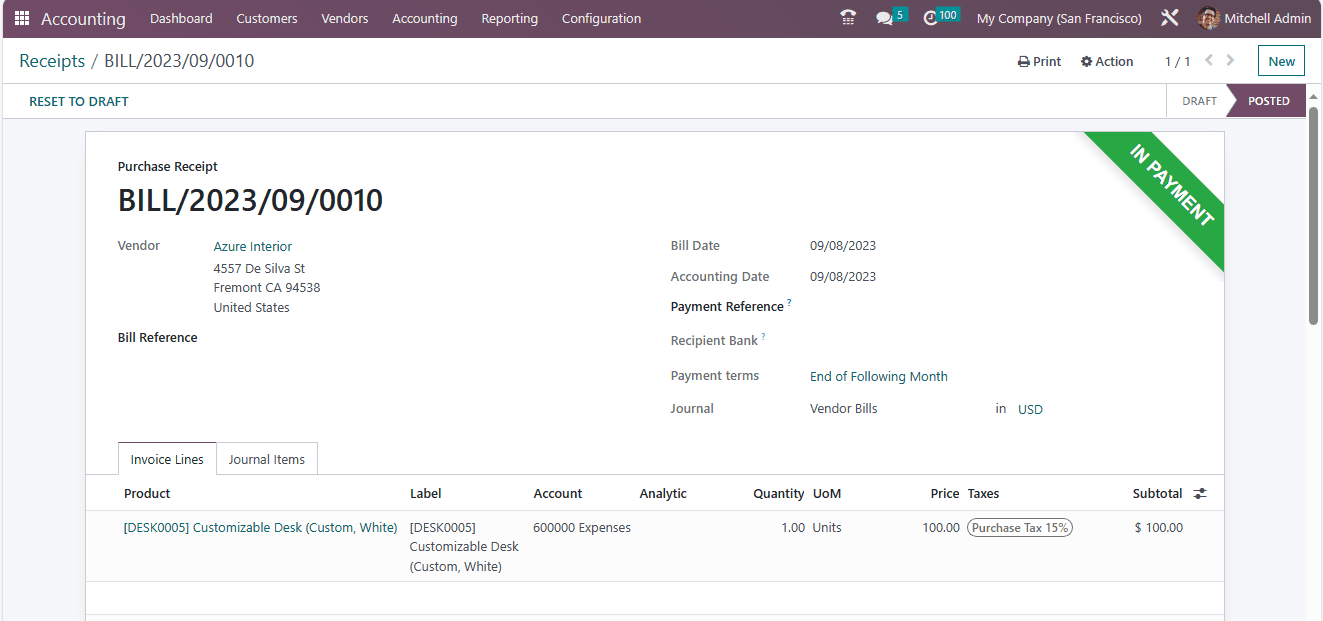
The Receipts window will depict all the already created Purchase Receipts. The image above shows the List view of the Receipt window along with a predefined Purchase Receipt. The Preview will display default Receipt details such as Number, Vendor, Bill Date, Due Date, Reference, Activities, Tax Excluded, Total, and many other details. The Status of the receipt can be viewed here in a specific color format. If you want to view the full details, you can select them. Now, you will be able to view the complete information, as shown in the image below.
You can also access the Receipts window in the Kanban view by selecting the Kanban menu icon.
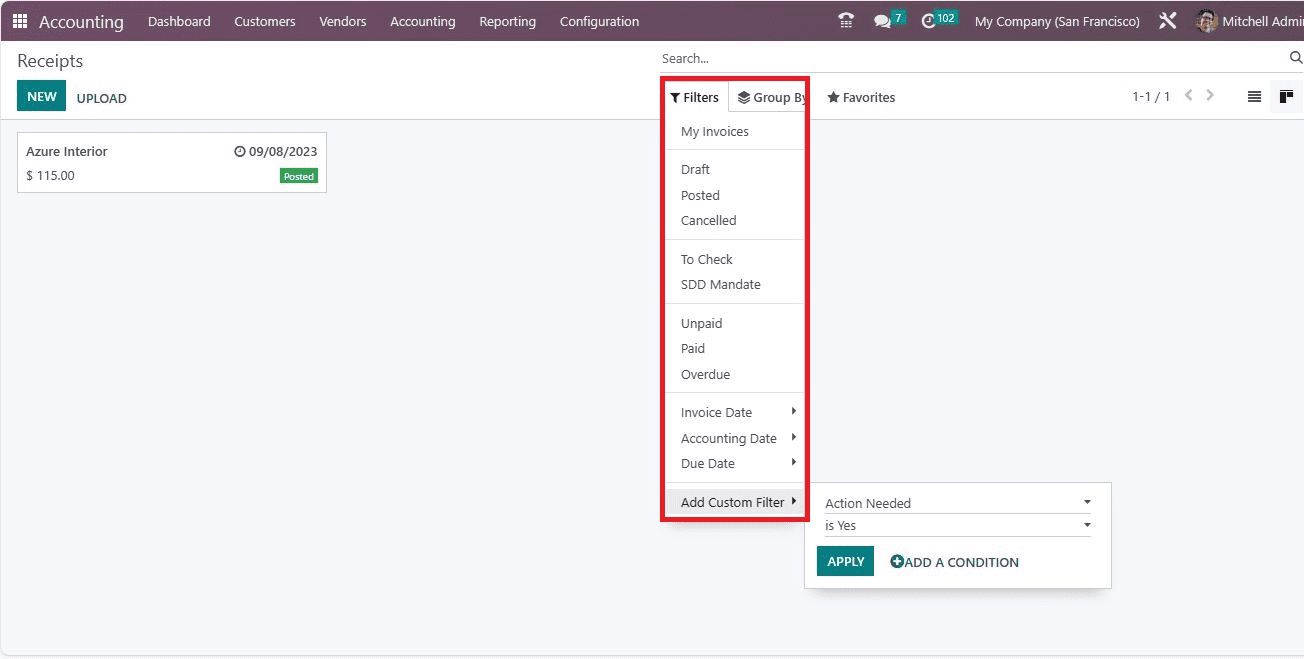
Moreover, the platform offers you a variety of options, especially for sorting out the data, grouping data, etc. The Search menu helps you search for the required data quickly. The Filters tab is worthwhile for filtering your records with various default and customizable filters. The default Filters included in the list are My Invoices, Draft, Posted, Cancelled, To Check, SDD Mandate, Unpaid, Paid, Overdue, based on Invoice Date, Accounting Date, and Due Date (Month, Quarter, or Year). The Add Custom Filter option allows you to customize various filters.
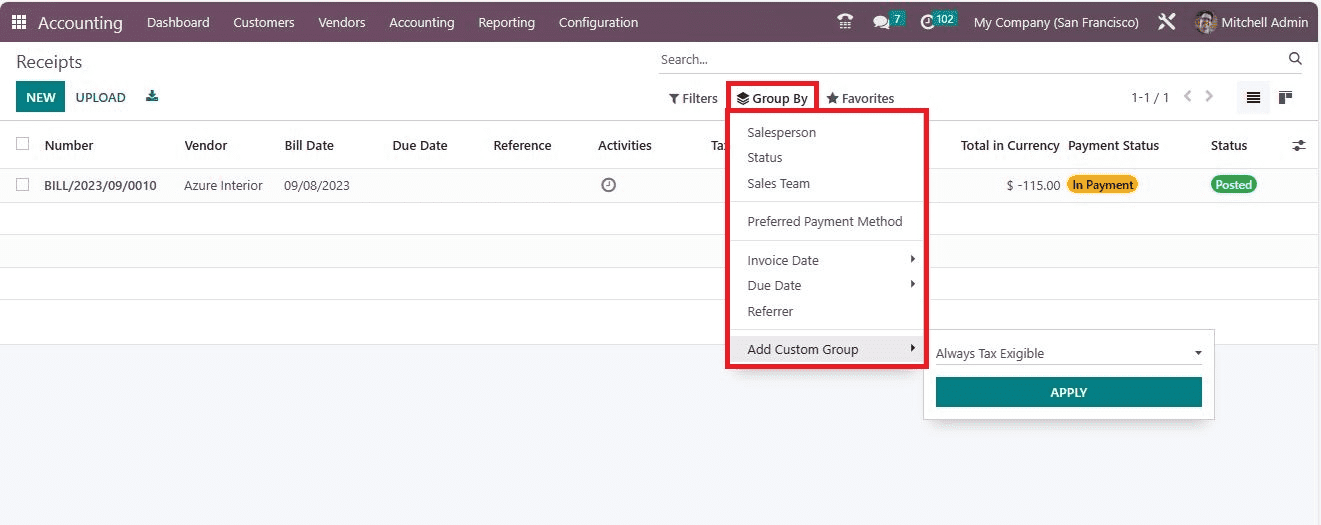
The Group By option is very convenient for grouping your purchase receipts based on various criteria. Here also, you have different default filter options, which are Salesperson, Status, Sales Team, Electronic Invoicing State, Preferred Payment Method, Invoice Date( Year, Quarter, Month, Week, Day), Due Date( Year, Quarter, Month, Week, Day), and Document Type.
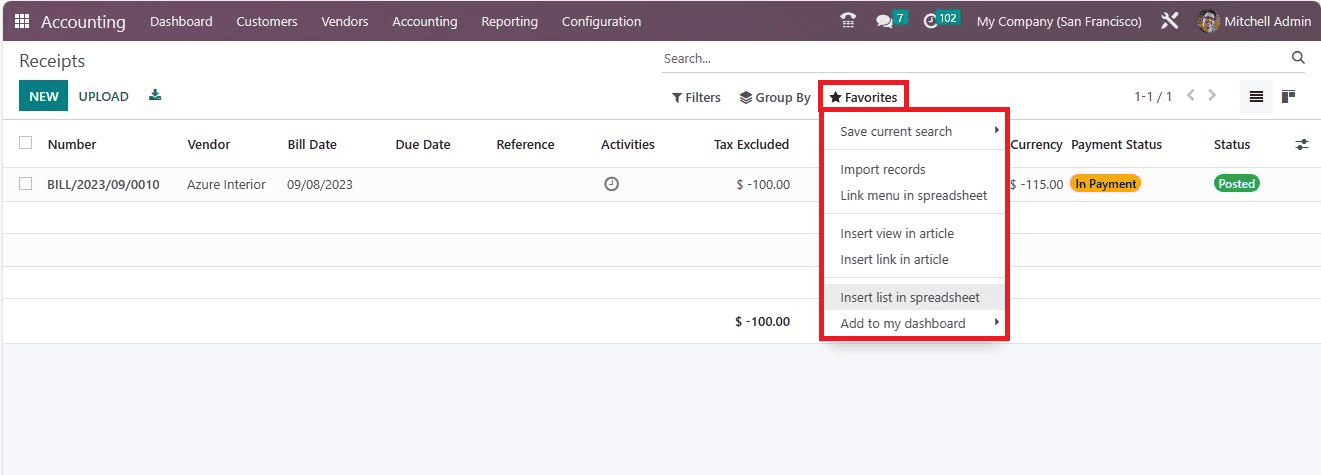
When we move on to the Favorites tab, you can view various useful options. These are Save current search, Import records, Link menu in spreadsheet, Insert view in article, Insert link in article, Insert list in spreadsheet, and Add to my dashboard.
In the left top of the window, just near the CREATE button, you have the UPLOAD and Export All icons. The NEW button allows you to access the Purchase creation window. Using this creation window, you can create purchase receipts effortlessly. When a Purchase Receipt is created and confirmed, you can record the vendor payment related to this purchase receipt.
Let us click the NEW button to open up the Receipt creation window.
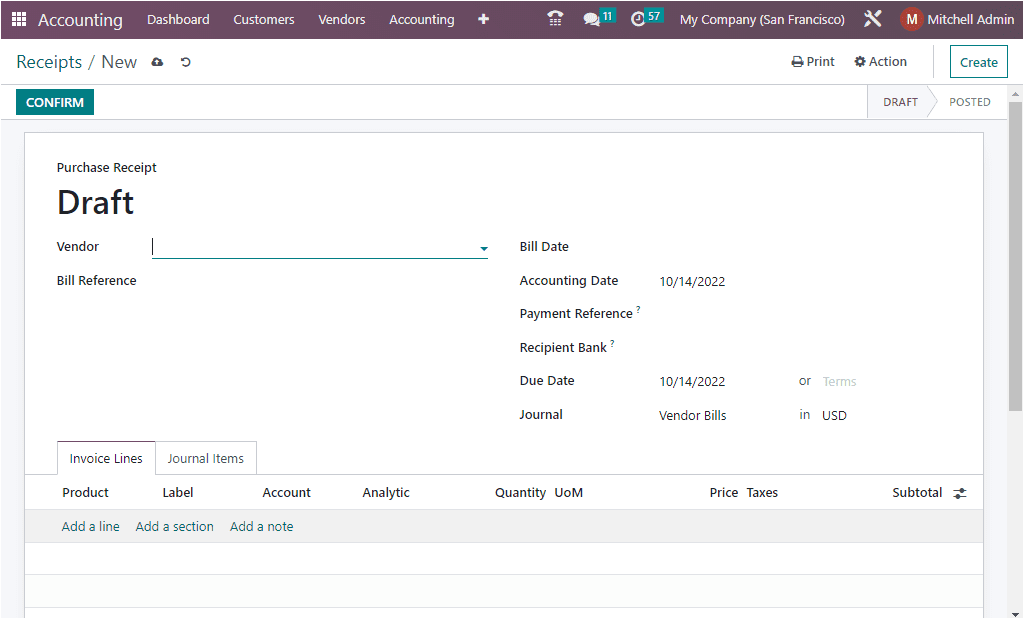
The image above represents the Receipts creation window. In the form view, you have a field to specify the Vendor. All the saved vendor names will be displayed under the field, and you can just select the required one. If the vendor is a new person, you can create it from the window itself. Let us choose Azure Interior as the Vendor. If you want to move into the vendor- Azure Interiors profile, you can select the Internal link option that is represented with an arrow mark on the right end of the Vendor field.
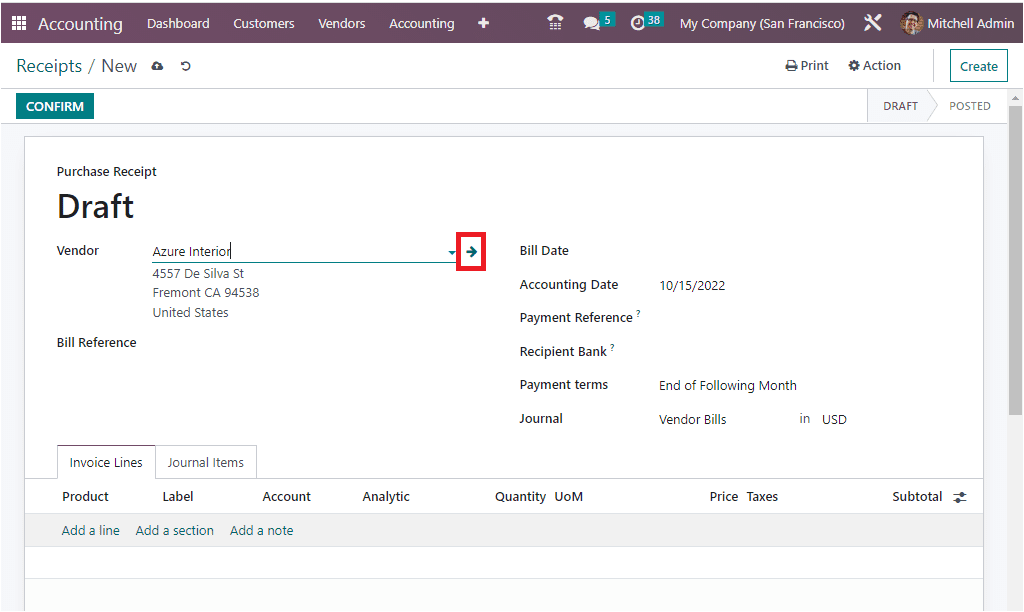
The Bill Date can be specified using the calendar pop-up. Likewise, the Accounting Date, and Payment Reference to set on journal items can be mentioned in the corresponding fields. In addition, the recipient bank account can be mentioned under the Recipient Bank field. This is the bank account number to which the invoice will be paid. It can be a company bank account if this is a Customer Invoice or Vendor Credit Note. Or else a partner bank account number can be specified. You can also describe payment terms in the Payment Terms field. All the payment terms that we have configured will be displayed here in the Payment Terms field. Similarly, the Journal field can be filled with adequate information.
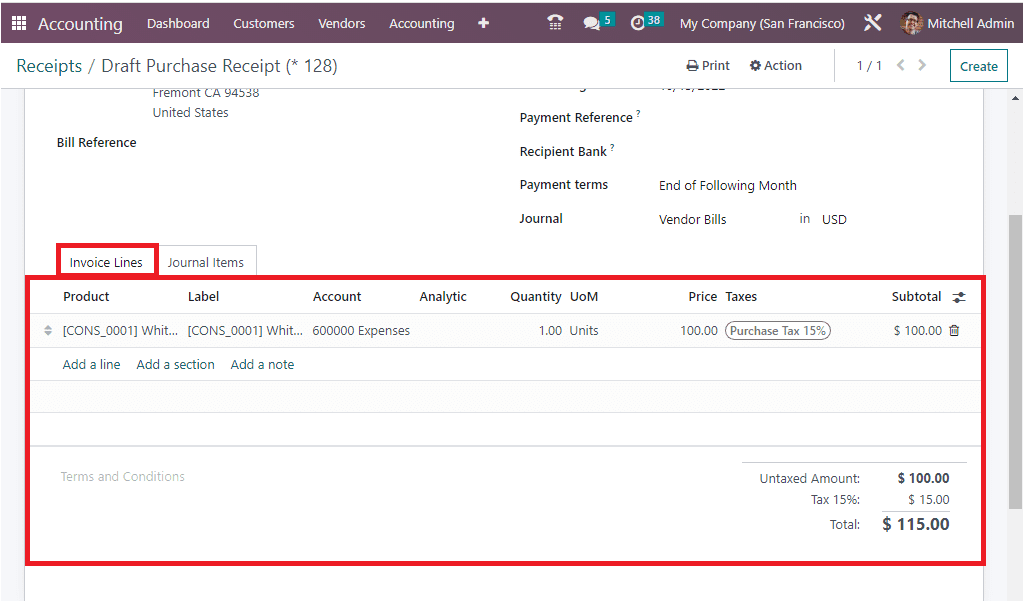
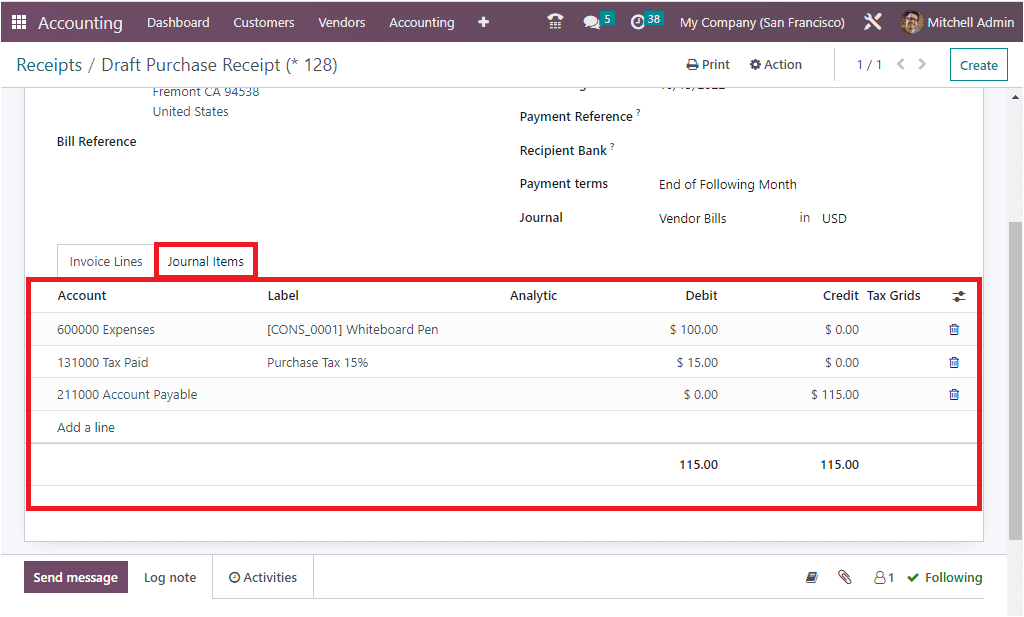
Now, in the Invoice Lines tab, you can add the product and the product details by clicking on the Add a line option. We can allocate the Whiteboard pen. The quantity and price can be updated. When you added the details, the total amount will be updated, including the purchase tax. Under the Journal Items tab, the account details will be automatically allocated by the system. Now, a draft purchase is created.
Once all the details are given, you can confirm the Purchase Receipt. For confirmation, the system provides a CONFIRM button on the top left corner of the window, as shown in the screenshot below.
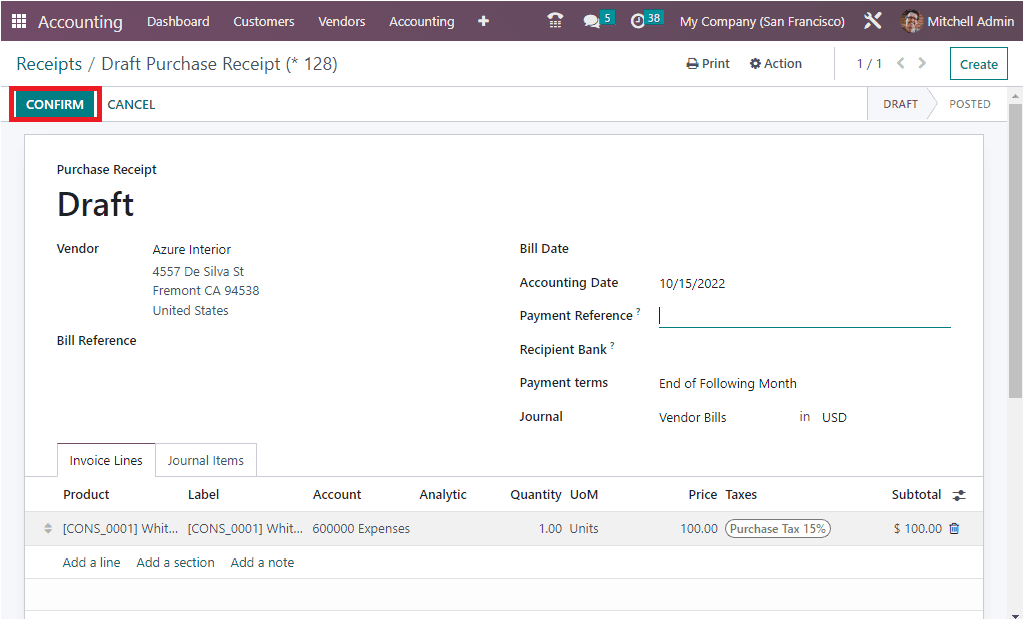
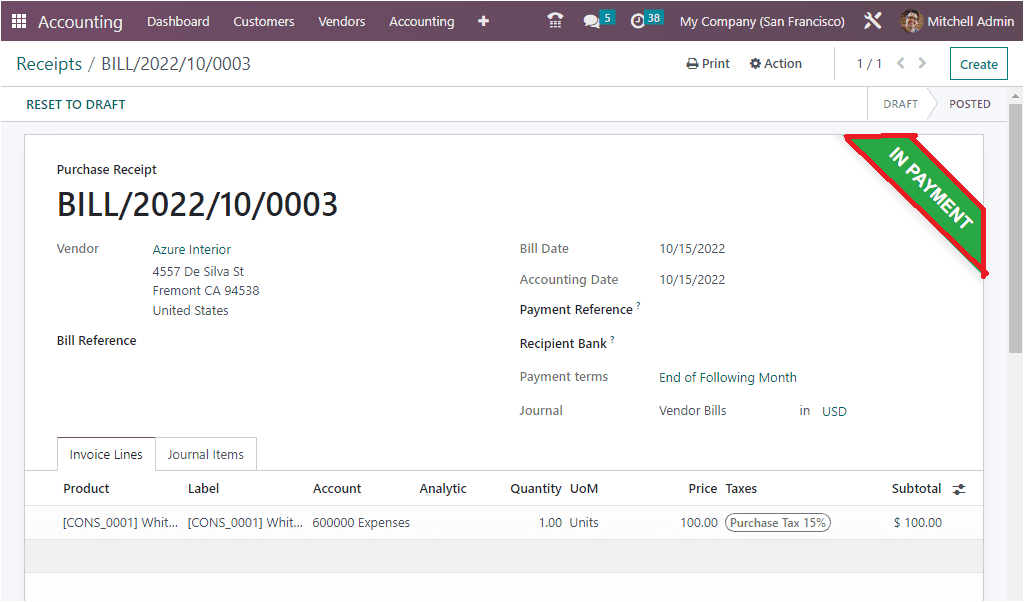
Then the Purchase receipt BILL/2022/10/0003 is posted and ready for the payment register.
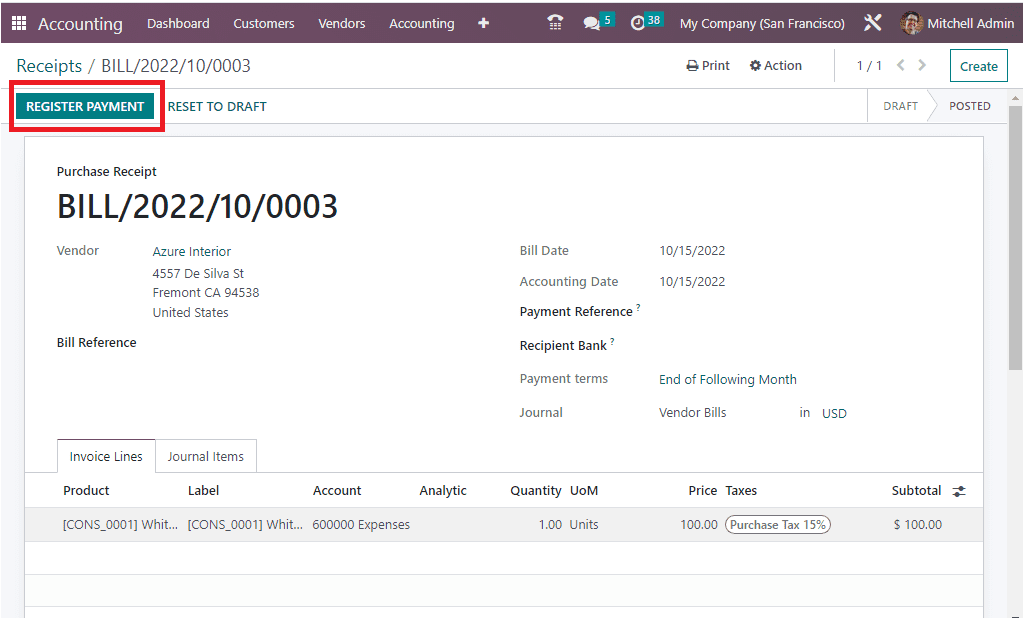
When you select the REGISTER PAYMENT button, the system will give a pop-up window, as shown in the image below.
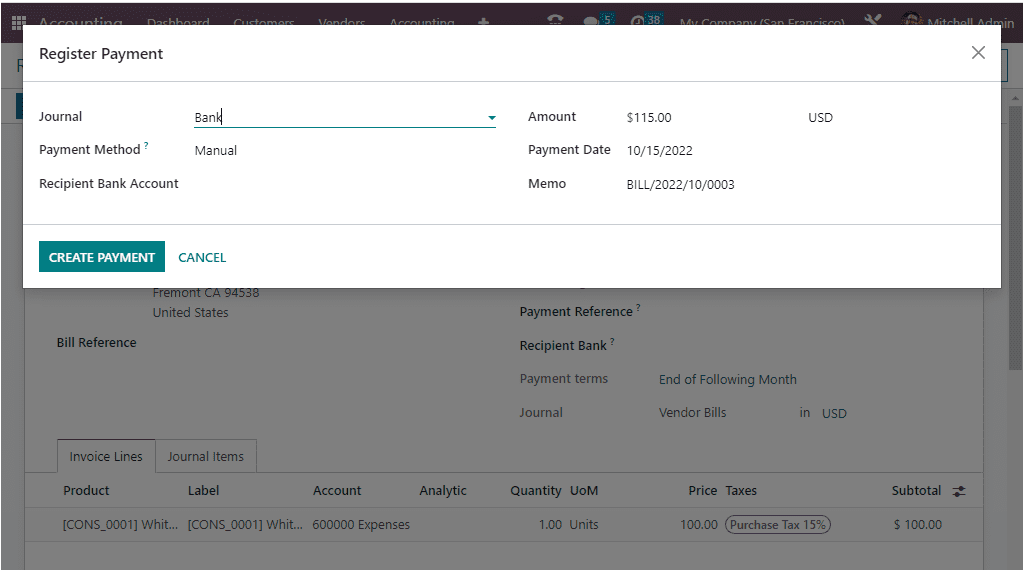
You can include the Journal, Payment Method, Recipient Bank Account, Amount, Payment Date, and Memo. Then you can select the CREATE PAYMENT button.
Now the Purchase Receipt is shown as in ‘IN PAYMENT’.
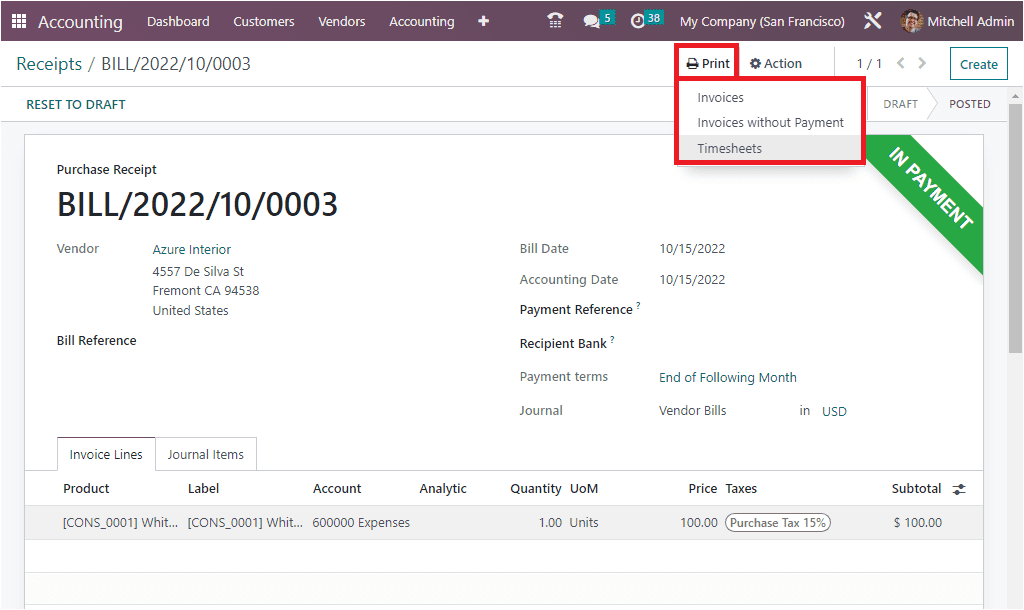
The Print and Action button includes different menus for getting various useful features. The Print option includes Invoices, Invoices without Payment, and Timesheets icons, as shown in the image below.
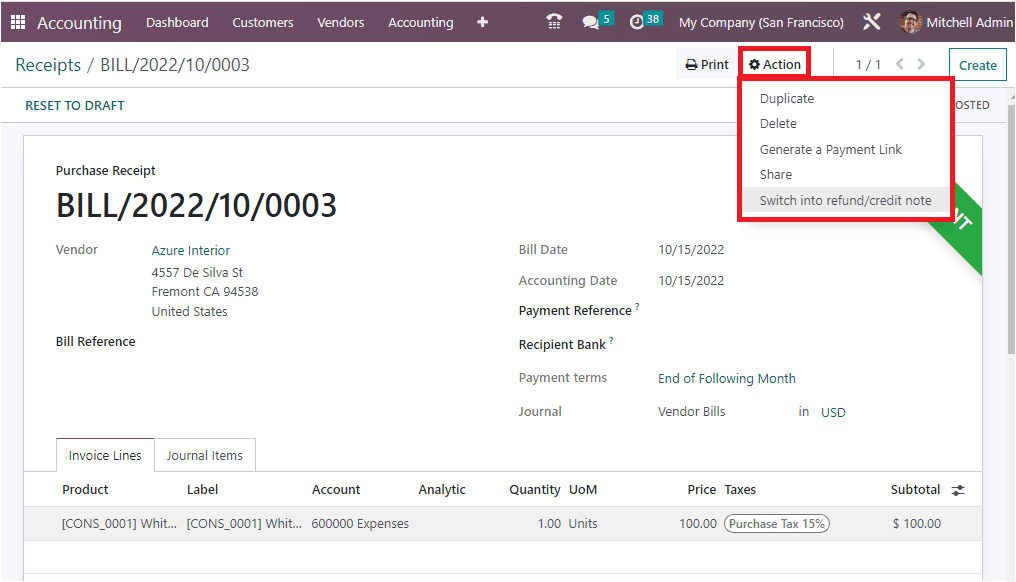
The Action button includes the Duplicate, Delete, Generate a Payment Link, Share, and Switch into refund/credit note options as highlighted below.
This is how you can manage purchase receipts in Odoo. Effective purchase receipt management is vital for maintaining accurate financial records and managing vendor relationships. With Odoo 16 Accounting, you can easily activate the Purchase Receipts feature and create purchase receipts by following the steps outlined in this blog post. By utilizing Odoo’s powerful accounting features, you can streamline your financial processes and keep your business running smoothly.
To read more about continental accounting in Odoo 16, refer to our blog An Overview of Continental Accounting in Odoo 16