The aged receivable report is a very important report in all ERP systems for tracking the overdue customers and how long the customer takes to make the payment in the due list. The aged receivables show all the outstanding invoices for the customers and group such invoices into aging bucket intervals. In the standard Odoo version, aged receivables have the following aging bucket intervals: At the Date, 0-30 days, 31-60 days, 61-90 days, 91-120 days, and Older. By using the standard Odoo aging bucket, we can detect the aging of outstanding items up to 120 days. We can't detect the data after 120 days; such data is shown under the 'Older' Bucket.
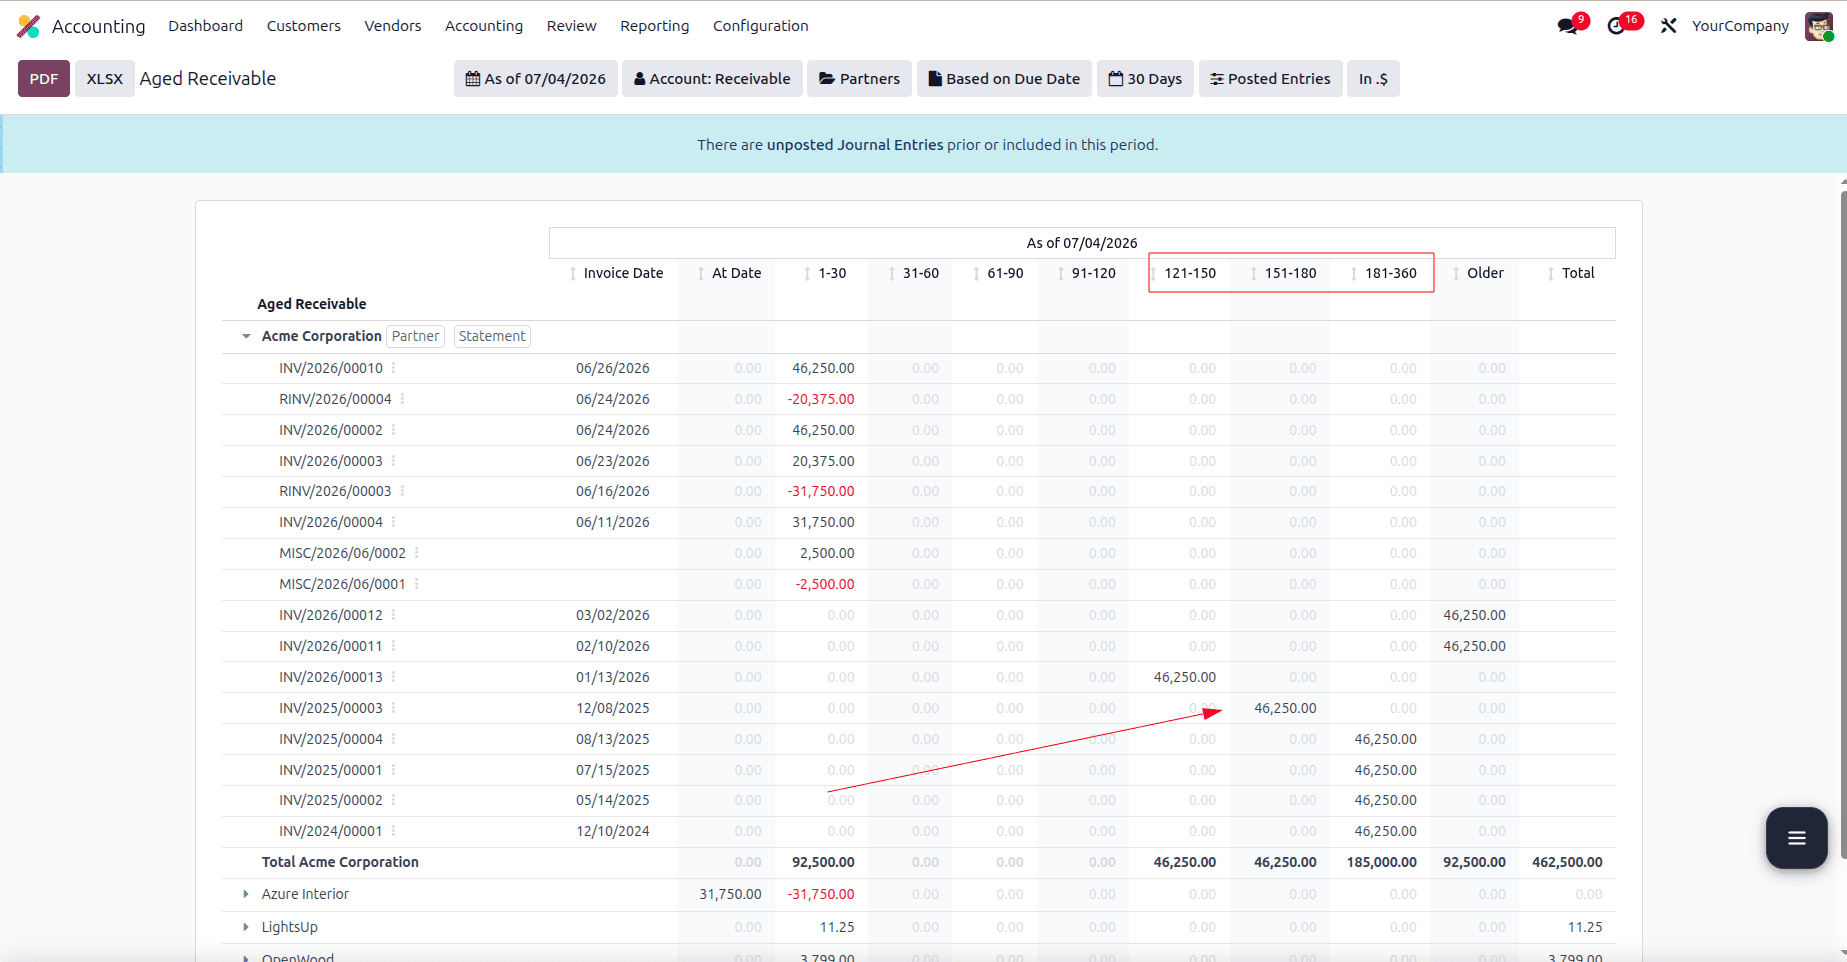
Some businesses need to fetch the outstanding records beyond 120 days. In this blog, we discuss how to add an additional aging bucket interval to the Odoo standard aged receivable report. Let's see how to add additional aging buckets, such as 120-150 days, 151-180 days, and 181-360 days.
Follow the steps below.
Add a data file in your custom module for defining the aging bucket intervals. The first step is to extend the existing Aged Receivable report by adding new aging bucket columns.
<data>
   <record id="account_reports.aged_receivable_report" model="account.report">
       <field name="column_ids">
           <record id="aged_receivable_report_period6" model="account.report.column">
               <field name="name">121-150</field>
               <field name="expression_label">period6</field>
               <field name="sortable" eval="True"/>
           </record>
           <record id="aged_receivable_report_period7" model="account.report.column">
               <field name="name">151-180</field>
               <field name="expression_label">period7</field>
               <field name="sortable" eval="True"/>
           </record>
           <record id="aged_receivable_report_period8" model="account.report.column">
               <field name="name">181-360</field>
               <field name="expression_label">period8</field>
               <field name="sortable" eval="True"/>
           </record>
       </field>
   </record>
</data>
Here, we are introducing three additional intervals: 121–150 days, 151–180 days, and 181–360 days. The data file inherits the existing Aged Receivable report (account_reports.aged_receivable_report) and extends its column_ids field by creating three new ‘account.report.column’ records.
- name: Defines the column label displayed in the report (for example, 121–150, 180-360).
- expression_label: Links the column to a report expression with the same identifier (period6, period7, or period8).
- sortable: Enables sorting for the newly added column in the report interface.
Also include the following in the same data file.
<record id="account_reports.aged_receivable_line" model="account.report.line">
   <field name="expression_ids">
       <record id="aged_receivable_line_period6" model="account.report.expression">
           <field name="label">period6</field>
           <field name="engine">custom</field>
           <field name="formula">_report_custom_engine_aged_receivable</field>
           <field name="subformula">period6</field>
           <field name="auditable" eval="True"/>
       </record>
       <record id="aged_receivable_line_period7" model="account.report.expression">
           <field name="label">period7</field>
           <field name="engine">custom</field>
           <field name="formula">_report_custom_engine_aged_receivable</field>
           <field name="subformula">period7</field>
           <field name="auditable" eval="True"/>
       </record>
       <record id="aged_receivable_line_period8" model="account.report.expression">
           <field name="label">period8</field>
           <field name="engine">custom</field>
           <field name="formula">_report_custom_engine_aged_receivable</field>
           <field name="subformula">period8</field>
           <field name="auditable" eval="True"/>
       </record>
   </field>
</record>
Here we extend the ‘account_reports.aged_receivable_line’ to add ‘account.report.expression’ records. These expressions compute the values that are displayed in the corresponding aging column.
Each expression uses the custom computation engine and calls the ‘_report_custom_engine_aged_receivable’ method. The subformula field specifies the aging bucket (period6, period7, or period8) that the Python method should calculate. The label field matches the ‘expression_label’ defined in the report column, creating the connection between the column displayed in the user interface and the value computed by the report engine. Setting auditable to True allows users to drill down into the report and inspect the accounting entries that contribute to each aging bucket.
After this, we need to extend the ‘account.aged.receivable.report.handler’ model. From this model, the data is fetched for the aged receivable report.
class AccountAgedReceivableReportHandler(models.AbstractModel):
    _inherit = 'account.aged.receivable.report.handler'
    def _custom_options_initializer(self, report, options, previous_options):
        super()._custom_options_initializer(report,options,previous_options=previous_options)
        for column in options['columns']:
            if not column['expression_label'].startswith('period'):
                continue
            period = int(column['expression_label'][6:])
            if period == 0:
                column['name'] = 'As of Date'
            elif period == 1:
                column['name'] = '1-30'
            elif period == 2:
                column['name'] = '31-60'
            elif period == 3:
                column['name'] = '61-90'
            elif period == 4:
                column['name'] = '91-120'
            elif period == 5:
                column['name'] = '121-150'
            elif period == 6:
                column['name'] = '151-180'
            elif period == 7:
                column['name'] = '181-360'
            elif period == 8:
                column['name'] = '360+'
In this, override the’ _custom_options_initializer()’ method to update the aging bucket labels that appear in the report header. In the standard version, Odoo defines a fixed number of aging bucket intervals. Since we have introduced additional buckets, we also need to update the report options so that the column headers match our new intervals.
The method first calls super() to preserve the standard report configuration. It then iterates through the report columns available in the options dictionary and processes only the columns whose ‘expression_label’ starts with a period.
Each period number is extracted from the 'expression_label,' and the corresponding column name is updated based on the required aging interval.
After upgrading the custom module, you can see the newly added aging bucket interval in the aged receivable report. The report categorizes outstanding receivables based on the customized aging periods, providing a more detailed breakdown of overdue customer invoices and improving financial analysis.
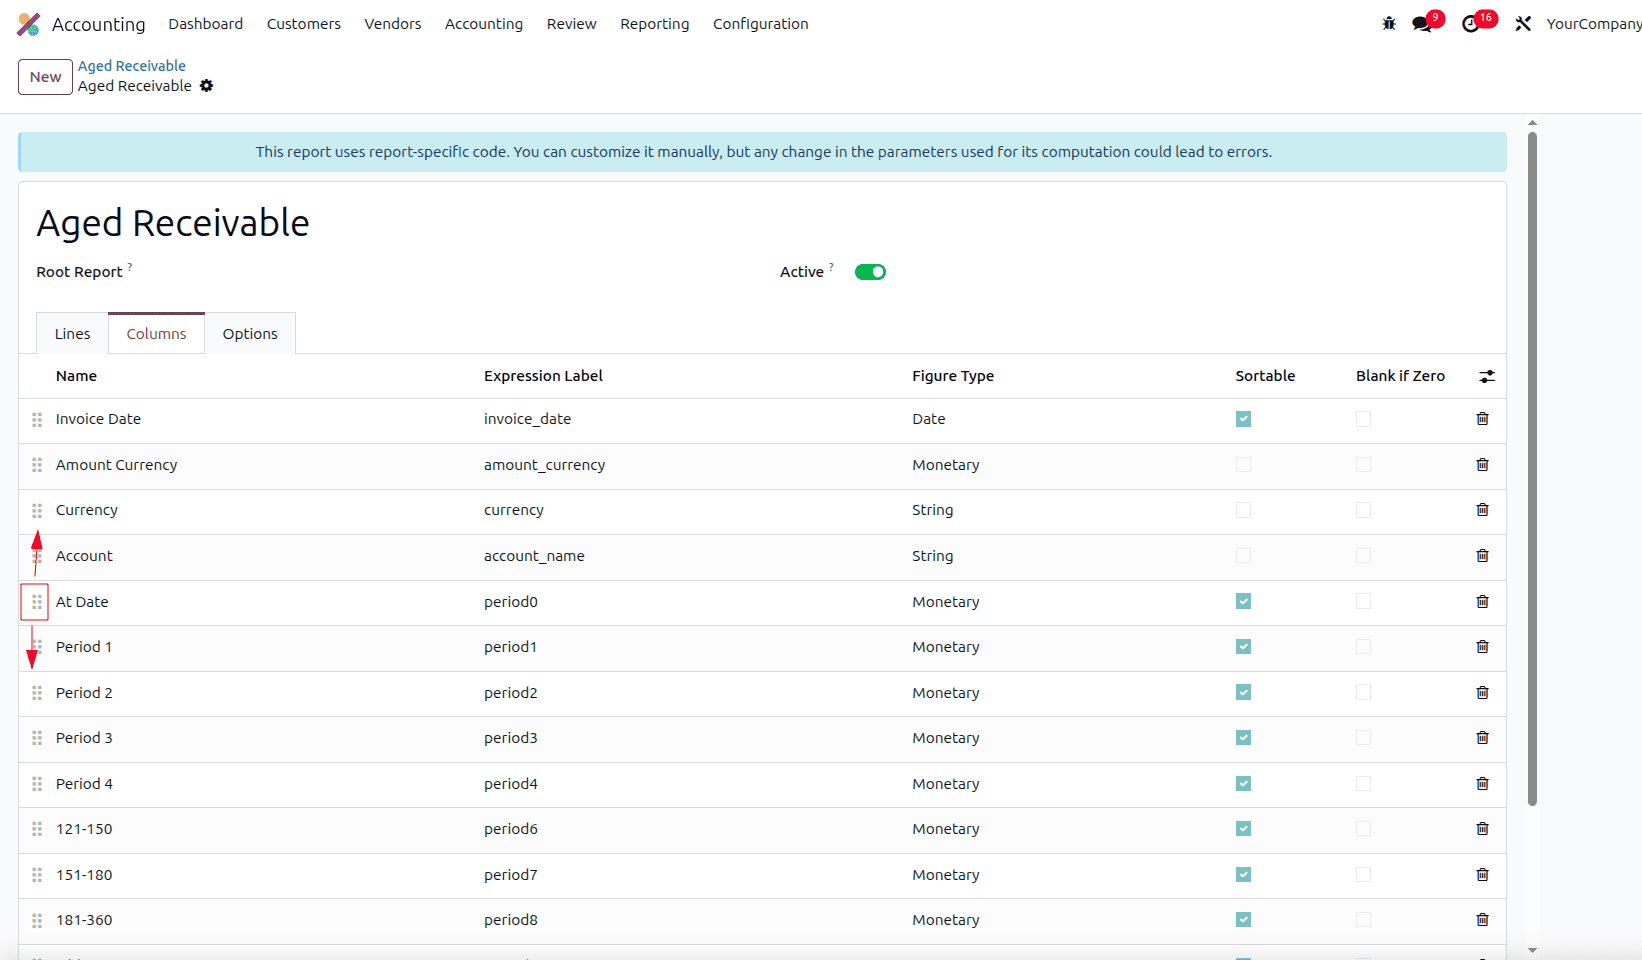
The position of each column can be changed according to the requirements. To do this, first enable Developer Mode. Then, open the Aged Receivable report and click the gear icon, or navigate to Accounting > Configuration > Accounting Reports.

Open the Aged Receivable report, and under the Columns section, you can easily reorder the report columns by changing their sequence. Once the changes are saved, the report will display the aging buckets in the updated order.
By adding custom aging bucket intervals, you can make the Aged Receivable report in Odoo 19 more detailed and better suited to your business requirements. This customization provides clearer insights into outstanding invoices while maintaining Odoo's standard reporting framework through model inheritance, making it easy to maintain and extend.
To read more about An Overview of Aged Reports in Odoo 18 Accounting, refer to our blog An Overview of Aged Reports in Odoo 18 Accounting.