The Odoo 17 Point of Sale (POS) application is a powerful tool for managing your retail business. Adding icons to the POS navbar can help to make the interface more user-friendly and improve the overall user experience.
In this blog, we will show you how to add icons to the POS navbar in Odoo 17.
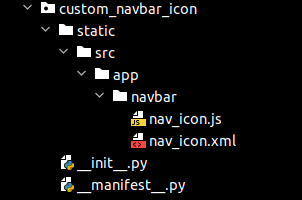
To begin, let's create a custom module named custom_navbar_icon. This module will house our custom navbar icon component. And create the directories as follows.
Add the files in the manifest as follows,
'assets': {
        'point_of_sale._assets_pos': [
            custom_navbar_icon/static/src/app/navbar/nav_icon.js',
            custom_navbar_icon/static/src/app/navbar/nav_icon.xml',
          ],
    },
In Odoo 16, POS templates were included in the asset section of 'point_of_sale.assets'. In Odoo 17, however, POS templates are now located in 'point_of_sale._assets_pos'.
In the module's XML file ie nav_icon.xml, we define the structure and appearance of the icon:
<?xml version="1.0" encoding="UTF-8"?>
<templates id="template" xml:space="preserve">
    <t t-name="custom_navbar_icon.NavIcon" owl="1">
        <div class="oe_status btn btn-light rounded-0">
            <div class="js_connected oe_icon" t-on-click="() => this.onClick()">
                <i class="fa fa-comments" />
            </div>
        </div>
    </t>
    <t t-name="custom_navbar_icon.Navbar" t-inherit="point_of_sale.Navbar"
       t-inherit-mode="extension" owl="1">
        <xpath expr="//div[hasclass('status-buttons')]" position="inside">
            <NavIcon/>
        </xpath>
    </t>
</templates>
In this XML file, we've defined a template for our custom icon (NavIcon) and extended the default POS navbar (Navbar) to include our custom icon.
Now, let's create the corresponding JavaScript file to add functionality to our custom icon:
/** @odoo-module **/
import { ErrorPopup } from "@point_of_sale/app/errors/popups/error_popup";
import { _t } from "@web/core/l10n/translation";
import { useService } from "@web/core/utils/hooks";
import { Navbar } from "@point_of_sale/app/navbar/navbar";
export class NavIcon extends Component {
    static template = "custom_navbar_icon.NavIcon";
    setup() {
        this.popup = useService("popup")
    }
    async onClick() {
         await this.popup.add(ErrorPopup, {
                title: _t("Add Products"),
                body: _t("Please add products before clicking Home delivery"),
            });
    }
}
// Add the Timer component to the Navbar components
Navbar.components = { ...Navbar.components,NavIcon };
This JavaScript file defines the functionality of our custom icon. In this example, clicking the icon triggers a popup which is a sample popup.
By following these steps, you can simply integrate custom icons into the POS navbar in Odoo 17. This enhances the visual appeal of your POS interface and allows for the implementation of specific functionalities to meet your business requirements. Experimenting with different icons and functionalities allows you to tailor the POS system to your exact requirements.
To read more about adding an icon in Systray in Odoo 16, refer to our blog How to Add an Icon in Systray in Odoo 16