We have different types of reports in PDF and Excel available in Odoo. We can also attach these reports and send emails to the customers from the inbuilt functions of Odoo, like Sale orders, Purchase Orders, Invoices, etc.
Let’s discuss a case where we need to add several reports (in PDF and Excel) to a particular mail template and automatically send the mail to the specific Partner. In this blog, we are going to discuss the flows to attain this feature.
First of all, let’s check on how to create an email template.
<record id="email_template_invoice_report" model="mail.template">
<field name="name">Invoice Reports: Send by mail</field>
<field name="model_id" ref="account.model_account_move"/>
<field name="subject">Invoice Reports</field>
<field name="body_html" type="html">
<div style="margin: 0px; padding: 0px;">
<p style="margin: 0px; padding: 0px; font-size: 13px;">
Dear&nbsp;
<t t-out="ctx.get('partner').name"/>
,
<br/>
<br/>
Here is the Invoice Reports related to&nbsp;
<t t-out="ctx.get('inv').name"/>&nbsp;Invoice.
</p>
<br/>
Regards,
<br/>
<t t-out="object.company_id.name"/>
</div>
</field>
<field name="auto_delete" eval="True"/>
</record>
In the above example, we created an email template in the model ‘mail.template’ with Id ‘email_template_invoice_report’ which is the external id to identify this email template. The model_id and ref are to relate the mail template to any of the existing Odoo models, and we added it as the ‘account.move’ as we are going to send the mail from the particular model. After we have specified the email subject, contents, etc., in the object variable, all the record details (invoice) will be available, which can be used to add the email contents as Odoo’s email template is developed by default with Jinja2.
As we have created the email template, we can now move to attaching the attachments to the template and sending the emails to the particular partner. Here we have already taken the example of the invoice, so we are going to send the attached email from the Confirm button in Invoice.
Let us check the case of attaching a PDF document first.
Attaching PDF Document to email:
In the blog, we attach a PDF document of one of the invoices created to our email template.
    def action_post(self):
        res = super(AccountMove, self).action_post()
 invoice_report = self.env.ref('account.account_invoices')
        data_record = base64.b64encode(
            self.env['ir.actions.report'].sudo()._render_qweb_pdf(
                invoice_report, [self.id], data=None)[0])
        ir_values = {
            'name': 'Invoice ' + self.name,
            'type': 'binary',
            'datas': data_record,
            'store_fname': data_record,
            'mimetype': 'application/pdf',
            'res_model': 'account.move',
        }
        invoice_report_attachment_id = self.env[
            'ir.attachment'].sudo().create(
            ir_values)
        if invoice_report_attachment_id:
            email_template = self.env.ref(
                'email_attachments.email_template_invoice_report')
            if self.partner_id.email:
                email = self.partner_id.email
            else:
                email = 'admin@example.com'
            if email_template and email:
                email_values = {
                    'email_to': email,
                    'email_cc': False,
                    'scheduled_date': False,
                    'recipient_ids': [],
                    'partner_ids': [],
                    'auto_delete': True,
                }
                email_template.attachment_ids = [
                    (4, invoice_report_attachment_id.id)]
                email_template.with_context(partner=self.partner_id,
                                            inv=self).send_mail(
                    self.id, email_values=email_values, force_send=True)
                email_template.attachment_ids = [(5, 0, 0)]
        return res
In the above code lines, we have supered the Confirm button of the Invoice (account.move) and added our functionality of adding the attachments and sending the mail.
We can generate a pdf report and to convert it into binary type to create an attachment by,
invoice_report = self.env.ref('account.account_invoices')
           data_record = base64.b64encode(
            self.env['ir.actions.report'].sudo()._render_qweb_pdf(
                invoice_report, [self.id], data=None)[0])
Now we can create the attachment,
ir_values = {
            'name': 'Invoice ' + self.name,
            'type': 'binary',
            'datas': data_record,
            'store_fname': data_record,
            'mimetype': 'application/pdf',
            'res_model': 'account.move',
        	}
       	 invoice_report_attachment_id = self.env[
           	 	'ir.attachment'].sudo().create(
            	ir_values)
Now in the variable ‘invoice_report_attachment_id’, we will have our pdf attachment. Next, we are going to add this attachment to our email template by,
email_template.attachment_ids = [
(4, invoice_report_attachment_id.id)]
After we send our mail with the values specified in the dictionary ‘email_values’ using,
email_template.with_context(partner=self.partner_id,
inv=self).send_mail(
self.id, email_values=email_values, force_send=True)
After sending the mail, we can remove the attachment from our mail template by using the code,
email_template.attachment_ids = [(5, 0, 0)]
Now, let us check how to add an Excel attachment to our email template. Here also we use the same flow, like sending the mail from the Confirm button of the invoice. Also, we have to use an external module named ‘report_xlsx’, which is available in the Odoo App Store.
Attaching Excel file to email:
First of all, we have to create a sample excel report. For this, let us add a report action which is of type ‘xlsx’.
	 <record id="action_report_send_sample_xlsx" model="ir.actions.report">
<field name="name">Sample Report XLSX</field>
<field name="model">account.move</field>
<field name="report_type">xlsx</field>
<fieldname="report_name">
email_attachments.report_customer_invoice_xlsx</field>
<field name="report_file">
email_attachments.report_customer_invoice_xlsx</field>
<field name="print_report_name">'Excel Report'</field>
</record>
In the above code lines, we have created a report action of type xlsx, and the template name will be email_attachments.report_customer_invoice_xlsx. email_attachments will be the module name. As we don’t need any template for our excel report, the template name can be used to create a report model where we can add the details and information in an excel file.
class ReportCustomerInvoiceXlsx(models.AbstractModel):
_name = 'report.email_attachments.report_customer_invoice_xlsx'
_inherit = 'report.report_xlsx.abstract'
_description = 'Report Customer Invoice Xlsx'
By the above code, we have created a report model by inheriting the report_xlsx abstract class (report.report_xlsx.abstract). And using the generate_xlsx_report function, we can generate our excel file like the one below.
	   def generate_xlsx_report(self, workbook, data, objs):
        sheet = workbook.add_worksheet('Report')
        head_format = workbook.add_format({
            'align': 'center',
            'bold': True,
            'font_size': '10px'
        })
        sheet.write(0, 2, 'PRODUCT', head_format)
        sheet.write(0, 3, 'PRODUCT DESCRIPTION', head_format)
        sheet.write(0, 7, 'ORDER #', head_format)
        sheet.write(0, 8, 'CUSTOMER', head_format)
        sheet.write(0, 11, 'UNITS ORDERED', head_format)
        sheet.write(0, 12, 'UNITS SHIPPED', head_format)
        sheet.write(0, 15, 'DELIVERY DATE', head_format)
        sheet.write(0, 16, 'NOTES', head_format)
        sheet.write(0, 20, 'INVOICE DATE', head_format)
        sheet.write(0, 21, 'INVOICE #', head_format)
As per the above codes, we have created an excel report. Now we can add this excel report as an attachment to our email template to send it to our partner.
As we have added for our pdf attachment, let’s super the action_post function (Confirm button’s function in invoice).
def action_post(self):
        res = super(AccountMove, self).action_post()
        report = self.env.ref(
            'email_attachments.action_report_send_sample_xlsx')
        data_record = base64.b64encode(
            self.env['ir.actions.report'].sudo()._render_xlsx(report, [self.id], data=None)[0]
        )
        ir_values = {
            'name': 'Sample Excel',
            'type': 'binary',
            'datas': data_record,
            'store_fname': data_record,
            'mimetype': 'application/vnd.ms-excel',
        }
        attachment = self.env[
            'ir.attachment'].sudo().create(ir_values)
        if attachment:
            email_template = self.env.ref(
                    'email_attachments.email_template_invoice_report')
            if self.partner_id.email:
                email = self.partner_id.email
            else:
                email = 'admin@example.com'
            if email_template and email:
                email_values = {
                    'email_to': email,
                    'email_cc': False,
                    'scheduled_date': False,
                    'recipient_ids': [],
                    'partner_ids': [],
                    'auto_delete': True,
                }
                email_template.attachment_ids = [
                    (4, attachment.id)]
                email_template.with_context(partner=self.partner_id,
inv=self).send_mail(
                    self.id, email_values=email_values, force_send=True)
                email_template.attachment_ids = [(5, 0, 0)]
        return res
In the above code lines, we have followed the same flow in the same way we used for attaching the pdf file to the mail template. Here to generate the excel file and to convert it to the binary (to add as an attachment), we used,
	report = self.env.ref(
            'email_attachments.action_report_send_sample_xlsx')
        data_record = base64.b64encode(
            self.env['ir.actions.report'].sudo()._render_xlsx(report, [self.id], data=None)[0]
        )
All the other code lines are the same as in the pdf attachment.
Let us check some examples for both cases based on our codes.
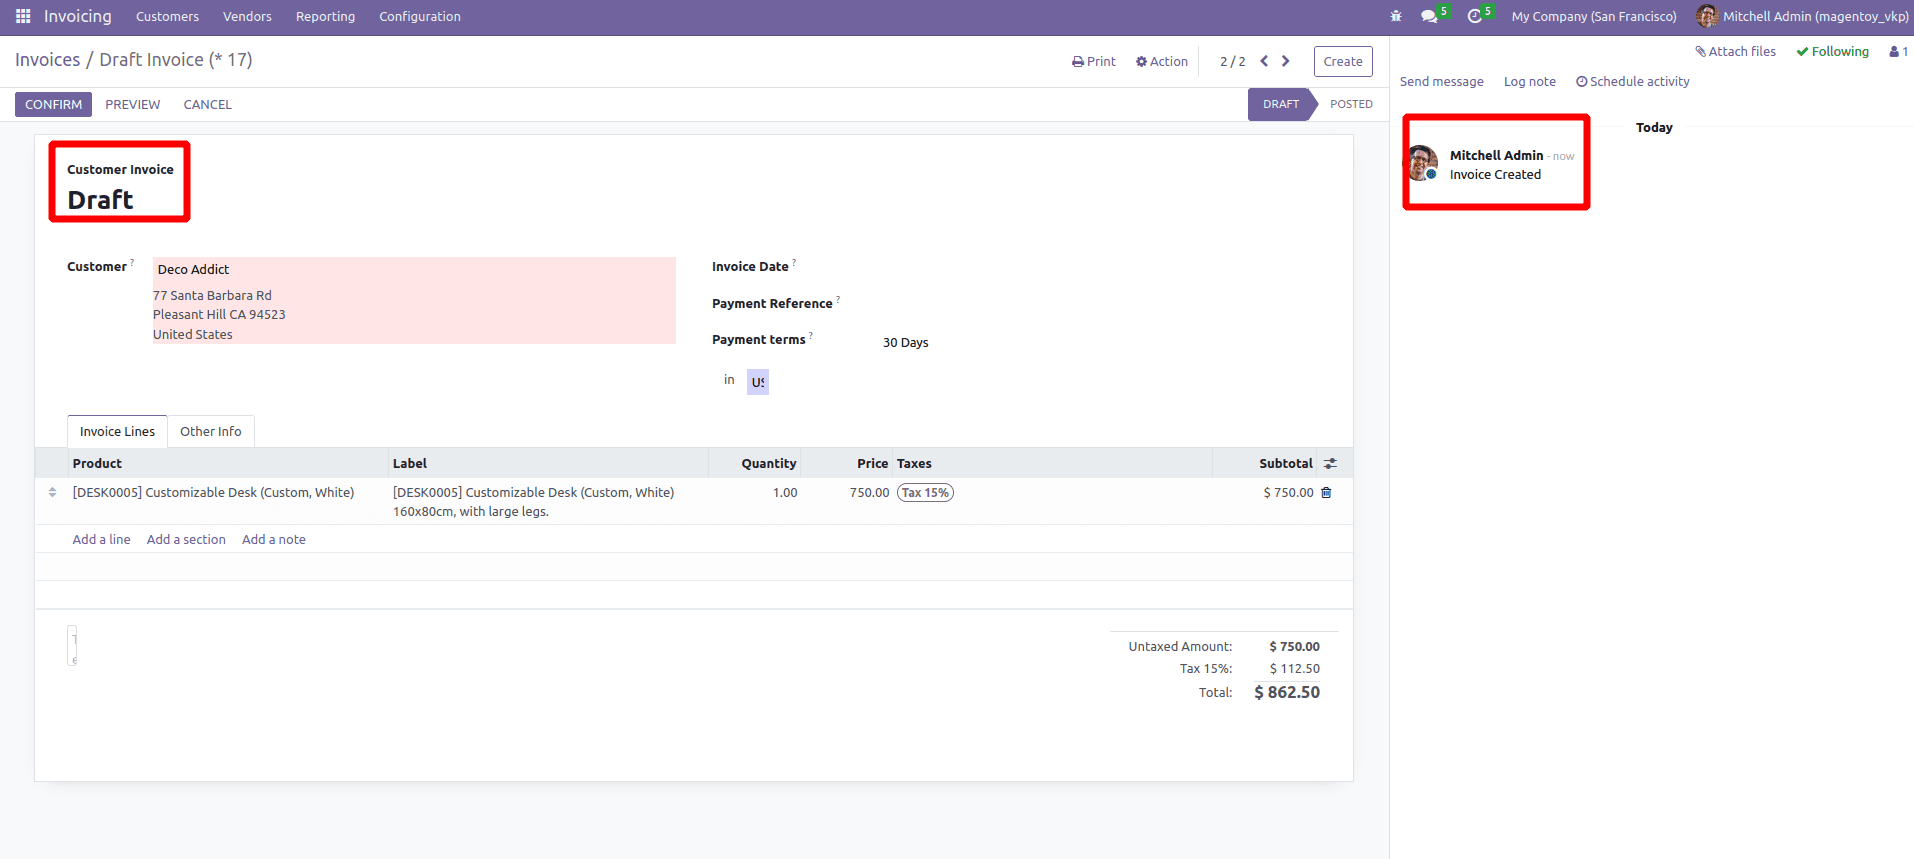
Here, we can see the draft invoice. Let's confirm this one to send the mail with a PDF attachment first.
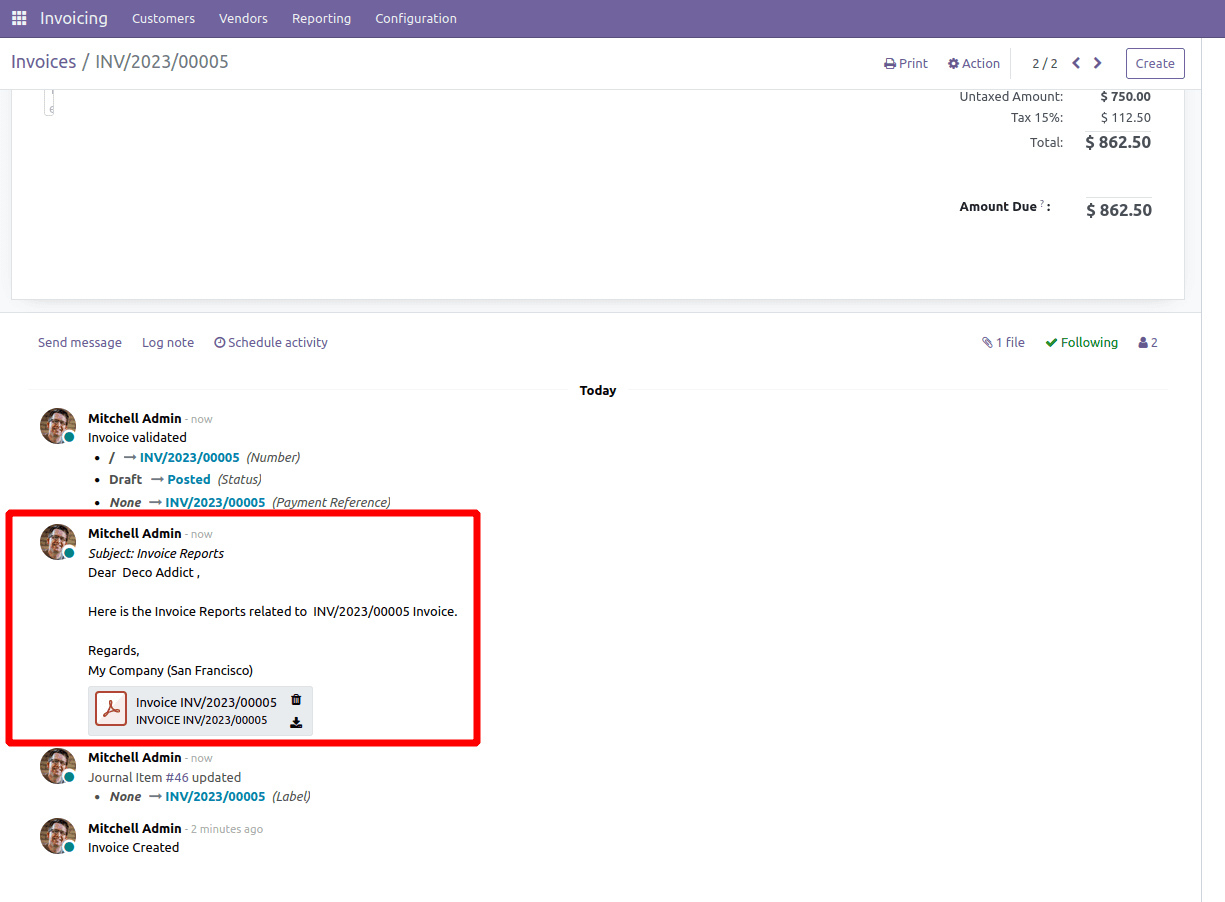
The invoice is now confirmed, and we can see a mail sent to the partner with the attached Invoice PDF report.
Let’s move on to the case of the Excel attachment now.
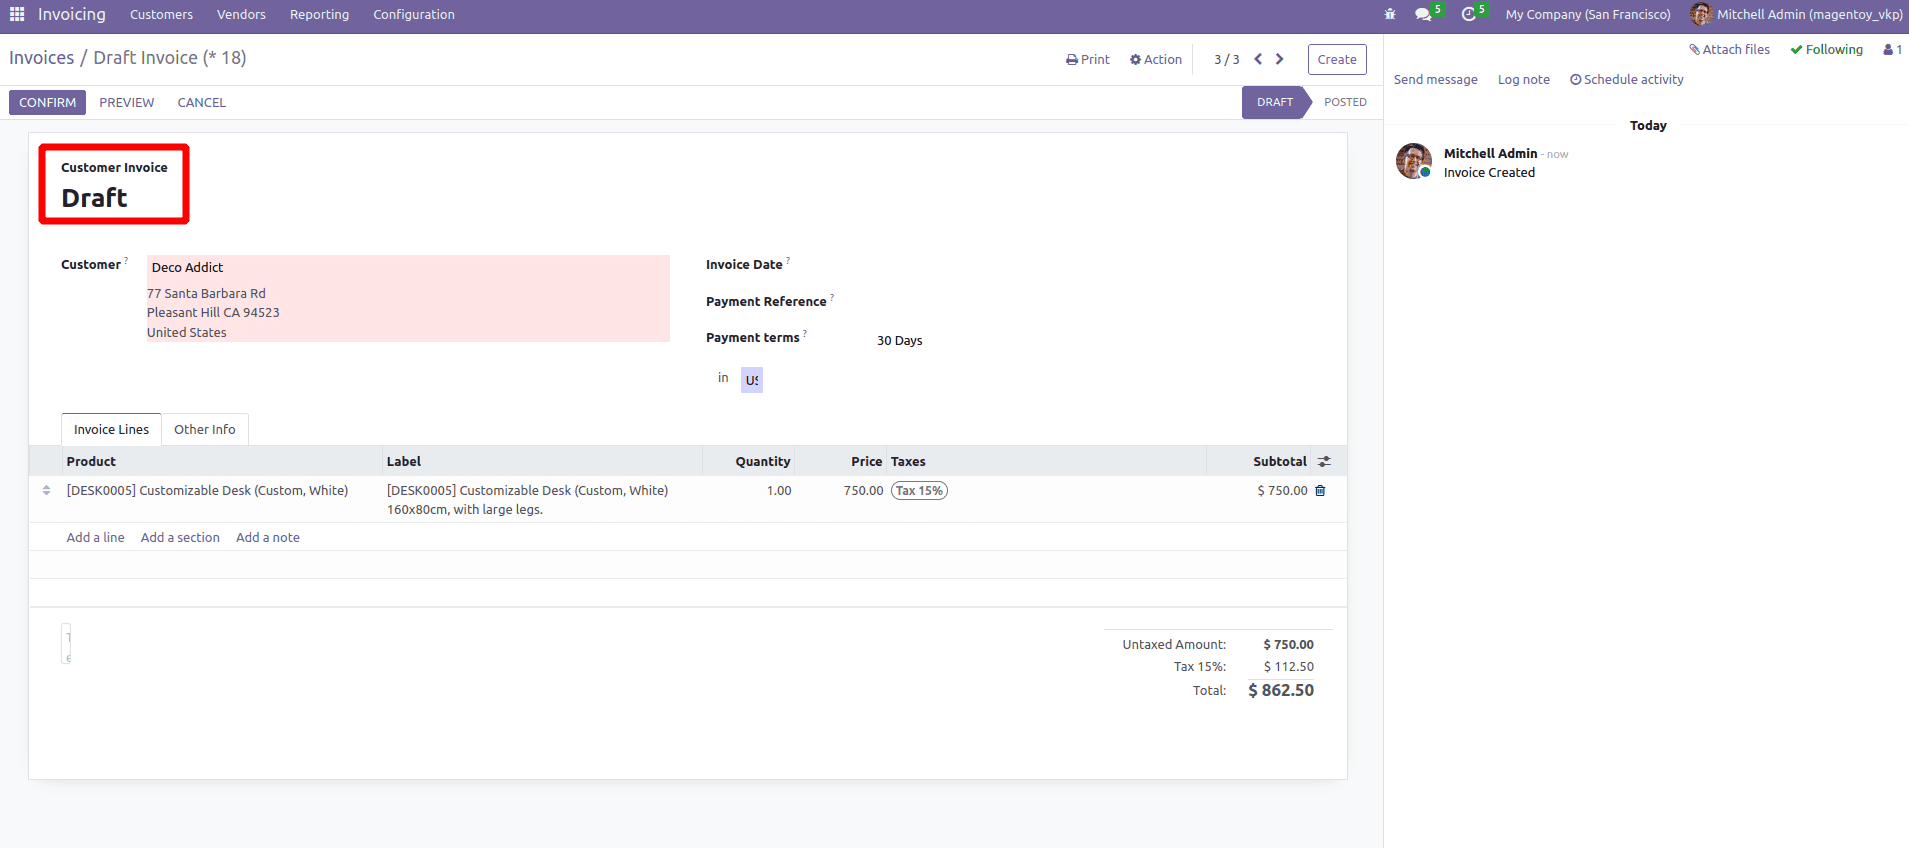
Here is our Draft invoice.
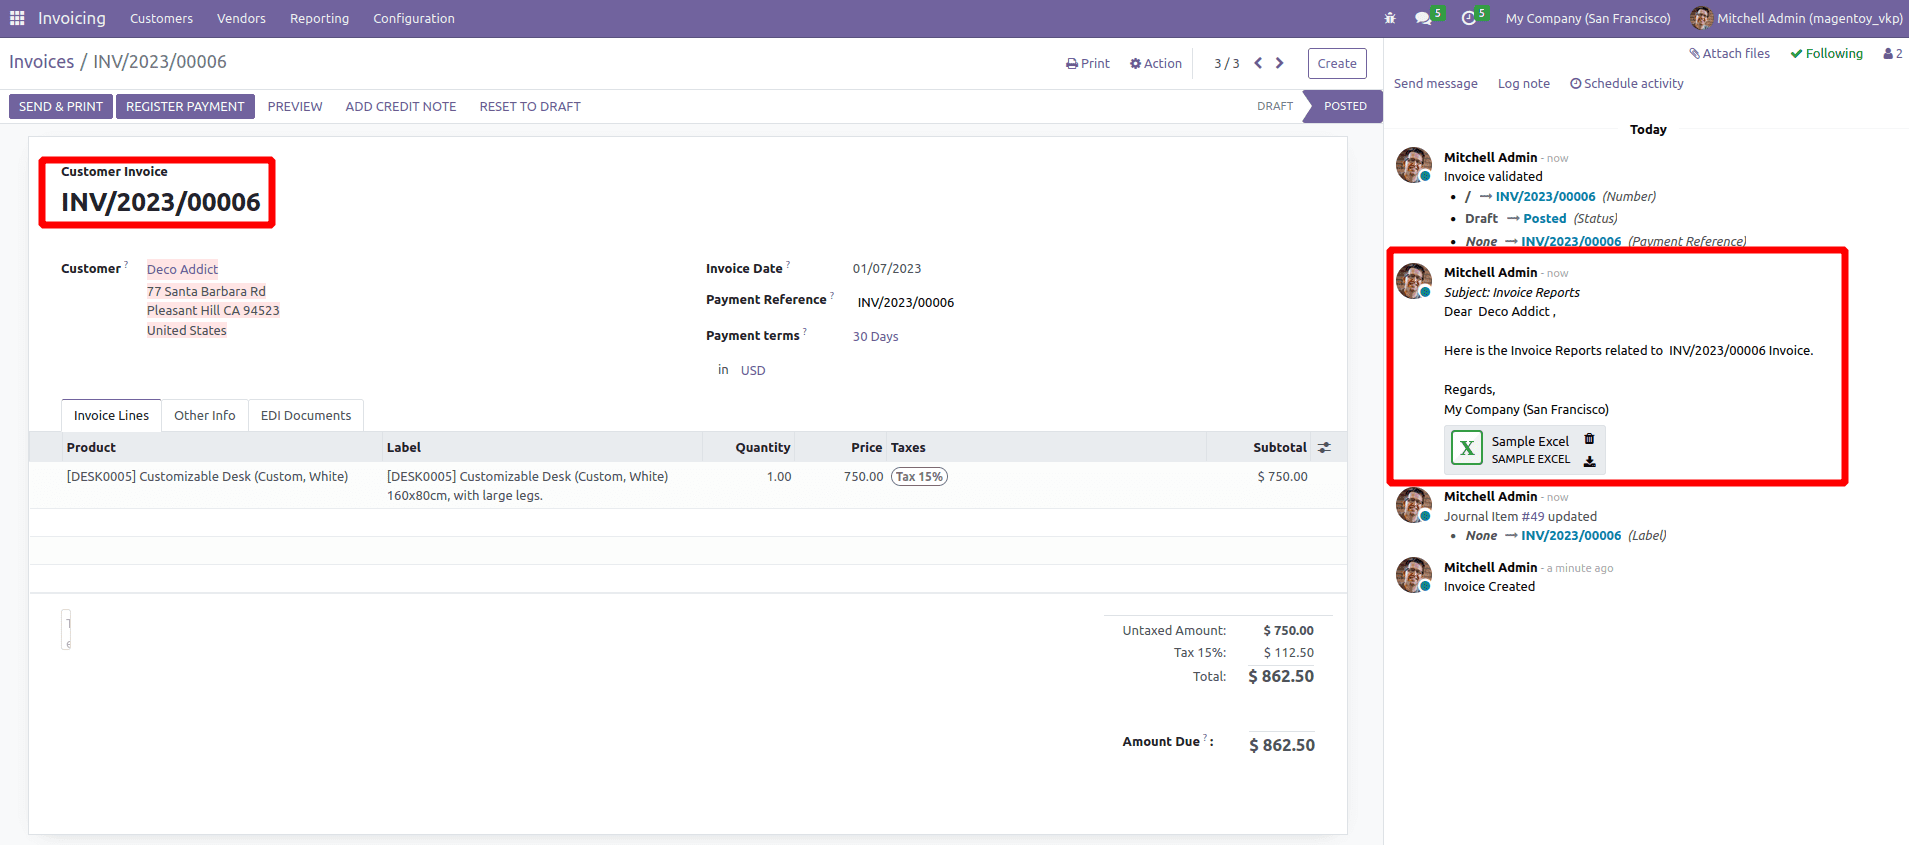
So after the confirmation of the invoice, we can see an email with an excel attachment is sent to the partner.
In this way, we can achieve the functionality of attaching pdf or excel attachments to the email templates.