Tax computation can be a labyrinth of complexities, especially for businesses operating in the United States, where tax rates vary based on ZIP codes. Odoo 17, renowned for its modular and comprehensive features, integrates seamlessly with TaxCloud to offer a robust solution for accurate tax rate calculations. In this blog post, we will delve into the intricacies of computing tax rates based on U.S. ZIP codes using TaxCloud within the Odoo 17 Accounting Module. TaxCloud stands as a cloud-based sales tax compliance service that provides businesses with the tools to calculate, collect, and remit sales tax within the United States. With seamless integration with Odoo 17's Accounting Module, TaxCloud ensures that businesses stay compliant with constantly evolving tax regulations, offering real-time updates and accurate calculations.
Integration of TaxCloud within the Odoo 17 Accounting Module
Accessing the Odoo 17 Dashboard: Start by logging into your Odoo 17 instance and navigate to the dashboard. Ensure that you have administrative privileges to install and configure modules. To install the TaxCloud Module, head to the Apps menu, search for "TaxCloud," and initiate the installation process. Follow the prompts to install the module, entering the required information for seamless integration.
Configuring TaxCloud
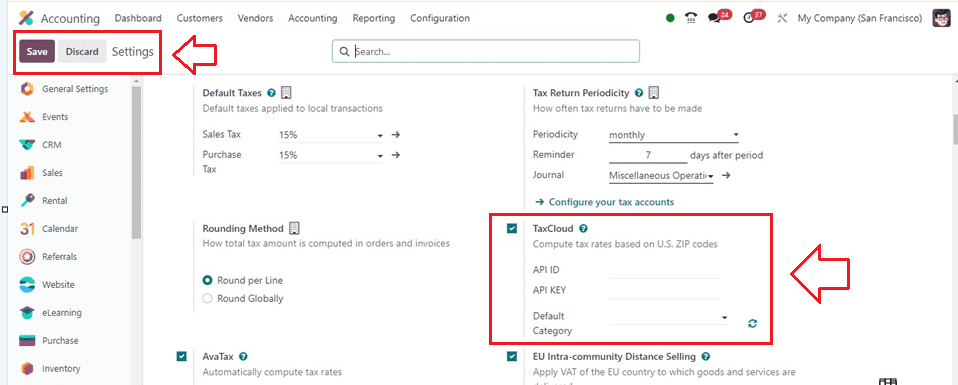
By turning on the “TaxCloud” field, you may calculate tax rates for US ZIP codes. The API KEY option allows users to authenticate themselves, and they may apply their TaxCloud credentials inside the API ID. By selecting the refresh icon next to the “Default Category” box, as seen in the picture below, you may import TIC product categories from a TaxCloud.
By choosing the “TaxCloud Categories” option from the “Configuration” tab, we can manage and create a TaxCloud category.

To create a new Taxcloud category, click the “New” icon, as seen in the picture below. This is where you'll define the tax configurations aligned with the cash basis method. Clicking on the “New” button will open a new editing line, where you can give the name of the Taxcloud Category inside the “TIC Description” area and the number of categories inside the “TIC Category” area, as shown below.

Then, save the details using the “Save” button. So you can use the TaxCloud Category for future requirements. Then, choose your TaxCloude Category inside the ‘Default Category’ field in the Settings window.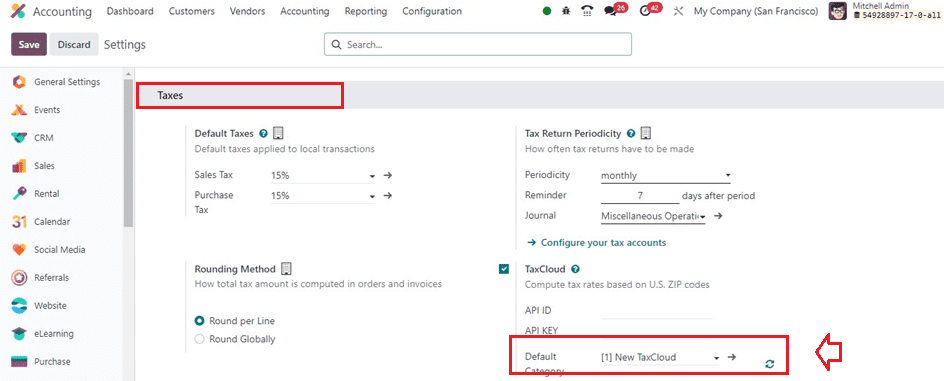
Configuring TaxCloud in the Accounting Module: Once the TaxCloud module is installed, go to the 'Accounting' module in Odoo 17. Under 'Configuration,' locate 'Taxes,' and enable the TaxCloud integration. Input the API key provided by TaxCloud to establish the connection. Make the required adjustments in the Settings area and click the SAVE icon to enable the TaxCloud function in the Odoo 16 Accounting module.
Configuring ZIP Code-Specific Tax Rates
Navigating Tax Configuration in the Accounting Module: Within the 'Accounting' module, select 'Configuration' and then 'Taxes.' This is where you will define the tax configurations based on ZIP codes.
Setting Up Tax Zones:
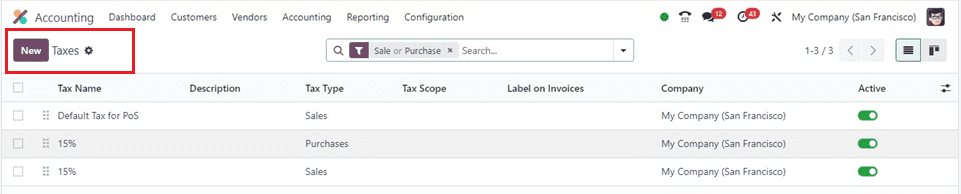
From the “Taxes” dashboard window, we can create new tax rates by clicking on the “New” button.
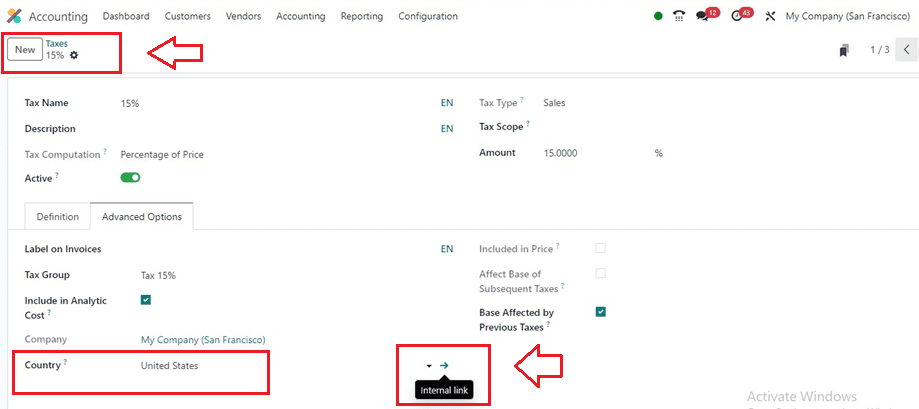
Inside the form view, provide the basic tax details in the relevant form fields, including the Tax Name, Description, Tax Computation, Active, Tax Type, Tax Scope, and Amount.
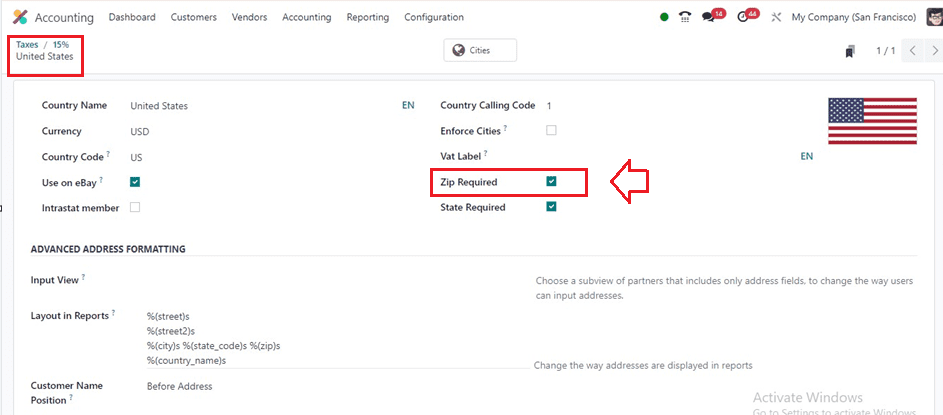
Inside the “Advanced Options” tab, we can set the advanced tax settings or features, including the country and tax zones, based on U.S. ZIP codes. Depending on your business structure and geographical scope, these zones can represent different states, regions, or any other segmentation relevant to tax rates.
Click the interlink provided near the “Country” field, and you will get the country configuration form, as shown below.
Assigning ZIP Code-Specific Tax Rates:
For each tax zone, specify the applicable tax rates based on ZIP codes. This information is crucial for TaxCloud to accurately calculate taxes during transactions. Ensure that the rates align with the relevant tax regulations.
Sales Tax Rates based on the Fiscal Positions
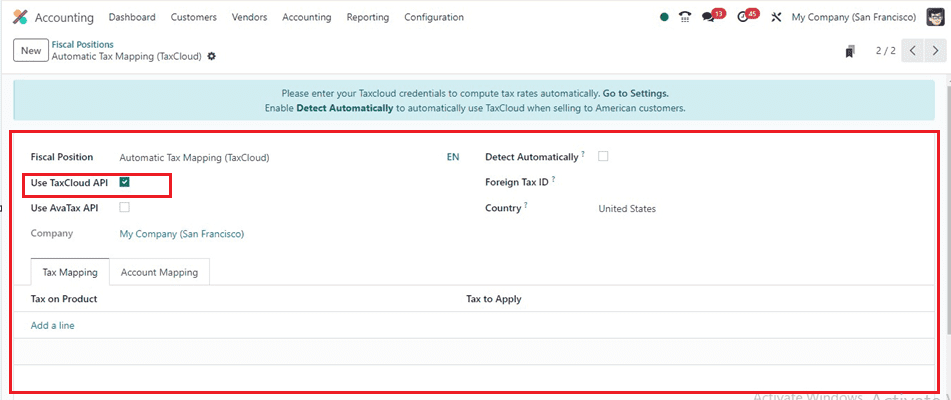
Sales tax setting based on Fiscal Positions, which may be accounting or tax mapping, is possible with Odoo 17. After installing TaxCloud, users may construct a financial position for any country. On the Accounting “Configuration” menu, choose the “Fiscal Positions” option to set Odoo up to detect when clients utilize their fiscal positions automatically. Click the NEW button in the Fiscal Positions box and input the Fiscal name Position for the United States to establish a new budgetary position. Enable the Use TaxCloud API option to turn on the tax cloud capability. Activating the “Detect Automatically” field will automatically establish fiscal positions in a sales order.
Then, choose your countries and other essential details inside your form and save the data. After the configuration, you can utilize this fiscal position for your next sales order. Here, we have selected the country ‘United States.’
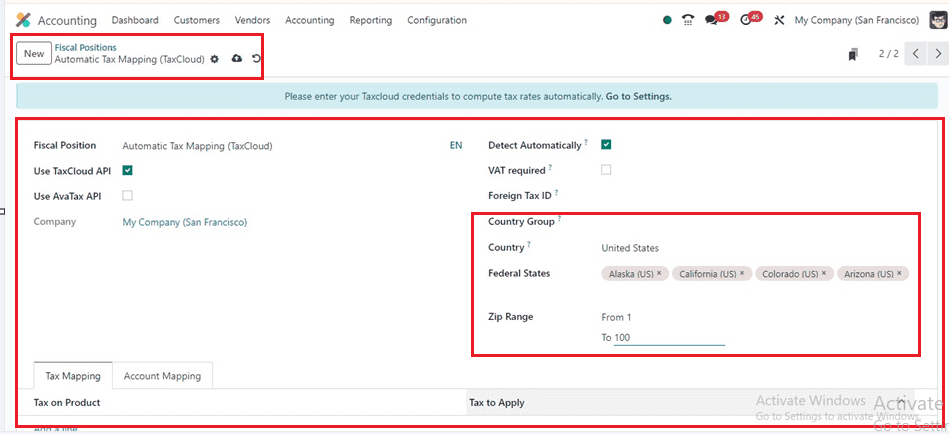
Choose the relevant Federal States and click the Save icon to generate a fiscal position. Selecting the US as the client nation instantly applies the newly established fiscal position to online orders, sales orders, and invoices. It is displayed in the Fiscal Positions pane. The Odoo 17 Accounting module supports tax rate computation using TaxCloud, allowing users to set US fiscal positions and apply them to customer invoices. Using this method, you can simplify tax rate calculations for specific organizational locations.
Tax Calculation within the Odoo 17 Accounting Module:
Initiate a new invoice within the Odoo 17 Accounting Module, incorporating products that are subject to sales tax. This will serve as a practical test to validate the effectiveness of the TaxCloud integration. So, we can go to the ‘Invoices’ section from the ‘Customers’ menu and start creating a new invoice.
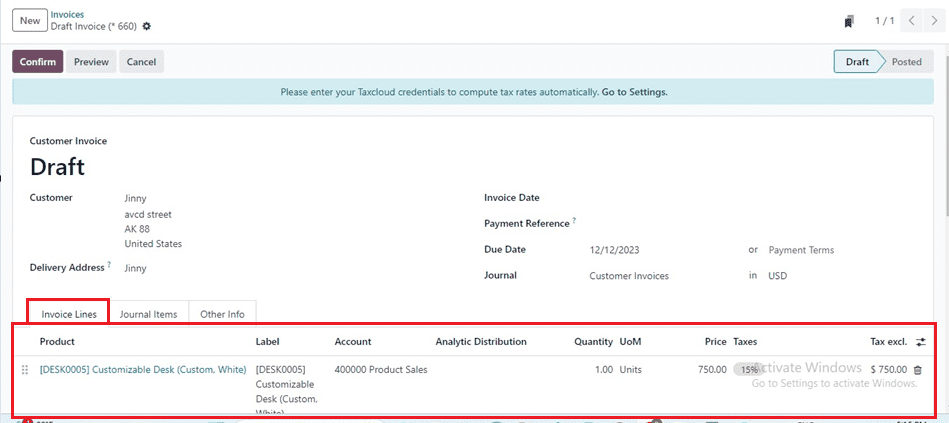
Just enter the customer's name and other details. The ‘Customer Invoice’ field automatically displays invoice numbers, and the ‘Delivery Address' field will show their address. The ‘Invoice Date,’ ‘Payment Reference,’ and ‘Journal’ details will be displayed. The ‘Due Date’ field lets users choose the final invoice date. Input the customer's address, making sure to include a valid U.S. ZIP code. The accuracy of the ZIP code is paramount, as TaxCloud relies on this information to determine the appropriate tax rate for the transaction.
The quantity and pricing of a new product may be shown on the Invoice Lines tab area after users pick the ‘Add a line’ option.
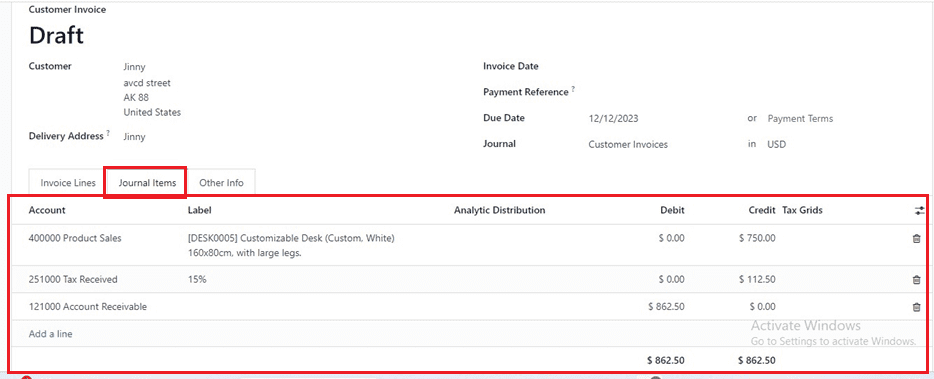
The ‘Journal Items’ tab will show the detailed account journals included in this invoice bill.
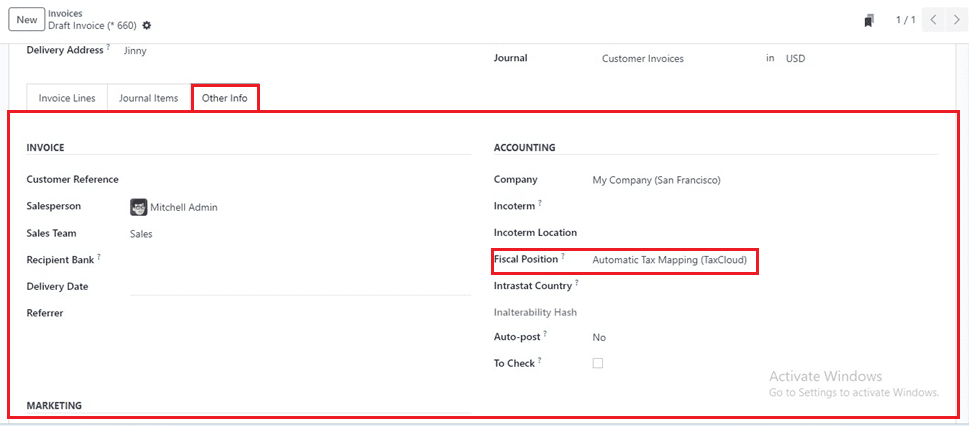
Users can adjust accounts and taxes for individual clients or invoices by managing fiscal situations in the ACCOUNTING area of the ‘Other Info’ tab. We can choose the ‘Automatic Tax Mapping’ option available in the ‘Fiscal Position’ field.
Finalize the invoice and scrutinize the computed tax amounts using the ‘Confirm’ button. TaxCloud dynamically calculates the sales tax based on the provided ZIP code, applying the relevant rate. Verify that the calculated taxes align with the expected amounts.
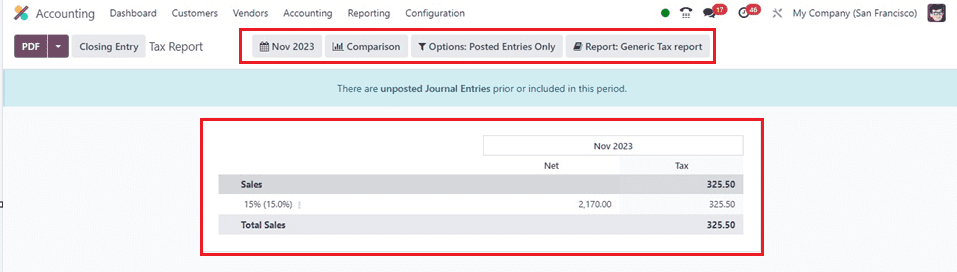
Generating Tax Reports Utilize the reporting features within the Odoo 17 Accounting Module to generate detailed tax reports. These reports may encompass summaries of collected taxes, tax liabilities, and other pertinent financial information. Regularly review these reports to ensure accuracy and compliance. A comprehensive review of your tax-based reports based on the current and prior Months, Financial Year, and Quarters will be displayed in the "Tax Report" box as depicted in the screenshot below.
The integration of TaxCloud within the Odoo 17 Accounting Module equips businesses with a powerful tool for precise tax rate computations based on U.S. ZIP codes. By following the step-by-step guide provided in this blog post, businesses can harness the synergy between Odoo 17 and TaxCloud to streamline their financial processes, ensuring compliance with tax regulations and maintaining accuracy in their financial transactions. Stay vigilant about updates to both TaxCloud and Odoo to make the most of the advanced features these tools provide, and elevate your business's financial management capabilities.