Odoo offers a user-friendly website management tool for their users to create and customize their websites according to their needs. The users can create custom responsive snippets in Odoo and can easily use these custom snippets by simple drag and drop. Odoo provides a variety of snippets to its users. Let us see how to create a custom responsive snippet in Odoo through the following simple example.
Step 1:
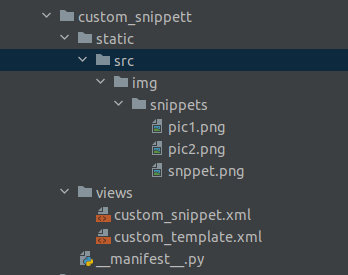
Create a custom module with the following directories.
Create an XML custom_snippet.xml file under the views directory. To this file, we can add our content which we need to be displayed on the web page. We can design a snippet as follows
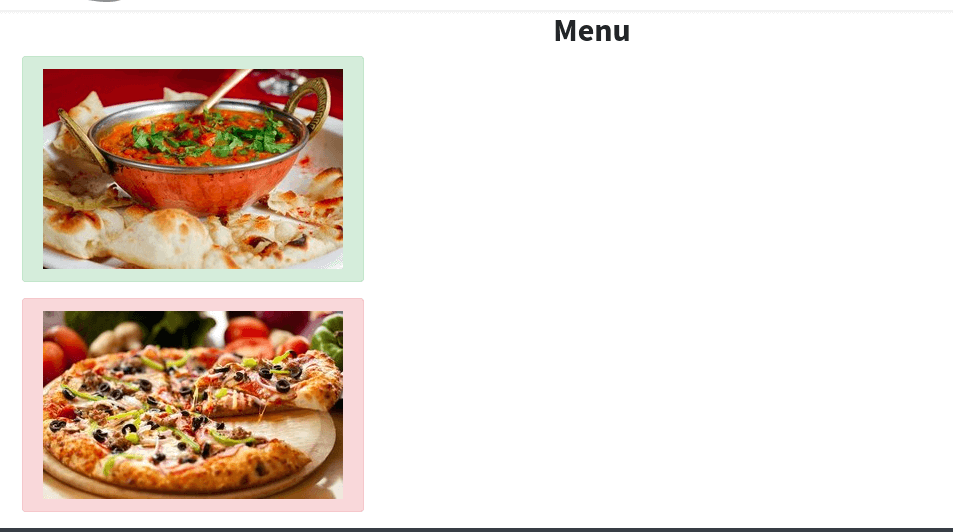
Add the following code to the XML file custom_snippet.xml created previously:
<?xml version="1.0" encoding="UTF-8" ?>
<odoo>
<data>
<template id="custom_snippets" name="Custom Snippets">
<section class="row align-items-center">
<div class="container">
<h2>
<center>
<b>Menu</b>
<br/>
</center>
</h2>
<div class="row">
<div class="alert alert-success">
<img src="/custom_snippett/static/src/img/snippets/pic1.png" class="img img- responsive" alt="Demo 1"/>
</div>
</div>
<div class="row">
<div class="alert alert-danger">
<img src="/custom_snippett/static/src/img/snippets/pic2.png" class="img img-responsive" alt="Demo 2"/>
</div>
</div>
</div>
</section>
</template>
</data>
</odoo>
On the above code inside the <template> tag, we can specify the snippet name we want to display in the UI. The image path can be specified by using the src attribute inside the <img>. src="/your_module_name/static/src/img/snippets/pic1.png" that we need to show in our snippet.
Step 2 :
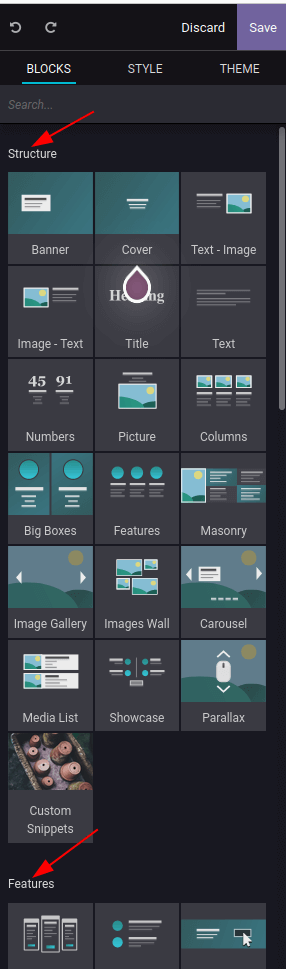
In step1 we designed our snippets or defined how they looked. And on the second step, we are going to add our snippet to different categories given below on the website edit or bar. The different categories are :
- Content- Snippet structure
- Effect- Feature
We can add snippets to any one of the above categories according to our requirements.
| Content: | XPath Expression |
| Feature: | //div[@id='snippet_structure'] |
| Effect: | //div[@id='snippet_content'] |
| Snippet structure: | //div[@id='snippet_feature'] |
| Editor Tab: | //div[@id='snippet_effect'] |
Here I am going to add the snippet to the structure tab. To add the snippet into the structure tab, we need to create another XML file custom_template.xml which inherits the main template of snippets, and then XPath our snippet to the correct place.
<?xml version="1.0" encoding="UTF-8" ?>
<odoo>
<data>
<template id="custom_snippets_web_snippets" inherit_id="website.snippets" name="Custom Snippets">
<xpath expr="//div[@id='snippet_structure']" position="inside">
<div class="o_panel_body">
<t t-snippet="custom_snippett.custom_snippets"
t-thumbnail="/custom_snippett/static/src/img/snippets/snppet.png" />
</div>
</xpath>
</template>
</data>
</odoo>
In the above code call your snippet from <t> tag using snippet="your_module_name.template_id" and to show the image for your snippet you can use t-thumbnail and add a path of the image to t-thumbnail.
Step 3:
Styling of snippets:
You can make your snippet more attractive by styling your snippet. To style a snippet, you can use CSS/SCSS files or bootstrap classes. You can add your CSS files inside the path static > src > CSS/SCSS > your CSS file. After styling your snippets, you can install the module and can see the snippet on websites by clicking on the edit button.
Now we can use our custom snippet by drag and drop.
Snippet Options
Snippet options in Odoo allow you to edit a snippet's appearance using the Website Builder's UI. We can apply CSS classes to the snippets by using Snippet options so that the users can make changes to the appearance of the snippets.
Options group
Options are enclosed in groups. Groups have features that define how the options included will interact with the UI.
1) data-drop-in="[selector(s)]"
List of selector (s) that the snippet can be dropped into
2) data-drop-near="[selector(s)]"
List of selector (s) that the snippet can be dropped beside
3) data-js="method name "
Custom javascript methods are binding using this
4) data-selector="[css selector(s)]"
Link the options included in the group to a specific element.
Default option methods
Options are used to apply standard CSS to snippets.
a) data-select-class="[class name]"
Defines a list of classes that the user can choose to apply when more data-select-class is set for the same groups.
b) data-toggle-class="[class name]"
By using data-toggle-class the user can apply one or more CSS classes from the list of classes to a snippet.
Hope you got a basic idea of snippet creation. To bring more richness to your snippet, you can use bootstrap. You can check our odoo blogs if you want to know more about the website-related technical blogs.