In Odoo, a One2many field is used to define a one-to-many relationship between two models. It allows multiple records from a secondary (related) model to be linked to a single record in the main (source) model. To configure a One2many field, you need to indicate the related model and reference the field in that model, which connects back to the main one.
Here’s an example:
from odoo import models, fields, Command
class MaterialRequest(models.Model):
   _name = 'material.request'
   _description = 'Material Request'
   employee_id = fields.Many2one('res.users', string="Requested By", required=True)
   date = fields.Date(string="Request Date", required=True)
   material_order_ids = fields.One2many('material.order', 'request_id', string='Materials')

class MaterialOrder(models.Model):
   _name = 'material.order'
   _description = 'Material Order Line'
   request_id = fields.Many2one('material.request', string='Material Request')
   material = fields.Manyone('product.product', string='Material', required=True)
   operation_id = fields.Many2one('stock.picking.type', string='Internal Transfer', required=True)
   quantity = fields.Float(string='Quantity', required=True)
   source = fields.Many2one('stock.location', string='Source Location')
   destination = fields.Many2one('stock.location', string='Destination Location')
In this example, we have two models: MaterialRequest and MaterialOrder.
1. The MaterialRequest model represents a material request made by an employee. It includes:
* employee_id: A Many2one field linking to the res.users model to track who made the request.
* date: The date of the request.
* material_order_ids: A One2many field that links to multiple MaterialOrder records, representing the materials requested.
2. The MaterialOrder model represents individual material order lines linked to a material request. It includes:
* request_id: A Many2one field linking back to the MaterialRequest, establishing the relationship.
* material: A Many2one field referencing product.product, indicating the requested material.
* operation_id: A Many2one field referencing stock.picking.type, specifying the internal transfer operation type.
* quantity: A Float field representing the quantity of the requested material.
* source: A Many2one field referencing stock.location, specifying the source location.
* destination: A Many2one field referencing stock.location, specifying the destination location.
One2Many Field on a Website
Allowing users to create records within a one2many field directly from a website can be very convenient. This functionality enables users to populate the table through an online form.
Here’s a practical example:
First, define two models that are related via a one2many relationship and create the corresponding views for these models.
Now, we need to create a website menu.
<?xml version="1.0" encoding="UTF-8" ?>
<odoo>
  <record id="material_request_website_menu" model="website.menu">
      <field name="name">Material Request</field>
      <field name="url">/material_request</field>
      <field name="parent_id" ref="website.main_menu"/>
      <field name="sequence" type="int">90</field>
  </record>
</odoo>
This will add a new menu option to the website.

Then create a template for the page.
<?xml version="1.0" encoding="UTF-8" ?>
<odoo>
   <template id="web_machine_request_template">
       <t t-call="website.layout">
           <div id="wrap" class="oe_structure oe_empty">
               <div class="container">
                   <div class="header">
                       <h3>Online Material Request</h3>
                   </div>
                   <form enctype="multipart/form-data" class="o_mark_required">
                       <input type="hidden" name="csrf_token" t-att-value="request.csrf_token()"/>
                       <div class="s_website_form_rows row">
                           <!-- Customer Name -->
                           <div class="col-12 mb-3">
                               <label class="col-form-label" for="customer">
                                   <span>Name</span>
                                   <span class="s_website_form_mark">*</span>
                               </label>
                               <select id="customer" name="customer" class="form-control s_website_form_input"
                                       required="1">
                                   <option></option>
                                   <option t-foreach="customer" t-as="cust" t-att-value="cust['id']"
                                           t-out="cust['name']"/>
                               </select>
                           </div>
                           <!-- Date -->
                           <div class="col-12 mb-3">
                               <label class="col-form-label" for="date">
                                   <span>Date</span>
                                   <span class="s_website_form_mark">*</span>
                               </label>
                               <input id="date" type="date" class="form-control s_website_form_input" name="date"
                                      required="1"/>
                           </div>
                           <!-- Table for Materials -->
                           <div class="col-12">
                               <table class="table table-bordered mt-3" id="material_table">
                                   <thead>
                                       <tr>
                                           <th>Material *</th>
                                           <th>Quantity *</th>
                                           <th>Operation Type *</th>
                                           <th>Source Location *</th>
                                           <th>Destination Location *</th>
                                           <th width="5%"></th>
                                       </tr>
                                   </thead>
                                   <tbody>
                                       <tr class="material_order_line">
                                           <td>
                                               <select name="product" class="form-control s_website_form_input">
                                                   <option value="">Select Material</option>
                                                   <t t-foreach="products" t-as="product">
                                                       <option t-att-value="product.id">
                                                           <t t-esc="product.display_name"/>
                                                       </option>
                                                   </t>
                                               </select>
                                           </td>
                                           <td>
                                               <input type="number" class="form-control total_cost" name="quantity"
                                                      id="quantity" value="1" placeholder="Quantity"/>
                                           </td>
                                           <td>
                                               <select name="operation"
                                                       class="form-control s_website_form_input operation">
                                                   <option value="">Select Operation</option>
                                                   <t t-foreach="operations" t-as="operation">
                                                       <option t-att-value="operation.id">
                                                           <t t-esc="operation.name"/>
                                                       </option>
                                                   </t>
                                               </select>
                                           </td>
                                           <td>
                                               <select name="source" class="form-control s_website_form_input">
                                                   <option value="">Select Source Location</option>
                                                   <t t-foreach="locations" t-as="location">
                                                       <option t-att-value="location.id">
                                                           <t t-esc="location.complete_name"/>
                                                       </option>
                                                   </t>
                                               </select>
                                           </td>
                                           <td>
                                               <select name="destination" class="form-control s_website_form_input">
                                                   <option value="">Select Destination Location</option>
                                                   <t t-foreach="locations" t-as="location">
                                                       <option t-att-value="location.id">
                                                           <t t-esc="location.complete_name"/>
                                                       </option>
                                                   </t>
                                               </select>
                                           </td>
                                           <td>
                                               <button type="button"
                                                       class="btn fa fa-trash-o remove_line text-danger"></button>
                                           </td>
                                       </tr>
                                   </tbody>
                               </table>
                           </div>
                           <!-- Add Material Button -->
                           <div class="col-12 text-end">
                               <button type="button" class="btn btn-info add_total_project">
                                   <i class="fa fa-plus"></i>
                                   Add Material
                               </button>
                           </div>
                           <!-- Submit Button -->
                           <div class="col-12 mt-3">
                               <button type="button" class="custom_create btn btn-primary btn-block">
                                   Create Request
                               </button>
                           </div>
                       </div>
                   </form>

               </div>
           </div>
       </t>
   </template>
</odoo>
After creating the template, we need to connect the template and the menu using the controller.
@route('/material_request', auth='public', website=True)
def material_request(self):
   products = request.env['product.product'].sudo().search([])
   customer = request.env['res.users'].sudo().search([])
   locations = request.env['stock.location'].sudo().search([])
   operations = request.env['stock.picking.type'].sudo().search([])
   datas = {
       'products': products,
       'customer': customer,
       'locations': locations,
       'operations': operations,
   }
   return request.render('website_one2many.web_machine_request_template', datas)
This will display the template when the web form menu is clicked. Here’s an example of the view.
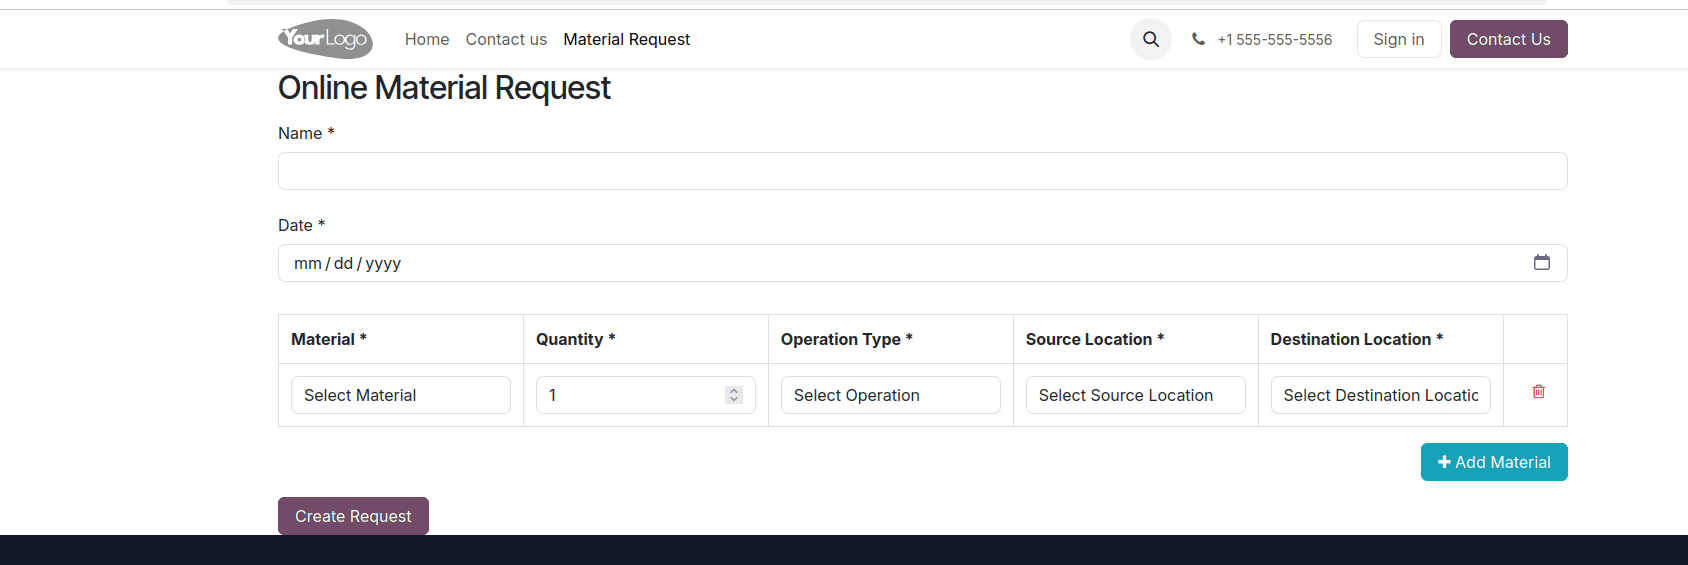
You can enter the name, add multiple codes, and cost simply by clicking the plus icon at the bottom. To handle operations such as adding or removing lines and submitting the form, we’ll need to implement some JavaScript for website functionality.
Custom.js file:
/** @odoo-module **/
import publicWidget from "@web/legacy/js/public/public_widget";
import { rpc } from '@web/core/network/rpc';
publicWidget.registry.MaterialRequest = publicWidget.Widget.extend({
   selector: "#wrap",
   events: {
       'change .operation': '_onChangeType',
       'click .add_total_project': '_onClickAddMaterial',
       'click .remove_line': '_onClickRemoveLine',
       'click .custom_create': '_onClickSubmit',
   },
   _onClickSubmit: async function (ev) {
       ev.preventDefault();
       var employee_id = $('#customer').val();
       var date = $('#date').val();
       var material_order_ids = [];
       $('#material_table tbody tr.material_order_line').each(function () {
           let product = $(this).find('select[name="product"]').val();
           let quantity = $(this).find('input[name="quantity"]').val();
           let operation = $(this).find('select[name="operation"]').val();
           let source = $(this).find('select[name="source"]').val();
           let destination = $(this).find('select[name="destination"]').val();
           material_order_ids.push({
               'material': product,
               'quantity': quantity,
               'operation_id': operation,
               'source': source || null,
               'destination': destination || null
           });
       });
       // Log data before sending
       console.log({
           'employee_id': employee_id,
           'date': date,
           'material_order_ids': material_order_ids
       });
       try {
           let response = await rpc('/material/submit', {
               employee_id: employee_id,
               date: date,
               material_order_ids: material_order_ids
           });
           console.log('Response:', response);
           alert('Material request submitted successfully!');
       } catch (error) {
           console.error('Error:', error);
           alert('Failed to submit the material request.');
       }
},

   _onClickAddMaterial: function (ev) {
       var $new_row = $('#material_table tbody tr.material_order_line:first').clone();
       $new_row.find('input, select').val('');  // Clear input values
       $new_row.appendTo('#material_table tbody');
   },
   _onClickRemoveLine: function (ev) {
       if ($('#material_table tbody tr').length > 1) {
           $(ev.target).closest('tr').remove();
       } else {
           alert("You must have at least one material entry.");
       }
   },
   _onChangeType: function (ev) {
       var $row = $(ev.target).closest('tr');
       if ($row.find('.operation').val() === "purchase order") {
           $row.find('.fields').prop('disabled', true);
       } else {
           $row.find('.fields').prop('disabled', false);
       }
   }
});
Here ‘Create Request’ function is to pass the cost and code to the controller. Delete button function is to remove the line.
And the Plus button is to add an extra line.
Then, we need to create a controller for the form submission, which is mentioned in the above js file, on submit action
@route('/material/submit', type='json', auth='public', website=True)
def request_submit(self, **post):
   """
   Handles the material request submission dynamically based on field types.
   """
   print('post',post)
   model_name = 'material.request'
   model_fields = request.env['ir.model.fields'].sudo().search([('model', '=', model_name)])
   values = {}
   for key, val in post.items():
       field = model_fields.filtered(lambda f: f.name == key)
       if not field:
           continue
       # Process data based on field type
       if field.ttype == 'many2one':
           val = int(val) if val else False
       elif field.ttype == 'one2many':
           relation_fields = request.env['ir.model.fields'].sudo().search([('model', '=', field.relation)])
           one2many_lines = []
           for line in val:
               line_data = {}
               for sub_key, sub_val in line.items():
                   sub_field = relation_fields.filtered(lambda f: f.name == sub_key)
                   if sub_field:
                       if sub_field.ttype == 'many2one':
                           sub_val = int(sub_val) if sub_val else False
                       elif sub_field.ttype in ['integer', 'float']:
                           sub_val = float(sub_val) if sub_val else 0
                       elif sub_field.ttype == 'boolean':
                           sub_val = str(sub_val).lower() in ['true', '1', 'yes']
                   line_data[sub_key] = sub_val
               one2many_lines.append((0, 0, line_data))
           val = one2many_lines
       values[key] = val
   # Create record
   record = request.env[model_name].sudo().create(values)
   print('record',record)
   return {'success': True, 'record_id': record.id}
This will create a record inside the model. With this approach, we can efficiently create records in the backend and include
one2many relationships using templates, allowing us to submit data in the desired format and generate records according to our requirements.
To read more about How to Create One2Many Field in Odoo 17 Website, refer to our blog How to Create One2Many Field in Odoo 17 Website.