Odoo has many widgets available in the backend user interface to perform different functionalities, such as one2many,many2many, many2many_tags, etc., which makes the operations of the selection fields in Odoo simpler and run with ease. So when we create a form that includes one2many or many2many fields, it is not easy to build an advanced selection field like the widgets without the help of external libraries. In Odoo, those one2many,many2many_tags.etc. widgets are made with the help of the Select2 js library.
In this blog, I will explain the different types of selection fields built by the Select2 library for simpler form creation, its purpose, and 00its implementation syntax/ examples.
1. Simple Select2 Field
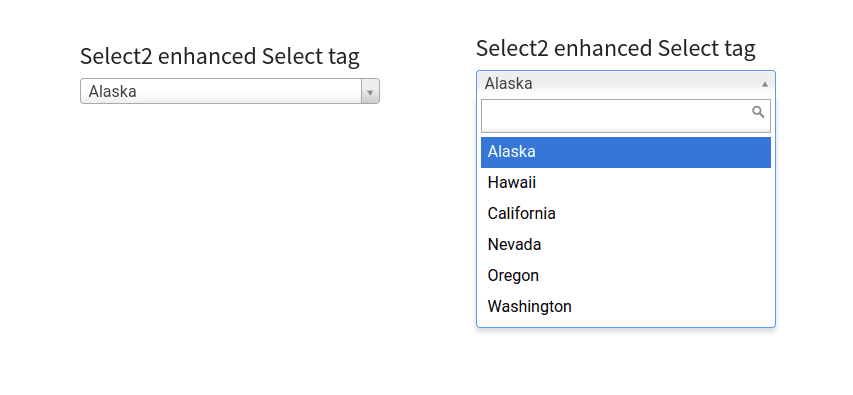
When using a normal select tag with a huge number of options, it is very hard for visitors to find their needed option from the list. For simplifying this, we can use the Select2 enabled select tag, which has an inbuilt filter mechanism for easy usage.
To create this, we need to give a Selector(Class or ID) to the select tag.
In the below example, we are using Class as the selector.
<select style="width:300px" class="advanced-select">
    <option value="AK">Alaska</option>
    <option value="HI">Hawaii</option>
    <option value="CA">California</option>
    <option value="NV">Nevada</option>
    <option value="OR">Oregon</option>
    <option value="WA">Washington</option>
</select>
Next, we use the selector class .advanced-select to activate the select2 from the webpage’s js file.
$(document).ready(function () {
    $('select.advanced-select').select2();
});
After adding the select2 enhancement we get the new Select field with live search filter functionality like the image given below
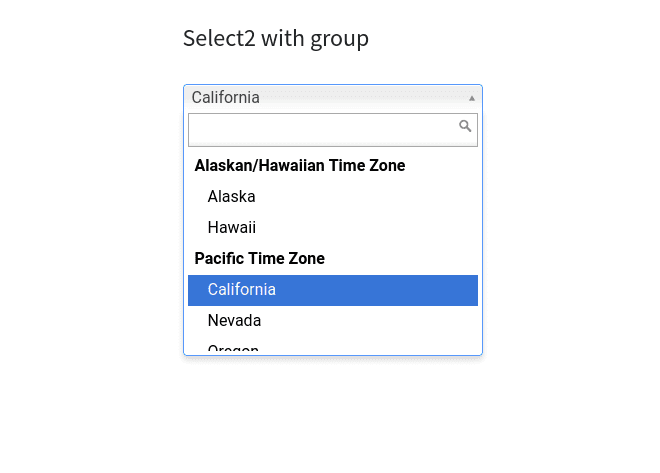
2. Select2 with grouping
Next, we are going to make the Select2 field with grouped options. For this we use the <optgroup> tag.
<select style="width:300px" id="source2">
    <option />
    <optgroup label="Alaskan/Hawaiian Time Zone">
        <option value="AK">Alaska</option>
        <option value="HI">Hawaii</option>
    </optgroup>
    <optgroup label="Pacific Time Zone">
        <option value="CA">California</option>
        <option value="NV">Nevada</option>
        <option value="OR">Oregon</option>
        <option value="WA">Washington</option>
    </optgroup>
</select>
And JS code like below will enable select2 enhancements to the select tag. In this example, we used the id of the select tag as the selector.
$(document).ready(function () {
    $('select#source2').select2();
});
The image given below is an example of select2 field with grouped elements.
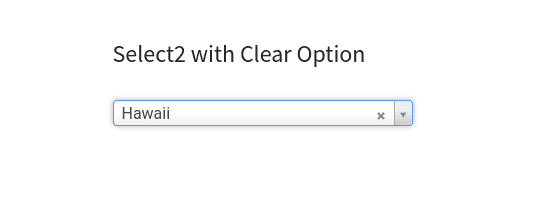
3. Select2 with Clear option enabled
Next, we are going to build an example for select2 enhanced fields with clear options. To enable a clear option, we use the attribute ‘allowClear: true’ in the JS file.
<select style="width:300px" id="source2">
    <option />
    <optgroup label="Alaskan/Hawaiian Time Zone">
        <option value="AK">Alaska</option>
        <option value="HI">Hawaii</option>
    </optgroup>
    <optgroup label="Pacific Time Zone">
        <option value="CA">California</option>
        <option value="NV">Nevada</option>
        <option value="OR">Oregon</option>
        <option value="WA">Washington</option>
    </optgroup>
</select>
By enabling the Clear option, the User will get a chance to clear the selected option in the select tag and leave it empty if wanted.
The example image is given here, and the x symbol shown after the selected option is used to clear the selection.
4. Select2 with Multiple Selection
Next, we are building a Multi-selection enabled select2 field. For this, we add multiple options to the select tag so that visitors can select multiple options from the list.
The example code is given below.
<select style="width:300px" class="advanced-select" Multiple="">
    <option value="AK">Alaska</option>
    <option value="HI">Hawaii</option>
    <option value="CA">California</option>
    <option value="NV">Nevada</option>
    <option value="OR">Oregon</option>
    <option value="WA">Washington</option>
    <option value="AZ">Arizona</option>
    <option value="CO">Colorado</option>
</select>
Then we use the JS to bind the select2 with the select tag like in the simple select2 example. The example for select2 with multiple selections enabled is given below.
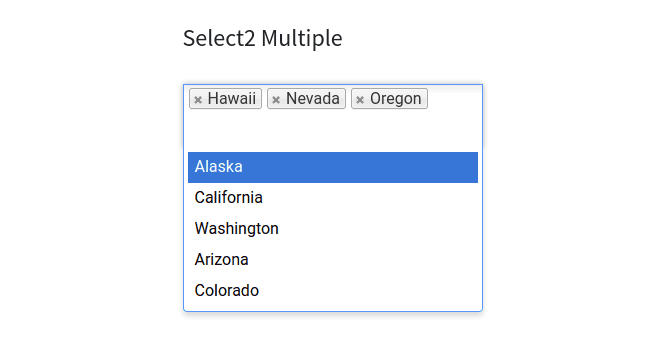
In this select2 field, visitors can use the x symbol shown in selected options to deselect them.
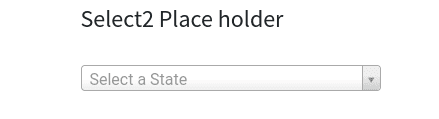
5. Select2 PlaceHolder
Next, we are going to enable a placeholder for the select2 field. We use the select2 attribute Placeholder in the JS file to enable this option.
$('select#source1').select2({
           placeholder: "Select a State",
           allowClear: true
       });
Note: for adding the placeholder like this, we need to make sure that the first option in the select field is an empty option, like in the code example given below.
<select style="width:300px" id="source1">
    <option />
    <option value="AK">Alaska</option>
    <option value="HI">Hawaii</option>
    <option value="CA">California</option>
    <option value="NV">Nevada</option>
    <option value="OR">Oregon</option>
    <option value="WA">Washington</option>
</select>
So when there is no option selected, the select2 field will display the placeholder like in the image given below.
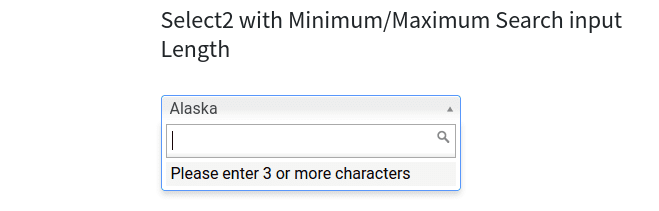
6. Select2 with Minimum/ Maximum search input
Select2 has an option to enable minimum /maximum search input length so that we can customize how much length is required for the search length to activate and disable filtering based on these attributes. The minimum attribute is useful when there is a large dataset as options, and small search strings are not enough for proper filtering.
An example for enabling both minimum and maximum search length limits is given in the below image.
$('select#source3').select2({
           minimumInputLength: 3,
           maximumInputLength: 10
       });
And the result example image is given below, here you can see that the filtering is only triggered when the minimum input length attribute is satisfied.
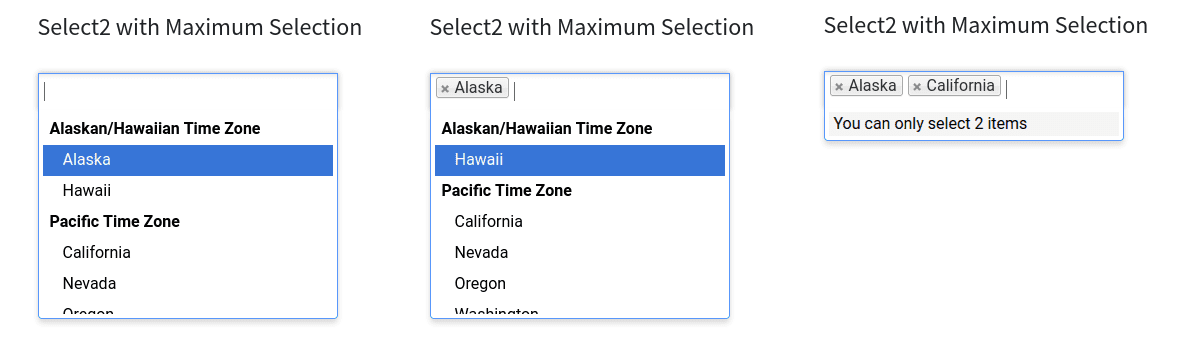
7. Select2 with Maximum selection Limit
In this section, we are going to give a limit for maximum selectable options for the multi-select enabled select2 field. For this, we use the JS attribute MaximumSelectionSize to specify the limit as in the example given below.
$('select#source4').select2({
           maximumSelectionSize: 2
});
In the above example, we gave 2 as the maximum limit, so that visitors can only select 2 options maximum from that select field. We can see the changes in select2 when visitors select each option in the example images given below.
There are many other attributes and functionalities available in the Select2 JS library. Some of them are
Width - controls the width style attribute of the select2
Id - used for getting the id from the selected choice
Locked - this attribute is used for locking the selected option so that the visitor cannot change its status.
Disabled - used to disable the unrequired options, so that visitors cannot accidentally select those options.
Tokenizer - this function is used to process the user input typed into the search field to the options
Query - this function is used to querying results when data is loaded dynamically.
If you want to learn more about the select2 JS library, you can access the documentation of selct2 version 3.5, which is the version used in Odoo15, through their GitHub page.