Marketing automation is the best strategy for automating our marketing activities. Marketing automation processes are performed with the help of advanced software so the result will be amazing. It will definitely assist you to increase your business profits and also help you to save more time and effort. The all-in-one complete business suit application Odoo also offers you a well-defined marketing automation module that can be easily integrated with CRM activities. The Odoo Marketing Automation platform allows you to configure automatic and specifically targeted campaigns with ease.
In this blog, we will discuss the campaign creation window of the Odoo marketing automation in detail.
First, let us have a look at the home dashboard window of the Odoo marketing module. Let me depict the image of the window below.
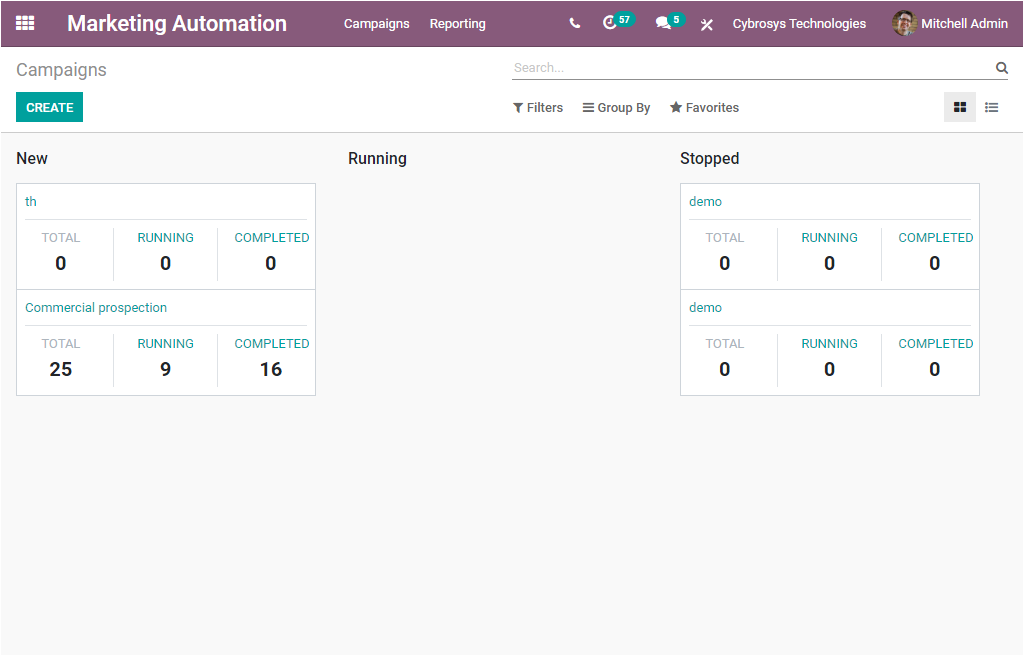
In this Campaign window,you can view all the campaigns defined on the platform. The Create icon available on the top left corner of the window will help you to access the campaign creation window. The image of the window is showcased below.
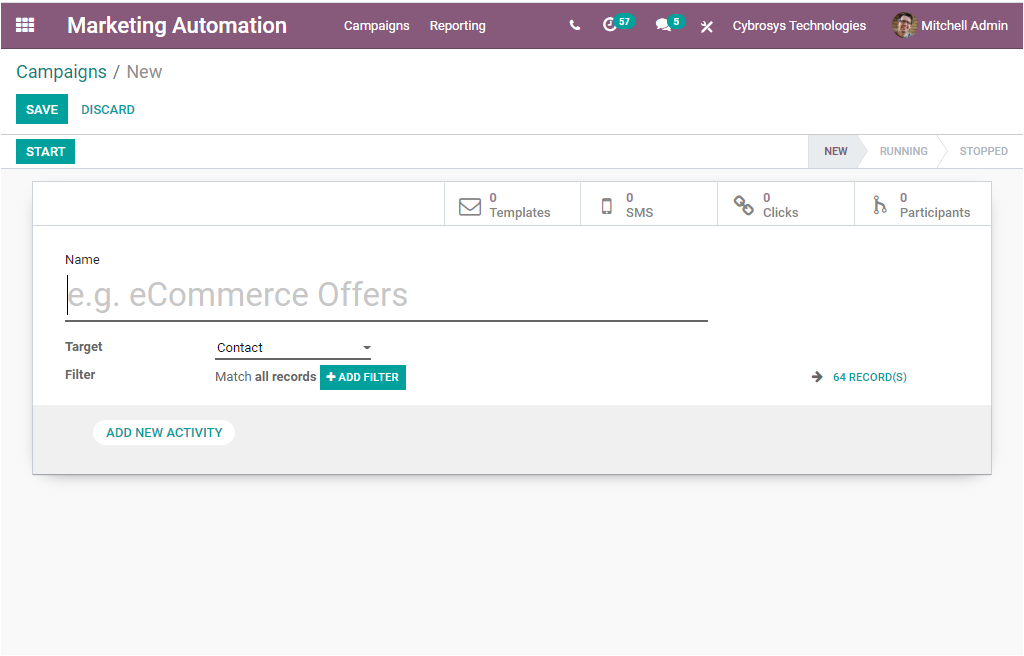
In this creation window, you can view so many options and these options will help you to conduct various operations of your campaign in an easy manner. Let us discuss each of the options below.
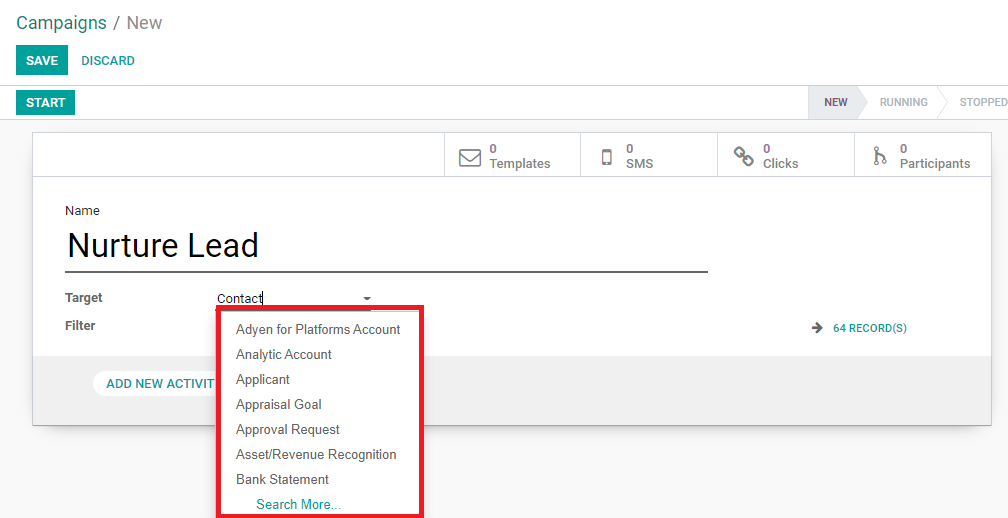
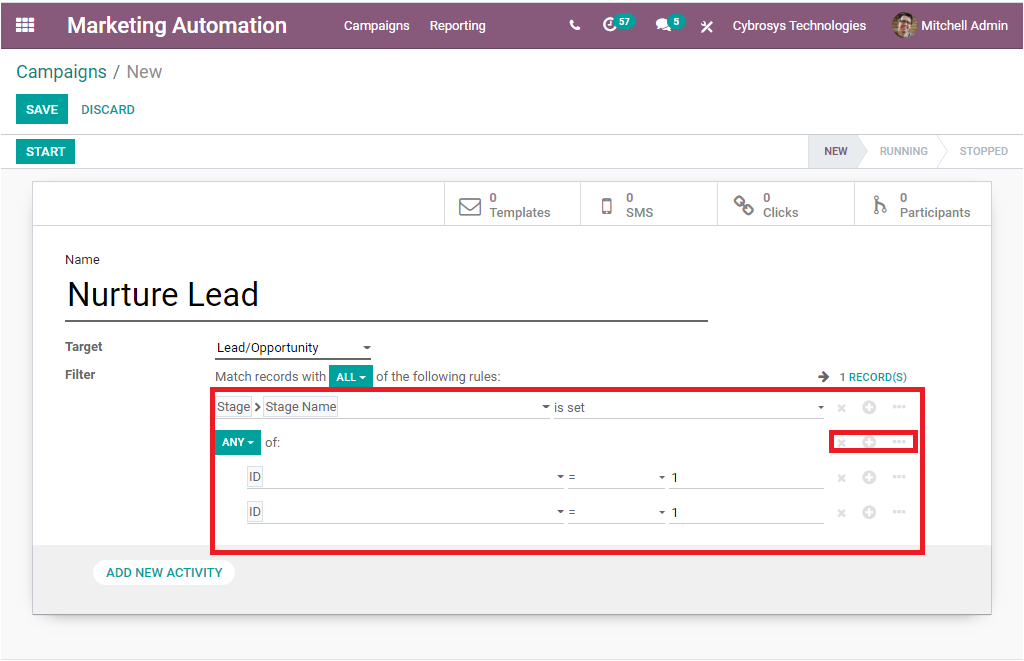
First, we can provide the Name of the Campaign in the allotted space. We can provide the name as Nurture Lead. After that, we can set the Target model under the option Target. Here Odoo gives so many possibilities for setting the target model. You can set your target model from the drop-down menu available. The dropdown menu is highlighted in the below image.
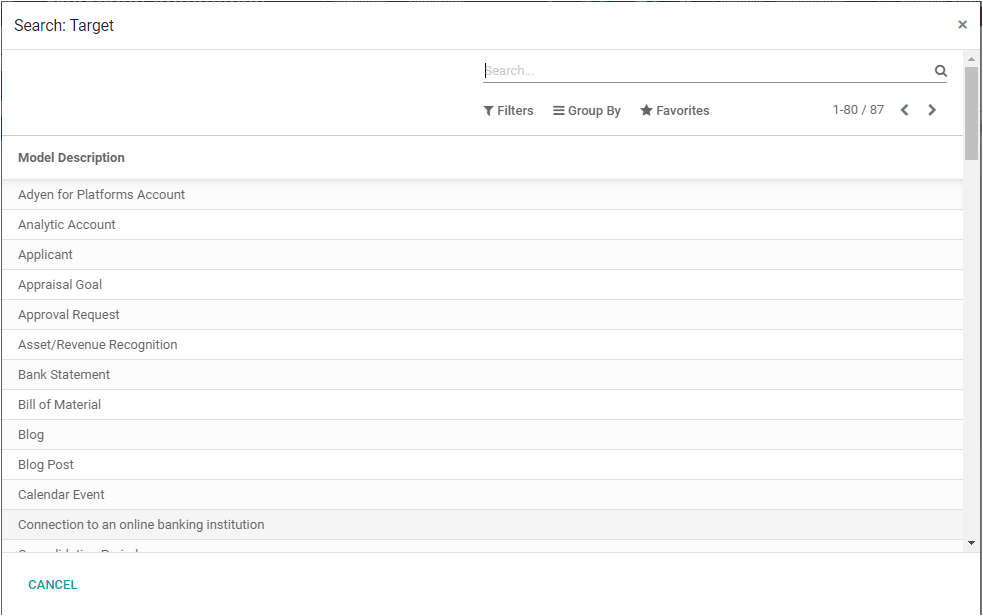
You can search for more target models using the Search More button available. On selecting the SearchMore button you will be visible with a pop-up window with the model description as shown in the below screenshot.
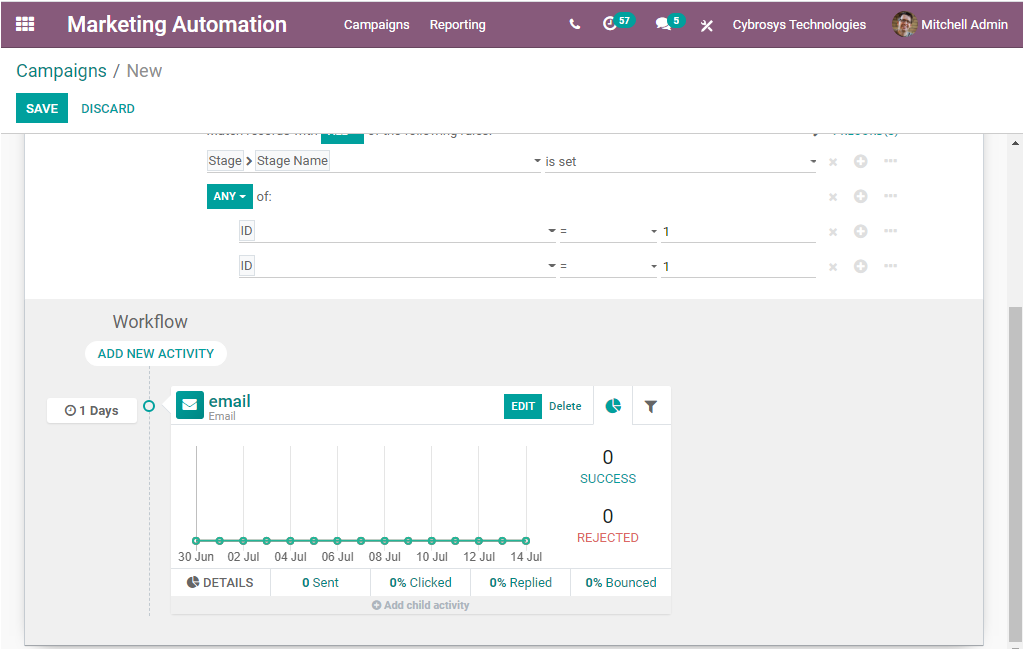
From this window, you can select your target model. Here we can select the Lead/Opportunity as the target model. Then we have the filter option which will allow us for the advanced filtering with a few clicks. By using this field, we can filter our target model specifically to the required participants. So let us click on the add FILTER option to match the record with a specific rule.
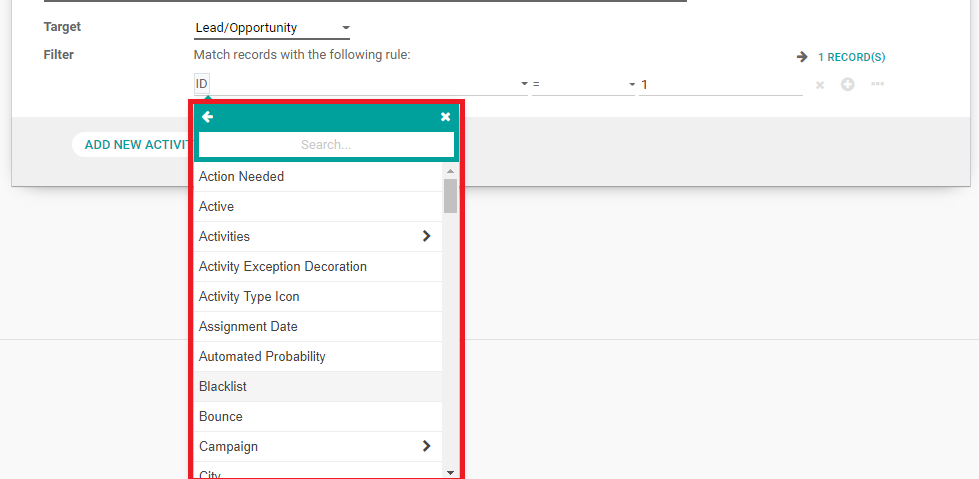
Using this dropdown menu, you can search your criteria. Here we can set the leads specifically the leads we have in different stages. So we can search it on the basis of the Stage and the Stage Name. Now we can see that we have 39 Records with this rule. Here you also have the options such as Delete node, Add node, Add branch in the right bottom of the window. Using the Add node icon, you can include more nodes.
Now it is time to discuss how to add a new activity here. For creating an activity, you can click on the ADD NEW ACTIVITY button available in the left bottom of the window. On clicking this button, you will be depicted with a pop-up window as shown below.
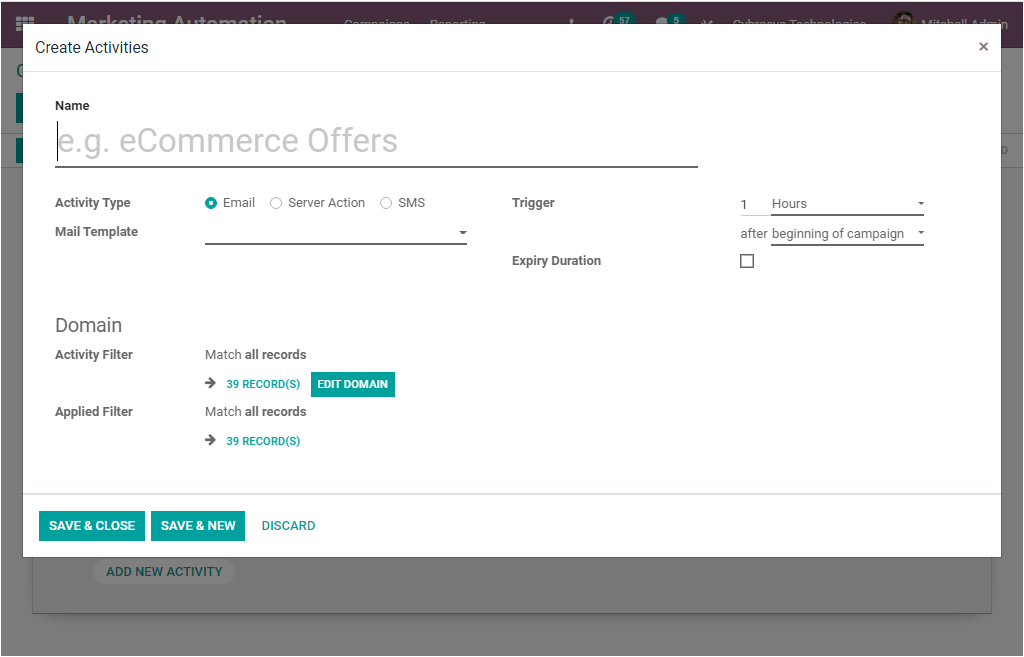
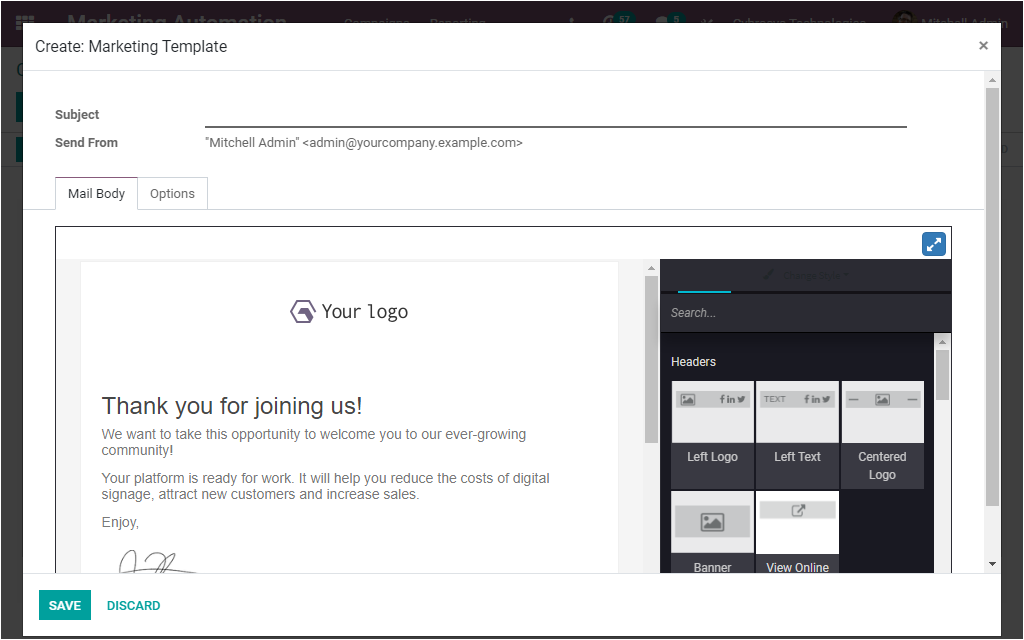
Using this window you can configure multiple activities which you planned for your campaign. In this activity creation window, you can provide the necessary details. So first you can allocate the name of the activity. You can specify the Activity Type either email, Server Action, or SMS. Then you can add mail templates. Odoo allows you to customize your mail templates using the Mail Template field. You can configure the mail template using the below window.
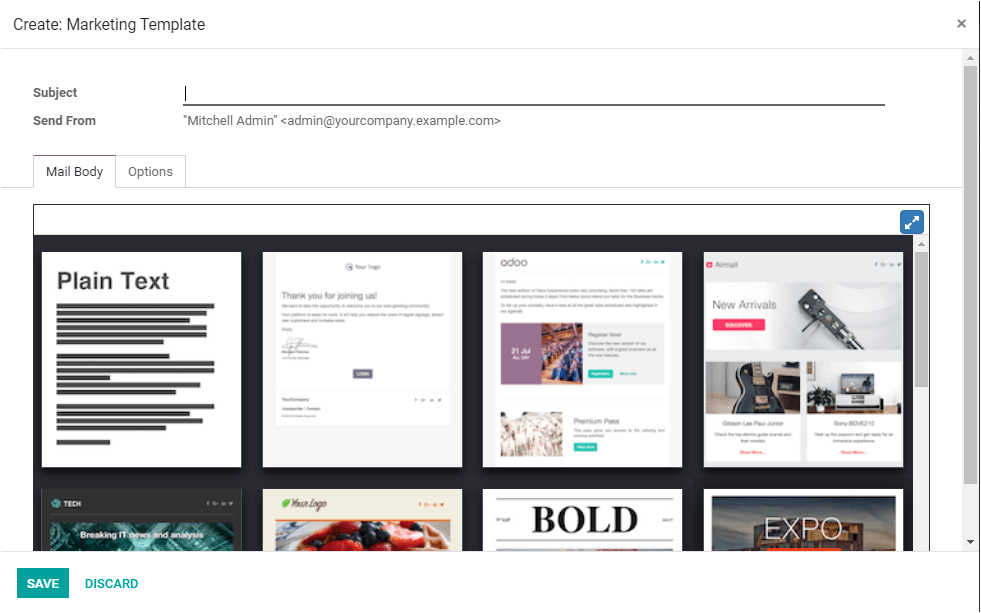
Using this window you can create a customizable marketing template. Here you can provide the subject of your mailing in the Field Mailing and the Send Fromoption is auto allocated. Under the Mail Body tab, you can select a template from the given options. Also, the platform supports and offers customizable building blocks which can be used for creating new templates in an impressive manner.
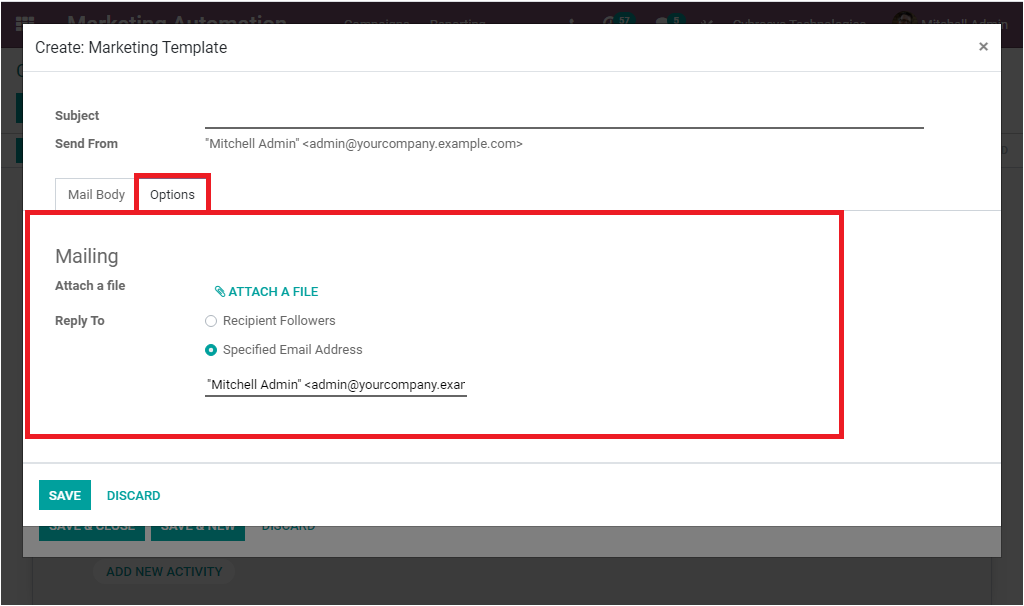
Under the Options tab, you have some additional options. The Mailing option available under this tab allows you to attach a file. This can be done by selecting the ATTACH A FILEoption available. The Reply-To option can be set to either Recipient Followersor Specified Email Address. In the case of Recipient Followers, the replies go to the target document and in the case of Specified Email Address, the replies are routed to a given email address. You can provide the mail id in the provided space.
After providing all the necessary details in the mail template window, you can click on the SAVE button to save the details. Now back to the Campaign creation window, on the right side of the window, you can view the Trigger option that will allow you to set triggers in different ways such as Hours, Days, Weeks, and Months. For example, here we can set one hour after the beginning of the campaign or One day after the mail opens and many more aspects.
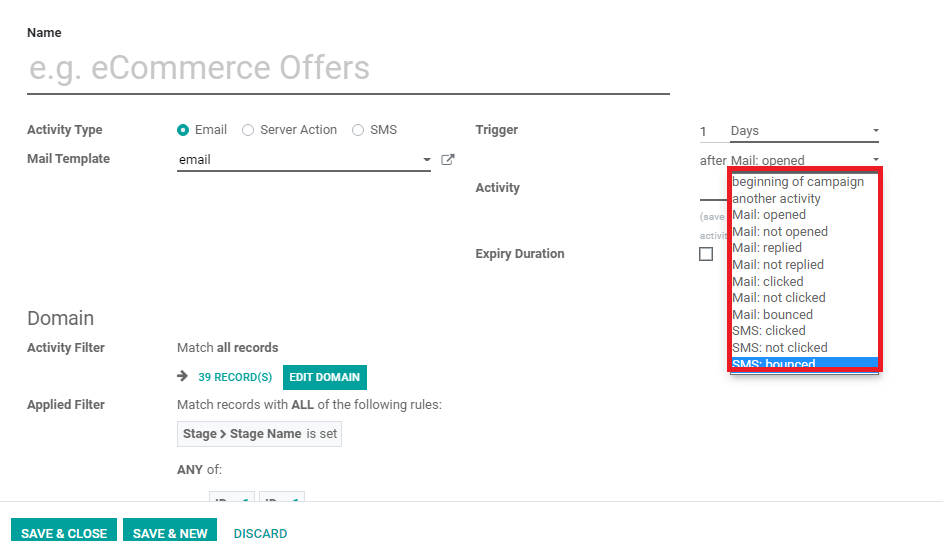
Then you can mention the Activity. Next, you can view the option Expiry Duration. You can activate the option to make sure your actions are not executed after a specific amount of time. If you set a time duration, the activity will cancel after the scheduled time.
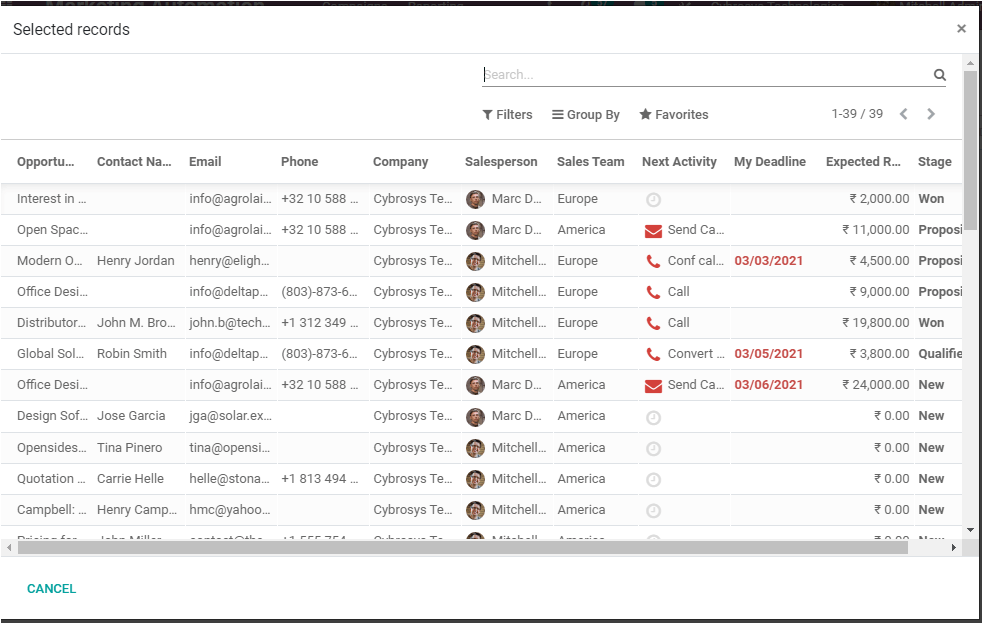
Under the Domain section, you have the option ActivityFilter and you can apply the filter for the specific activity. You can edit the domain using the EDIT DOMAIN option available. On selecting the Record, you can view the selected records.
In addition, the AppliedFilter option will allow you to match records with all of the given (applied)rules. So the activity can only be performed if the record satisfies this domain. Then you can click on the SAVE & CLOSE button to save the created activity. On the other hand, the SAVE & NEW button allows you to create multiple activities. Now you can view the workflow of your activity in the campaign window.
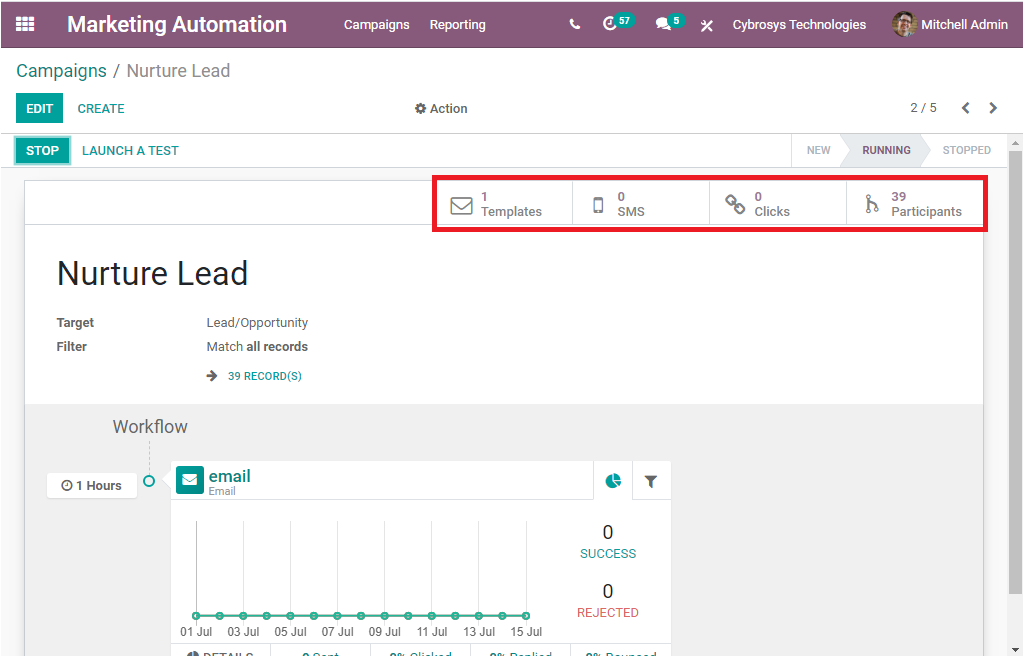
With this representation you will be easily able to see how the workflow has been built and the details of each activity. If we need to set more activities for our campaign, we can configure it by selecting the ADD NEW ACTIVITY button available. Again you can save the Campaign by clicking on the SAVE button available. Then you can click the START button for running the campaign. Now the status of the campaign is changed from NEW to RUNNING. Whenever you want to stop the marketing campaign, you can click on the STOP button available.
In the Workflow, you have so many options such as Filter, and the buttons Sent, Clicked, Replied, Bounced. These buttons allow you to view the participant of the campaign whom the mails send and not bounced, participants who clicked emails, participants who replied to emails, and the mails bounced. And the graph will show the successes and rejected counts.
Additionally, you can view some other smart buttons on the top right side of the window. Which are Participants, Clicks, SMS, and templates as highlighted in the below image.
If you click on the participant's button, you will be directed to a new window where you can view all the participants of the campaign. The image of the window is depicted below.
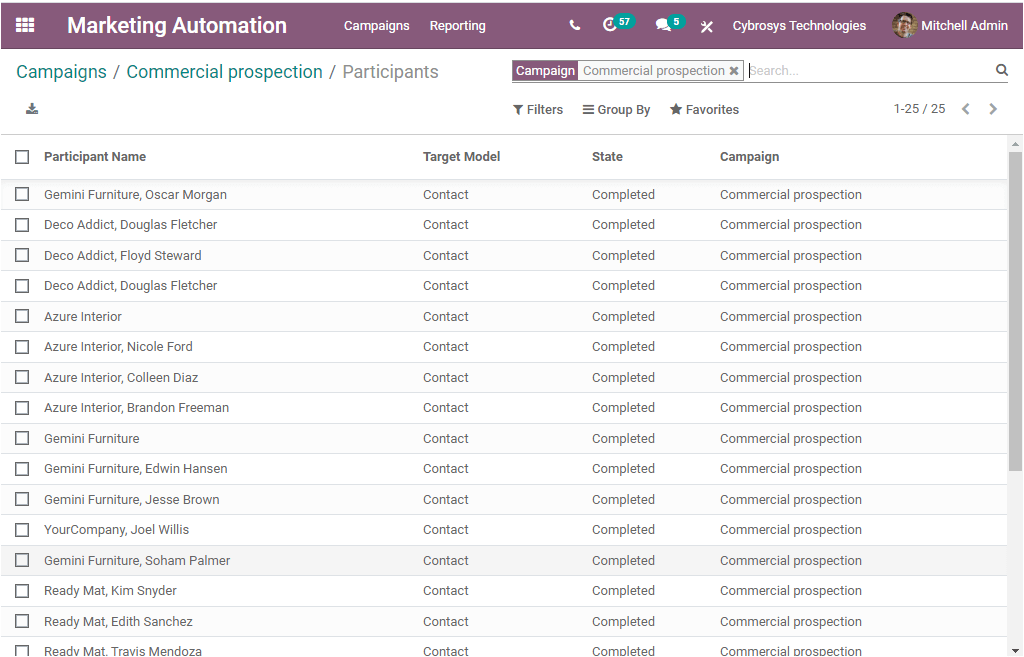
This window will list out all the Participants’ Names along with the Target Model, Status, and the details of the associated Campaign. Now let us click on one of the listed participants to view the details. We can click on the first participant named, Gemini Furniture, Oscar Morgan. Then you will be navigated to the window as shown in the below image.
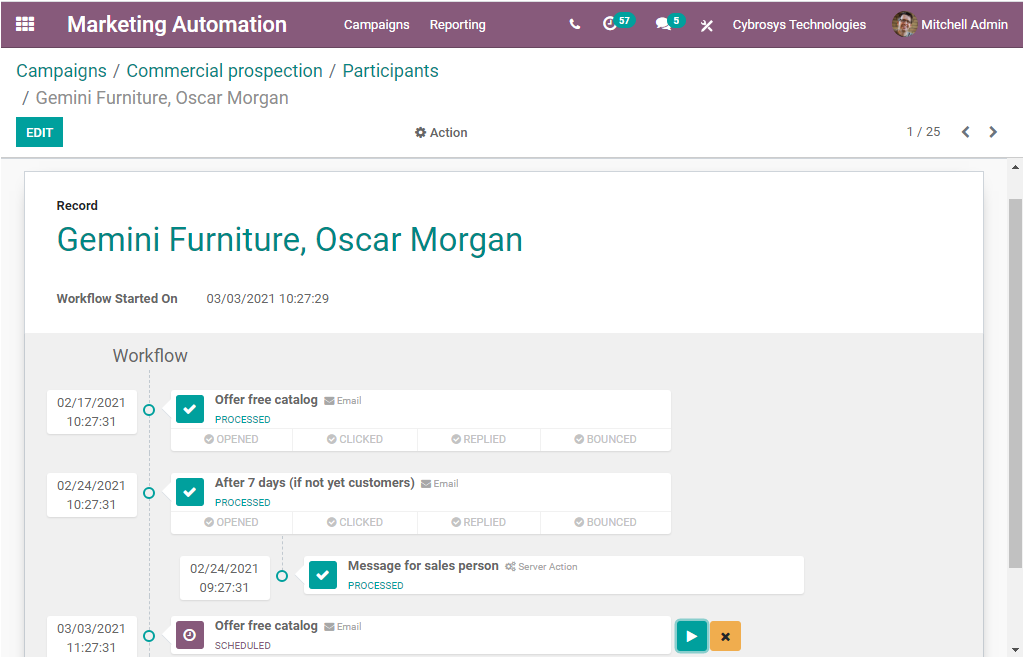
Here in this participants details window, you can view the activities which are configured for participants. The workflow starts time and each of the activities along with the time and date can be viewed. This window describes not only the activities done for the participant but also the scheduled activities for the participants. We can also run the activities manually for the participant by clicking on the Run button available. The Run button is highlighted in the below image.
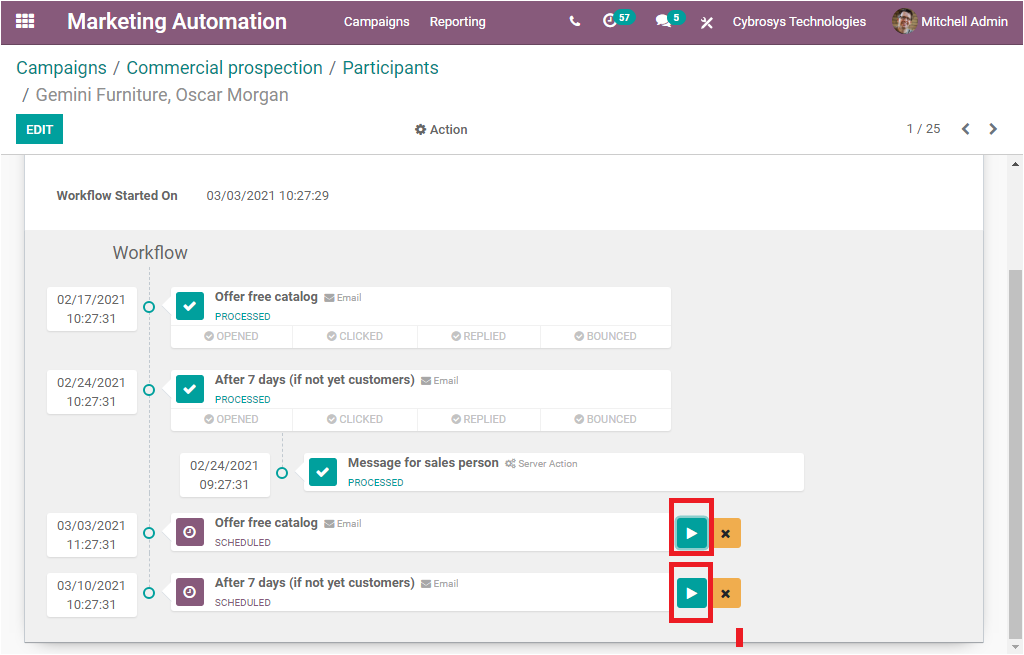
It is also possible to cancel the activity by selecting the Cancel icon available next to the Run button.
Back to the Campaign creation window, now let us click on another smart tab, Templates are available next to the Participants tab. On selecting this button, you will be directed to another window where you can view all the Marketing automation mailings window and you can view the image of the window below.
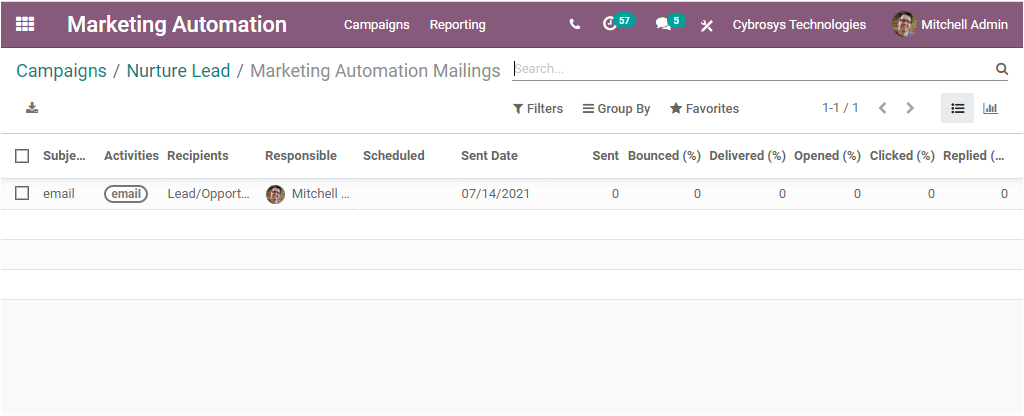
This is the List view of the window and you can also view the data in the window in graphical representation. In this window, you can view all the mailings along with the details of the Subject, Activities, Recipients, Responsible, Scheduled, Sent Date, Sent Bounced, Delivered, Opened, Clicked, and Replied.
In conclusion, we have discussed all the important steps and features for creating and designing engaging campaigns using the exclusive Odoo 14 Marketing Automation module.