Odoo’s Point of Sale (POS) system provides a highly dynamic and interactive UI, which can be easily customized to fit specific business needs. One of the key areas for enhancement is the POS product screen, where you might want to add new buttons to trigger custom logic such as opening popups, applying promotions, or executing API calls.
In this blog post, we’ll walk through a practical example where we add a custom control button to the product screen of the POS interface. When clicked, this button will open a simple confirmation dialog with a message of our choice.
Step 1: Extending the POS ControlButtons Component
Odoo’s frontend architecture is built using the Owl framework, and most of the POS UI elements are implemented as Owl components. The ControlButtons component is responsible for rendering the set of control buttons in the product screen. To customize this area, we can “patch” the component using Odoo’s utility function called patch.
In our custom module, we start by creating a new JavaScript file, for example, custom_button.js. Within this file, we import necessary tools such as _t for translations, ConfirmationDialog for the popup, and the ControlButtons component itself. Then, using the patch function, we extend the component by adding our custom method onClickMessage.
Here’s how the code looks:
/** @odoo-module */
import { _t } from "@web/core/l10n/translation";
import { ConfirmationDialog } from "@web/core/confirmation_dialog/confirmation_dialog";
import { patch } from "@web/core/utils/patch";
import { ControlButtons } from "@point_of_sale/app/screens/product_screen/control_buttons/control_buttons";
patch(ControlButtons.prototype, {
    onClickMessage() {
        this.dialog.add(ConfirmationDialog, {
            body: _t("Your custom Message is here"),
            confirmLabel: _t("Confirm"),
        });
    },
});
This patch introduces a new method called onClickMessage, which will be invoked when our custom button is clicked. It simply adds a confirmation dialog using Odoo’s native ConfirmationDialog component. The _t() function ensures that our message is translatable.
Step 2: Inserting the Button into the POS UI
After adding the logic, the next step is to insert the actual button into the interface. For this, we make use of Odoo’s QWeb templating system.
We create a new XML file, say custom_button.xml, under the static/src/xml directory. In this file, we extend the existing point_of_sale.ControlButtons template using t-inherit and t-inherit-mode="extension". We locate the position where existing buttons like the Orderline Note button are rendered and insert our button just after it.
Here's the XML code:
<?xml version="1.0" encoding="UTF-8"?>
<templates id="template" xml:space="preserve">
    <t t-name="pos_sale.ControlButtons"
       t-inherit="point_of_sale.ControlButtons" t-inherit-mode="extension">
        <xpath expr="//t[@t-if='props.showRemainingButtons']/div/OrderlineNoteButton"
               position="after">
            <button t-att-class="buttonClass"
                    t-on-click="() => this.onClickMessage()">
                <i class="fa fa-link me-1" role="img"
                   aria-label="Set Custom Message" title="Set Custom Message"/>
                Custom Control Button
            </button>
        </xpath>
    </t>
</templates>
In this template, we add a <button> element with a click event bound to the onClickMessage method we defined earlier. We use FontAwesome’s fa-link icon to visually distinguish the button and give it an appropriate label.
Step 3: Declaring Assets in the Manifest
Now that both the logic and template are ready, we need to make sure that Odoo knows about them and includes them in the POS assets bundle. This is done by adding entries in the module’s __manifest__.py file.
Within the assets section, we include both the JS and XML files under the 'point_of_sale._assets_pos' key like so:
'assets': {
    'point_of_sale._assets_pos':
[
        'your_module_name/static/src/js/custom_button.js',
        'your_module_name/static/src/xml/custom_button.xml',
    ],
},
Once everything is set up, launch your POS session and navigate to the product screen. You should now see a new button labeled “Custom Control Button” next to the other control buttons, like the discount and note buttons.
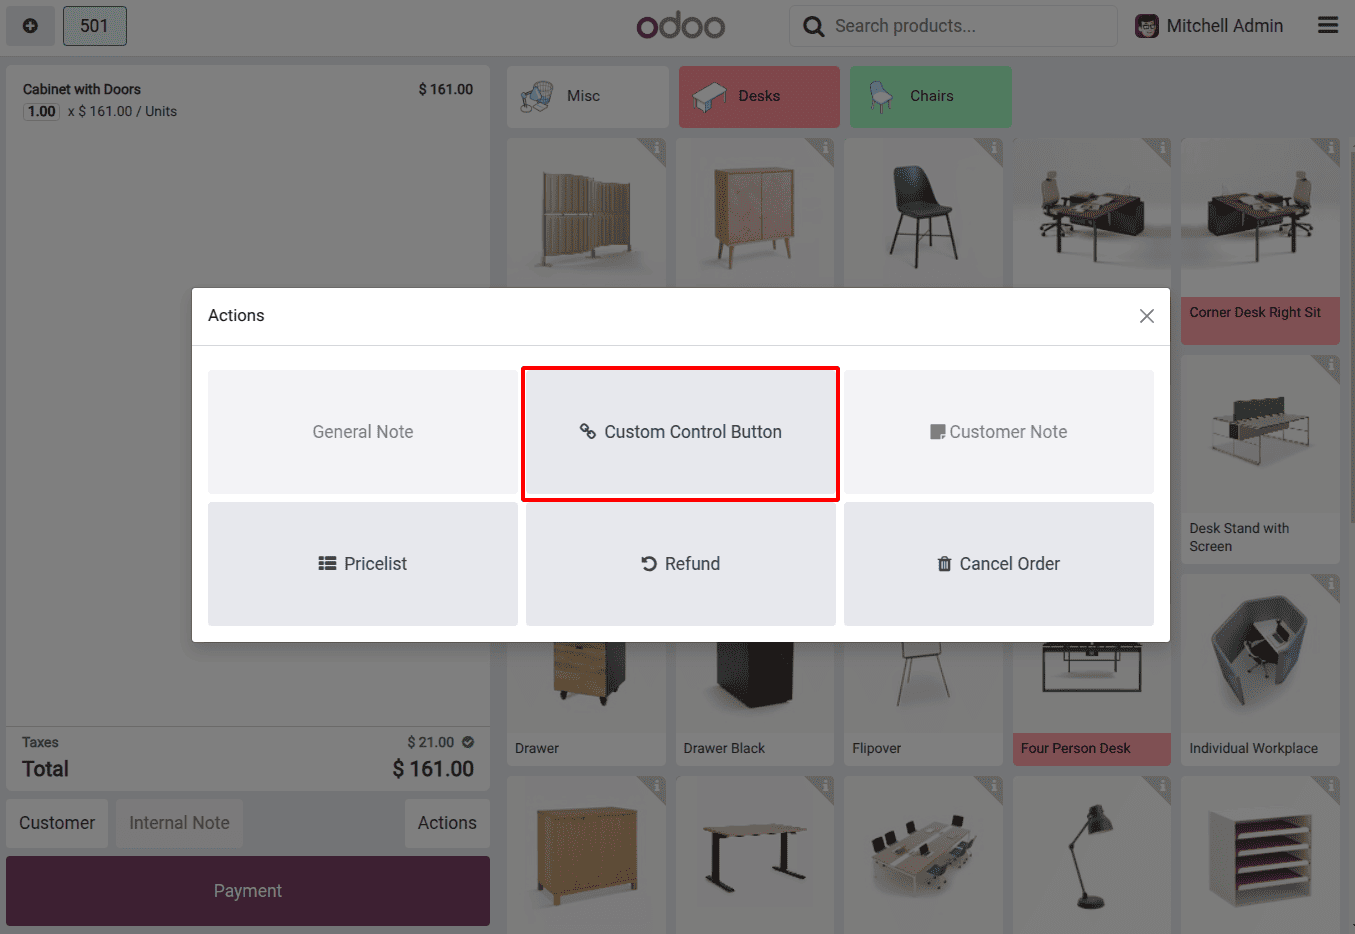
Clicking it will trigger a neat pop-up with your custom message.
This approach not only shows how to add a static popup, but also serves as a foundation for more dynamic interactions — such as triggering an RPC call, applying business logic, or capturing user input through custom dialogs.
Customizing the POS interface in Odoo is not only powerful but also fairly straightforward once you understand the Owl component structure and templating system. In this tutorial, we added a simple custom button that opens a confirmation dialog, which can now be extended further to suit any business requirement.
To read more about How to Modify/Create Control Buttons in Odoo 17 POS, refer to our blog How to Modify/Create Control Buttons in Odoo 17 POS.