Email is a crucial tool for corporate communication, playing an integral role in various aspects of modern business operations. It serves as the primary channel for exchanging information both within the organization and with external parties. Email enables seamless communication with colleagues, clients, and partners, allowing users to share messages and documents efficiently. Additionally, it maintains a written record of conversations, ensuring accountability and reference. Beyond these examples, email remains a flexible and indispensable medium for communication in both personal and professional contexts, offering a dependable method for written interaction in today’s digital world.
Odoo 18 includes an enhanced email feature across all modules, facilitating seamless communication with clients, suppliers, employees, and other stakeholders. This functionality is highly customizable, allowing users to tailor the email-sending options in Odoo 18 to meet specific business requirements.
This blog will discuss how to create an email template in Odoo 18 and send emails with the click of a button.
First, let’s create an email template.
<?xml version="1.0" encoding="utf-8" ?>
<odoo>
   <data>
       <record id="email_template_name" model="mail.template">
           <field name="name">Email Template Name</field>
           <field name="model_id" ref="custom_calendar.model_student_student"/>
           <field name="subject">Testing Email Template "{{ object.name }}"</field>
           <field name="email_to">{{ object.user_id.email}}</field>
           <field name="body_html" type="html">
               <div style="margin: 0px; padding: 0px;">
                   <p style="margin: 0px; padding: 0px; font-size: 13px;">
                       Hello<span style="font-weight: bold;" t-out="object.user_id.name"/>,
                       <br/>
                       <br/>
                       This is the first mail for you.
                   </p>
               </div>
           </field>
           <field name="lang">{{ object.user_id.partner_id.lang or object.user_id.lang }}</field>
           <field name="auto_delete" eval="True"/>
       </record>
   </data>
</odoo>
The email template must include the email_from and email_to fields, which specify the sender and recipient email addresses. These fields are mandatory. If the email_from and email_to fields are not defined in the template, we must provide their values through the email_values dictionary in the code.
<field name="email_to" >{{ object.user_id.email}}</field>A subject can be specified in the subject field.
<field name="subject">Testing Email Template "{{ object.name }}"</field>The body content for the mail can be included in the body_html field.
<field name="body_html" type="html">
   <p>Email Body</p>
</field>
Sent Email by button click:
Now, let's look at how to send an email using code by clicking a button. For that, first, we need to create a button and add it to the header of the form view of the given model. Then, we need to create a Python method for the button. The code for this is shown below.
<?xml version="1.0" encoding="utf-8" ?>
<odoo>
   <data>
       <record id="student_view_form" model="ir.ui.view">
           <field name="model">student.student</field>
           <field name="arch" type="xml">
               <form>
                   <header>
                       <button name="action_send_mail" type="object"
                               string="Send Email"/>
                   </header>
                   <sheet>
                       <group>
                           <group>
                               <field name="user_id"/>
                               <field name="dob"/>
                               <field name="class_no"/>
                           </group>
                           <group>
                               <field name="division"/>
                               <field name="start_date"/>
                               <field name="end_date"/>
                               <field name="company_id" invisible="1"/>
                           </group>
                       </group>
                   </sheet>
                   <chatter/>
               </form>
           </field>
       </record>
   </data>
</odoo>
In the above code, we added a “Send Email” button to the <header> of the form view of the student. student model.
The corresponding action method “action_send_mail” must be defined in a Python file.
def action_send_mail(self):
   template = self.env.ref(“module_name.email_template_name”)
   email_values = {'email_from': self.env.user.email}
   template.send_mail(self.id, force_send=True, email_values=email_values)
1. template = self.env.ref(“module_name.email_template_name”):
* This line is fetching a pre-defined email template from the Odoo. The template is identified by the XML ID 'module_name.email_template_name'.
* email_values = {'email_from': self.env.user.email}:
This creates a dictionary that holds the email values to be used in the email. The key 'email_from' sets the sender's email address and the value self.env.user.email gets the email address of the currently logged-in user (the person sending the email).
2. template.send_mail(self.id, force_send=True, email_values=email_values):
* This line triggers the sending of the email.
* self.id: This is the ID of the record associated with the email. The template can be customized to include information related to this record.
* force_send=True: This ensures the email is sent immediately, without being queued.
* email_values=email_values: This passes the sender's email address (email_from) to the template.
So, this is how we create a simple email template and send an email using a button click in Odoo 18.
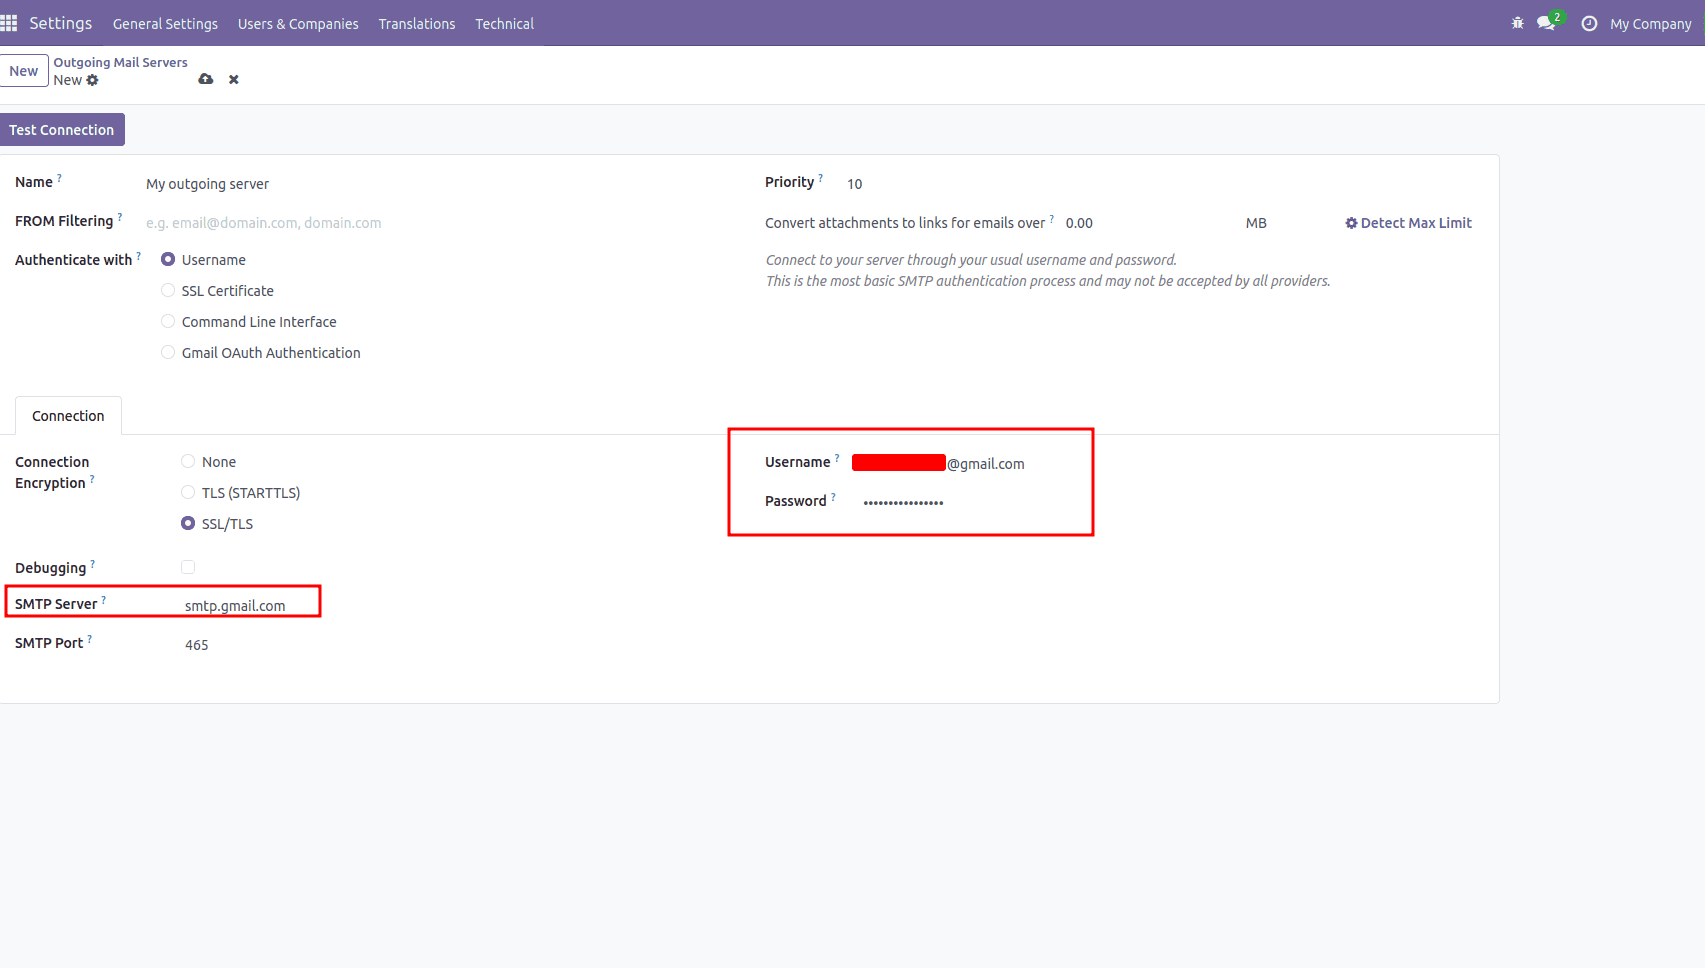
However, before you can send emails, you need to set up an outgoing mail server in Odoo. This can be done by going to the 'Settings' menu, then selecting 'Email' and 'Outgoing Mail Servers.' Here, you can configure your SMTP server details (like your email provider's settings) to enable Odoo to send emails from your account." Check the following images for the same.

If you want to schedule the email to be sent at a specific time or based on particular conditions, you can make use of Odoo's scheduled actions or other triggers.
That's all! By following these steps, you can send emails through your custom code in Odoo 18. Be sure to adjust the code according to your specific requirements and modify the email content as needed.
To read more about How to Send Email From Code in Odoo 17, refer to our blog How to Send Email From Code in Odoo 17.