Odoo’s modular architecture allows developers to extend its functionality by building custom modules. In this blog post, we’ll create a Newsletter Subscription Module from scratch in Odoo 18. We’ll cover module structure, model creation, view design, security rules, and installation. By the end, you’ll have a working newsletter system with subscriber management, categories, and email validation.
Step 1: Setting Up the Module Structure
Every Odoo module follows a standard directory structure. Our custom_newsletter module includes:
* __init__.py – Marks the folder as a Python package.
* __manifest__.py – Contains module metadata (name, version, dependencies).
* models/ – Holds Python files defining database models.
* views/ – Contains XML files for user interfaces.
* security/ – Defines access permissions.
* data/ – Stores default or demo data.
This structure ensures Odoo recognizes the module and loads its components correctly.
Module-level __init__.py
# -*- coding: utf-8 -*-
from . import models
Models directory __init__.py
# -*- coding: utf-8 -*-
from . import newsletter_subscription
from . import newsletter_category
These initialization files serve two crucial purposes:
1. Module Initialization: The root __init__.py tells Python this directory should be treated as a package and imports all models.
2. Model Registration: The models directory __init__.py explicitly imports each model file, ensuring Odoo loads them when the module is installed.
Without these files, Odoo wouldn't recognize your Python models, and the module would fail to install properly. The UTF-8 encoding declaration ensures proper handling of special characters in your code.
Step 2: Configuring the Manifest File
The __manifest__.py file describes the module’s properties:
{
    'name': 'Custom Newsletter',
    'version': '18.0.1.0.0',
    'summary': 'Newsletter Subscription Management System',
    'description': """
        Comprehensive newsletter management module for Odoo 18
        =====================================================
        Features:
        - Subscriber management with email validation
        - Category organization
    """,
    'author': 'Your Name',
    'website': 'https://www.yourwebsite.com',
    'category': 'Marketing/Email Marketing',
    'depends': ['base', 'mail'],
    'data': [
        'security/ir.model.access.csv',
        'views/newsletter_views.xml',
    ],
    'demo': [],
    'installable': True,
    'application': True,
    'license': 'LGPL-3',
}
This file declares the module’s name, version, and dependencies (base and mail for email features). The data key lists files to load, such as security rules and views. Setting application=True makes the module appear in Odoo’s Apps menu.
Step 3: Creating the Models
1. Subscriber Model (newsletter_subscription.py)
This file defines the newsletter.subscription model, which stores subscriber details:
from odoo import models, fields, api, _
from odoo.exceptions import ValidationError
import re

class NewsletterSubscription(models.Model):
   _name = 'newsletter.subscription'
   _description = 'Newsletter Subscription'
   _inherit = ['mail.thread',
               'mail.activity.mixin']  # For chatter and activities
   name = fields.Char(string='Subscriber Name', required=True, tracking=True)
   email = fields.Char(string='Email', required=True, tracking=True)
   is_active = fields.Boolean(string='Active', default=True, tracking=True)
   subscription_date = fields.Datetime(string='Subscription Date',
                                       default=fields.Datetime.now)
   category_id = fields.Many2one('newsletter.category', string='Category')
   source = fields.Selection([
       ('website', 'Website'),
       ('manual', 'Manual Entry'),
       ('event', 'Event'),
       ('other', 'Other')
   ], string='Source', default='website')
   # SQL constraints for data integrity
   _sql_constraints = [
       ('email_unique', 'UNIQUE(email)', 'Email address must be unique!'),
   ]
   # Python constraints
   @api.constrains('email')
   def _check_email(self):
       for record in self:
           if not re.match(r'^[\w\.-]+@[\w\.-]+\.\w+$', record.email):
               raise ValidationError(_('Please enter a valid email address'))
   # Custom methods
   def action_activate(self):
       self.write({'is_active': True})
   def action_deactivate(self):
       self.write({'is_active': False})
The model includes fields for the subscriber’s name, email, status, and subscription date. The _sql_constraints ensure email uniqueness, while _inherit = ['mail.thread'] enables Odoo’s built-in messaging features.
2. Category Model (newsletter_category.py)
This model organizes subscribers into categories:
from odoo import models, fields, api, _
class NewsletterCategory(models.Model):
   _name = 'newsletter.category'
   _description = 'Newsletter Category'
   name = fields.Char(string='Name', required=True)
   code = fields.Char(string='Code')
   subscription_ids = fields.One2many('newsletter.subscription',
                                      'category_id', string='Subscriptions')
   subscriber_count = fields.Integer(string='Subscriber Count',
                                     compute='_compute_subscriber_count')
   @api.depends('subscription_ids')
   def _compute_subscriber_count(self):
       for category in self:
           category.subscriber_count = len(category.subscription_ids)
The One2many field links categories to subscribers, allowing one category to have multiple subscriptions.
Step 4: Designing the User Interface
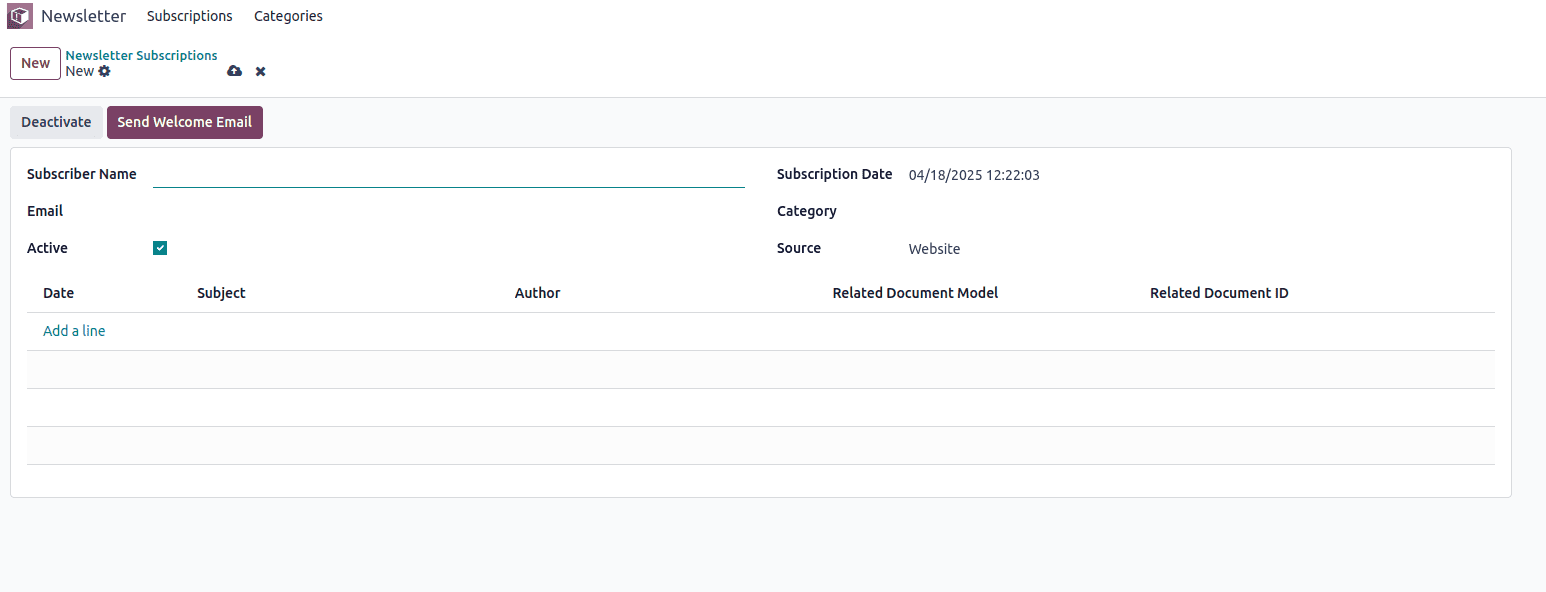
1. List and Form Views (newsletter_views.xml)
The XML file defines how data is displayed:
<?xml version="1.0" encoding="utf-8"?>
<odoo>
    <data>
<!-- Tree View for Subscriptions -->
<record id="view_newsletter_subscription_tree" model="ir.ui.view">
   <field name="name">newsletter.subscription.tree</field>
   <field name="model">newsletter.subscription</field>
   <field name="arch" type="xml">
       <list>
           <field name="name"/>
           <field name="email"/>
           <field name="is_active" widget="boolean_button"/>
           <field name="subscription_date"/>
           <field name="category_id"/>
       </list>
   </field>
</record>
<!-- Form View for Subscriptions -->
<record id="view_newsletter_subscription_form" model="ir.ui.view">
   <field name="name">newsletter.subscription.form</field>
   <field name="model">newsletter.subscription</field>
   <field name="arch" type="xml">
       <form>
           <header>
               <button name="action_activate" string="Activate" type="object" class="oe_highlight" invisible="is_active == True"/>
               <button name="action_deactivate" string="Deactivate"
                       type="object" invisible="is_active == False"/>
           </header>
           <sheet>
               <group>
                   <group>
                       <field name="name"/>
                       <field name="email"/>
                       <field name="is_active"/>
                   </group>
                   <group>
                       <field name="subscription_date"/>
                       <field name="category_id"/>
                       <field name="source"/>
                   </group>
               </group>
               <div class="oe_chatter">
                   <field name="message_ids" widget="mail_thread"/>
               </div>
           </sheet>
       </form>
   </field>
</record>
<!-- Action and Menu Items -->
<record id="action_newsletter_subscription" model="ir.actions.act_window">
   <field name="name">Newsletter Subscriptions</field>
   <field name="res_model">newsletter.subscription</field>
   <field name="view_mode">list,form</field>
</record>
<menuitem id="menu_newsletter_root" name="Newsletter"/>
<menuitem id="menu_newsletter_subscriptions" name="Subscriptions" parent="menu_newsletter_root" action="action_newsletter_subscription"/>
<!-- Category Views -->
<record id="view_newsletter_category_tree" model="ir.ui.view">
   <field name="name">newsletter.category.tree</field>
   <field name="model">newsletter.category</field>
   <field name="arch" type="xml">
       <list>
           <field name="name"/>
           <field name="code"/>
           <field name="subscriber_count"/>
       </list>
   </field>
</record>
<record id="view_newsletter_category_form" model="ir.ui.view">
   <field name="name">newsletter.category.form</field>
   <field name="model">newsletter.category</field>
   <field name="arch" type="xml">
       <form>
           <sheet>
               <group>
                   <field name="name"/>
                   <field name="code"/>
                   <field name="subscriber_count"/>
               </group>
               <field name="subscription_ids">
                   <list>
                       <field name="name"/>
                       <field name="email"/>
                       <field name="subscription_date"/>
                   </list>
               </field>
           </sheet>
       </form>
   </field>
</record>
   </data>
</odoo>
The <list> view displays subscribers in a list, while the <form> view provides a detailed interface. The widget="boolean_button" adds a toggle for the is_active field.
2. Menu and Actions
This section adds navigation entries:
<?xml version="1.0" encoding="utf-8"?>
<odoo>
    <data>
<!-- Action and Menu Items -->
<record id="action_newsletter_subscription" model="ir.actions.act_window">
   <field name="name">Newsletter Subscriptions</field>
   <field name="res_model">newsletter.subscription</field>
   <field name="view_mode">list,form</field>
</record>
<menuitem id="menu_newsletter_root" name="Newsletter"/>
<menuitem id="menu_newsletter_subscriptions" name="Subscriptions" parent="menu_newsletter_root" action="action_newsletter_subscription"/>
<record id="action_newsletter_category" model="ir.actions.act_window">
   <field name="name">Newsletter Categories</field>
   <field name="res_model">newsletter.category</field>
   <field name="view_mode">list,form</field>
</record>
<menuitem id="menu_newsletter_categories" name="Categories" parent="menu_newsletter_root" action="action_newsletter_category"/>
   </data>
</odoo>
The <menuitem> creates a sidebar entry, and the <action> opens the subscription list when clicked.
Step 5: Setting Up Security Rules
The ir.model.access.csv file controls user permissions:
id,name,model_id:id,group_id:id,perm_read,perm_write,perm_create,perm_unlink
access_newsletter_subscription,newsletter.subscription,model_newsletter_subscription,base.group_user,1,1,1,0
access_newsletter_category,newsletter.category,model_newsletter_category,base.group_user,1,1,1,0
This grants standard users (base.group_user) read, write, and create permissions but prevents deletion (perm_unlink=0).
Step 6: Installing the Module
1. Go to Apps ? Update Apps List.
2. Search for "Custom Newsletter" and click Install.
Once installed, you’ll see the Newsletter menu with subscriber management features.
Conclusion
In this tutorial, we built a Newsletter Subscription Module for Odoo 18, covering:
* Module structure – Organized files for models, views, and security.
* Model creation – Defined subscribers and categories with constraints.
* UI design – Created list and form views with interactive buttons.
* Security – Configured access permissions for users.
* Installation – Deployed the module in Odoo.
This module can be extended with features like email templates, analytics dashboards, or website integration. By following these steps, you’ve learned how to develop a custom Odoo module from scratch. Try enhancing it further to match your business needs!
To read more about How to Create a Module in Odoo 17, refer to our blog How to Create a Module in Odoo 17.