Effective scheduling helps you to achieve the goals and objectives of the company. It makes you understand what you can achieve with the permitted time. You can identify the available resources and time, schedule essential actions, and unexpected problems can be eliminated to an extent. You can get every employee on a synchronized track and can check the progress of the work easily. Scheduling tasks establish a routine in the organization and organizes your work.
To make a positive impact it is necessary to define the roles and responsibilities of each employee. When an employee is made aware of his contribution to the organization through his role, he/ she works harder to achieve it. As everyone knows their responsibilities they will make sure that the task is completed on time as they are accountable for it.
So it is important to create schedules and roles in the workplace. Doing these manually will make errors and there is a chance of contradictions and conflict in assigning tasks. Therefore you need proper planning management. Odoo ERP makes sure that all the planning activities are well organized and scheduled. With Odoo 14's Planning module you can do all these very easily.
Let us check how to create schedules and roles in Odoo 14 Planning Module.
Planning module
You can add the Planning module by installing them from the applications. Earlier planning was added with Project Application, and now Odoo 14 has launched a whole module for planning. By opening the planning module you can see the list of schedules already created in the database in a calendar view. You can view the shifts with measures such as Employees, Roles, and projects. The total number of shifts that occur on each day is displayed at the bottom of each date.
Creating new shift
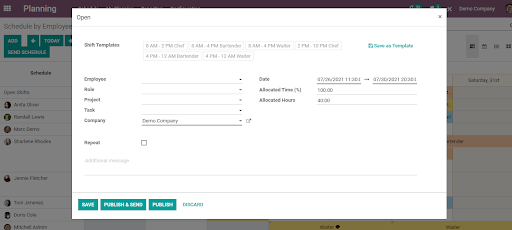
To create a new shift you can press the ADD button situated at the top left corner of the page. A form page will appear on the screen. You have to fill it with details such as:
Shift Templates - Shift templates are pre-determined shit details that include the starting hour of the shift and duration of the shift. By selecting the shift template your Allocated Time percentage and Allocated Hours will automatically be filled.
Employee - here you have to select the name of the employee from the list.
Role - while selecting the shift template the role column will also get filled, and if you haven't selected any shift template then you can choose the role of the employee.
Project - you can select the name of the project that the employee will be working under from here.
Task - you need to select the task that you want to assign to the employee. With this employees can clearly get an understanding of what their objectives are. After entering the task Initially Planned Hours and Forecast Hours of the task will be displayed. With the help of this, you can determine the time that has to be allocated to the employee in order to complete the task.
Company - at the provided space you have to enter the name of the company.
Date - here you can add the starting and ending date of the schedule with the help of a calendar. You can also select the starting time and ending time of the task.
Allocated Time percentage - if you haven't selected the shift template earlier then you can enter the allocated time percentage here.
Allocated Hours - the number of hours that the employee is granted to complete the task can be entered at this space. If you have already selected a shift template then the details of allocated hours will be displayed automatically.
Repeat - if you want the employee to repeat the same task and shift then you can check the box. You can also mention how many weeks the employee has to continue to do the same shift and till when. And if you want the employee to have the same shift forever then you can choose that option too.
Additional Message - if you have any additional message regarding the shift then you can mention it in the box provided. This will help the employee to know his objective clearly.
Save as Template - if you want the created shift to be a template and use them later then you can click on the Save as Template button.
You can save the shift by clicking on the SAVE button. To publish and send the schedule to the employees you can press the PUBLISH & SEND. To publish the schedule you can press the PUBLISH button. You view the published schedule on the dashboard.
Creating new Roles
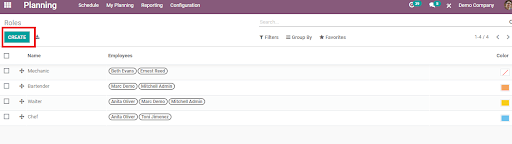
To create roles in the database, you have to press the Configuration tab and then select Roles. All the created roles with the name of the employees under each role will be displayed on the screen. To create a new role, you can click on the CREATE button. A new bar will appear at the bottom of created roles.
You will have to enter the name of the role which you are creating at this space. Then you have to select the employees which will come under the created role. You can select the employees from the drop-down menu. You can add more than one employee here. After adding the employee names you can select the preferred color for them. These colors will help you to easily understand what role they have been assigned. After completing all these procedures you can press the SAVE button and your role will be created and shown among already created roles. To eliminate or delete any role from the dashboard you can select the role from the box situated left to the role and from Actions you can click on the Delete option.
Other than creating schedules and roles, the Planning module helps you to organize and create a planning analysis of the recent schedules. You can effectively run the planning processes with help of Odoo 14's Planning module. As planning is the most integral part of the business, this module helps you to complete the targets in time.