Wizards are used to having interactive sessions with the dialogue boxes in Odoo. Mainly there are two types of wizards models available in Odoo transient and abstract.
Transient models:
It's based on the model TransientModel class. Moreover, the data stored in the database is temporary in this class which is periodically cleared data from the database table.
Abstract models:
Most of the models in Odoo are based on the Model class. Furthermore, it has permanent data persistence by which the data stored in the table created are permanent until deleted.
Data in the wizard requires only temporary storage so Odoo uses a transient model, where data is stored temporarily. Following are the characteristics of the transient model:
* Records in the wizard require only temporary storage, so they are deleted after some time from the database.
* Users have all permissions on wizard records, they don't require explicit access rights.
* Records in the wizard can refer through many2one fields or to regular records, but regular records cannot refer through many2one fields or to wizard records.
Let's check with an example:
Here I am going to define a wizard to select the multiple manufacturing orders and mark it as at done state altogether.
class MrpProductWizard(models.TransientModel):
_name = 'mrp.product.produce.wizard'
produce_line_ids = fields.One2many('mrp.product.produce.wizard.line', 'product_produce_id',
string='Product to Track')
# Method to mark the mrp orders as done
def action_done(self):
for line in self.produce_line_ids.mapped('production_id'):
line.button_mark_done()
In the above code, I define an one2many field to select the MRP orders and a method by which “Mark as done” performed on the click of a button.
class MrpProductProduceWizardLine(models.TransientModel):
_name = "mrp.product.produce.wizard.line"
_description = "Record Production Line"
product_produce_id = fields.Many2one('mrp.product.produce.wizard')
production_id = fields.Many2one('mrp.production')
product_id = fields.Many2one('product.product', 'Product')
qty = fields.Float('Quantity')
I have created another wizard for the model mrp.product.produce.wizard.line with the respective fields which is defined as a produce_line_ids field in the above wizard.
<record id="view_mrp_product_done_wizard" model="ir.ui.view">
<field name="name">mrp.product.produce.wizard.view</field>
<field name="model">mrp.product.produce.wizard</field>
<field name="type">form</field>
<field name="arch" type="xml">
<form>
<field name="produce_line_ids" widget="one2many_list">
<tree string="Mrp production lines" editable="bottom">
<field name="product_produce_id" invisible="1"/>
<field name="production_id"/>
<field name="product_id"/>
<field name="qty"/>
</tree>
</field>
<footer>
<button name="action_done" string="Confirm" type="object" class="oe_highlight"/>
<button string="Cancel" class="btn btn-default" special="cancel"/>
</footer>
</form>
</field>
</record>
Above XML code is for the view of the wizard.
As we have understood, how a wizard for the model mrp.product.produce.wizard.line with the respective fields is defined as a produce_line_ids field. Let's now move on to the next section where the wizard action is returned.
Return the wizard action
Next is to define a method which returns the action to the wizard
class MrpProduction(models.Model):
_inherit = 'mrp.production'
# Method for the wizard Mark as Done
def action_done_show_wizard(self):
production_ids = self.env['mrp.production'].browse(self._context.get('active_ids', False))
lines = []
for line in production_ids:
vals = (0, 0, {
'production_id': line.id,
'product_id': line.product_id.id,
'qty': line.product_qty
})
lines.append(vals)
return {'type': 'ir.actions.act_window',
'name': _('Mark as Done'),
'res_model': 'mrp.product.produce.wizard',
'target': 'new',
'view_id': self.env.ref('multiple_mrp_orders.view_mrp_product_done_wizard').id,
'view_mode': 'form',
'context': {'default_produce_line_ids': lines}
}
Here I append the lines which have to be displayed in the wizard and we can pass it to the context.
res_model: Model of the wizard that has to appear.
view_id: xml view of the wizard.
view_mode: wizard appears in the form view so it is form.
One can pass the values through the context to display it in the wizard.
Here I need the wizard in the action button, so I added the following code to the XML file,
<record id="mrp_production_done_action_server" model="ir.actions.server">
<field name="name">Mark as Done</field>
<field name="type">ir.actions.server</field>
<field name="model_id" ref="mrp.model_mrp_production"/>
<field name="binding_model_id" ref="mrp.model_mrp_production"/>
<field name="state">code</field>
<field name="code">
action = model.action_done_show_wizard()
</field>
</record>
One can add the wizard even in the button, for that add the method name as the button name as described in the following code:
<button name="action_done_show_wizard" string="Wizard" type="object" class="oe_highlight"/>
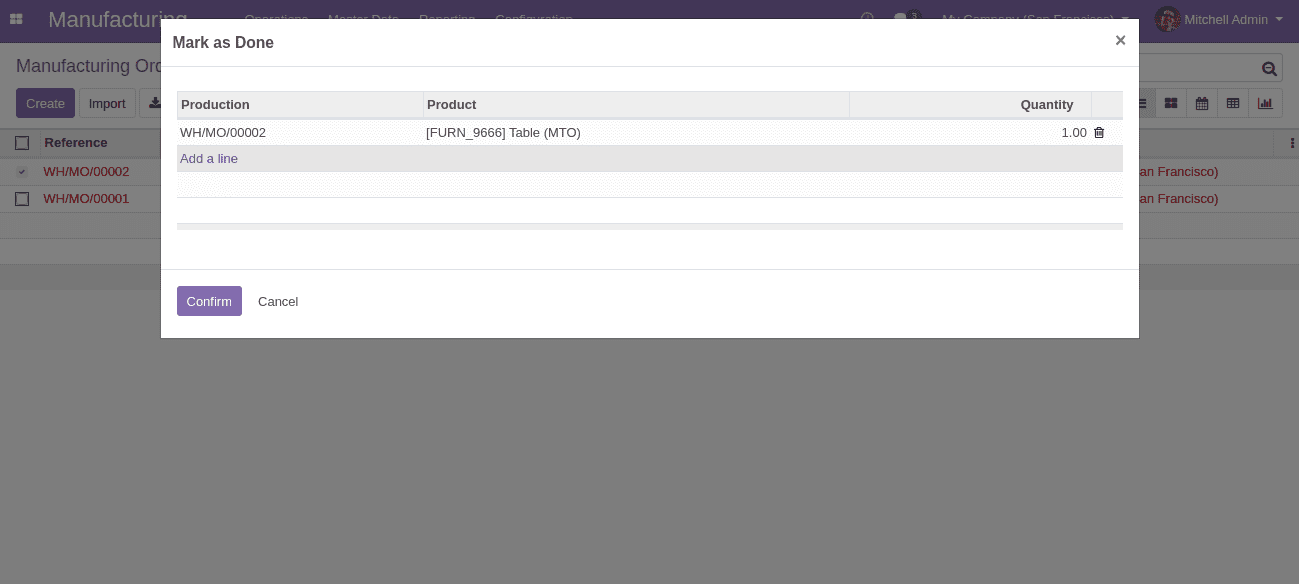
The resultant output wizard is depicted as shown in the figure below:
To perform more action on the confirm button, you can add an additional method for the button confirm. I hope that now you have an understanding on how to create a wizard in Odoo 13?