Lots and serial numbers are used to trace items from the point of manufacturing to the point of sale. They are allocated during manufacturing & occasionally added while the product is being packed. Lots are collections of numbers or codes applied to a collection of products sharing a similar attribute, whereas serial numbers are distinct numbers allocated to a particular object. The Odoo ERP Software also uses a lot and serial numbers to track product movement throughout the supply chain, helping identify product sources in case of recalls or quality issues in its Inventory Application. When items reach their expiry date, Odoo's traceability feature removes them from bulk storage, making inventory management and manufacturing more difficult for expanding enterprises. The Odoo 17 Inventory platform simplifies tasks and ensures quick completion of tasks.
The blog will guide you through the process of configuring or creating Lot Numbers and Serial Numbers inside the latest Enterprize edition of the Odoo 17 Inventory platform.
Configuring Lots, Serial Numbers, and Traceability
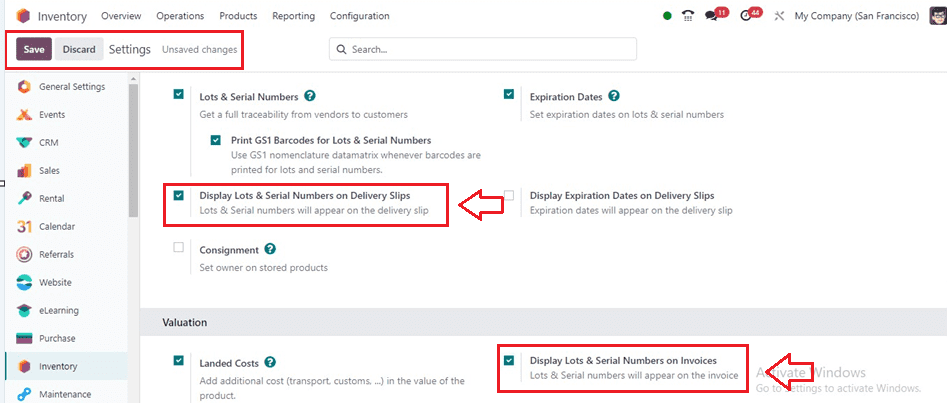
You can activate the Lots & Serial numbers inside the “Traceability” tab of the “Settings” page of the “Configuration” menu, as shown below.
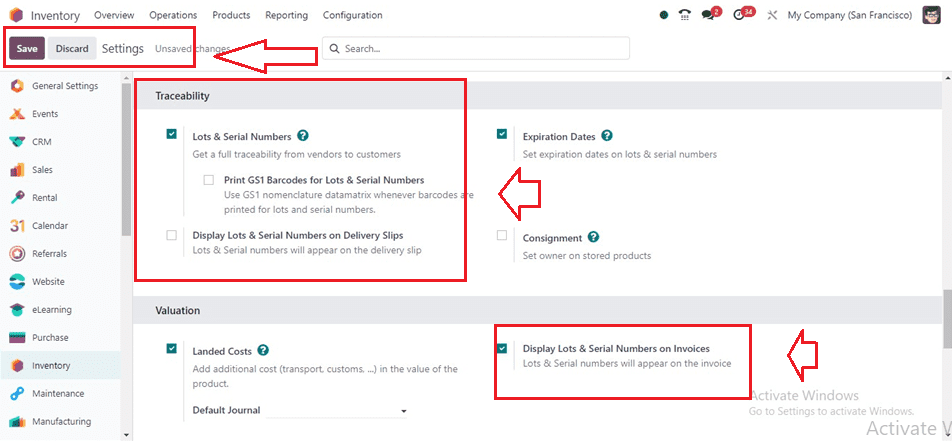
Also, enabling the “Display Lots & Serial Numbers on Invoices” option inside the “Valuation” tab will be helpful to display the product lot numbers inside any order invoices that contain this specific product.
Product Traceability Inside Product Forms
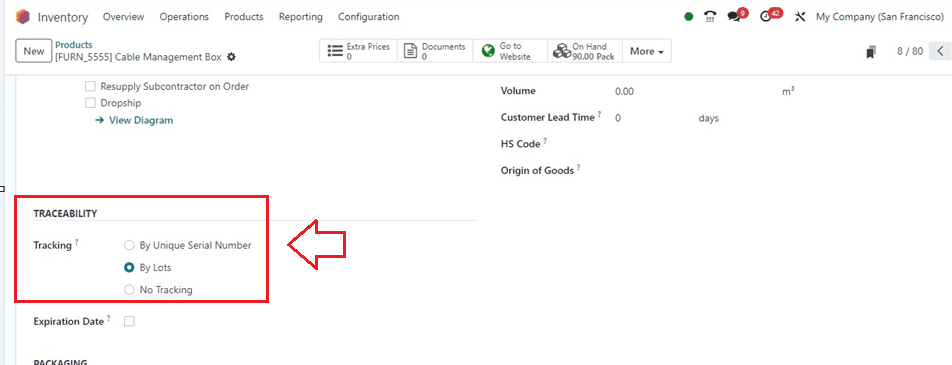
To check the traceability of the product inside forms, we can go to the “Inventory” tab section of the form view of any product. While you are configuring product data inside your inventory, the product is trackable in two different ways. Now, Let’s look at a product configuration form as shown below.
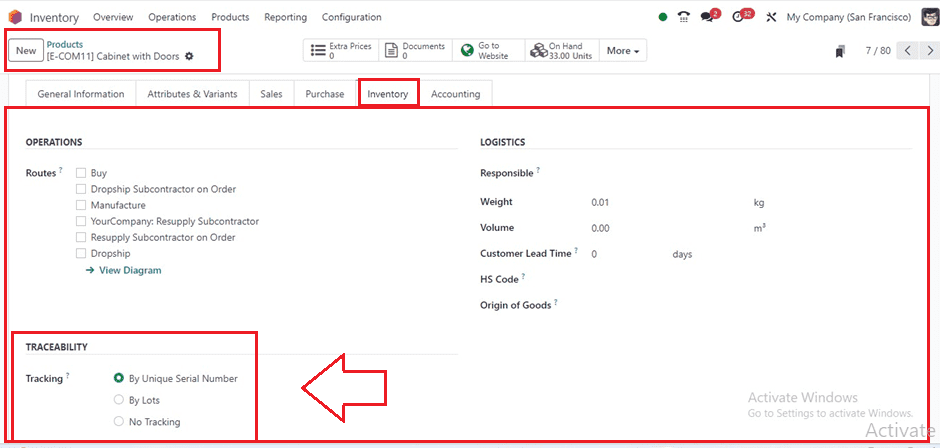
Inside the “TRACEABILITY” section of the Inventory tab, you can see various “Tracking” options such as “By Unique Serial Numbers,” “By Lots,” and “No Tracking.” Despite some differences, both function in the same way. When it comes to lots, it's the amount set aside for specific items that are purchased and kept in a single pack. On the other hand, the serial number is the special code or number needed for every single item in stock.
Operation Types and Setting Traceability
We can also set a traceability option within the operation types form. To configure various operation types, go to the “Operation Types” section of the “Configuration” menu.

Opening a new configuration form or checking the available operation type from the dashboard will give you the details of the specifics of that particular operation type.
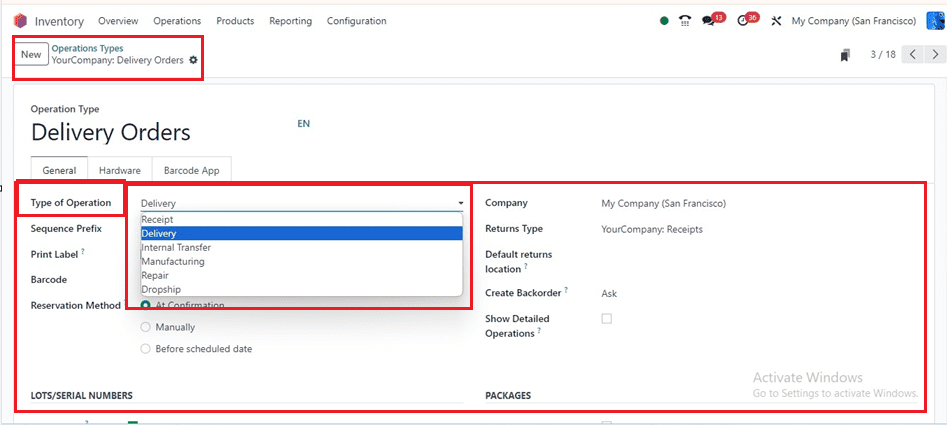
You can see the various inventory operations inside the “Type of Operations” field, including Receipt, Delivery, Internal Transfer, Manufacturing, Repair, and Dropship.
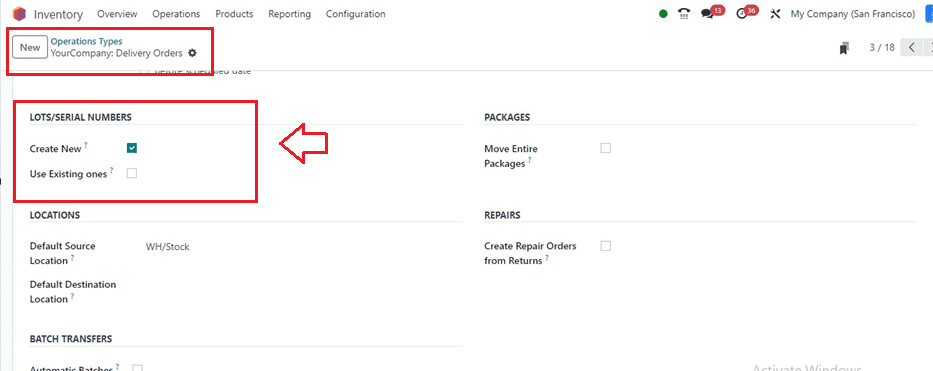
Inside the “LOTS/SERIAL NUMBERS” section, you can see two options such as "Use existing" and "Create new.” When purchasing a product, users have the option to select pre-existing lots and serial numbers or generate new ones, as depicted below.
How to track and trace a product using Serial Numbers
If a customer or vendor places a purchase order or any quotation, they can track or trace their product or order using the unique serial number that we have provided in the product’s configuration form. So we can set the “Traceability” for the product.

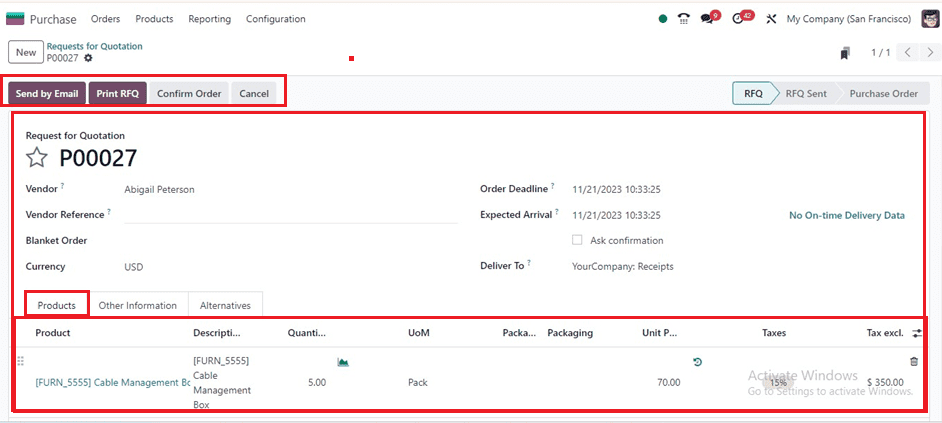
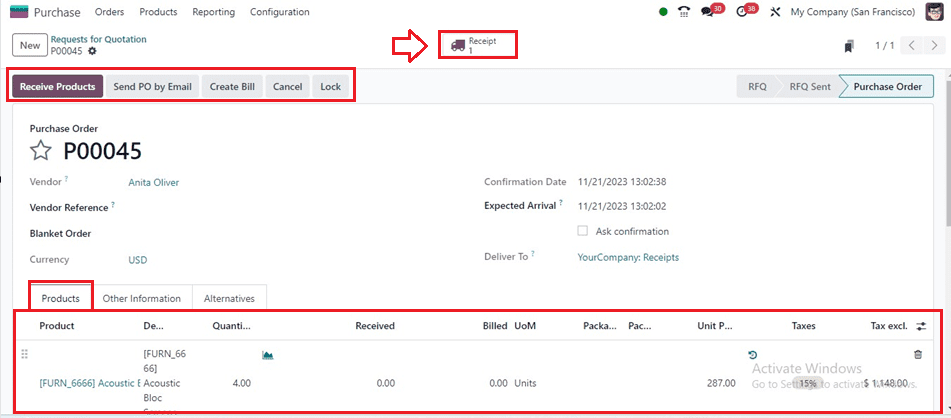
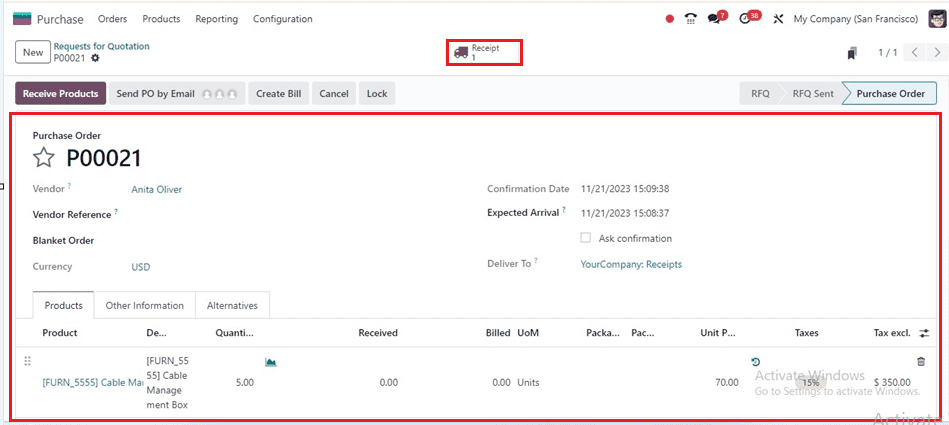
To check the tracking and traceability function, go to the “Request For Quotations” window of the Odoo 17 Purchase Module’s “Orders” menu and create a new purchase order.
Inside the displayed configuration page, provide the essential information of the purchase order, including the Vendor Name, Vendor Reference, Currency, etc. Within the "Products" tab, we have also chosen the product that we have chosen.
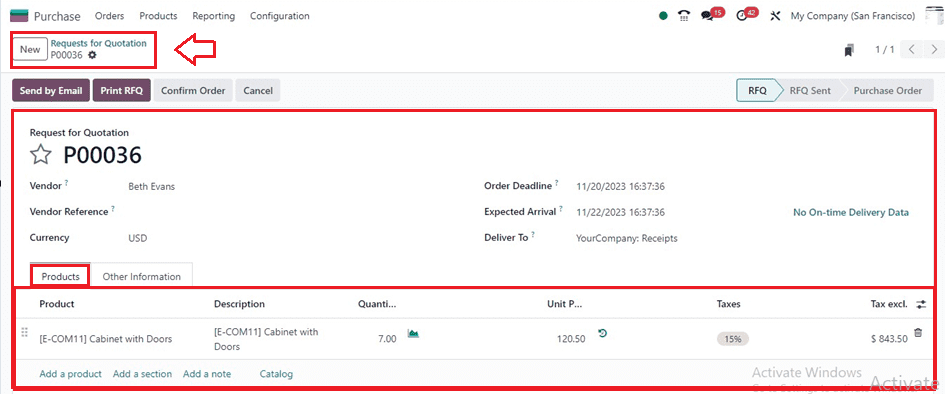
Save the form data and products. The serial number can be configured when the product is being delivered after the order has been confirmed using the "Confirm Order" button.
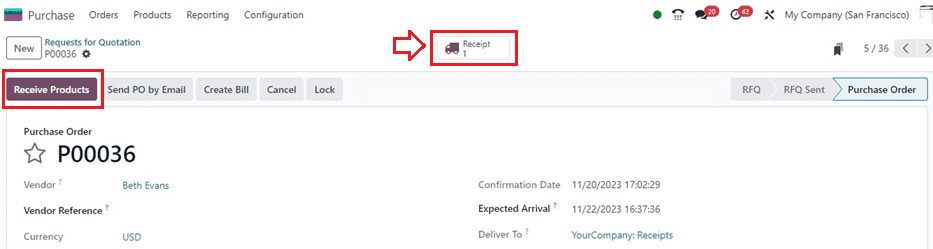
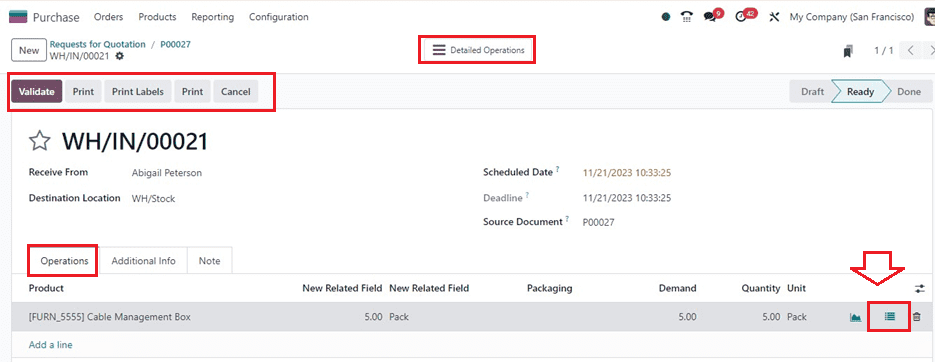
The “Receipts” smart button will give the details of the product. The admins can validate the product delivery using the “Validate” button placed in the receipts dashboard.
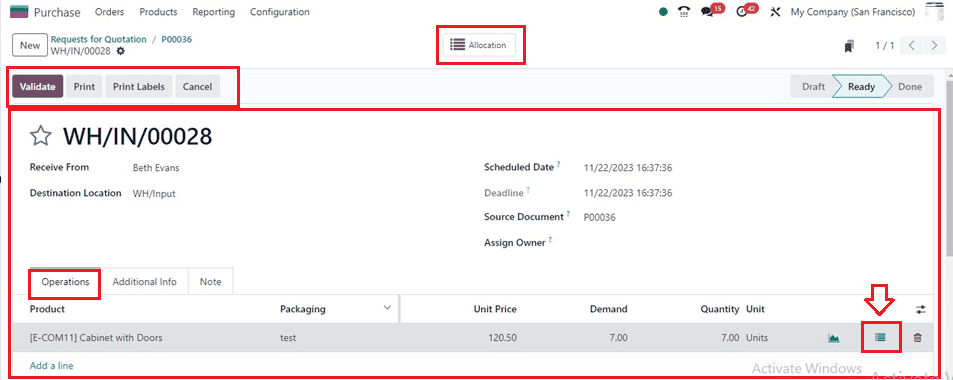
The menu icon provided inside the “Operations” tab of the Receipt form will take you to a pop-up window as depicted below. You can generate Serial Numbers or Lot Numbers for the ordered products from here.

I have entered some sample serial numbers from SN0001 to SN0007 for a sample demonstration.
Auto Generating Serial Numbers
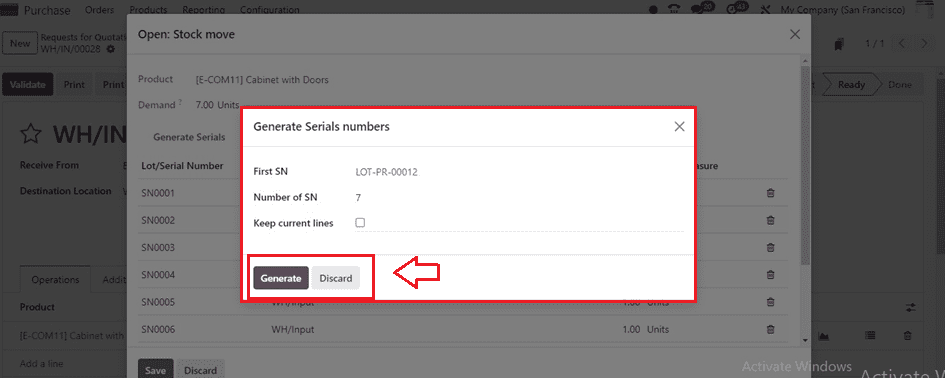
To simplify the process of assigning serial numbers to numerous products, Odoo offers an automatic solution. To use this feature, click on the “Generate Serials” button, and the serial numbers and required number of SNs will be automatically displayed. Also, you can input the product's first serial number (SN) if you want to customize the serial numbers. Then, click the “Generate” button to generate the necessary serial numbers for your products.
Then, save the serial numbers and validate the purchase order from the configuration page. Inside the receipts page, a “Traceability” smart button will appear.
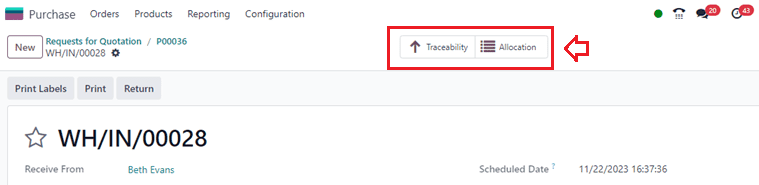
You can check the product serial numbers from this Traceability Report dashboard, as shown below.

Then, you can proceed with the purchase order as usual by validating and confirming the order.
Tracking Products with Lot Numbers
Lot numbers are unique identification codes that are assigned to products and are used to identify particular batches and track their movement through the entire supply chain. Now, we can choose or create a product with the “Traceability” as “By Lots” from the “Products” window.
After setting the TRACEABILITY function, create a purchase order with the selected product using the Purchase Module. Edit the order details, Add the Products, and confirm the order.
Confirming the order will display a “Reciept” smart button as in the above scenario, you can open the “Reciepts” dashboard and manually validate the order and products. Inside the validation form, you can use the menu found inside the “Operations” tab to generate customized Lot numbers. as shown below.
Opening the menu will display another pop-up window, the same as we discussed in the previous sequence number configuration section, as depicted below.
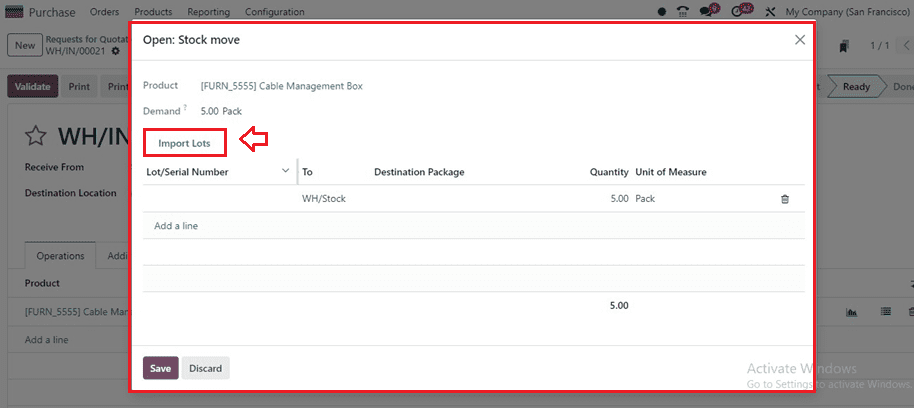
The product name and the demanded quantities will be displayed on the form. We can add the required number of LotNumbers by clicking on the “Add a line” button provided in the “Lot/Serial Number” section manually, or you can generate new lot numbers using the “Import Lots” button.
Generating Lots
Clicking the “Import Lots” button will take you to another page from where you can generate a Lot number for this whole product package.
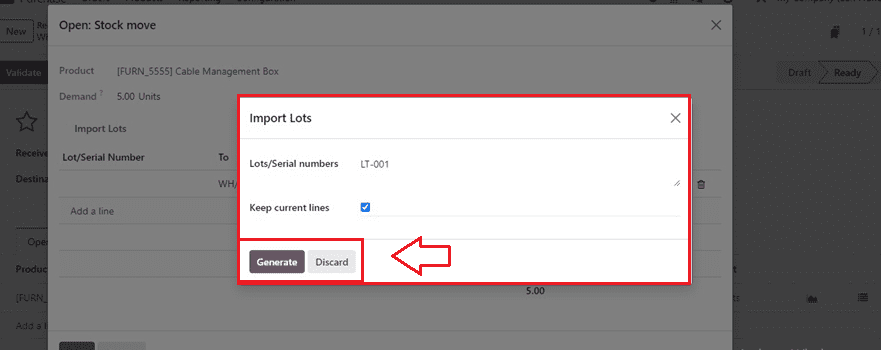
I have provided a Lot number for an easy demonstration. The Lot number LT-001 will now be the lot number assigned to these products’ five quantities. Then click on the “Generate” button to generate lot numbers.
Come back to the order configuration page, save the Lot numbers, and validate the order using the “Validate” button you can view the “Traceability” smart button from the top of the form view to check the products by their lot number inside the “Receipts” page.
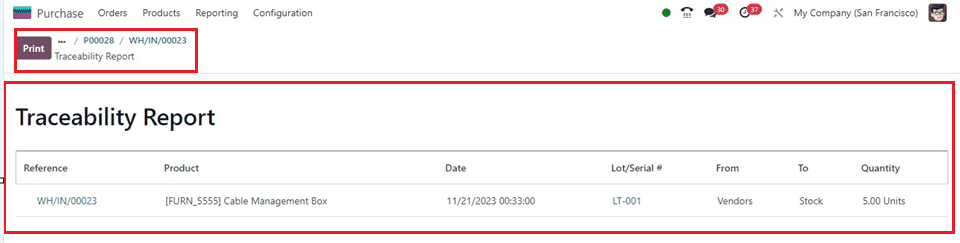
Here, I have provided the same lot number for a pack of five products, but we can also provide different lot numbers using the same method. After validating the order, you can proceed with the purchase order.
No Tracking of Products
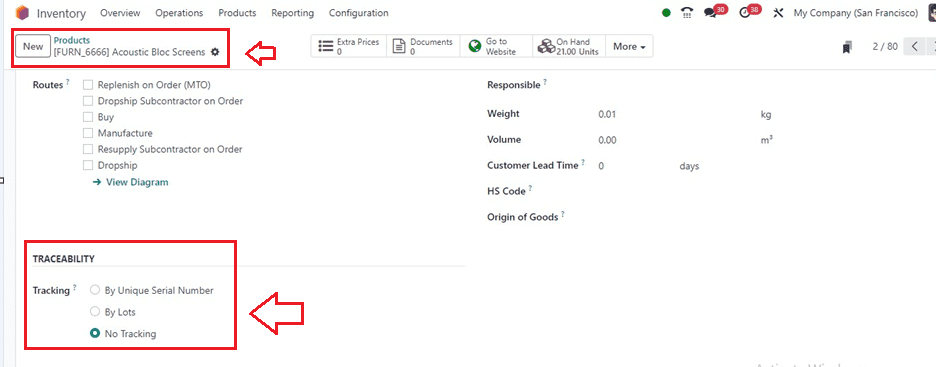
Here, we can set the “Traceability” of the product “Acoustic Block Screens” as “No Tracking” inside a product configuration form as depicted below.
Create a new purchase order with the chosen product from the Odoo 17 Purchase Module, Edit the order details, and Save and Confirm the order.
The product details are visible within the "Receipt" smartbutton. The pop-up window that we received for generating Lot/Serial Numbers in the previous scenarios, as shown below, will appear if you attempt to open the menu located within the "Operations" tab. Here, we can't produce any tracking Lots or Sequences but only set the stock move locations.
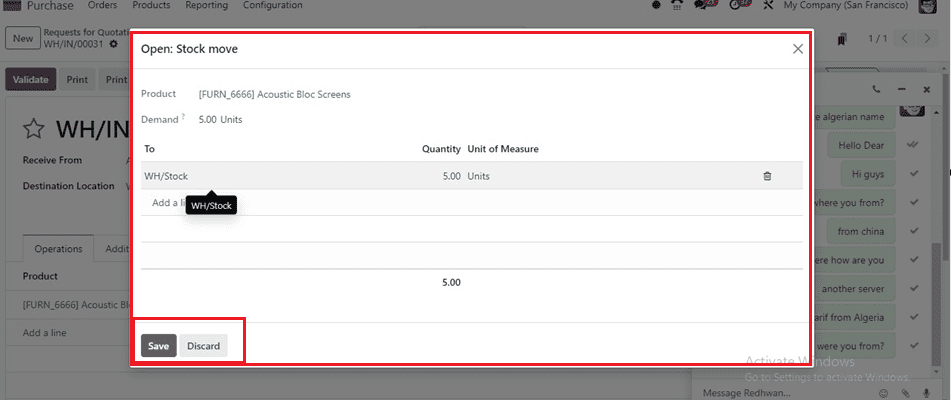
Return to the order configuration page after saving the details of the stock move. We won't receive the "Traceability" smart button and won't be able to track the products using lot or serial numbers if we validate the order.
Using Existing Lot/Serial Numbers
Here, we can check the functionality of setting “Use Existing One” in the “Lots/Serial Numbers” section of an Operation Type configuration form.
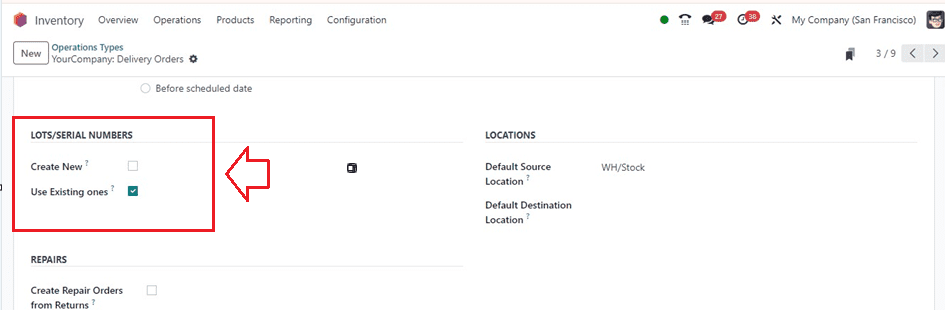
I have selected a Lots/Serial Number option for the “Delivery Orders” Operation Type. then choose a product and set its “Traceability” as “By Lots.”

Configuring Lot/Serial Numbers for Products
Odoo also provides an exclusive submenu section to create or configure Lots and Serial Numbers for products. We can use the “Lots/Serial Numbers” option from the “Product” menu for this purpose. Opening this menu will show the details of all the Lot/Serial numbers created inside the Inventory database with their Internal Reference, Product, Created On date, Company, and activities as shown below

We can create a new Lot Number using the “New” button. Edit the required fields in the displayed form.
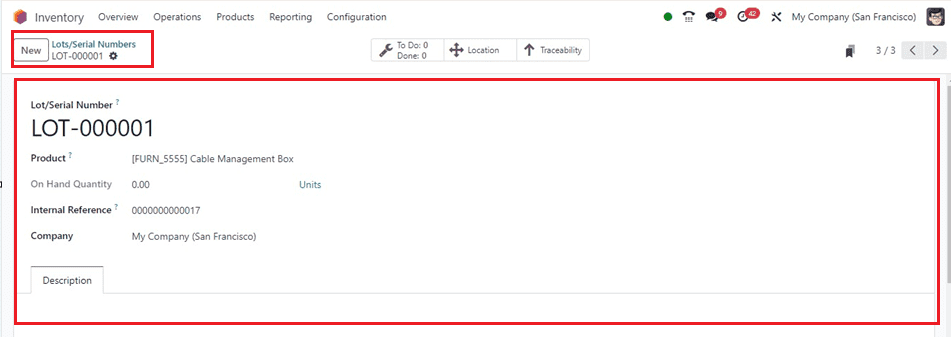
You can enter the “Lot/Serial Number” and select the “Product” that uses this lot/serial number on the aforementioned form. When a product uses this lot number, the quantity will also automatically update. If the lot/serial number is different from the manufacturer's, use it as an “Internal Reference.” Here, I have configured a lot number as LOT-000001.
Now, Let’s create a delivery order using the purchase module, Edit the required fields, Save the data, and Confirm the purchase order.
Go to the “Receipt” smart button section and try to generate a Lot Number using the menu provided inside the “Operations” tab section.
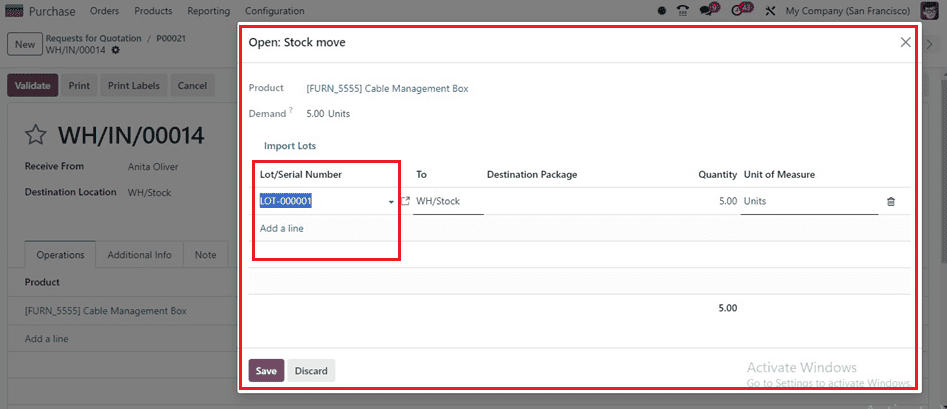
Choose the Lot Number that we have created above inside the stock move window’s Lot/Serial Number field and save the data.
Billing and Displaying Lot/Serial Numbers in Invoice
To display Lot/Serial Numbers in your invoices and Delivery Slips, enable the features from the “Settings” window of the Inventory Module.
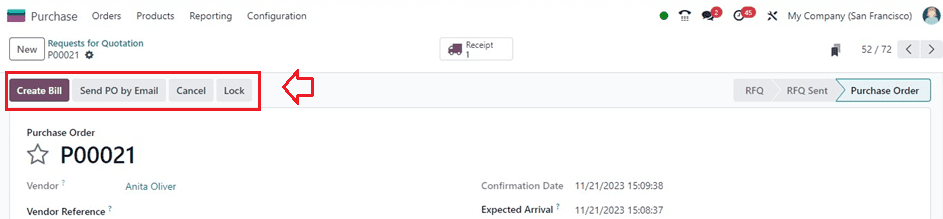
Now, you can bill a purchase order after confirming and validating the order using the “Create Bill” button.
After creating the bill and making payments using the “Create Payments” button, you can go to the “Recipets” section.
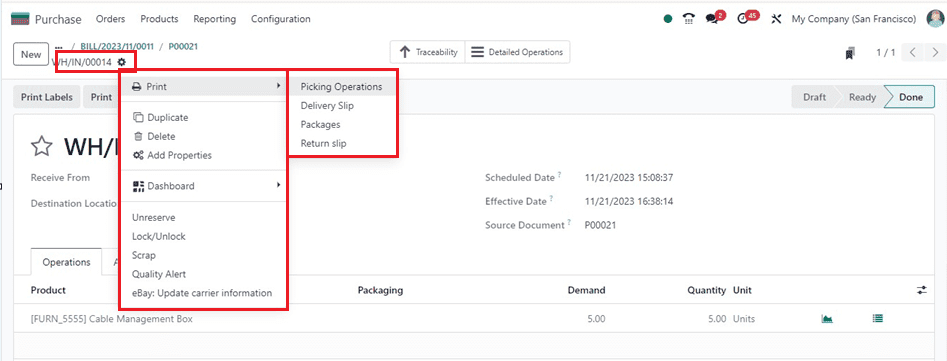
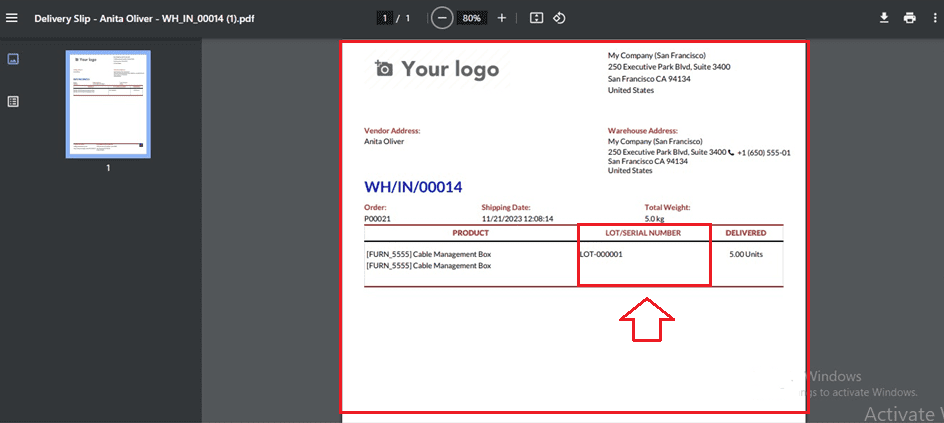
Then click on the “Delivery Slip” option available in the “Print” action menu. This will download the delivery slip of your order, where you can see the product lot numbers, as shown below.
Determining the expiration date of a product via looking up its lot or serial number
There are instances when you may have certain products, such as food items, medications, cosmetics, etc., with a shorter shelf life or expiration date. Odoo 17 offers the ability to specify the expiration dates for individual products based on Lot/Serial Number.
Enable the “Expiration Dates” from the “Settings” window and go to the product configuration form of the specific product inside your Inventory platform. Here, I am creating a “PIZZA” as the product and opening its configuration form, as depicted below.
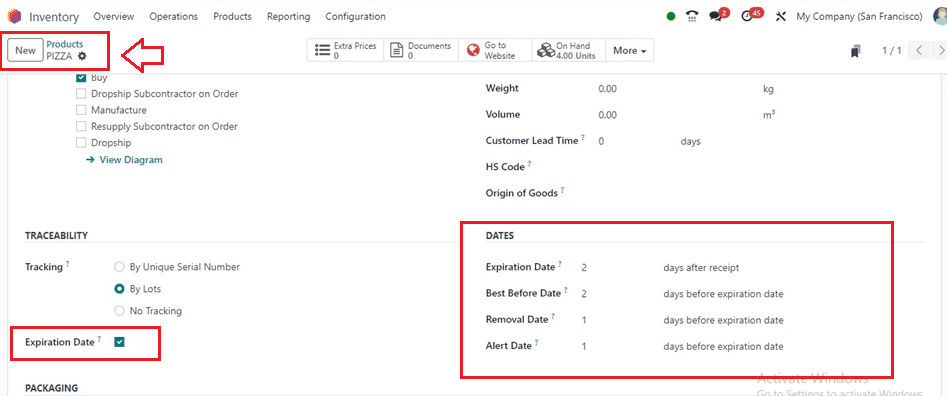
Choose a “Traceability” and “Expiration Date.” This will display some extra “Dates” fields inside the form, giving products “Expiration Date,” which can be set after the receipt date, “Best Before Date,” “Removal Date,” and “Alert Date,” which makes it possible to enable traceability. These dates can then be used to create a purchase order.
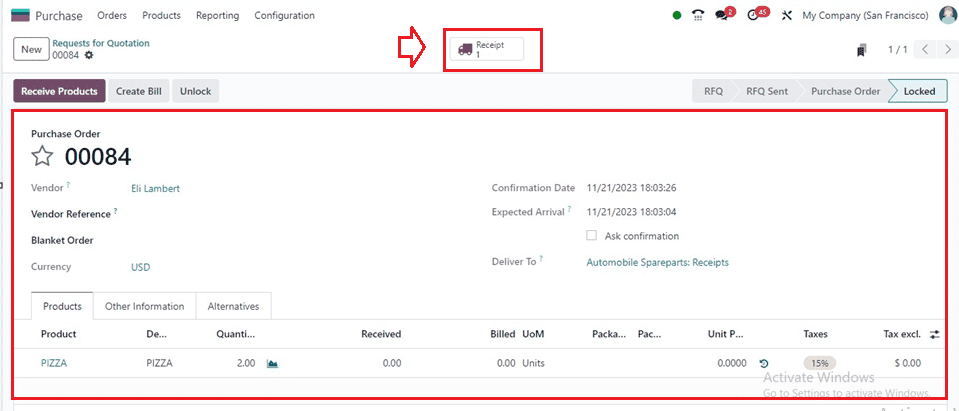
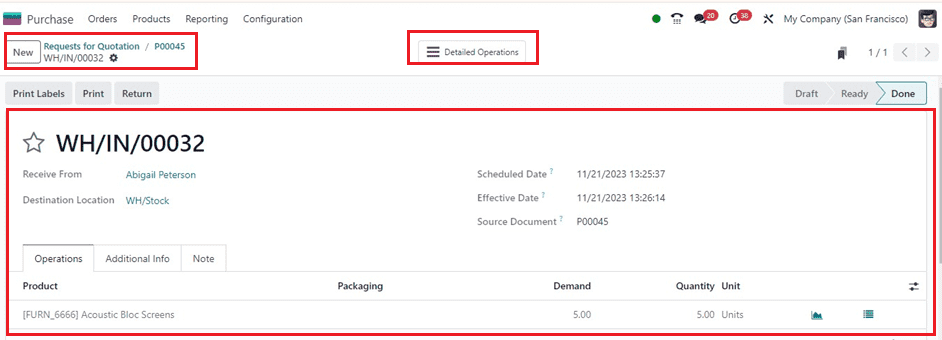
After editing the order details, save and confirm the order. Inside the “Receipt” smart button area, you can see the “Detailed Operations” smart tab.
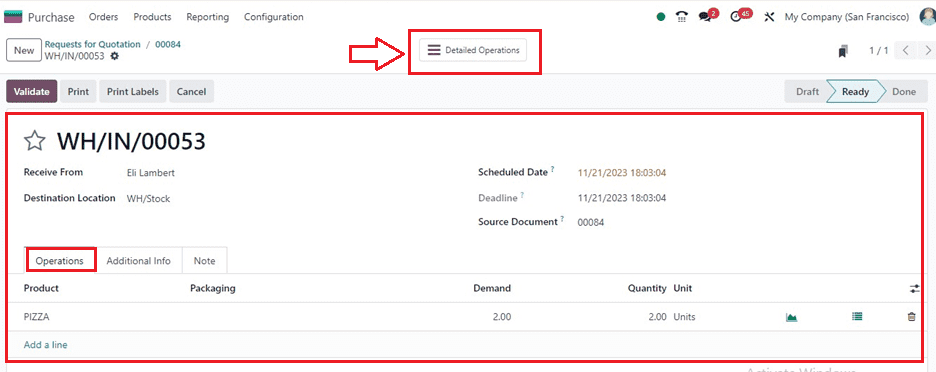
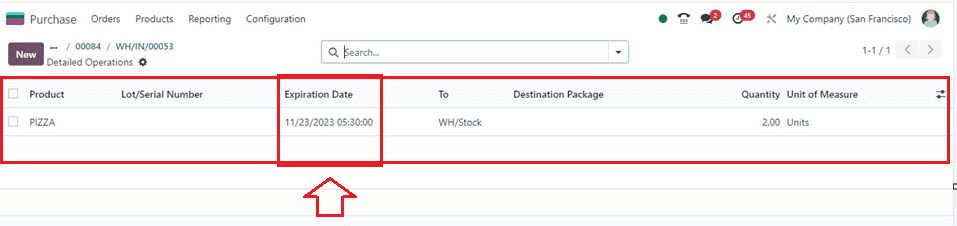
You can see a dashboard of the products with their lot/serial numbers and expiration dates under the "Detailed Operations" tab. The two-day expiration date that we have set on the product form is also displayed in the “Expiration Date” section of the dashboard as below.
You can also provide these expiration dates for a specific lot number from the “Lot/Serial Numbers” configuration form available inside the “Products” menu.
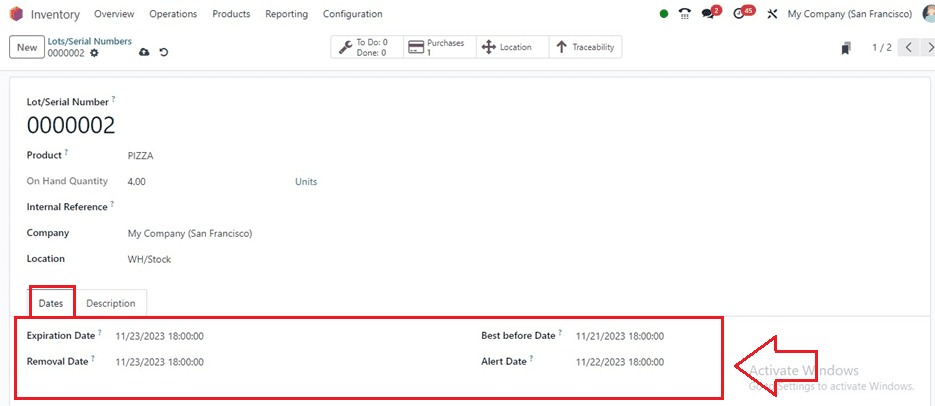
Any product that includes or is associated with this Lot/Serial number will have the corresponding expiration dates once these different expiration dates have been set.
The Odoo system uses lots and serial numbers to track the movements of the products, locating them based on their most recent movement. Although lot and serial numbers are useful, they are not mandatory for every transaction to be completed successfully.
To read more about configuring lots/serial numbers & product traceability in Odoo 16, refer to our blog How to Configure Lots/Serial Numbers & Product Traceability in Odoo 16