When a full database migration is not possible or necessary, using XML-RPC to transmit data between two Odoo instances is a reliable and effective method. By making queries and receiving responses in XML format, two systems can communicate via HTTP thanks to the XML-RPC (XML Remote Procedure Call) protocol. To put it another way, it makes it possible to interact with Odoo remotely, accessing data, creating records, or carrying out any model job as if you were working directly in the Odoo environment.
XML-RPC functions as a web service API within the Odoo environment, allowing users to authenticate, read records, add new entries, edit old ones, and even initiate custom business logic. Because it doesn't impact irrelevant data or modules, it's particularly helpful for moving particular datasets such as partners, products, or orders from one Odoo environment (like Odoo 18) to another.
Developers can create unique scripts or connectors to carry out safe, organized, and regulated data transfers between test or live environments by utilizing XML-RPC. For selective migrations, third-party tool integrations, or data synchronization across dispersed Odoo deployments, this approach is perfect. This example will show you how to use the XML-RPC protocol to move customer records (res.partner) from Odoo 18 to Odoo 19. We'll write a stand-alone Python script that transfers customer data across the two Odoo instances.
There are various steps to take.
Install Required Python Libraries:
Ensure you have Python 3 installed (with xmlrpc.client included by default). All you have to do is import it as follows:
import xmlrpc.client
Configure Server Connections:
# Odoo 18 - Source
url_db1 = "http://localhost:8018"
db_1 = "odoo18"
username_db_1 = "admin"
password_db_1 = "admin"
common_1 = xmlrpc.client.ServerProxy(f'{url_db1}/xmlrpc/2/common')
models_1 = xmlrpc.client.ServerProxy(f'{url_db1}/xmlrpc/2/object')
version_db1 = common_1.version()
# Odoo 18 - Destination
url_db2 = "http://localhost:8019"
db_2 = "odoo19"
username_db_2 = "admin"
password_db_2 = "admin"
common_2 = xmlrpc.client.ServerProxy(f'{url_db2}/xmlrpc/2/common')
models_2 = xmlrpc.client.ServerProxy(f'{url_db2}/xmlrpc/2/object')
version_db2 = common_2.version()
Set up the connection details for both Odoo 18 (source) and Odoo 19 (destination) instances.
Two kinds of XML-RPC proxies are made for every Odoo instance following the definition of the connection variables:
- The XML-RPC API's common endpoint is accessed via common_1 and common_2. These are principally in charge of user authentication and the retrieval of fundamental data, such as the server version.
- Since models_1 and models_2 are linked to the object endpoint, we are able to work with Odoo models in real time. These let us do things like read fields, create new entries, update existing ones, and search for records.
In this scenario, common_1 and models_1 are for the source (Odoo 18), and common_2 and models_2 are for the destination (Odoo 19).
Full Python Script: Transfer Customers from Odoo 18 to Odoo 19 using XML-RPC:
import xmlrpc.client
# --- Odoo 18 (Source) ---
url_src = "http://localhost:8018"
db_src = "community_18"
user_src = "admin"
pwd_src = "admin"
common_src = xmlrpc.client.ServerProxy(f"{url_src}/xmlrpc/2/common")
uid_src = common_src.authenticate(db_src, user_src, pwd_src, {})
models_src = xmlrpc.client.ServerProxy(f"{url_src}/xmlrpc/2/object")
# --- Odoo 19 (Destination) ---
url_dest = "http://localhost:8019"
db_dest = "community_19"
user_dest = "admin"
pwd_dest = "admin"
common_dest = xmlrpc.client.ServerProxy(f"{url_dest}/xmlrpc/2/common")
uid_dest = common_dest.authenticate(db_dest, user_dest, pwd_dest, {})
models_dest = xmlrpc.client.ServerProxy(f"{url_dest}/xmlrpc/2/object")
# --- Fetch customers from Odoo 18 ---
partners_src = models_src.execute_kw(
    db_src, uid_src, pwd_src,
    'res.partner', 'search_read',
    [[]],
    {'fields': ['name', 'email', 'phone', 'city', 'company_type']}
)
print(f"Fetched {len(partners_src)} customers from Odoo 18...")
# --- Transfer to Odoo 19 (Skip duplicates by email) ---
created_count = 0
skipped_count = 0
for partner in partners_src:
    email = partner.get('email')
    name = partner.get('name')
    # Skip if email exists in Odoo 19
    if email:
        existing = models_dest.execute_kw(
            db_dest, uid_dest, pwd_dest,
            'res.partner', 'search',
            [[('email', '=', email)]],
            {'limit': 1}
        )
        if existing:
            print(f"Skipped (duplicate email): {email}")
            skipped_count += 1
            continue
    # Prepare minimal partner data
    new_partner = {
        'name': name or 'Unnamed',
        'email': email,
        'phone': partner.get('phone'),
        'city': partner.get('city'),
        'company_type': partner.get('company_type'),
    }
    # Create in Odoo 19
    models_dest.execute_kw(
        db_dest, uid_dest, pwd_dest,
        'res.partner', 'create',
        [new_partner]
    )
    created_count += 1
    print(f"Created: {name}")
print(f"\nCustomer transfer complete!")
print(f"Created: {created_count}, Skipped: {skipped_count}")
Code Explanation (Each Steps)
1. Connect to Odoo Instances
- Make use of xmlrpc.client.ServerProxy to connect to both Odoo 18 and Odoo 19 servers.
- Establish connections to the /object and /common endpoints.
2. Authenticate and Get User IDs
- Use common.authenticate(...) to authenticate every database.
- For Odoo 18 and 19, store the returned user ID as uid_db1 and uid_db2, respectively.
3. Fetch Customer Records from Odoo 18
- To retrieve every customer record, use search_read on the res.partner model.
- Only specific fields such as name, email, phone number, city, company_type, etc., are read.
4. Loop Through Every Customer
For each client that was retrieved:
- Verify whether an existing customer in Odoo 19 has the same email address.
- To prevent duplicate entries, skip if found.
- If not, use the create method to create a new customer and construct a dictionary of customer fields.
5. Output Display Message
- When a customer is created or skipped, a message is printed.
- "Customer transfer complete!" should be displayed as the loop's final message.
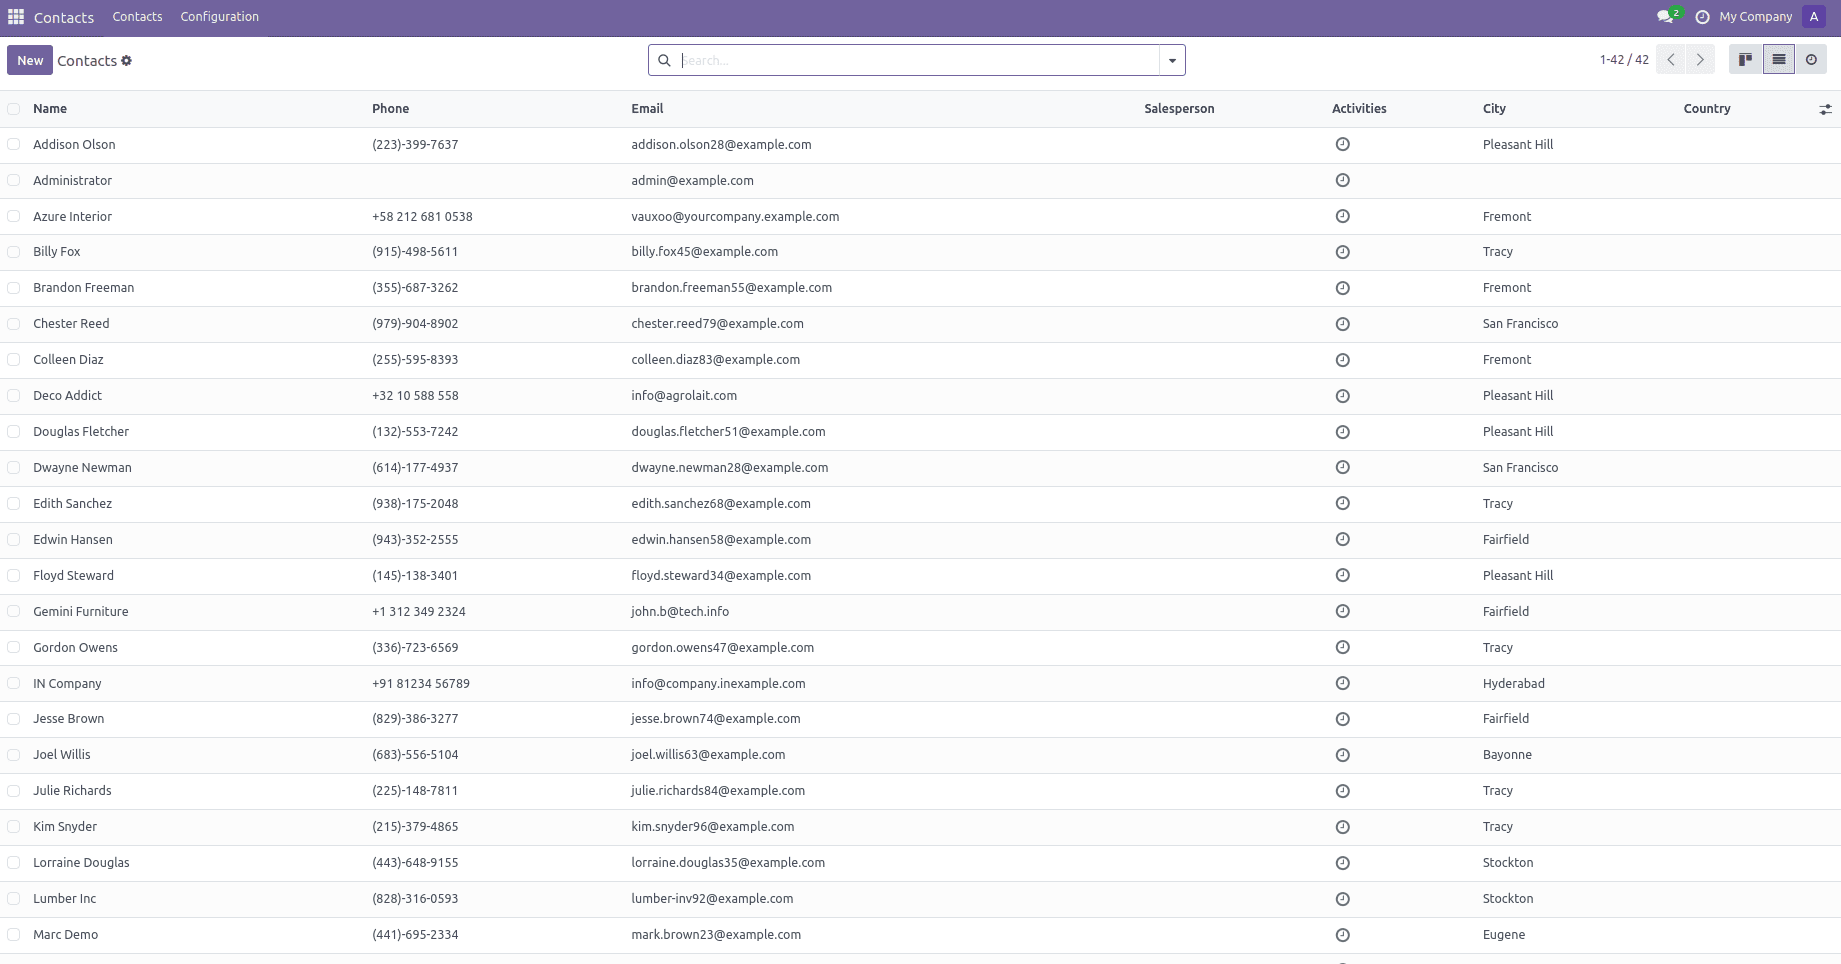
The contract list view in Odoo 18 with the client list displayed, is seen in the following image.
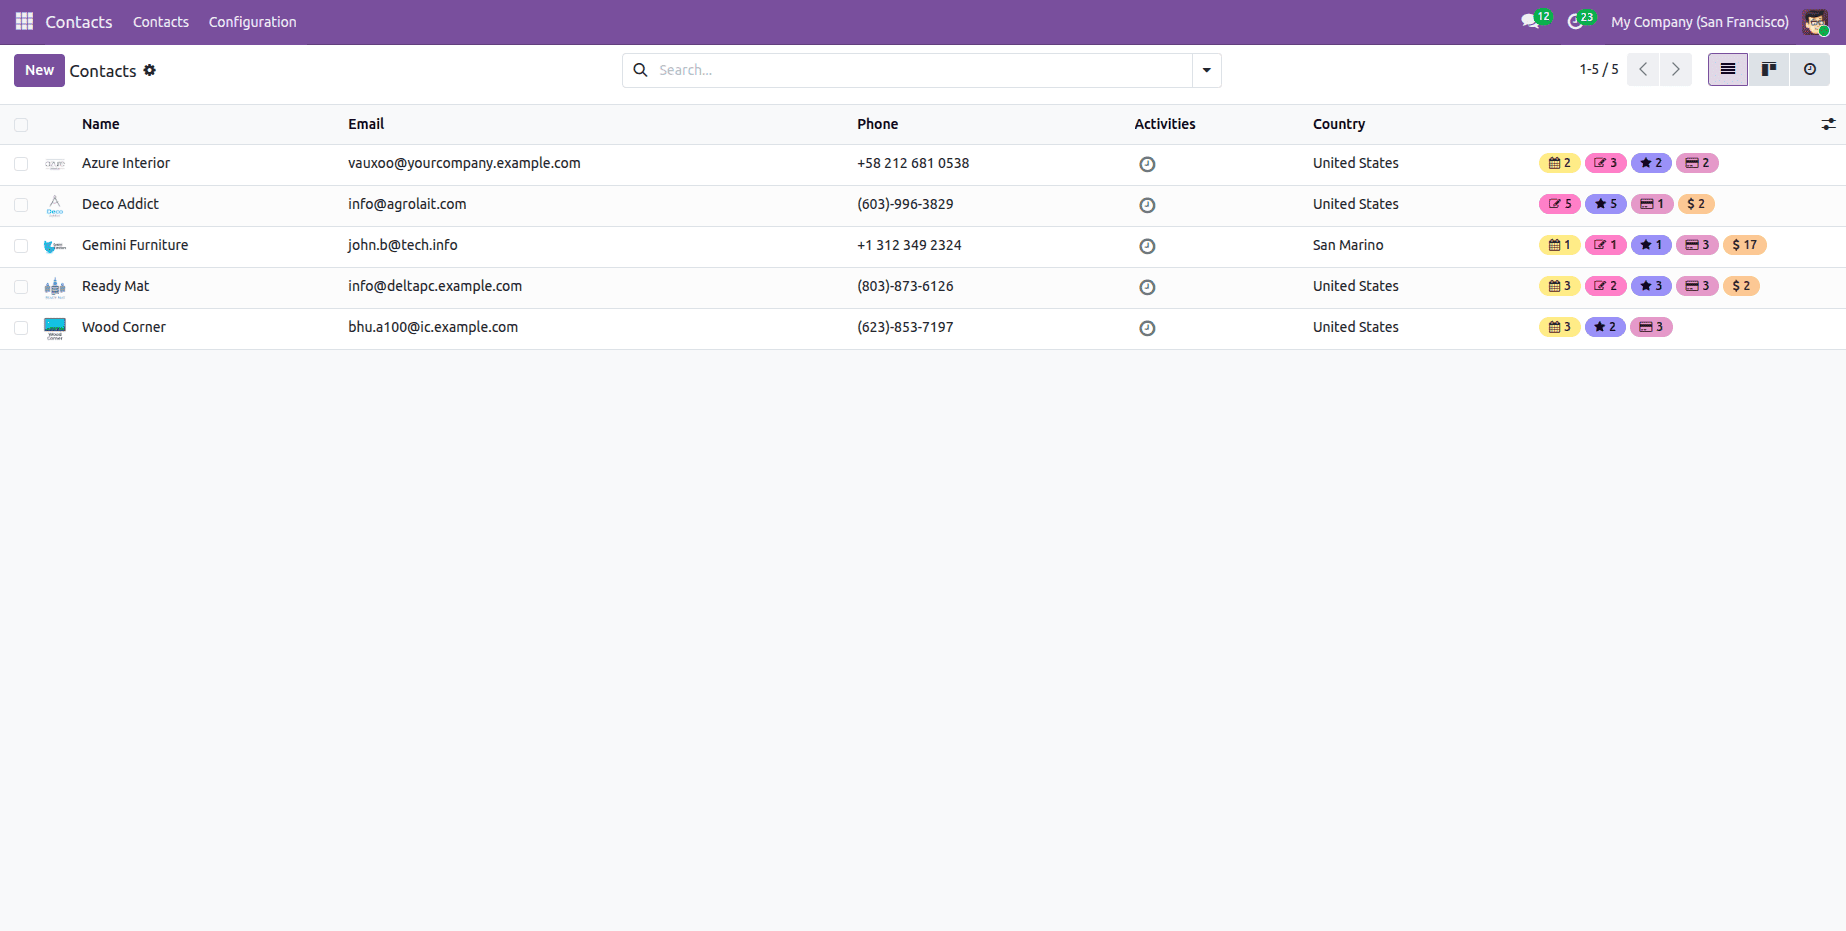
The contract list view in Odoo 19 is shown in the image below.
Use the following command on the terminal to launch the Python script:
python3 -m transfer_18_19.py
The script indicated above can be found in the transfer_18_19.py Python file.
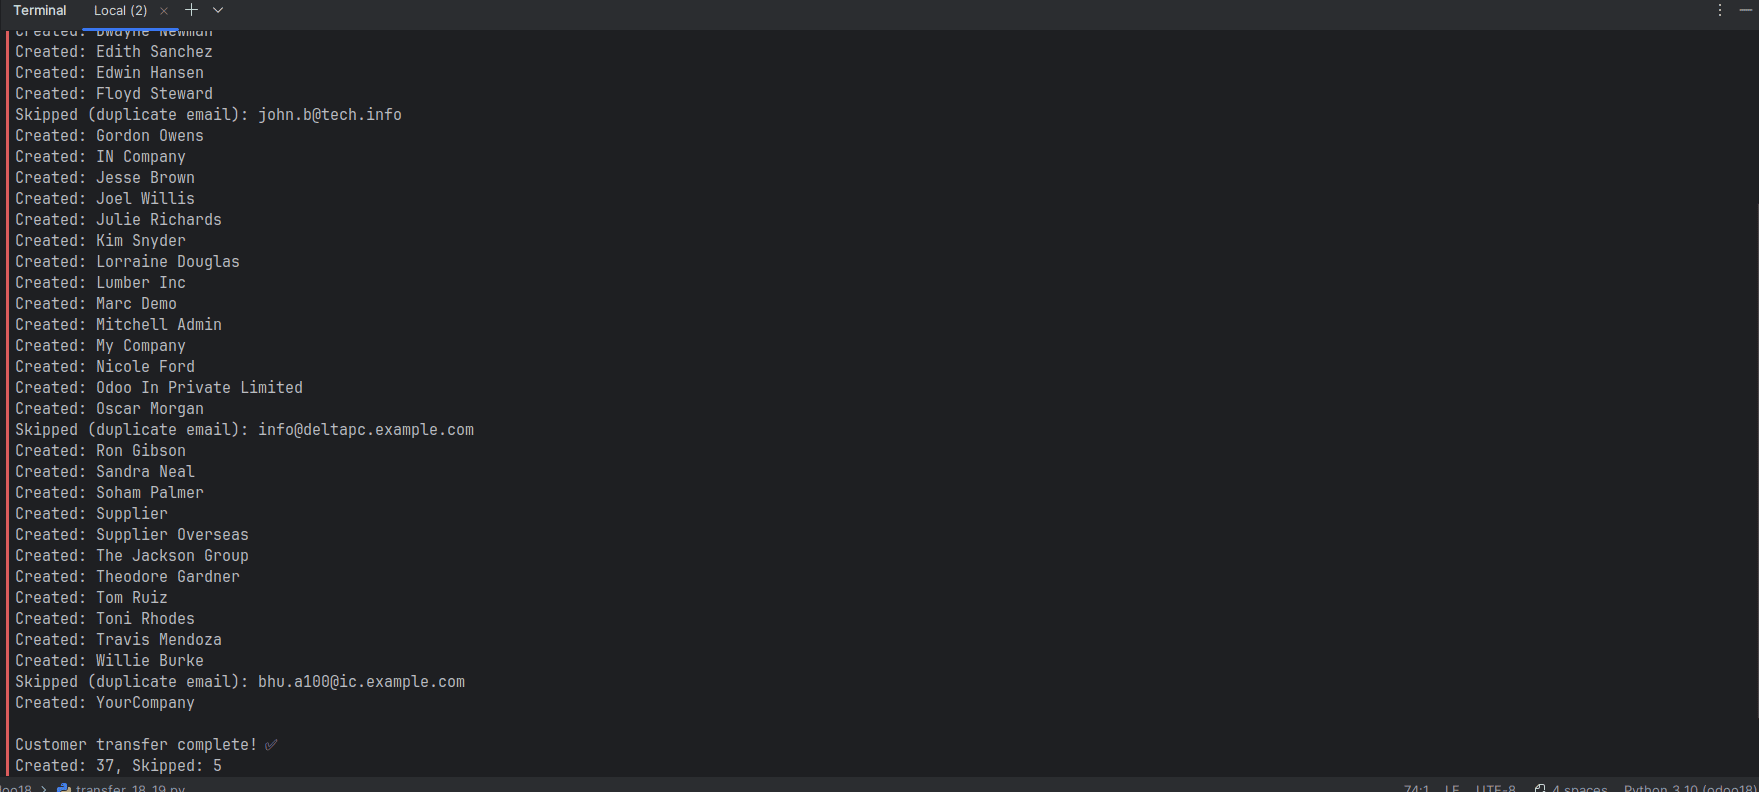
The Python script transfer_18_19.py execution result is displayed in the terminal screenshot above. The script retrieves all customer records from Odoo 18 and moves them to Odoo 19 after connecting to Odoo 18 and Odoo 19 over XML-RPC.
Every line that starts with generated: verifies that an Odoo 18 customer record has been correctly generated/skipped. The output's final message, "Customer transfer complete!" attests to the successful completion of the data migration procedure.
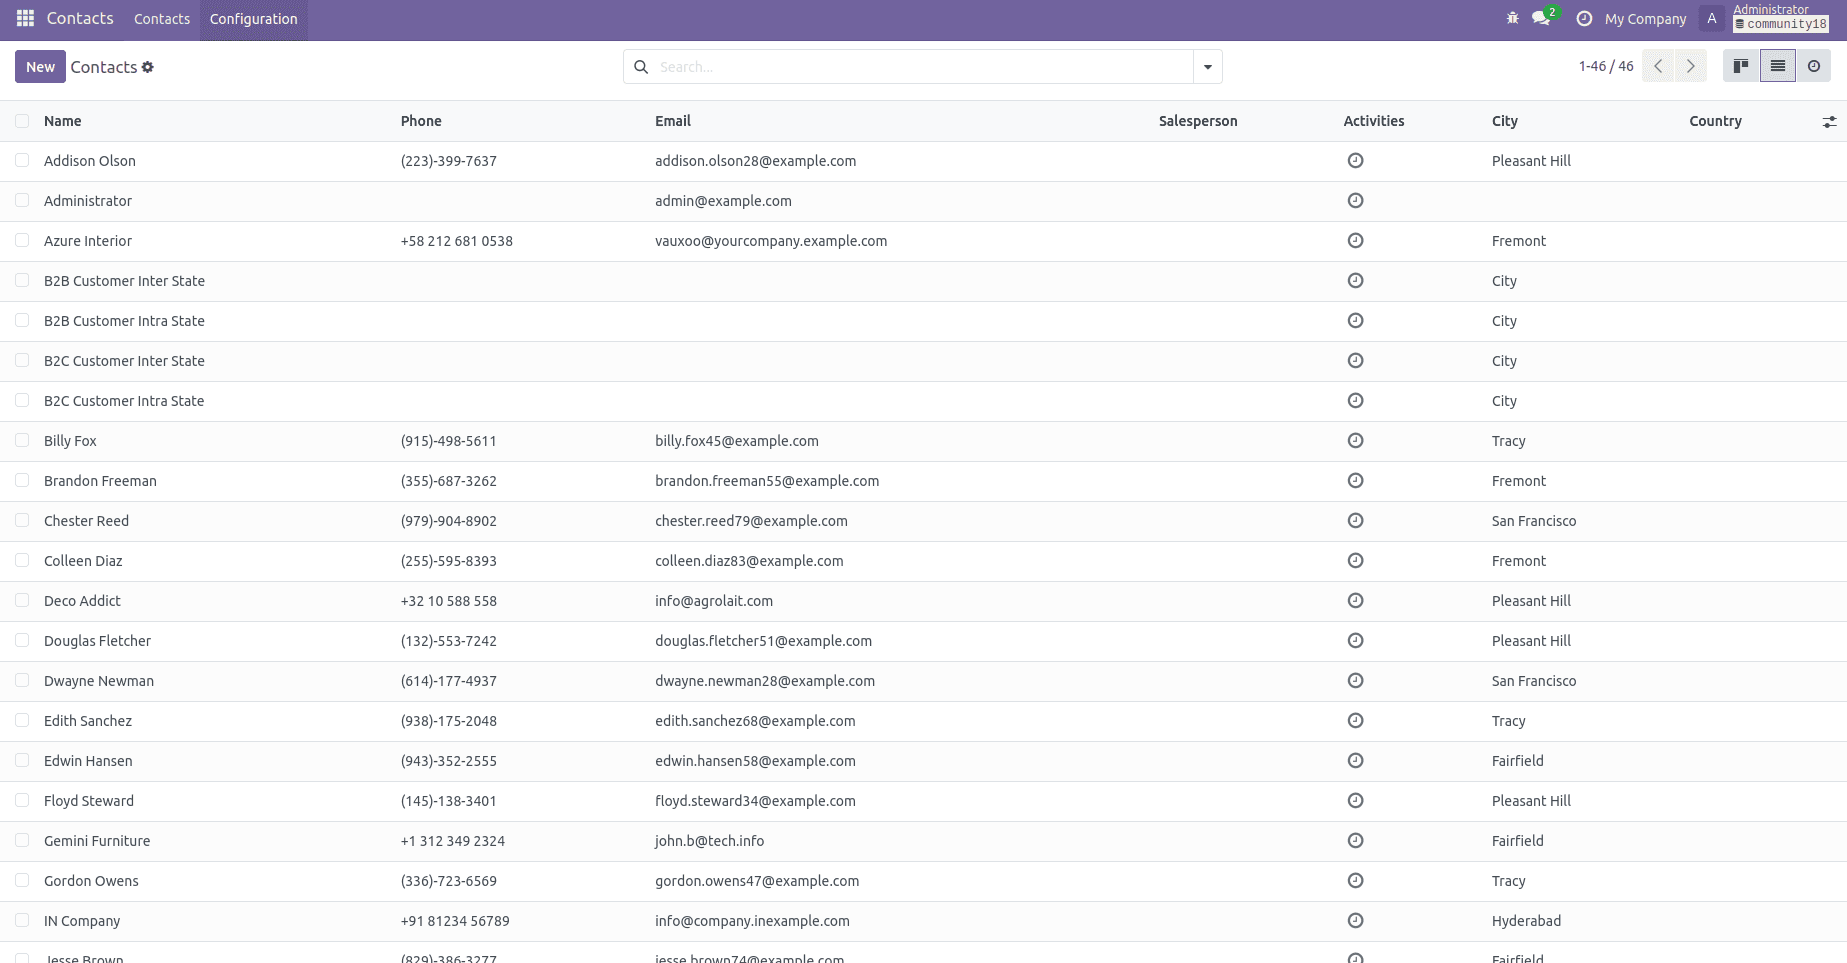
Once the script has run, go to your Odoo 19 instance's Customers area. All of the customer records from Odoo 18 have been successfully moved to Odoo 19, as you can see.
An effective and adaptable way to migrate records between instances is to use XML-RPC to move data from Odoo 18 to Odoo 19. You may specify precisely what data to send and how to handle it because it supports any model and field structure. The procedure can be modified to meet different business requirements thanks to its integrated support for authentication, filtering, and duplicate checks. This method ensures data consistency when transferring between Odoo environments and is perfect for both complete and partial migrations.
To read more about How to Transfer Data From Odoo 17 to Odoo 18 Using XML-RPC, refer to our blog How to Transfer Data From Odoo 17 to Odoo 18 Using XML-RPC.