In this blog, we are discussing Odoo JS dialog popups. A Dialog box is a small window that is displayed on top of the existing windows, and it may be an alert or a new screen. Dialogs are also called modals or popups. The best example of an Odoo dialog box is when we click on the Search More button in the Many2one field, it displays a popup window. Here we are discussing different dialogs that are commonly used in Odoo, especially on backend pages. We can write this dialog in two methods by using web.Dialog and the web.view_dialogs, Both these are used in different scenarios. Here we are discussing the alert, confirm, Sale Confirm, Form View Dialog, and Select View Dialog.
Alert:
First, we are discussing Alert. For this, we need to import ‘web.Dialog’ module.
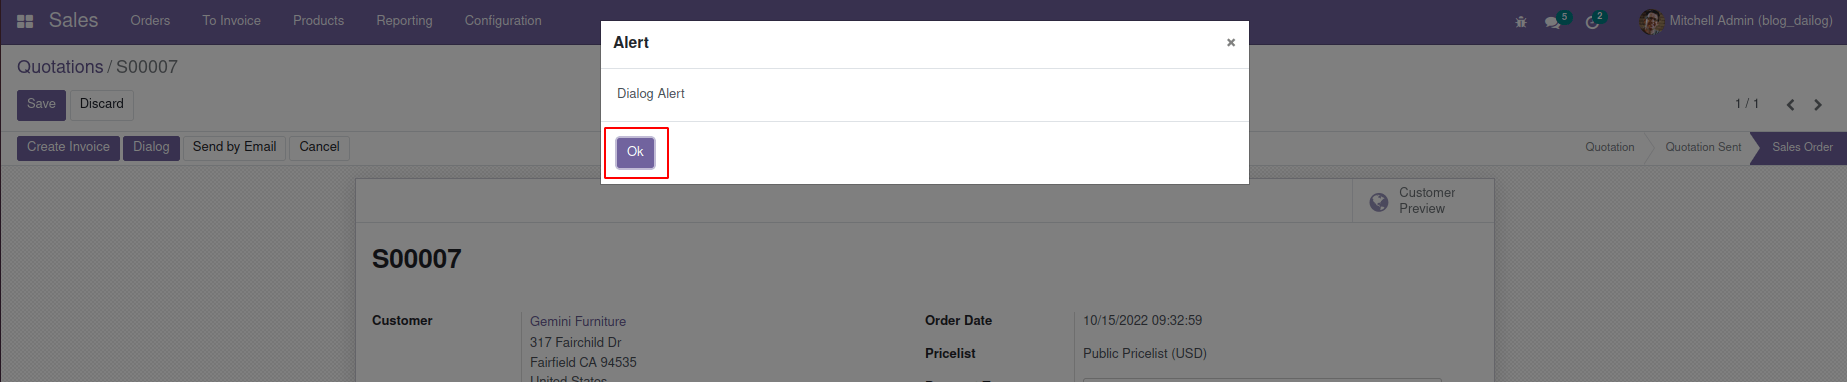
var Dialog = require('web.Dialog');Alert is used to display simple messages. web.Dialog.alert takes three arguments. The first argument is the required field. We need to specify the owner with the value of this or self. The Second argument is also a required field. Fill that field with the message that you want to show to the user. The third argument is optional. When the user forcibly closes the dialog or clicks the button, this argument sets the action OK that will be executed by Odoo.
Dialog.alert(
   this,
   "Dialog Alert",
   {
       onForceClose: function(){
           console.log("Click Close");
       },
       confirm_callback: function(){
           console.log("Click Ok");
           self._setValue("0");
       }
   }
);
Here added 1st argument as this, the message is Dialog Alert.
This is the view.
Confirm:
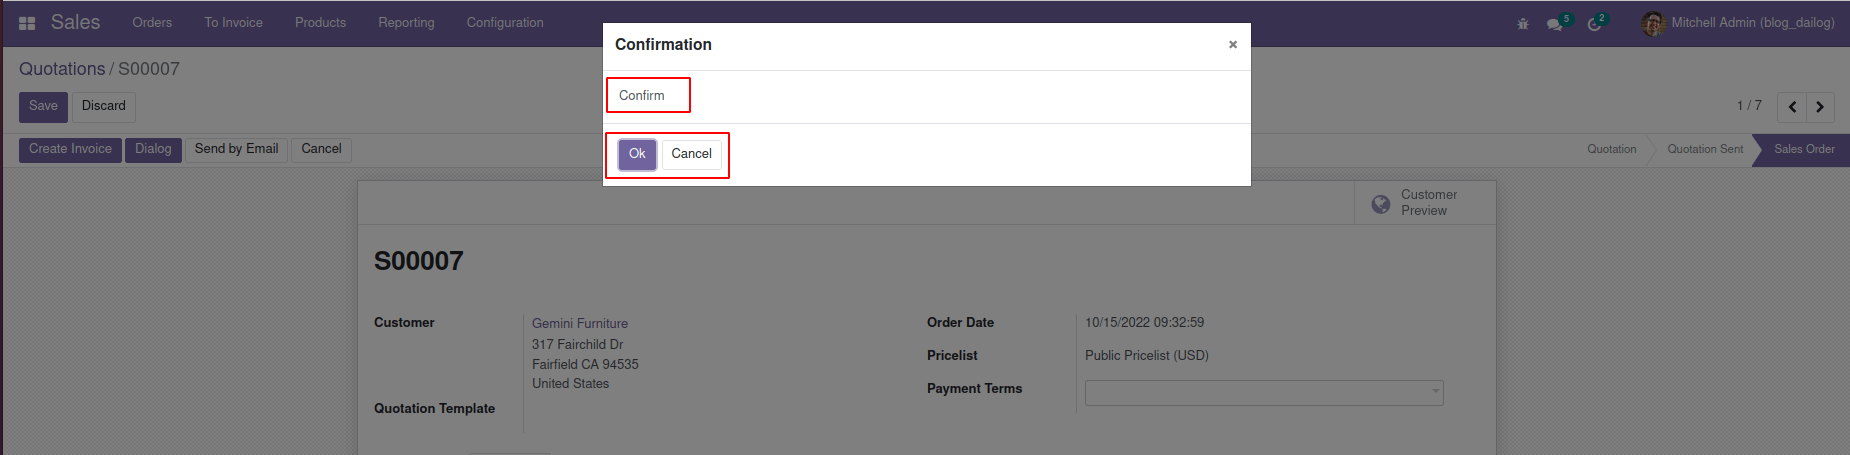
Similar to the web.Dialog.alert, the web.Dialog.confirm is also used to display a simple message to the user. There is only one difference, and that is the web.Dialog.confirm has two buttons, that is the Ok button and the Cancel button. Therefore we have two ways to close the dialog. By clicking the button with the X icon or by clicking the Cancel button.
Dialog.confirm(
   this,
   "Confirm",
   {
       onForceClose: function(){
            console.log("Click Close");
       },
       confirm_callback: function(){
           console.log("Click Confirm");
           self._setValue("1000");
       },
       cancel_callback: function(){
           console.log("Click Cancel");
       }
   }
);
Here the message is ‘Confirm’. And in the third argument, there are three key-value pairs for that 3 three buttons.
This is the view.
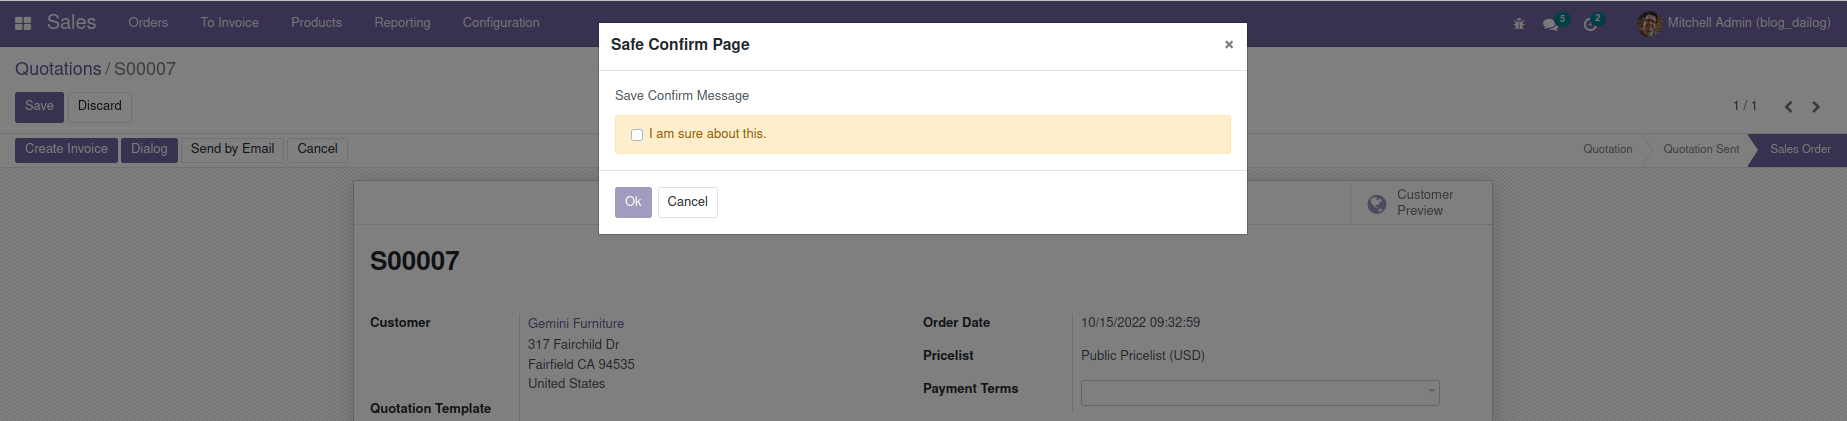
Safe Confirm
Another web.dialog is Safe Confirm. It is also similar to the Web.Dialog.Confirm. Here we can also specify the title of the popup
Dialog.safeConfirm(this, "Save Confirm Message", {
               title: "Safe Confirm Page",
               async confirm_callback() {
                   console.log('Click Confirm')
               },
               async cancel_callback(){
                   console.log('Click Cancel')
               },
               async onForceClose(){
                   console.log('Click Close')
               }
           });
This is the form view.
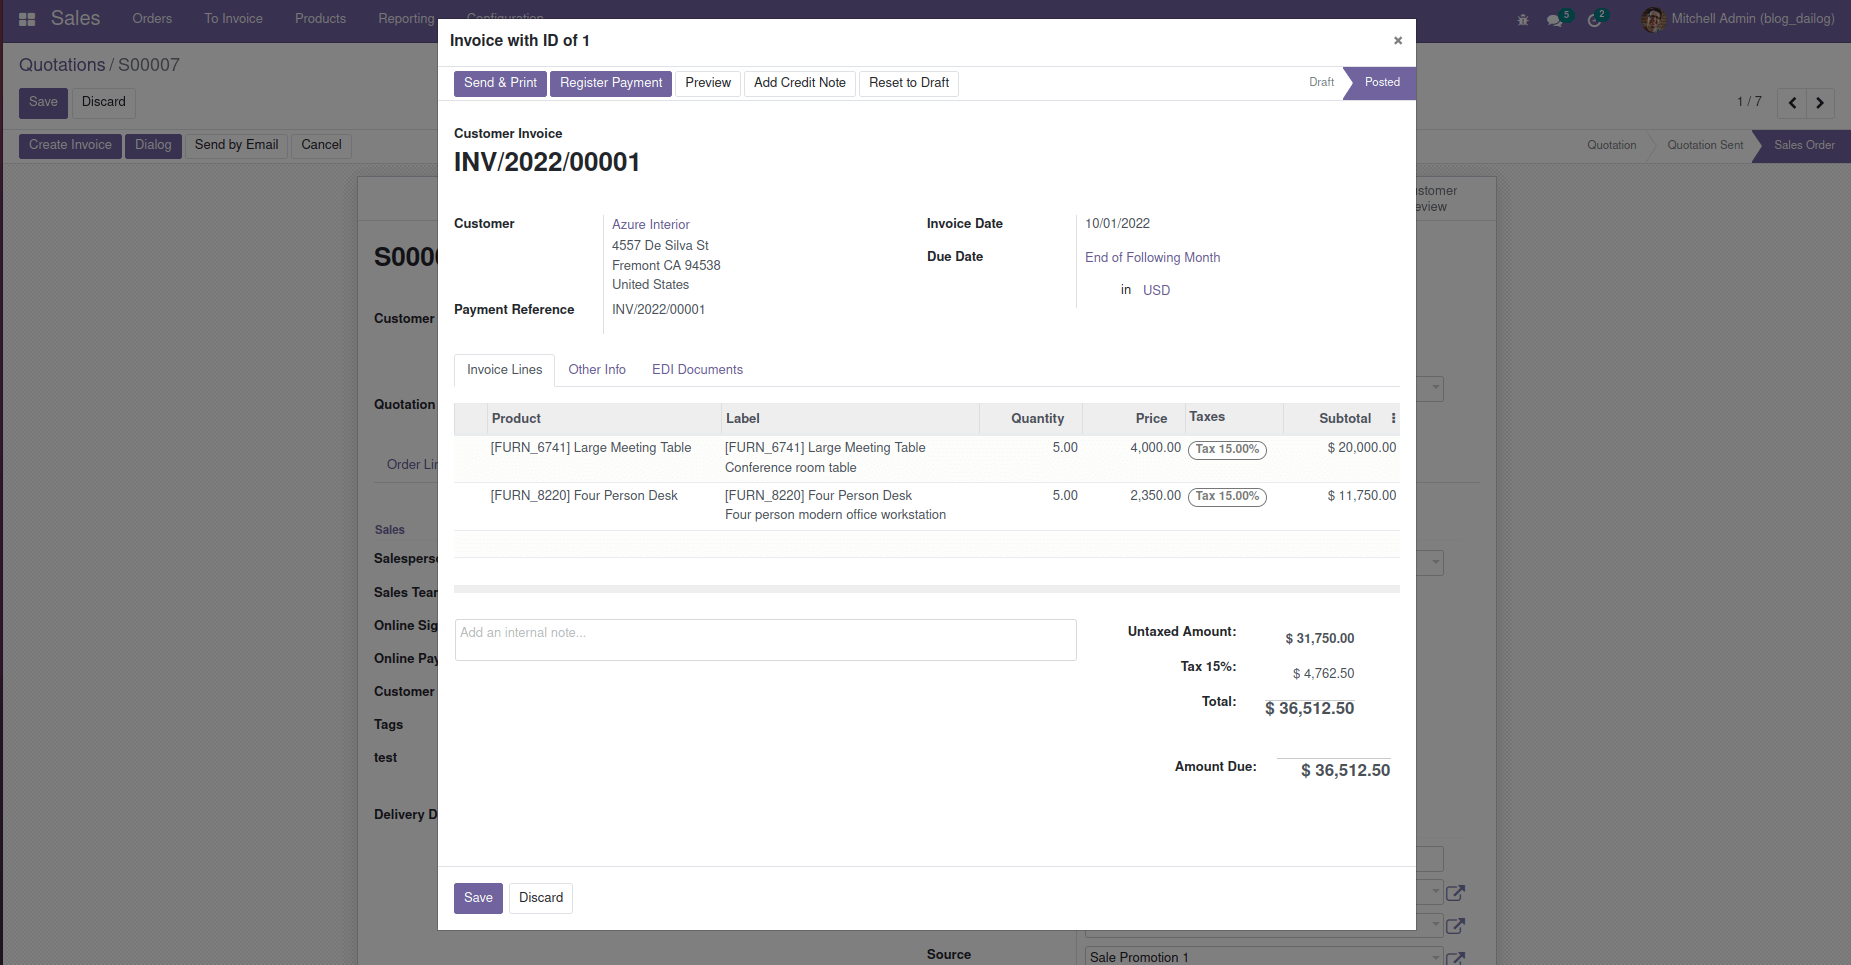
Next, we are discussing web.view_dialogs. First, we need to import web.view_dialogs.
var view_dialogs = require('web.view_dialogs');FormViewDialog
It is used to display a form view of a record. For example, click the external link button on the sales order form in the Customer field.
new view_dialogs.FormViewDialog(this, {
   res_model: 'account.move',
   res_id: 1,
   title: "Invoice with ID of 1",
   on_saved: function (record) {
       console.log("Click Save");
   }
}).open();
This is the example to display the invoice with the id of 1. Here we are passing some arguments. res_model is a specified model we are displaying, res_id is the id of the displayed record. In the title, we can specify the title of the popup. It is not a mandatory field. on_saved is the function that works when we click the save button.
This is the form view.
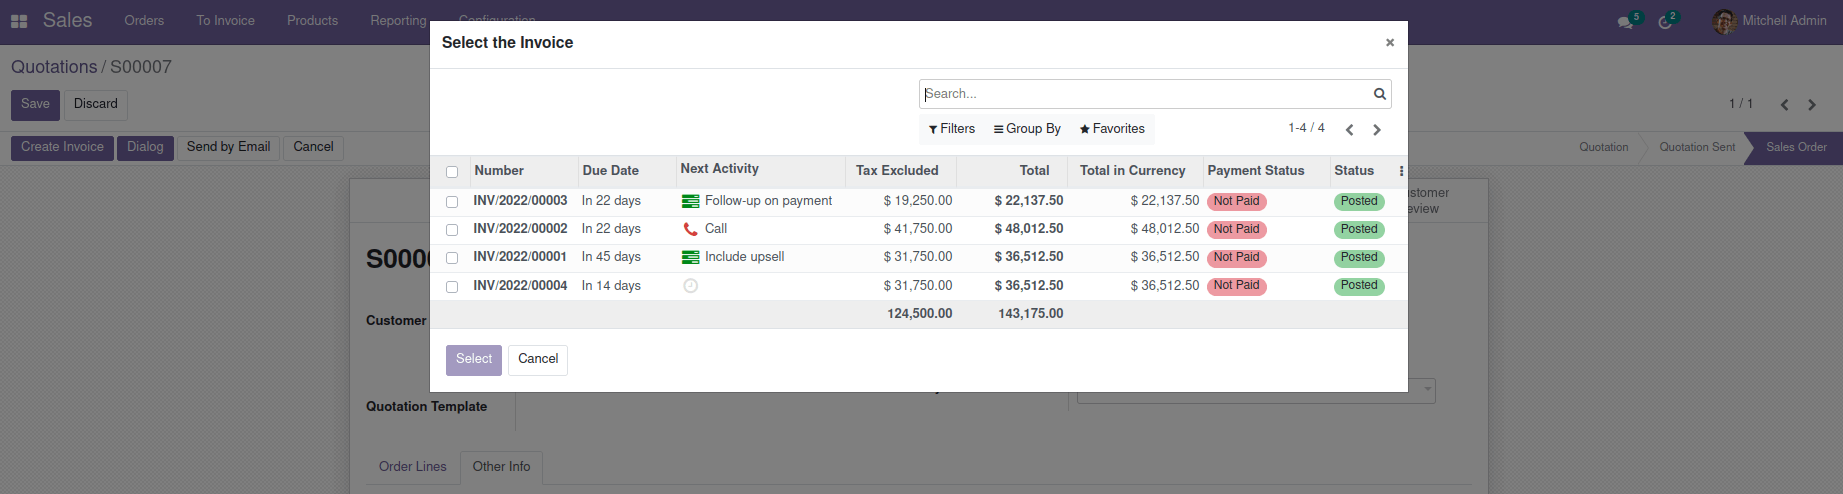
SelectCreateDialog
The SelectCreateDialog is used to display a list view of a model, including the search view. The best example of this is the Search More button in the Many2one field. Here we are passing some arguments. res_model is the model name. The title is the heading of the popup, and it is optional. The Domain is the limit to the record that can be selected; it is optional. no_create is the option to ensure that the user can not create a new record. It is optional. on_selected is the function that works when we click the select button.
new view_dialogs.SelectCreateDialog(this, {
   res_model: 'account.move',
   title: "Select the Invoice",
   domain: [['move_type','=', 'out_invoice']],
   no_create: true,
   on_selected: function (records) {
       console.log(records)
   }
}).open();
This is the form view.
Here we mentioned some Dialogs. This is used on backend pages. The dialog above cannot be used at the Point of Sales or on the Website.