Leave is an important factor to an employee and thus the leave management is an essential and inevitable factor in any organization. Odoo 12 leave management module is intuitive and helps the HR people to handle their work in a much easier format.
The basic concept of leave management is as follows- each employee can create their own leave request which shall be approved or rejected by the manager or concerned representative. Here, the employee can select the different leave types which are already created in the system or the manager can create leaves to a particular employee upon his request.
Now let us look deep into the module.
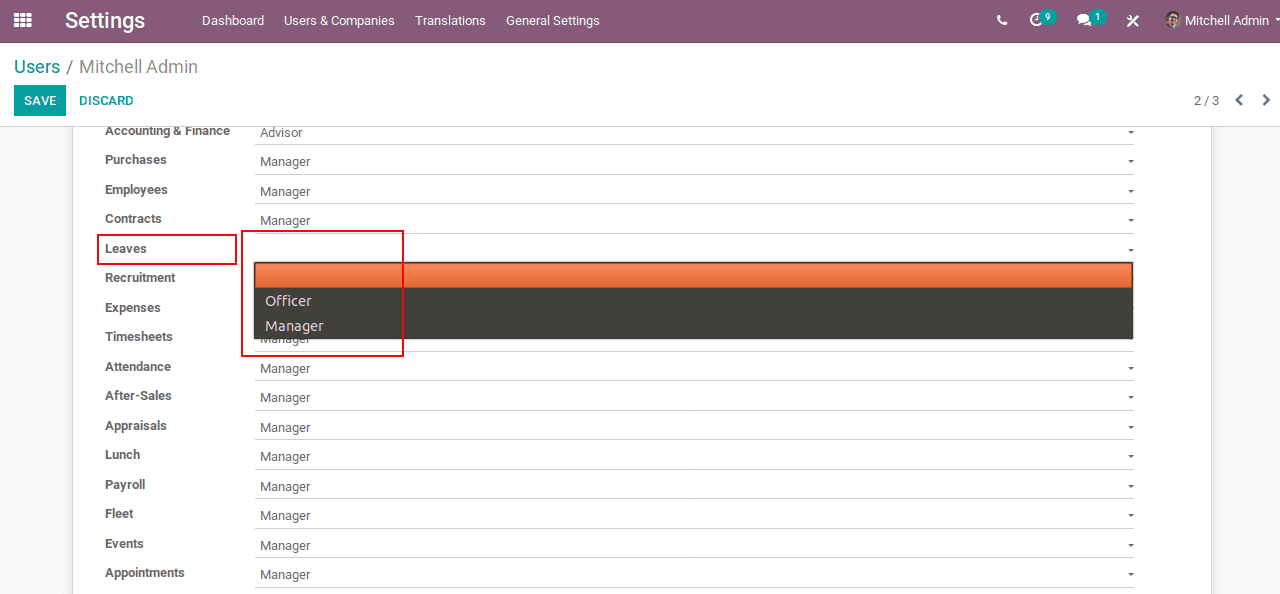
Starting with the permissions, as default, there are 3 user groups in the leave module. If the user is a normal employee, they don't need to choose any user groups. The employee will have the privilege to create and view his own leaves. On the other hand, upon choosing the user group as an officer, then the user gets the privileges to their leaves alongside the view permission to all the menu, leave types and so on. If upon choosing the user group as a manager, then again he gets with all the privileges.
Below shown is the screenshot of the user settings and its group.
Settings -> Users -> Leave
Now let's look at the Leave module.
Odoo is having an outstanding overview of the leaves in both calendar and gantt view.
Calender View
Gantt View
Now let's go through the leave request.
Under the leave module, the end user has a separate provision to create leave request for individuals and for managers. From the menu item My Leaves, an employee will be able to see his individual leaves.
Now let's have a look on My Leaves menu item. Here, you will be able to see your personal leaves and its belongings. There are 4 sub menu items for this menu. They are,
1. New Request
Here in the first click, you will get a calendar view including the leave details and you can click on a particular date to create a new leave request on that date.
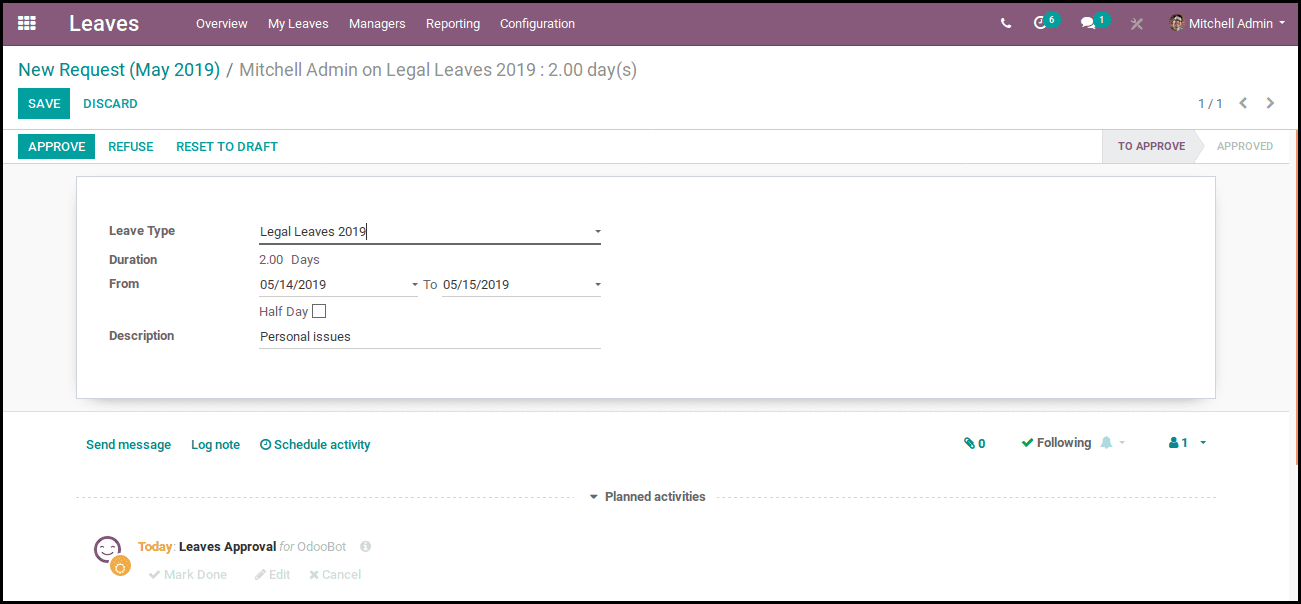
In the above form view, you will be able to select the leave types, duration, from date and to date, description and also the option for taking the half day leaves. If we put a tick in the half day, then there will arrive an option to select the date and choose the session- morning or afternoon.
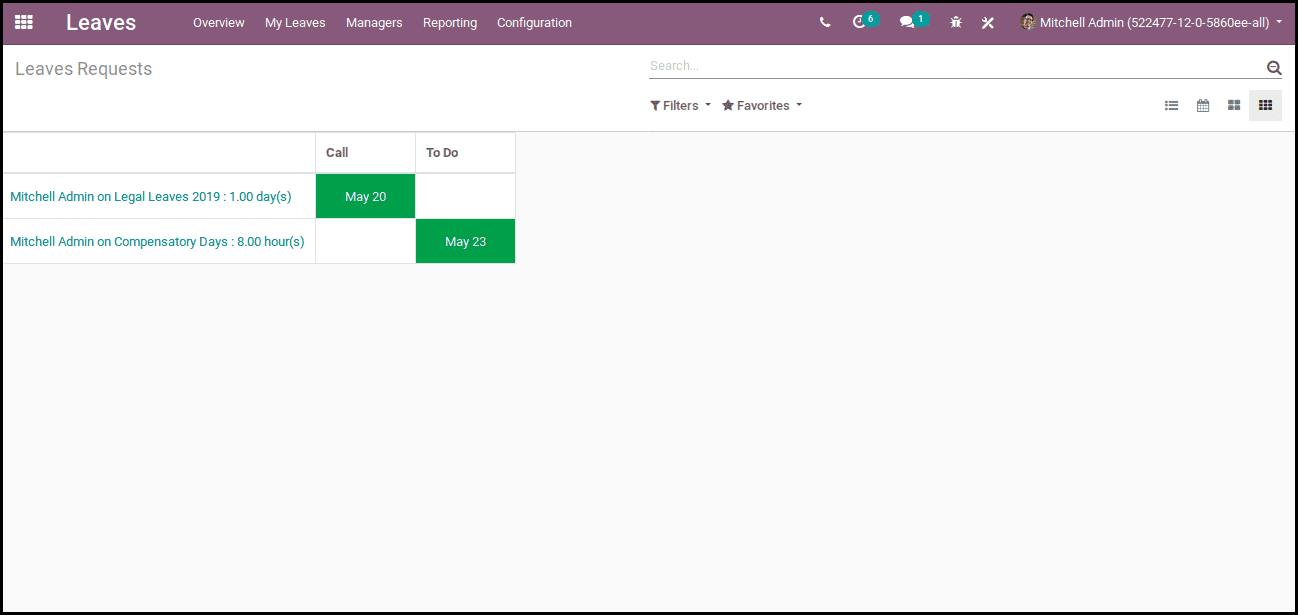
2. Leaves Requests
In this menu, you will be able to view all your leaves in a list view. You will also have the provision for other views like calendar view and the kanban view. And at the same time, there is an option to view the activities which are scheduled with the leave.
3. Allocations Requests
We already discussed the leave types earlier. In leave type, we are giving a fixed number of days in a particular leave type. What happens if the leaves get over early due to some reason? In that case, we are using the allocation request.
I will explain with an example. Assume that there are 15 legal leaves which are available to an employee. Due to some reason, he exceeded the limit and needs to acquire more legal leaves. In this case, an employee can create the leave allocation request and request for more leaves in this particular leave type ie, legal leaves. And he requests an additional 5 more days of leave. If the allocation request is approved by the manager then the total number of available leaves of legal leaves will become 20 ie, like 5 remaining out of 20. Below is the form view.
4. Summary
Gives the summary of all leaves which is taken by the current user.
Next, we can look on to the manager's menu
In this menu, there are sub menus like Leaves and Leave allocations which need to be approved. Also, there are sub-menus which are available to view all leave requests, allocation requests, and leaves that need to report to payslip.
As we look into the tree view of all these menus, Odoo gives the quick access buttons here. The admin can approve and reject the requests from the tree view itself. There is a green tick and if he clicks, the leave gets approved, and at the same time, he can reject it via clicking the icon, next to the green tick which is shown below.
Also, there is another field ie, Report to payslip. The admin can also change the state of that leave if it is reported to payslip.
Next is the departmental leaves. The manager has the provision to create leave request to a particular employee as well as department wise, company wise and employee tag wise. And after creating the leave, he can just approve them
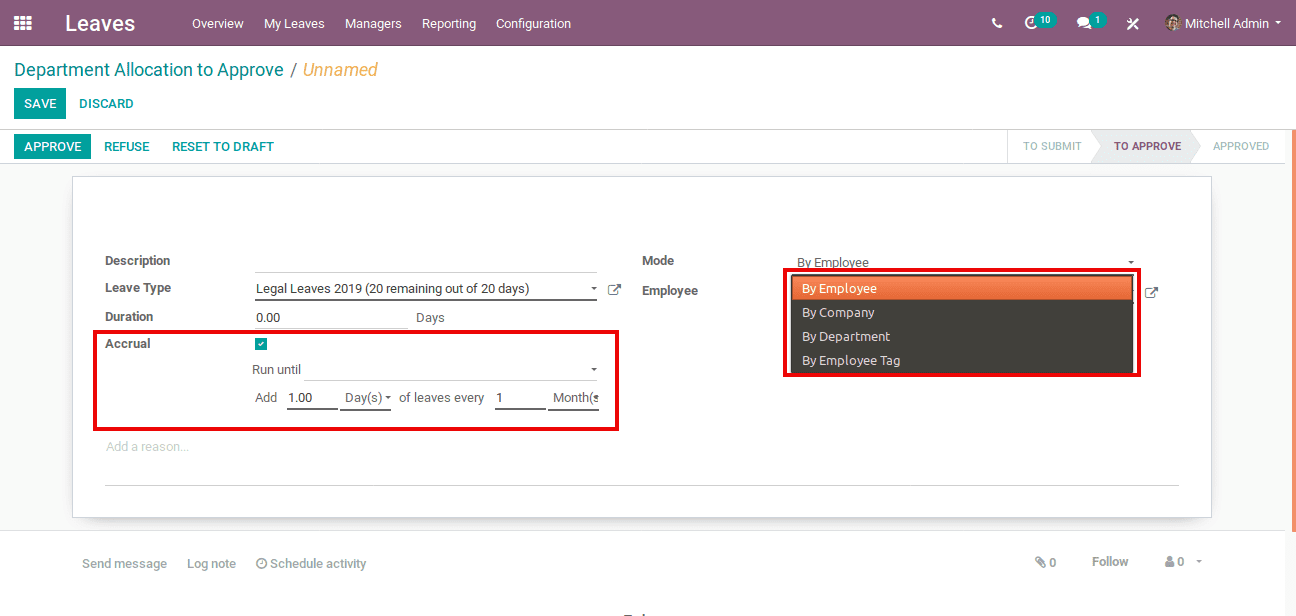
Now, we can look into leave allocations. In the leave allocation, the managers will be able to see the common fields including the mode in which he can choose whether it is an employee, department, company or employee tag. Now, let's look into Odoo 12 new feature called Accrual. If we tick the check box, new field appears. The end date, and the number of days or week that need to be incremented and the count which need to be incremented in weak, month or year. I will explain with an example.
If an employee joins a company, he may have a legal leave of 12 days in a year. But he can't take all these leaves in a single month. This can be made possible here. He can take leave on completion of one month. If he completes a period of 2 months, he is availed to take 2 leaves. And it will so on increasing. This is what we say leave accruals. And the increment can be made possible in a week , month and year. Also, the option for leave is day and hour.
No, we can look into the reporting section. Here, all the leaves taken by the employees are shown. There is also a provision for pivot table view and the calendar view.
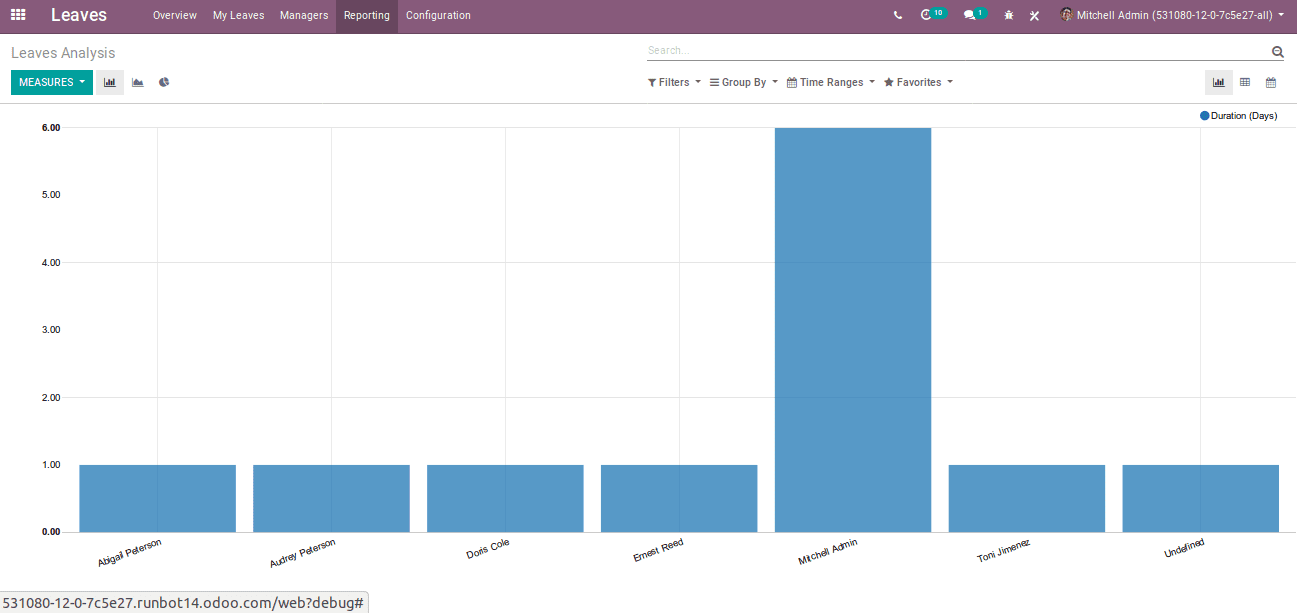
Pivot table
Calendar view
Next is the report by the department. Here we have provision to get the pdf report of the leaves taken by employees under each department, with color coding indication of leave types. The color can be set in the Leave type option under the configuration.
Now we can look to the Leave Types. This option is available under the
configuration menu.
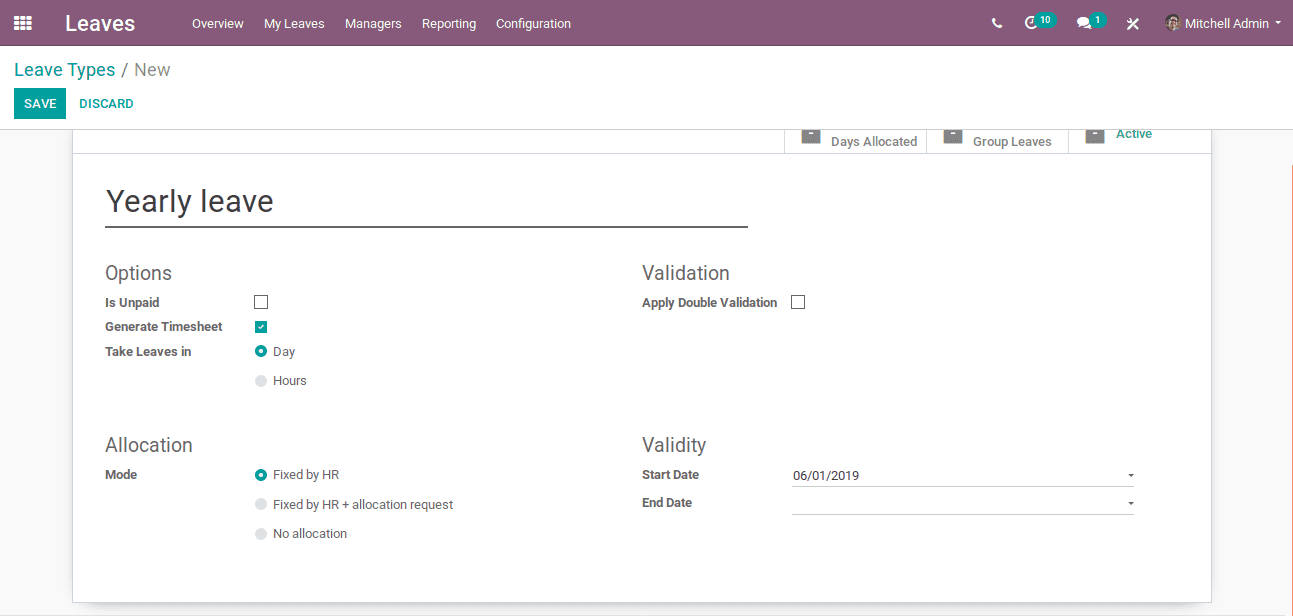
The common fields in the leave type are:
Unpaid: To identify the leave type is a paid or unpaid leave.
Generate Timesheet: Upon ticking, a timesheet shall be generated in the vacation project of the company while validating the leave. And two more fields -Internal Project and Internal Task for Timesheet shall appear to choose the project and the tasks in the timesheet.
Take Leaves in: Day/Hour. This helps to identify whether the leave taken is in day or hour. If the company have the policy to take leave in hours, then we need to tick this. If we choose hours, then at the time of leave allocation request we are entering the count in hours. Suppose if we want to allocate 5 days then we need to enter 40 hours if the total company working hours is 8 hours per day. Now, while employee chooses this leave type, he will be able to view 5 remaining of 5 in his leave type. If he had already taken a 2 hours leave, then it will be shown as 4.75 remaining of 5.
Sequence: The smallest sequence is the default value in the leave request.
Kind of Leave: Provision to choose whether it is computed as a holiday or working time.
Mode: Here we have 3 options.
Fixed by HR: HR is allocating the days and cannot be bypassed. User can request leaves.
Fixed by HR + allocation request: Allocated by HR and the user can create leave requests and leave allocations.
No allocation: By default, there is no leave allocation. But the user can freely request leaves.
Meeting Type: Odoo will create a corresponding meeting in the calendar while leave is validated.
Color in Report: The color which is used in the leave summary in Reporting -> Leaves by Department.
Apply Double Validation: Provision for second validation.