Adding payment options to your Flutter app is important if you're creating an e-commerce, subscription, or service-based app. When choosing a payment gateway, Stripe is a top choice because of its easy-to-use APIs, strong security features, and support for many different payment methods.
In this blog, we’ll walk you through how to integrate Stripe payments in Flutter, step by step.
First, include the flutter_stripe package in your pubspec.yaml file:
flutter_stripe: ^12.0.2
Android Setup:
- Update the minimum SDK version to 21 in …/android/app/build.gradle.kts.
- Use Kotlin version 1.8.0 or higher. For example:
- id "org.jetbrains.kotlin.android" version "2.1.0" apply false
- Update your …/android/settings.gradle.kts as follows:
pluginManagement { val flutterSdkPath = run { val properties = java.util.Properties() file("local.properties").inputStream().use { properties.load(it) } val flutterSdkPath = properties.getProperty("flutter.sdk") require(flutterSdkPath != null) { "flutter.sdk not set in local.properties" } flutterSdkPath } includeBuild("$flutterSdkPath/packages/flutter_tools/gradle") repositories { google() mavenCentral() gradlePluginPortal() }}plugins { id("dev.flutter.flutter-plugin-loader") version "1.0.0" id("com.android.application") version "8.7.3" apply false id("org.jetbrains.kotlin.android") version "2.1.0" apply false}include(":app") - Update themes in both …/android/app/src/main/res/values/styles.xml and …/android/app/src/main/res/values-night/styles.xml:
- Replace FlutterActivity with FlutterFragmentActivity in your MainActivity.kt.
- Create a new file proguard-rules.pro inside …/android/app with the following content to avoid Stripe class warnings:
-dontwarn com.stripe.android.pushProvisioning.PushProvisioningActivity$g-dontwarn com.stripe.android.pushProvisioning.PushProvisioningActivityStarter$Args-dontwarn com.stripe.android.pushProvisioning.PushProvisioningActivityStarter$Error-dontwarn com.stripe.android.pushProvisioning.PushProvisioningActivityStarter-dontwarn com.stripe.android.pushProvisioning.PushProvisioningEphemeralKeyProvider# Keep Stripe classes-keep class com.stripe.** { *; }iOS Setup:
- In your Podfile, set the platform version:
- To enable card scanning, add the following permissions to Info.plist:
NSCameraUsageDescriptionScan your card to add it automaticallyNSCameraUsageDescriptionTo scan cards
Need to define stripPublishableKey and stripeSecretKey initially. So, for easy access, add both in a separate file named as const.dart as below:
const String stripPublishableKey = "pk_test_51S0eMrC1KUSkQ9BgXvdhz3fuOrW1XAg8x3bjwpSq6y9dPc4S9X0OriDNePItXfM0heaUHLToFkLIQWe2Dtr100sdm9kUae";const String stripeSecretKey = "sk_test_51S0eMrC1KUSkQf9vPA7vEP69tPPzo9kZM8VWeYpATwXMvooCcvA2C3b3aByODeJF1pGTwXOw1Qcdav00cZBB5FeF";
Inside main.dart add Stripe.publishableKey = stripPublishableKey; inside main() function.
Now create a class for defining Stripe services and define StripeService._() and static final StripeService instance = StripeService._() as below:
class StripeService { StripeService._(); static final StripeService instance = StripeService._(); }StripeService._(); - This is a private constructor in Dart.
- The underscore _ makes the constructor private, meaning it cannot be called from outside the class.
static final StripeService instance = StripeService._();
- It creates a single, permanent instance of the StripeService class.
Inside the class, add a makePayment function to initiate the payment process using the payment intent.
 Future<void> makePayment() async {
    try {
      String? paymentInitialClientSecret = await createPaymentIntent(
        100,
        'usd',
      );
      if (paymentInitialClientSecret == null) return;
      await Stripe.instance.initPaymentSheet(
        paymentSheetParameters: SetupPaymentSheetParameters(
          paymentIntentClientSecret: paymentInitialClientSecret,
          merchantDisplayName: 'Cybrosys',
        ),
      );
      await processPayment();
    } catch (e) {
      print('Error: $e');
    }
}- String? paymentInitialClientSecret = await createPaymentIntent(100, 'usd');
- Calls the createPaymentIntent() method, passing:
- 100 > amount to be charged
- 'usd' > currency
- Future createPaymentIntent(int amount, String currency) async { try { final Dio dio = Dio(); Map data = {"amount": amount*100, "currency": currency}; final response = await dio.post( "https://api.stripe.com/v1/payment_intents", data: data, options: Options( contentType: Headers.formUrlEncodedContentType, headers: { "Authorization": "Bearer $stripeSecretKey", "Content-Type": "application/x-www-form-urlencoded", }, ), ); if (response.data != null) { return response.data['client_secret']; } return null; } catch (err) { print('Error creating payment intent: $err'); return null; } }
- final Dio dio = Dio();
- Dio is an HTTP client for Dart/Flutter.
- Used to make a POST request to Stripe’s API.
- Map data = {"amount": 100, "currency": currency};
- Data sent to Stripe API to create a Payment Intent.
- The amount should usually be in cents, not dollars..
- final response = await dio.post( "https://api.stripe.com/v1/payment_intents", data: data, options: Options( contentType: Headers.formUrlEncodedContentType, headers: { "Authorization": "Bearer $stripeSecretKey", "Content-Type": "application/x-www-form-urlencoded", }, ),);
- Sends a POST request to Stripe’s Payment Intents API.
- Headers:
- Authorization > Bearer token (your Stripe secret key)
- Content-Type > Form URL encoded (Stripe requires this)
- paymentInitialClientSecret > the client secret returned by Stripe(from response.data['client_secret'] of createPaymentIntent function), needed to initialize the payment sheet.
- if (paymentInitialClientSecret == null) return;
- If the client secret is null (meaning payment intent creation failed), the method stops here.
- await Stripe.instance.initPaymentSheet( paymentSheetParameters: SetupPaymentSheetParameters( paymentIntentClientSecret: paymentInitialClientSecret, merchantDisplayName: 'Cybrosys', ),);
- This sets up the Stripe Payment Sheet, which is the UI that lets the user enter card details and pay.
- Parameters:
- paymentIntentClientSecret > links the Payment Sheet to the payment intent created on Stripe.
- merchantDisplayName > your business name shown on the Payment Sheet.
- await > ensures the Payment Sheet is fully initialized before showing it.
- await processPayment();
- Calls another method, processPayment(), which actually presents the Payment Sheet to the user and completes the payment.
- Future processPayment() async { try { await Stripe.instance.presentPaymentSheet(); await Stripe.instance.confirmPaymentSheetPayment(); } catch (e) { print("eee$e"); } }
- await Stripe.instance.presentPaymentSheet();
- Opens the Stripe Payment Sheet UI for the user.
- User can enter card details, choose payment methods, and confirm the payment.
- await Stripe.instance.confirmPaymentSheetPayment();
- This line attempts to confirm the payment.
Here is the full code for StripeService:
import 'package:blogs_2/PaymentMethod/const.dart';
import 'package:dio/dio.dart';
import 'package:flutter_stripe/flutter_stripe.dart';
class StripeService {
  StripeService._();
  static final StripeService instance = StripeService._();
  Future<void> makePayment() async {
    try {
      String? paymentInitialClientSecret = await createPaymentIntent(
        100,
        'usd',
      );
      if (paymentInitialClientSecret == null) return;
      await Stripe.instance.initPaymentSheet(
        paymentSheetParameters: SetupPaymentSheetParameters(
          paymentIntentClientSecret: paymentInitialClientSecret,
          merchantDisplayName: 'Cybrosys',
        ),
      );
      await processPayment();
    } catch (e) {
      print('Error: $e');
    }
  }
  Future<String?> createPaymentIntent(int amount, String currency) async {
    try {
      final Dio dio = Dio();
      Map<String, dynamic> data = {"amount": 100, "currency": currency};
      final response = await dio.post(
        "https://api.stripe.com/v1/payment_intents",
        data: data,
        options: Options(
          contentType: Headers.formUrlEncodedContentType,
          headers: {
            "Authorization": "Bearer $stripeSecretKey",
            "Content-Type": "application/x-www-form-urlencoded",
          },
        ),
      );
      if (response.data != null) {
        return response.data['client_secret'];
      }
      return null;
    } catch (err) {
      print('Error creating payment intent: $err');
      return null;
    }
  }
  Future<void> processPayment() async {
    try {
      await Stripe.instance.presentPaymentSheet();
      await Stripe.instance.confirmPaymentSheetPayment();
    } catch (e) {
      print("eee$e");
    }
  }
}
Now create a view for the mobile app for the Pay Now button as below:
class _PaymentPageState extends State<PaymentPage> {
  final StripeService _stripeService = StripeService.instance;
  @override
  Widget build(BuildContext context) {
    return Scaffold(
      appBar: AppBar(title: const Text('Stripe Payment')),
      body: Center(
        child: ElevatedButton(
          onPressed: _stripeService.makePayment,
          child: const Text('Pay Now'),
        ),
      ),
    );
  }
}
When you click the Pay Now button,
- It triggers the makePayment() method from StripeService.
- This starts the full payment flow:
- Create a PaymentIntent on Stripe.
- Initialize the Payment Sheet.
The output is given below:
When you click the Pay Now button, the following payment sheet view will appear

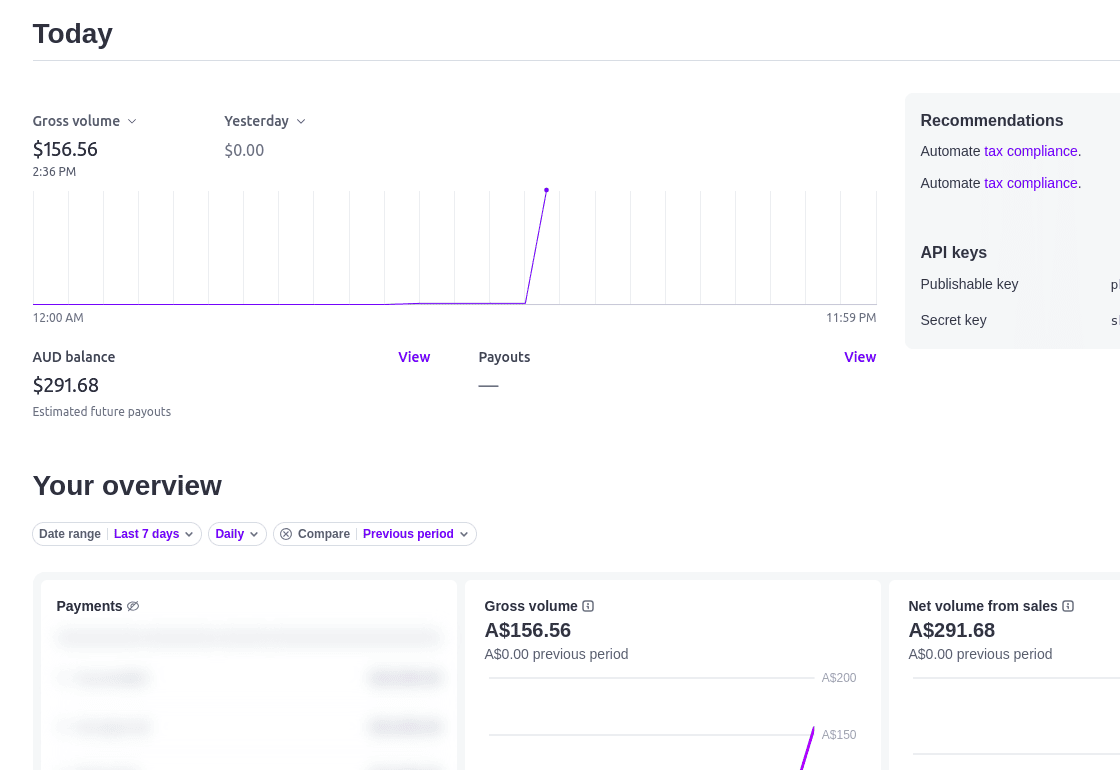
On the Stripe Dashboard, you can see that the payment amount has been updated as follows
Using Stripe with Flutter offers a secure and smooth way for users to make payments, while making it easy for developers to handle the code. By setting up a PaymentIntent, launching the Payment Sheet, and confirming the payment, you can create a full payment process. This method ensures transactions go smoothly and also allows for future changes, such as adding subscriptions, handling refunds, or supporting multiple currencies.
To read more about Overview of Google Map integration to Flutter, refer to our blog Overview of Google Map integration to Flutter.