Effective receipt and invoice management are pivotal elements in maintaining a seamless and organized transaction process within any business. Odoo's Point of Sale (POS) module offers robust features and capabilities for businesses seeking to streamline their receipt and invoice workflows. In this detailed blog post, we will explore the steps to set up receipts, customize headers and footers, print receipts, manage invoices, and leverage QR codes for enhanced customization.
The Point of Sale module in Odoo 17 has a new, updated user interface. Customers and cashiers will have a more straightforward and user-friendly experience thanks to the updated interface. The enhanced visual appeal not only contributes to a more engaging transaction process but also facilitates easy navigation through the receipt management functionalities.
Receipts Configuration
One of the standout features of Odoo 17 is its ability to create highly customizable receipt templates. Companies may customize their receipts to match their corporate identity in terms of appearance and feel. Whether it's adding a company logo, adjusting fonts, or including specific information, the flexibility provided by Odoo 17 allows businesses to create professional and branded receipts.
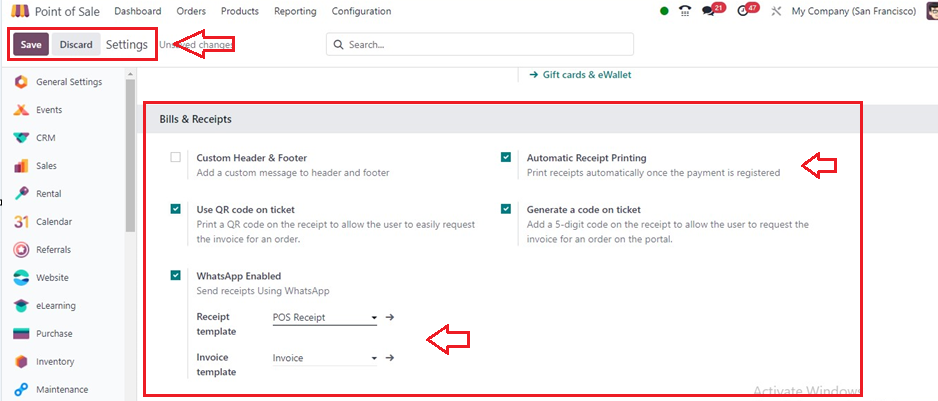
Navigate to Point of Sale Configuration. Begin by setting up receipts in Odoo's POS module. Navigating to the "Configuration" menu of the Point of Sale module will bring up the Configuration Settings window. Select the specific POS you want to configure and scroll down to the "Bills & Receipts" section.
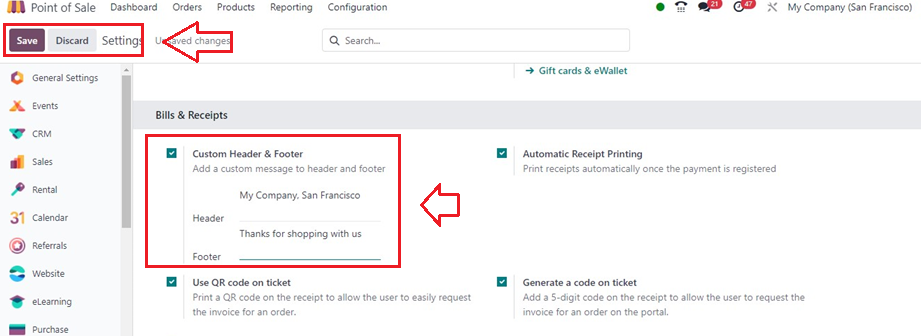
Customize Header and Footer
To personalize the appearance of your receipts, activate the "Header & Footer" option. Fill in both fields with the relevant information that you want to be printed on the receipts, such as the business name, address, and contact details.
Then, we can check this Receipt Header and Footer inside a receipt that is generated after creating a payment. So, I am creating a random PoS Order by opening a new session.
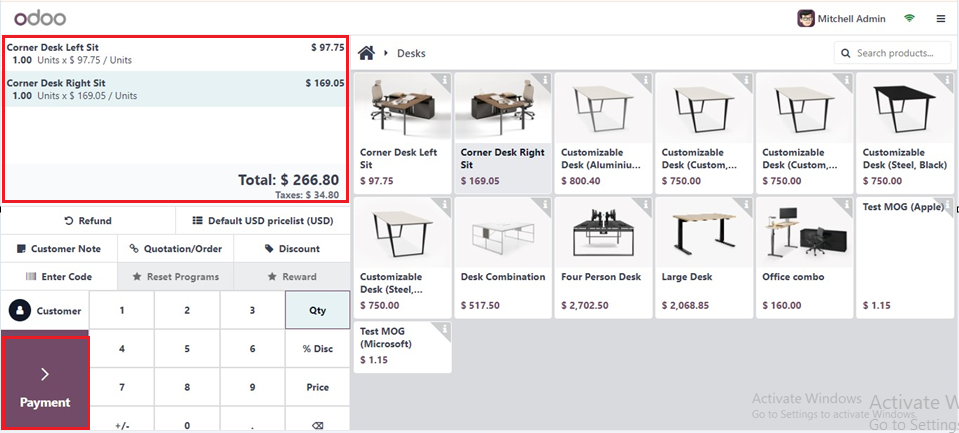
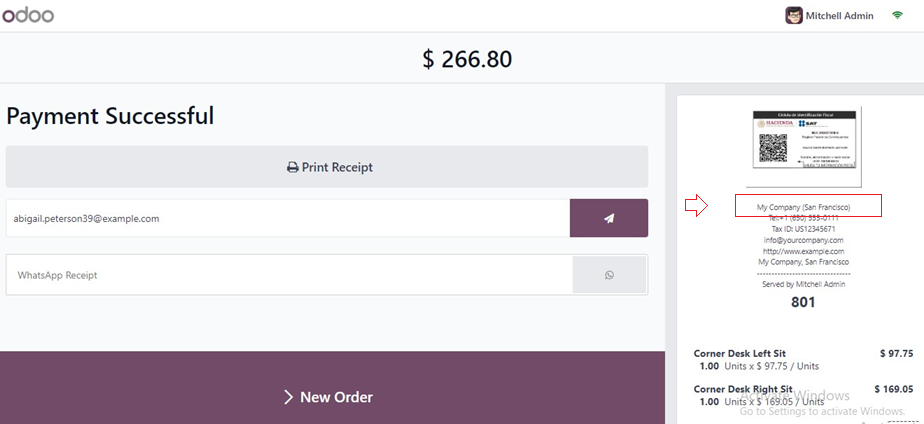
After completing the order, proceed with the payment procedure, Choose a Payment Method and Validate the payment from the ‘Payments’ page. As a result, the invoice receipt will be generated. Scrolling down will allow you to view the invoice's Header and Footer texts, as shown in the screenshots below.
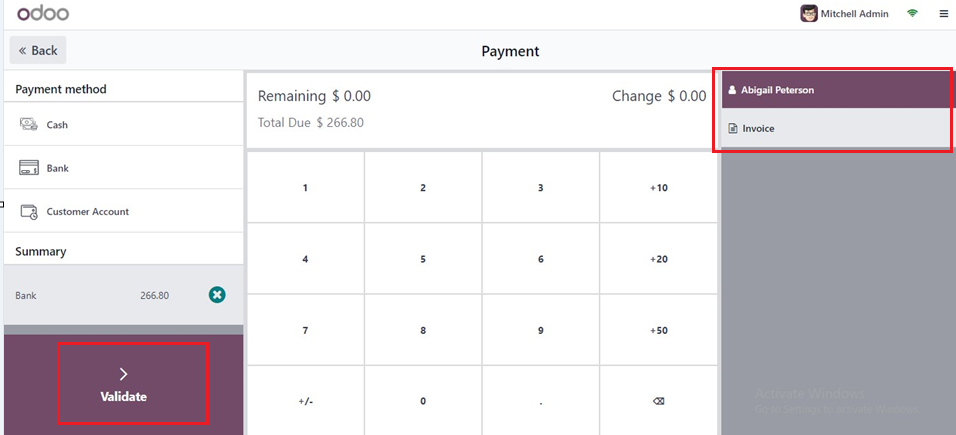
Invoice Issuance
Upon processing a payment, click "Invoice" beneath the customer's name to issue an invoice for the corresponding order. Select the payment method and click "Validate." The invoice is automatically generated and ready for download or printing.
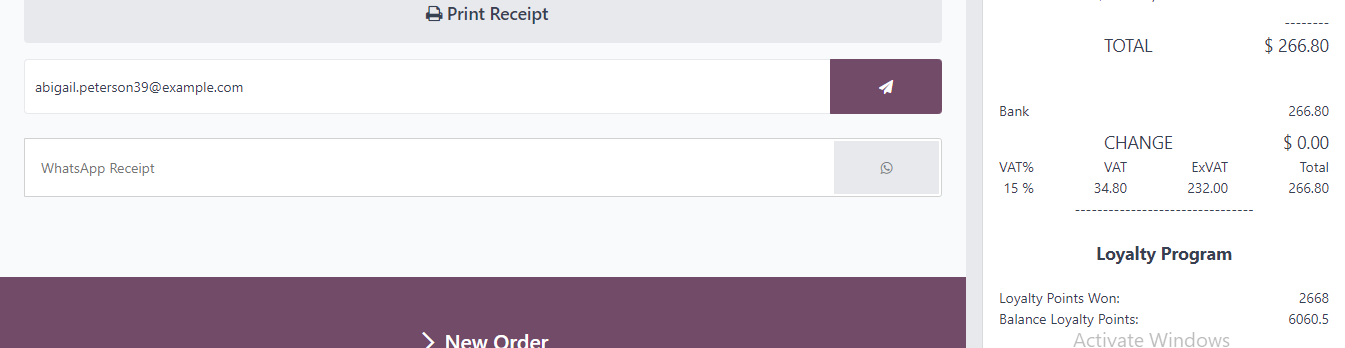
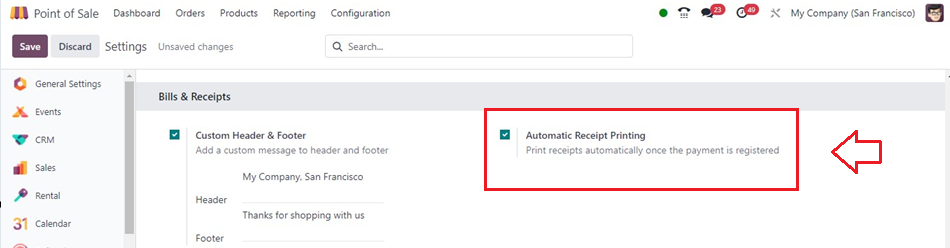
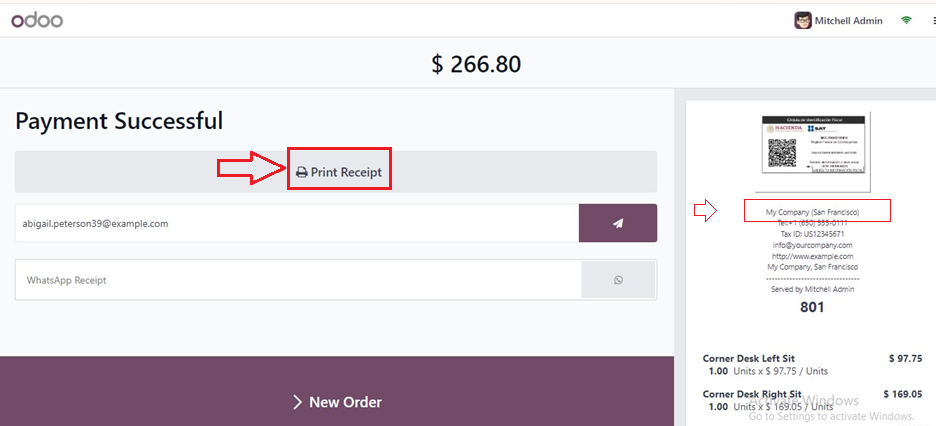
Automatic Receipt Printing
If you would want receipts to be produced immediately as soon as the payment is registered, turn on the "Automatic Receipt Printing" setting. This feature contributes to a more efficient transaction process, reducing manual steps.
Upon activation of this option, a "Print Receipt" button will appear on the screen as soon as the payment has been completed, providing automated receipt printing capabilities, as seen below.
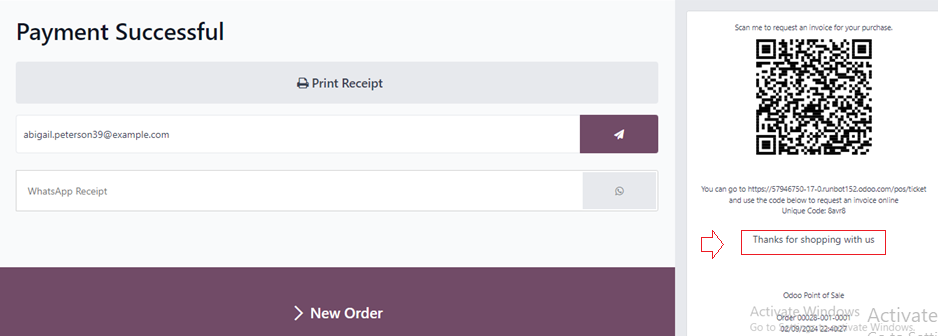
Use the QR Code on the Ticket
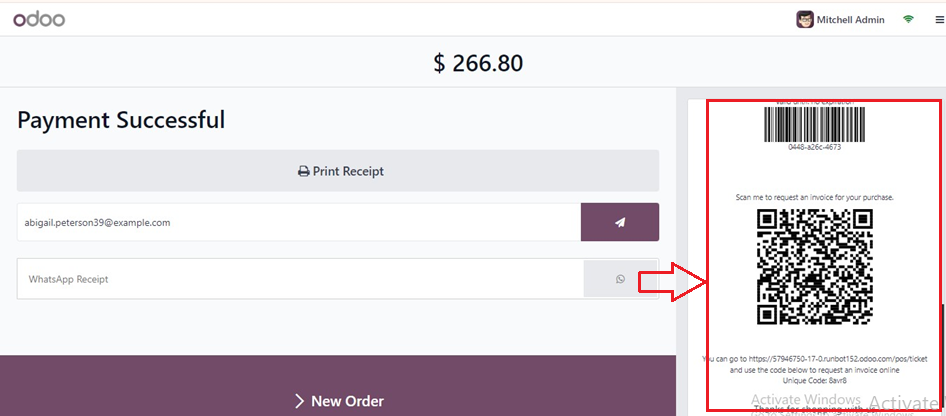
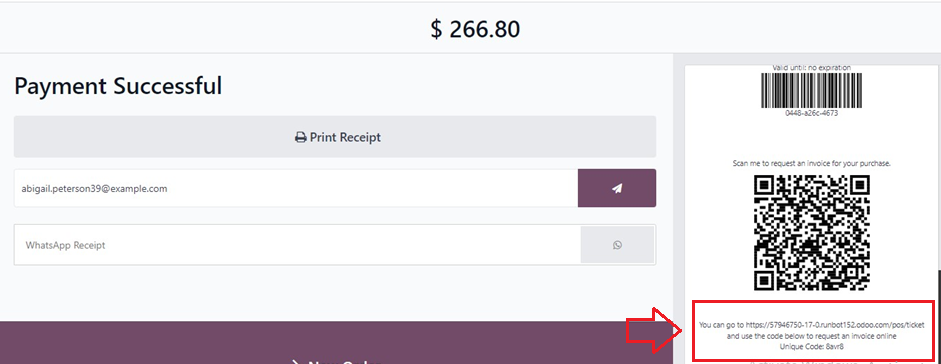
Through the QR code on their receipt, customers can request an invoice. This initiates a form-fill process where customers provide their billing information and click "Get my invoice." This action generates an invoice for download, simultaneously updating the order status to "Invoiced" in the Odoo backend.When this ‘Use QR Code on Ticket’ option is enabled, a QR code will be printed on the receipt, making it simple for customers to obtain an invoice for a purchase.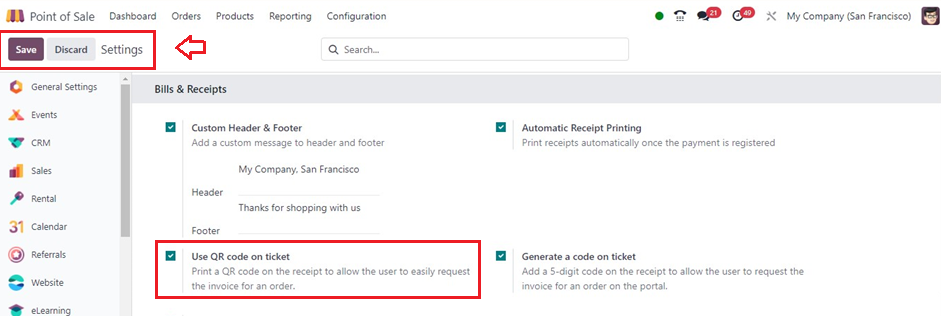
After the payments are made, the QR Code for that specific order is shown inside the invoice. Here, I am using the same invoice that we have created in the above section as seen below.
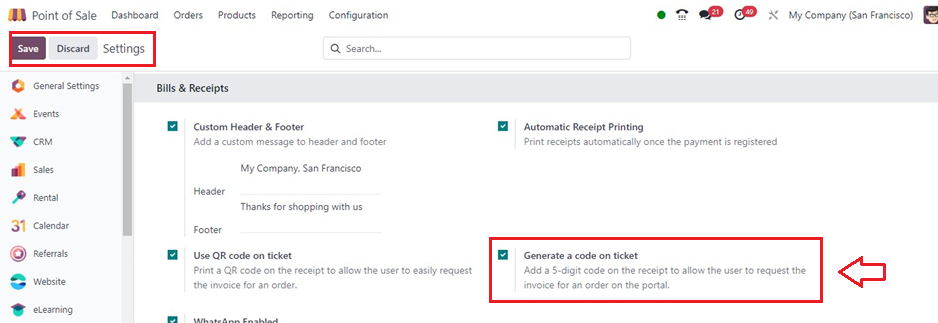
Generating a Ticket Code
Selecting the 'Generate a code on the ticket' option, customers may add a five-digit number to their receipt, which will enable them to access the order invoice on the site.
As indicated below, these five-digit numbers may be found inside the invoice beneath the QR code section under the name of a Unique Code.
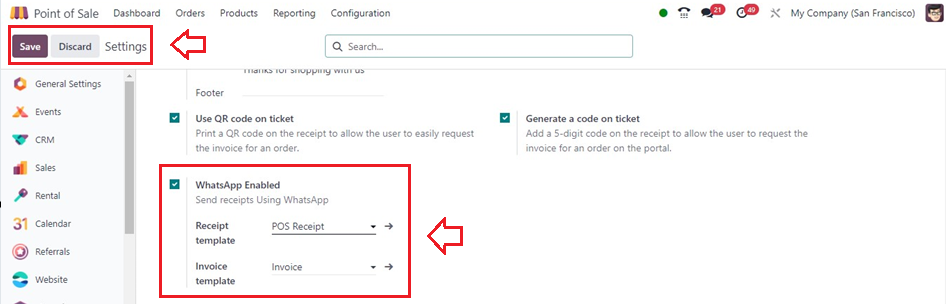
Sending Receipts through WhatsApp
You may use the WhatsApp Application to send receipts by turning on the "WhatsApp Enabled" option. You may also choose which models of the invoice and receipt templates you wish to send inside the Receipt template and Invoice template fields, as shown below.
Following the successful completion of the payment, as seen below, we can see a "WhatsApp Receipt" button inside the payment success window.
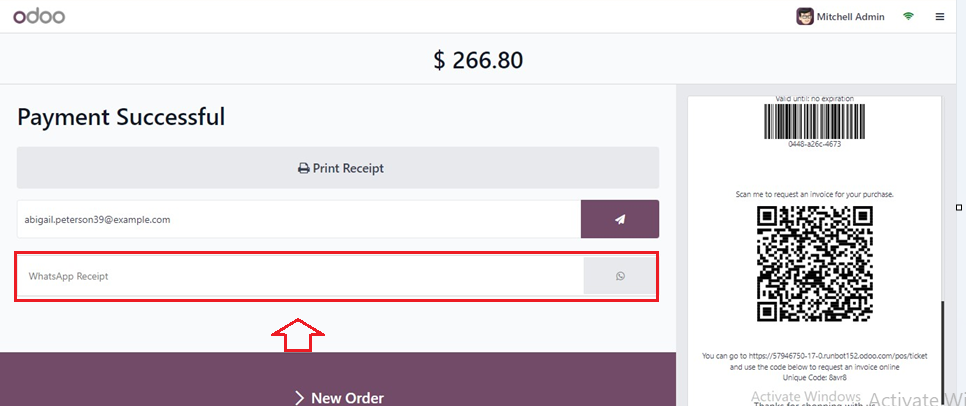
The receipts can be sent via WhatsApp by entering the phone number in the provided field. To, access this functionality, it is imperative to ensure that your WhatsApp integration settings are properly configured within the Odoo Database.
Retrieving Invoices
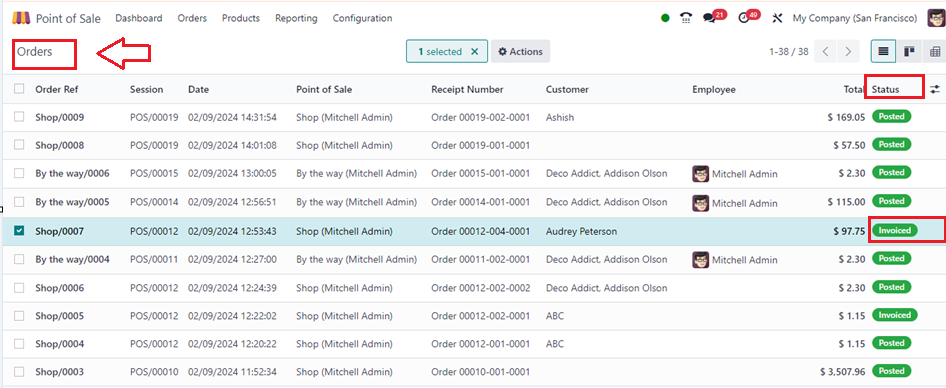
To access invoices from the POS dashboard, navigate to the “Orders" window from the "Orders" menu to view all orders. To open an order's invoice, simply select the desired order and click on "Invoice." Invoices for orders can be identified by the "Invoiced" status displayed in the Status column, as shown below.
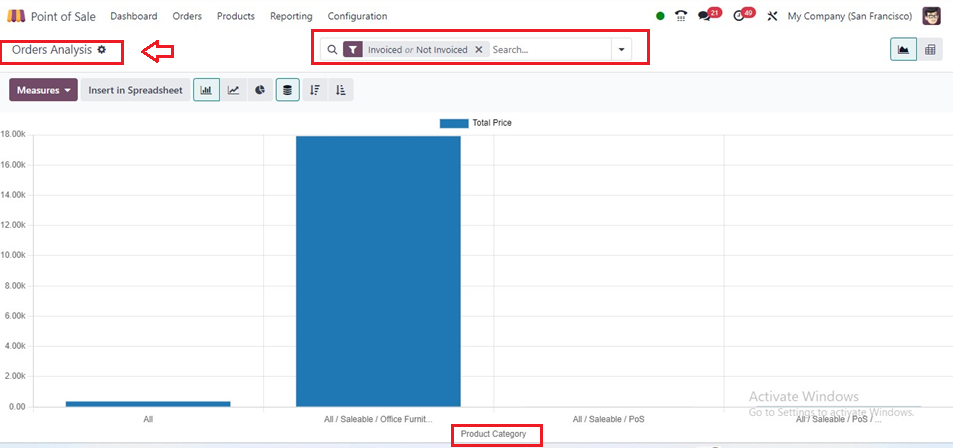
Reporting
Beyond individual transactions, Odoo 17's POS module empowers businesses with comprehensive sales reporting. In-depth data about sales trends, best-selling items, and cashier performance are generated by the system. These reports leverage the data collected through receipt management, offering valuable analytics for strategic decision-making.
The Orders Reporting window below offers a comprehensive graphical analysis of both invoiced and non-invoiced orders according to the filter criteria I've applied. This serves as an illustrative example of order analysis reporting based on invoice status.
Providing a smooth and expert client experience depends on efficiently handling bills and receipts. With Odoo's POS module, businesses can customize receipts, automate printing, issue invoices, and leverage QR codes to enhance customer interactions. By following the outlined steps and utilizing the advanced features offered by Odoo, businesses can elevate their transaction processes and stay ahead in today's competitive marketplace.