Odoo provides a variety of powerful view types, such as Kanban, Form, Graph, List, Pivot, Search, and Calendar, each designed to offer a smooth and efficient user experience.
In this blog, we will explore how to create a list view in Odoo 19 and walk through all the available list-view attributes, along with examples and expected results.
1. Create a New Model (class.teacher)
# -*- coding: utf-8 -*-
from odoo import fields, models

class ClassTeacher(models.Model):
   _name = 'class.teacher'
   _description = 'Class Teacher'
   name = fields.Char(string='Name')
   age = fields.Float(string='Age')
   email = fields.Char(string='Email')
   subject = fields.Char(string='Subject')
   qualification = fields.Char(string='Qualification')
   experience = fields.Float(string='Experience')
   state = fields.Selection([
       ('draft', 'Draft'),
       ('confirm', 'Confirmed')
   ], string='State')
   joining_date = fields.Date(string='Joining Date')
2. Create Action for class.teacher
Odoo 18+ and Odoo 19 use <list> as the root element instead of <tree>.
<odoo>
   <record id="student_action_teacher" model="ir.actions.act_window">
       <field name="name">Teachers</field>
       <field name="type">ir.actions.act_window</field>
       <field name="res_model">class.teacher</field>
       <field name="view_mode">list,form</field>
   </record>
3. Create the List View
<record id="class_teacher_view_list" model="ir.ui.view">
   <field name="name">class.teacher.view.list</field>
   <field name="model">class.teacher</field>
   <field name="arch" type="xml">
       <list string="Teachers">
           <field name="name"/>
           <field name="age"/>
           <field name="email"/>
           <field name="joining_date"/>
           <field name="subject"/>
           <field name="qualification"/>
           <field name="state"/>
       </list>
   </field>
</record>

List root attributes:
All attributes from Odoo 18 still exist in Odoo 19, with improved UI and behavior.
Below are the detailed explanations.
1. string (str)
The view title is displayed when the action has no name.
<list string="Teachers">
2. create (bool)
Allow or restrict record creation. Default = True.
<list string="Teachers" create="0">
Result: User cannot create records from the list view. There won’t be a NEW button.

3. edit (bool)
Disable editing from list view.
<list string="Teachers" edit="0">
4. delete (bool)
Disable record deletion from Action menu.

<list string="Teachers" delete="0">

5. import (bool)
Disable CSV/XLS import.

<list string="Teachers" import="0">

6. export_xlsx (bool)
Disable export to Excel.

<list string="Teachers" export_xlsx="0">

7. editable (str)
Enable inline row editing and row-based creation.
Options:
<list string="Teachers" editable="bottom">


8. multi_edit (bool)
Apply one edited value to multiple selected records.
<list string="Teachers" multi_edit="1">

When editing a cell, this dialog appears:
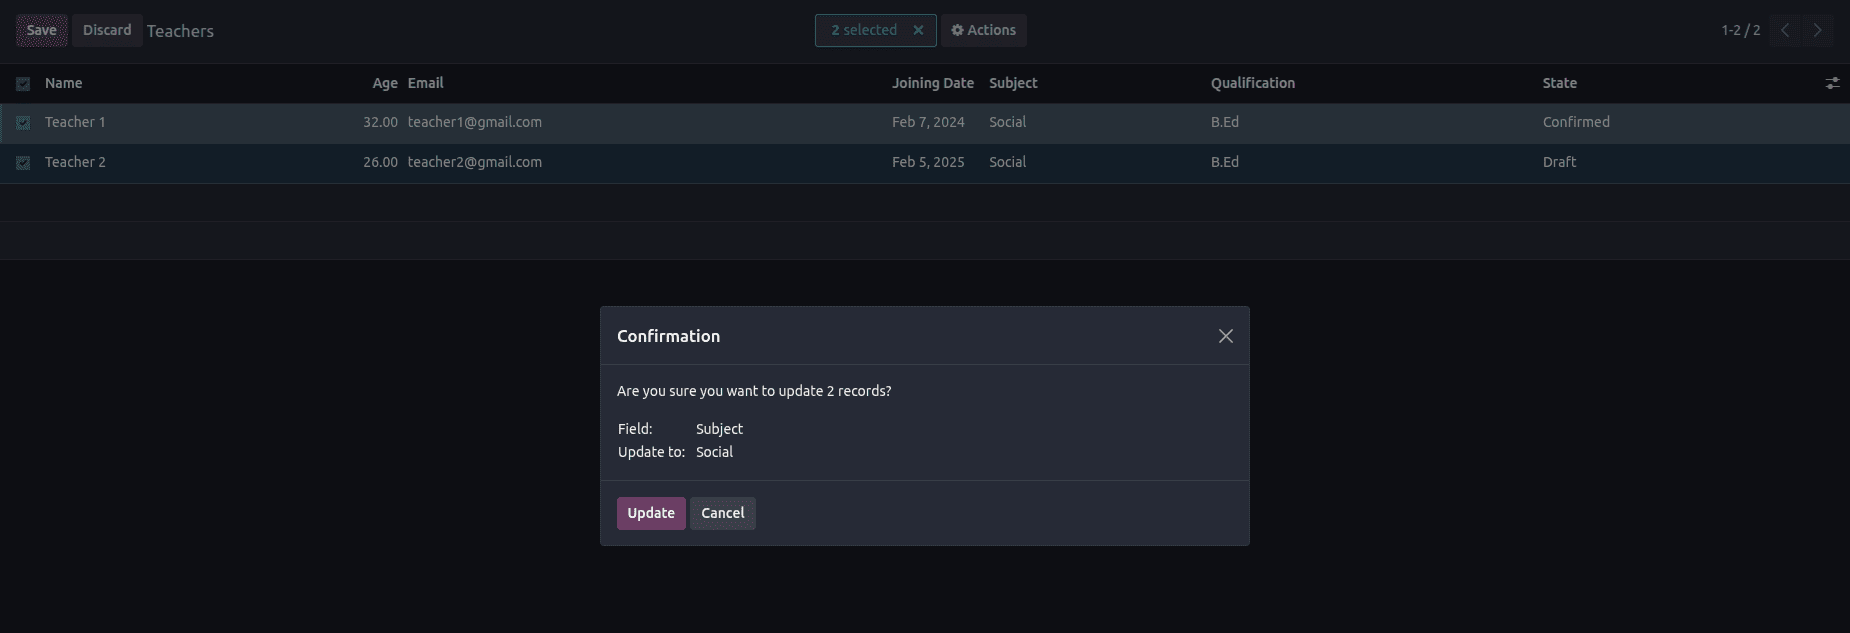
After confirmation, selected records update together.

9. open_form_view (bool)
Adds a small button at the end of each row to open form view.
<list string="Teachers" editable="bottom" open_form_view="1">
Works only when editable is enabled.

10. default_group_by (str)
Automatically groups list by a field.
<list string="Teachers" default_group_by="state">

11. expand (bool)
Expand groups by default.
<list string="Teachers" default_group_by="state" expand="1">

12. default_order (str)
Override _order of the model.
<list string="Teachers" default_order="age desc">

13. limit (int)
Number of records per page.
Default = 80 (list), 40 (x2many).
<list string="Teachers" limit="2">

14. groups_limit (int)
Limit number of visible groups before clicking > "More Groups".
<list string="Teachers" default_group_by="age" groups_limit="2">

15. decoration-<style>
Color-code records based on conditions.
Available styles:
- decoration-it — italics
- decoration-bf — bold
- decoration-danger — light red
- decoration-primary — purple
- decoration-info — blue
- decoration-warning — brown
- decoration-muted — gray
- decoration-success — green
Example:
<list string="Teachers"
      decoration-success="state == 'confirm'"
      decoration-info="state == 'draft'">
The List View in Odoo 19 remains one of the most powerful and customizable views available.
Using the above attributes, developers can:
- Control permissions
- Enable inline editing
- Apply batch updates
- Group & sort data intelligently
- Apply visual decorations
- Improve user workflow drastically
To read more about How to Create a List View Attributes in Odoo 18, refer to our blog How to Create a List View Attributes in Odoo 18.