In Odoo 19, creating a form view is one of the essential skills for building custom applications. Form views allow users to enter, edit, and view records of a model in a structured and user-friendly way. In this blog, we’ll walk you through the process step by step, using a practical example.
Creating Form View in Odoo 19
A form view is a type of view in Odoo that displays one record at a time. It can include fields, groups, tabs, and even embedded records from related models. Form views are highly customizable—they can include multiple columns, notebook tabs, widgets, and dynamic behavior.
Step 1: Create a New Module
Before creating a form view, it’s best to create a custom module. For example, let’s create a module called library_management. The folder structure should look like this:
library_management/
+-- __init__.py
+-- __manifest__.py
+-- models/
¦   +-- __init__.py
¦   +-- library_book.py
+-- views/
¦   +-- library_book_views.xml
+-- security/
    +-- ir.model.access.csv
    +-- security.xml   (optional, for groups/rules)
Step 2: Define Your Model
Next, define the model you want to attach the form view to. In models/library_book.py:
# -*- coding: utf-8 -*-
from odoo import fields, models
class LibraryBook(models.Model):
   _name = 'library.book'
   _description = 'Library Book'
   name = fields.Char(string='Title', required=True)
   author = fields.Char(string='Author')
   isbn = fields.Char(string='ISBN')
   description = fields.Text(string='Description')
   published_date = fields.Date(string='Published Date')
   active = fields.Boolean(string='Active', default=True)
Step 3: Define Model Security
In security/ir.mode.access.csv, define the model security:
id,name,model_id:id,group_id:id,perm_read,perm_write,perm_create,perm_unlink
access_library_book,library.book,model_library_book,base.group_user,1,1,1,1
Step 4: Create the Form View XML
In views/library_book_views.xml, define the form view:
<?xml version="1.0"?>
<odoo>
   <record id="view_library_book_form" model="ir.ui.view">
       <field name="name">library.book.form</field>
       <field name="model">library.book</field>
       <field name="arch" type="xml">
           <form string="Library Book">
               <group>
                   <group>
                       <field name="name"/>
                       <field name="author"/>
                   </group>
                   <group>
                       <field name="isbn"/>
                       <field name="published_date"/>
                       <field name="active" invisible="1"/>
                   </group>
               </group>
               <notebook>
                   <page string="Description">
                       <field name="description"/>
                   </page>
               </notebook>
           </form>
       </field>
   </record>
   <record id="view_library_book_list" model="ir.ui.view">
       <field name="name">library.book.list</field>
       <field name="model">library.book</field>
       <field name="arch" type="xml">
           <list string="Library Books">
               <field name="name"/>
               <field name="author"/>
               <field name="isbn"/>
               <field name="published_date"/>
               <field name="active"/>
           </list>
       </field>
   </record>

    <!-- Action -->
   <record id="action_library_book" model="ir.actions.act_window">
       <field name="name">Library Books</field>
       <field name="res_model">library.book</field>
       <field name="view_mode">list,form</field>
   </record>

   <!-- Menu -->
   <menuitem id="menu_library_book"
             name="Books"
             parent="menu_library_book_root"
             action="action_library_book"
             sequence="1"/>
</odoo>
Step 5: Install and Test Your Module
To make your new module available, place the module folder inside the Odoo addons directory. Once it is in the correct location, restart your Odoo server so that it can detect the new module.
Next, open Odoo and go to the Apps menu. From there, update the apps list so that Odoo refreshes the available modules. Once the list is updated, search for your Library Management module and install it.
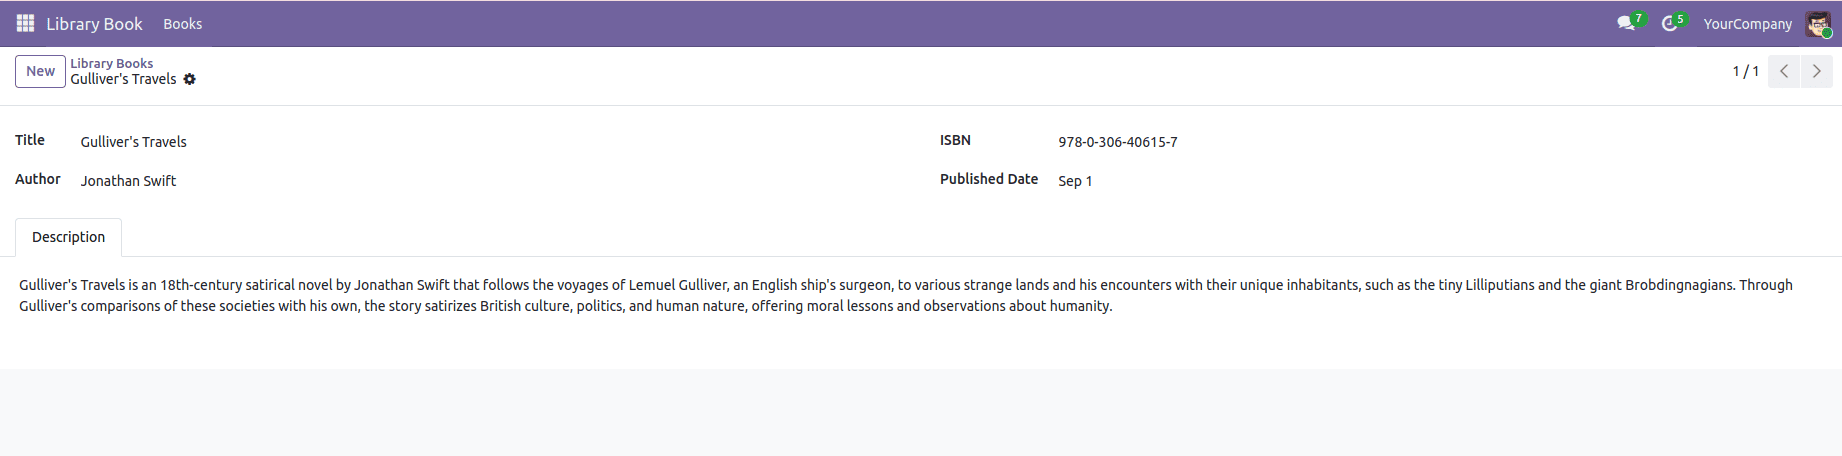
After installation, you can navigate through the menu by going to Library > Books. This will open the list and form views you created, allowing you to add, view, and manage your records in action.
Creating a form view in Odoo 19 is a straightforward but powerful way to manage data. By defining a custom model, setting up security rules, and designing the form layout in XML, you can build user-friendly interfaces tailored to your business needs. Once the module is installed, users can easily navigate to the menu, open records, and work with them in a structured format. With options like groups, tabs, and widgets, form views in Odoo 19 offer both flexibility and functionality, making them an essential part of any custom application.
To read more about Overview of Form View Attributes in Odoo 19, refer to our blog Overview of Form View Attributes in Odoo 19.