Managing vendor payments efficiently is an essential part of maintaining accurate financial records and ensuring smooth supplier relationships. In Odoo 19 Accounting, businesses can easily register, track, and reconcile payments made to vendors through a structured workflow that connects vendor bills, payment registration, and bank reconciliation. This integrated process helps ensure that all outgoing payments are properly recorded, matched with bank transactions, and reflected accurately in the accounting system. By following a few systematic steps, companies can manage vendor payments in a transparent and organized manner while reducing the risk of discrepancies in financial records.
The vendor payment process in Odoo 19 typically begins once a vendor bill has been created and confirmed. For that, let’s first create a purchase order and confirm it.
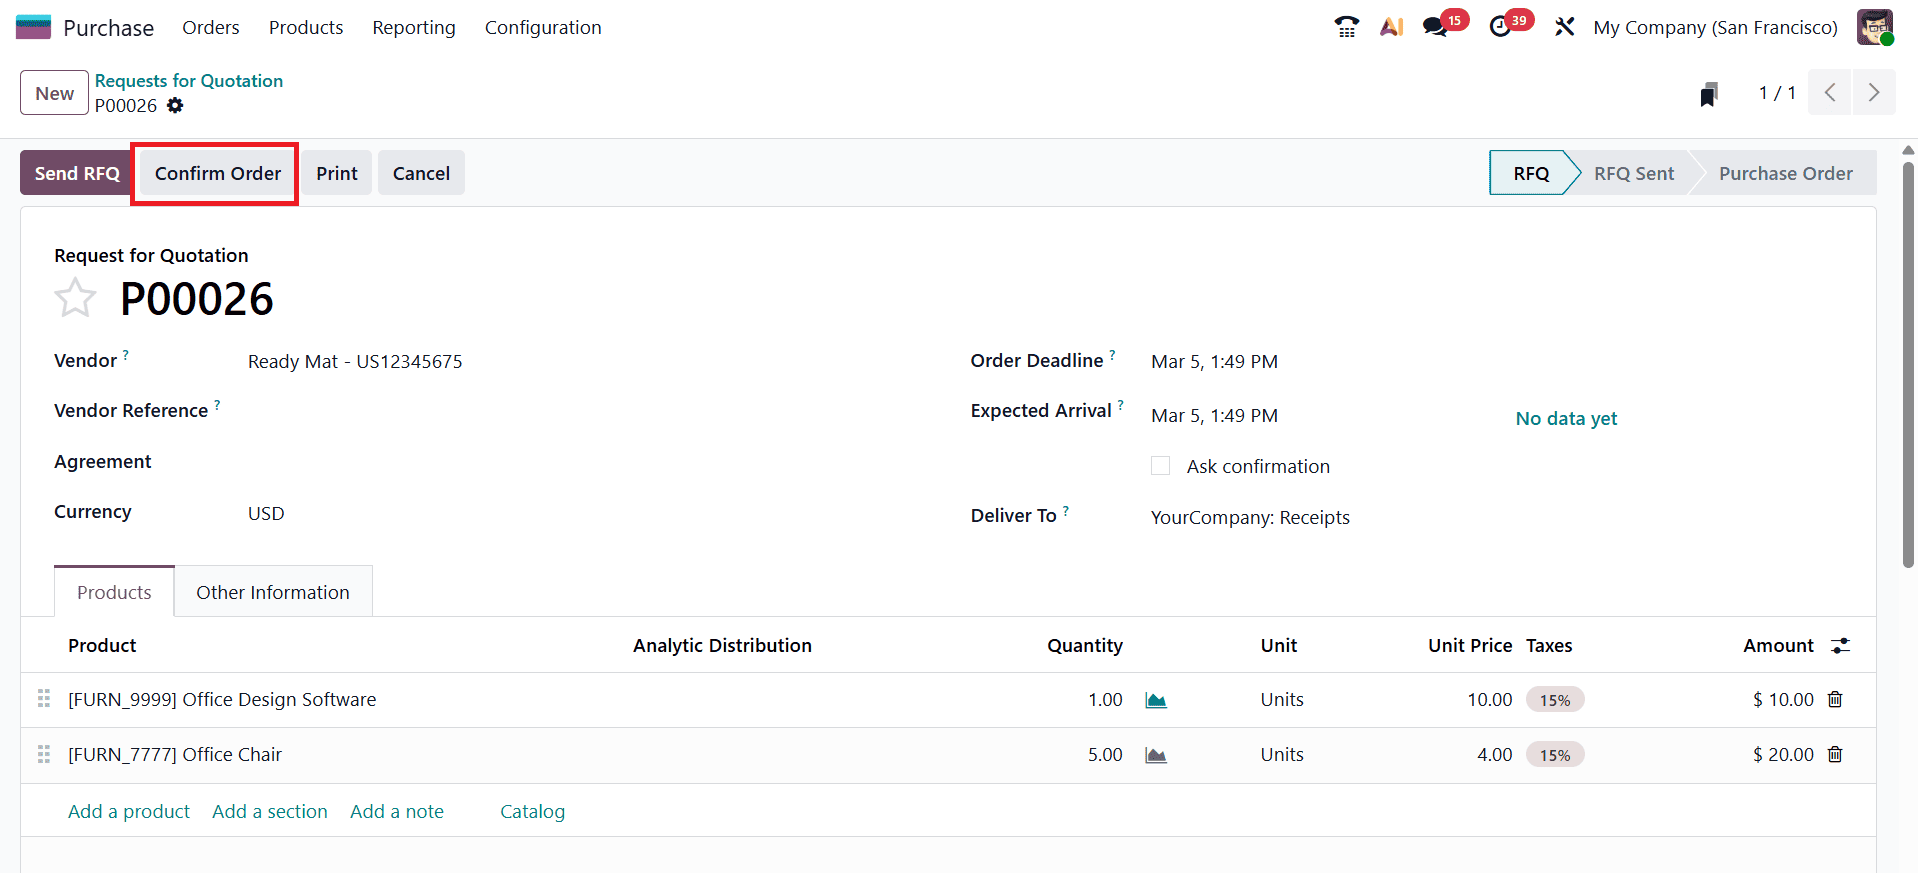
After confirming the purchase order, validate the receipt of the purchase.

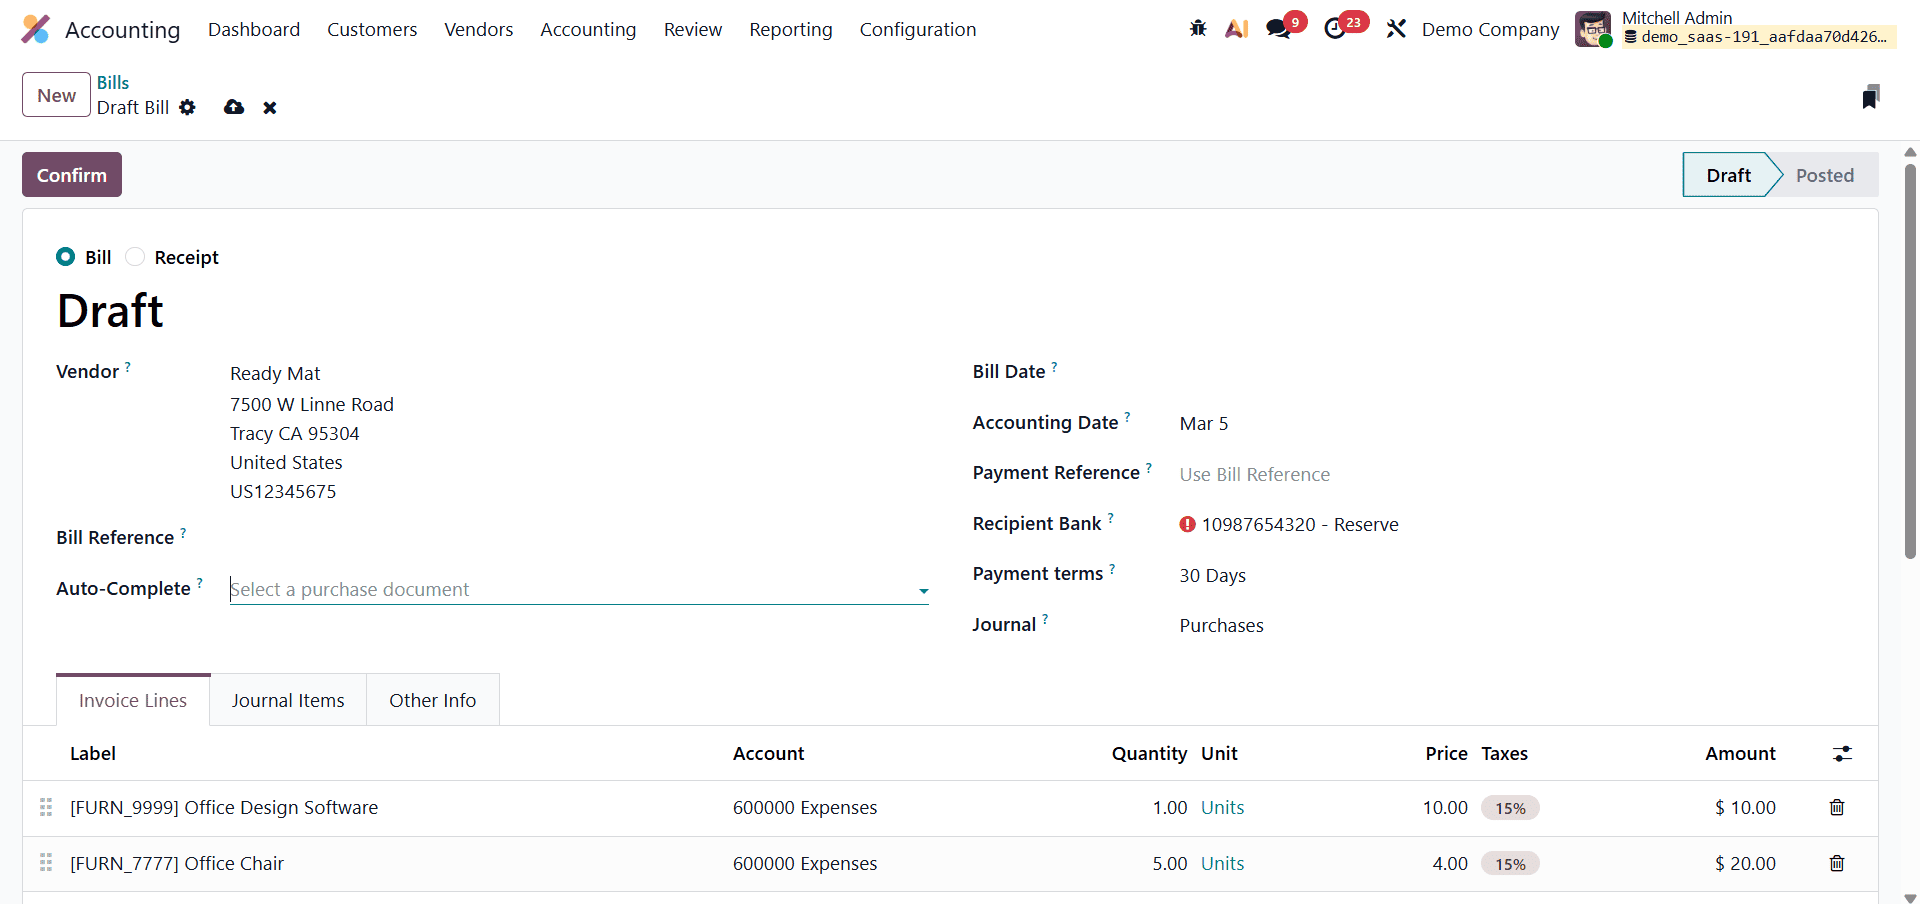
Next, navigate to the Accounting module to create the bill. From the Vendor menu, select Bills to open the vendor bill window. Click the New button to create a new bill. First, add the Vendor. The form includes an Auto-Complete option that allows you to select the related Purchase Order, which will automatically populate the Invoice Lines.
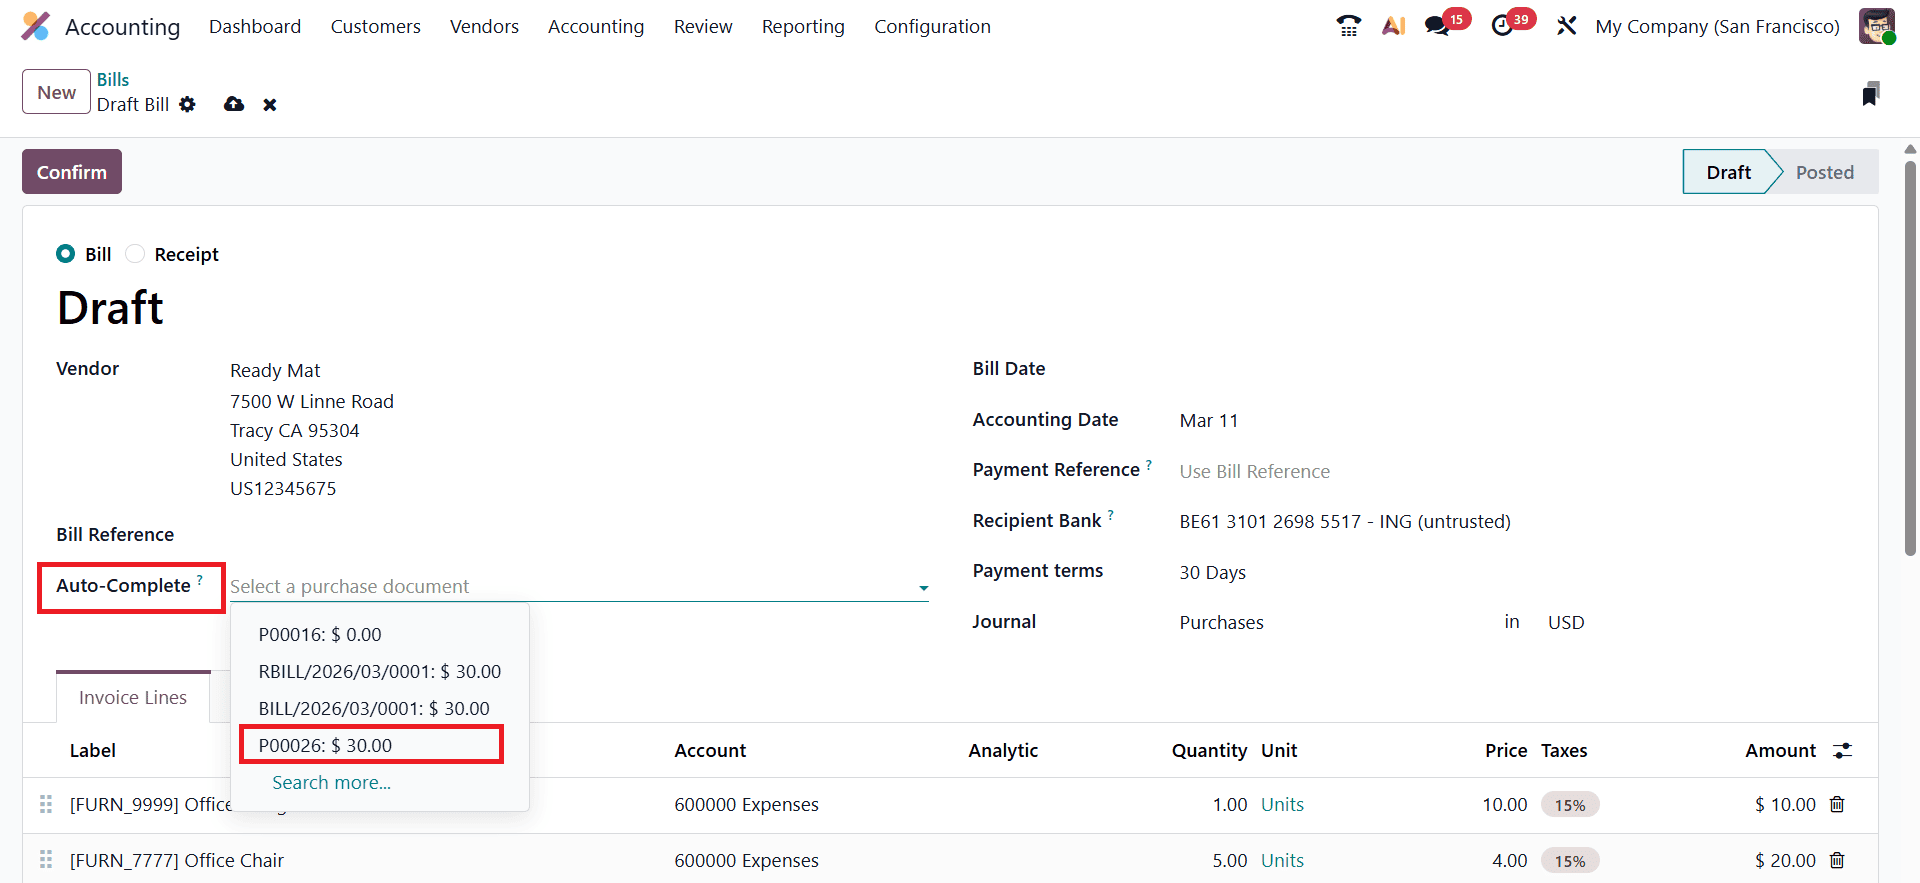
You can either choose the purchase order to auto-fill the invoice details or manually enter the information in the Invoice Lines section. After verifying that the products and amounts listed in the invoice lines are correct, click the Confirm button to validate the bill.
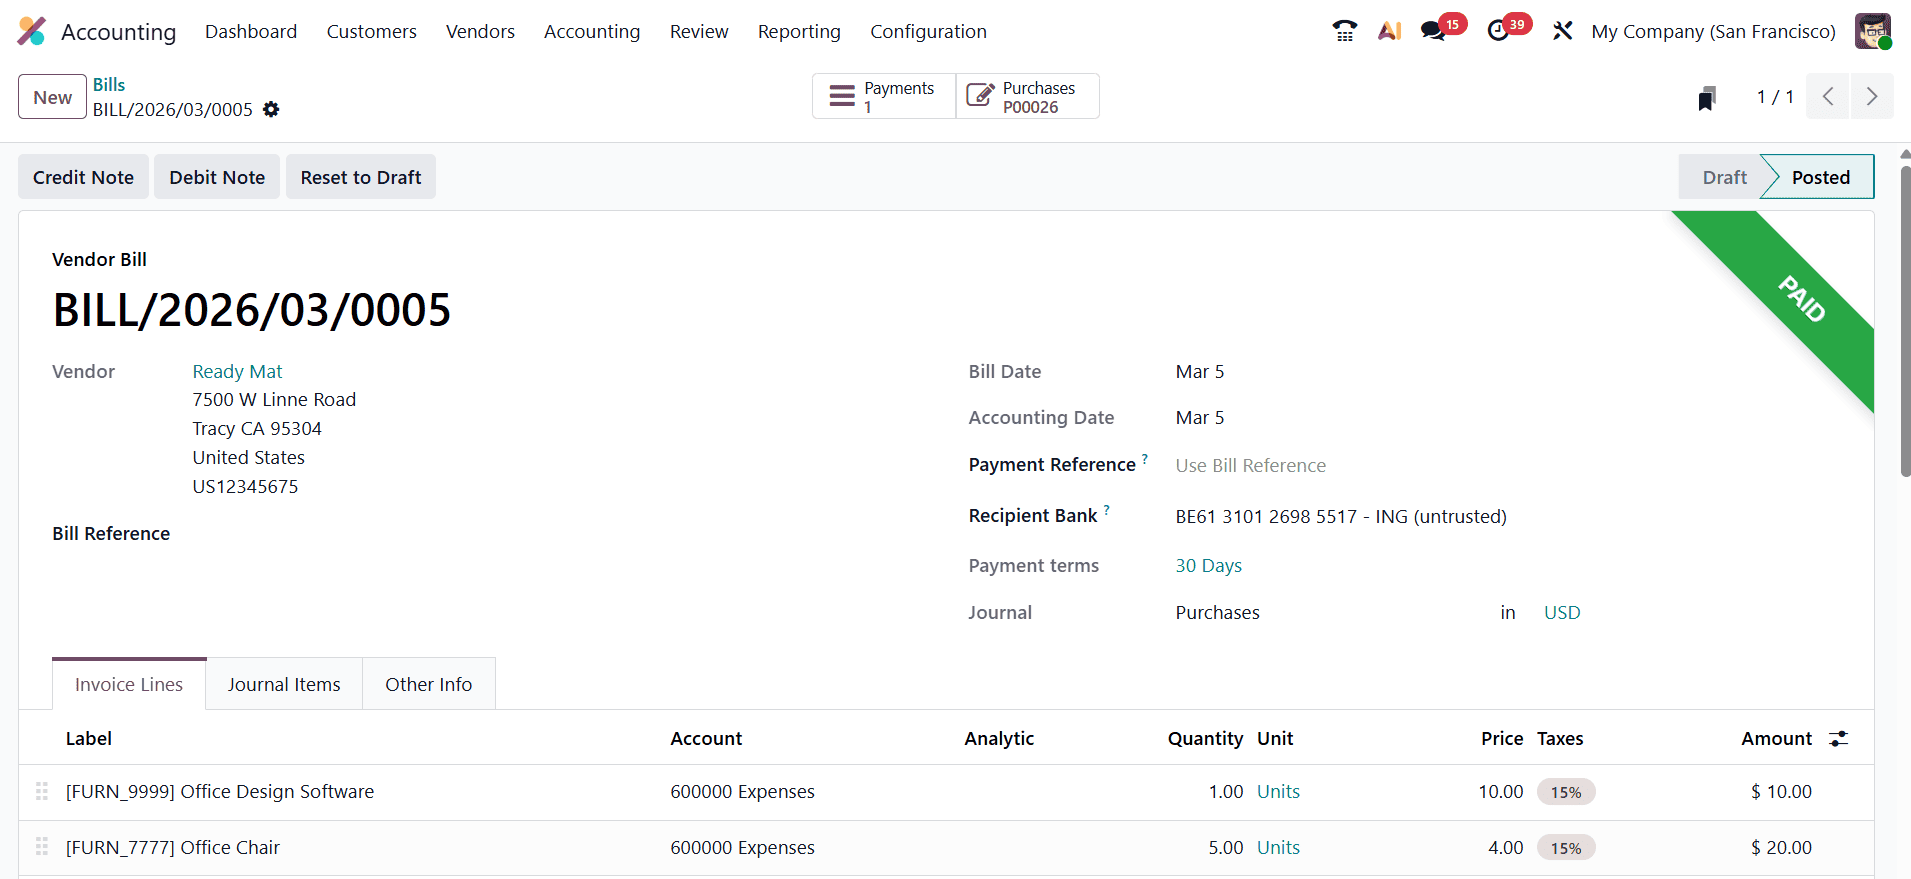
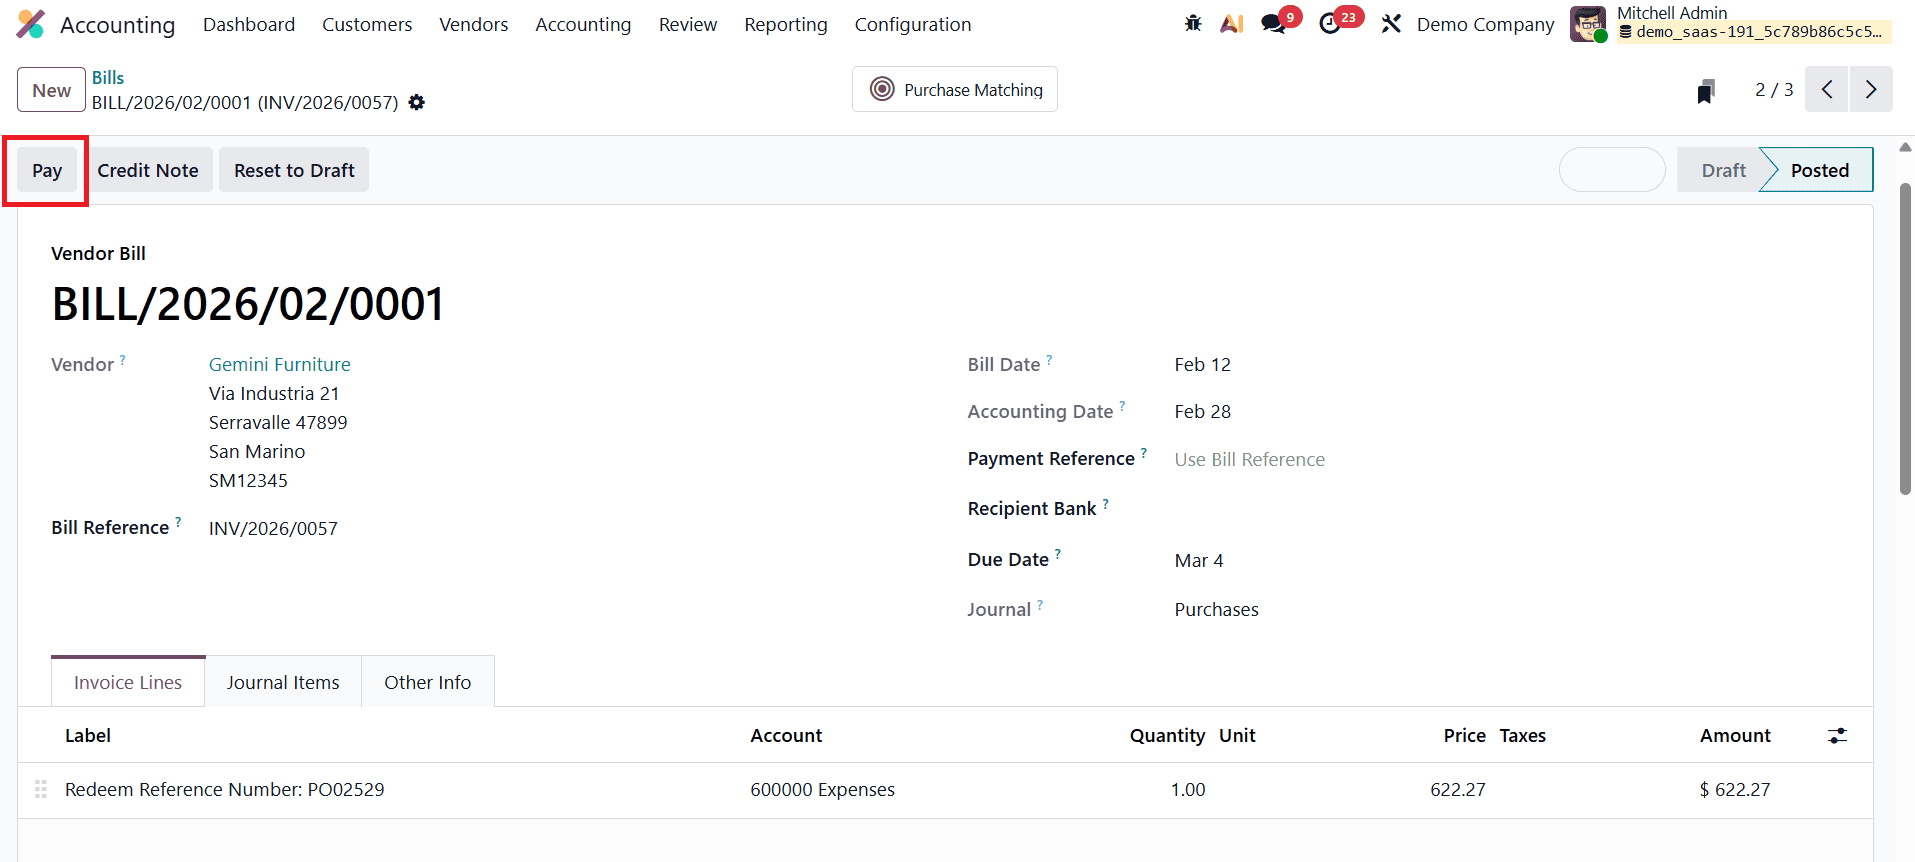
After verifying the details of the bill, such as the vendor information, invoice lines, taxes, and payment terms, the bill is posted and becomes ready for payment. At this stage, the user can register the payment directly from the vendor bill form.
If no outstanding accounts are configured in Odoo, registering a payment will not generate a corresponding journal entry. By default, payments in Odoo do not automatically create journal entries. However, this behavior can be changed by configuring outstanding accounts within bank or cash journals, allowing payments to be recorded in the accounting system before they are reconciled with bank transactions. An Outstanding Payments account is used to temporarily record outgoing payments, such as vendor payments, until they are linked with the related bank transaction. When payments are registered in Odoo, the system posts them to the appropriate outstanding accounts until the reconciliation process is completed.
To configure outstanding accounts in Odoo, navigate to Accounting > Configuration > Journals, then select an existing Bank or Cash Journal or create a new one. Within the journal configuration, go to the Outgoing Payments section and assign the appropriate Outstanding Payments accounts.
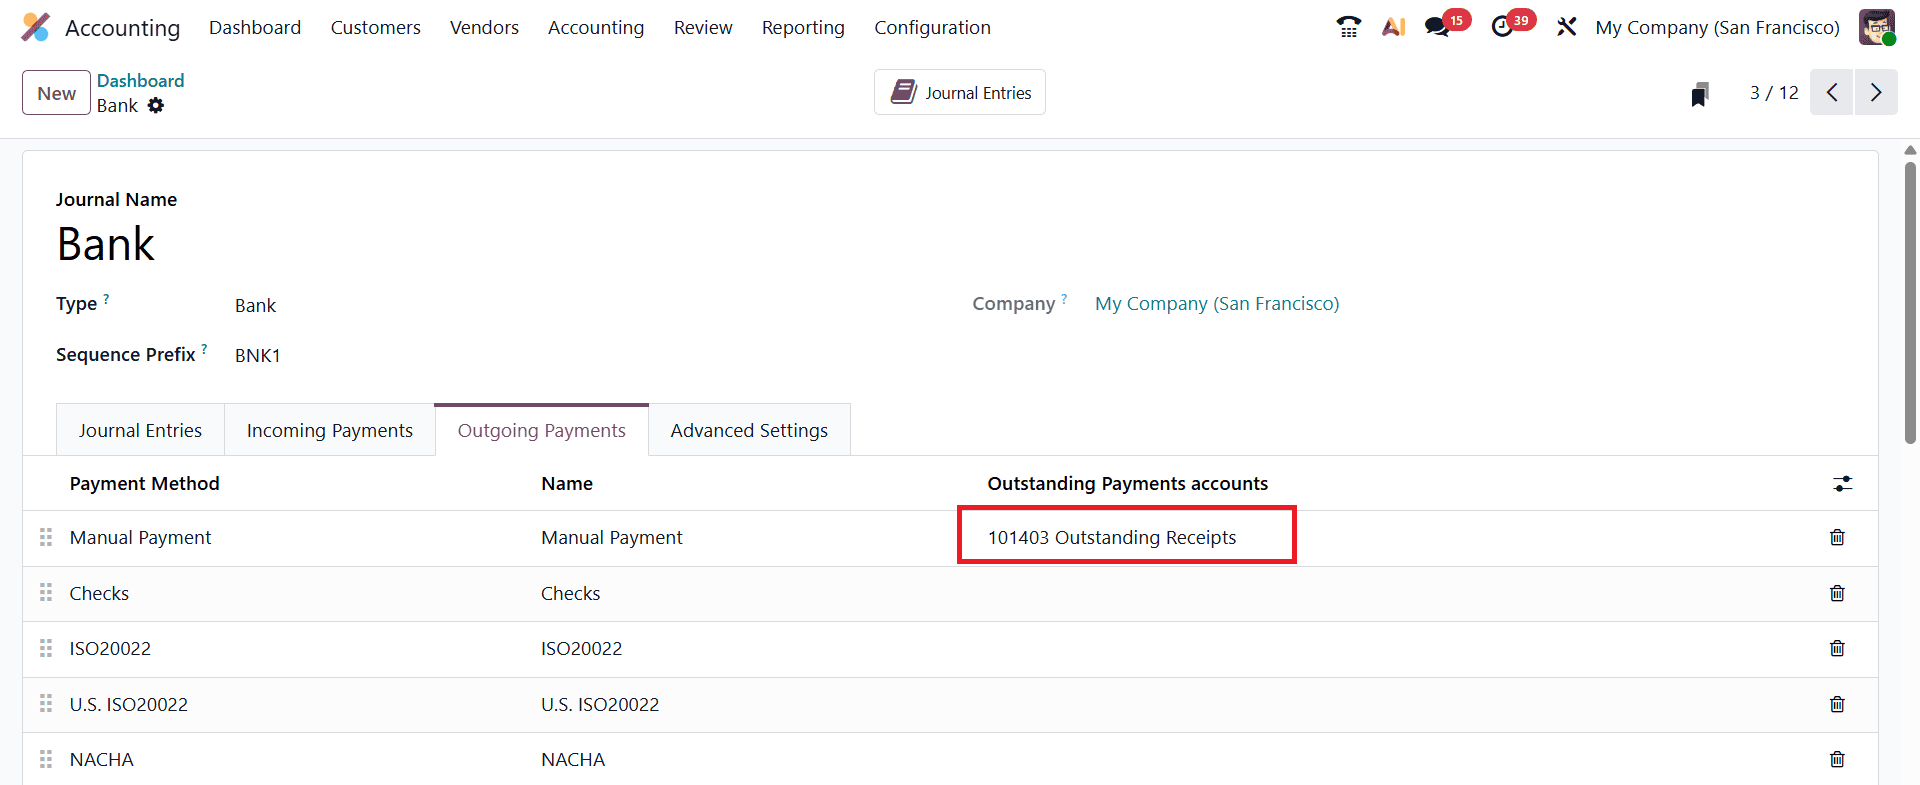
Once configured, Odoo will automatically generate journal entries for registered payments and track them through the reconciliation process.
Now, let’s go back to the vendor bill that we created earlier and start the payment process.
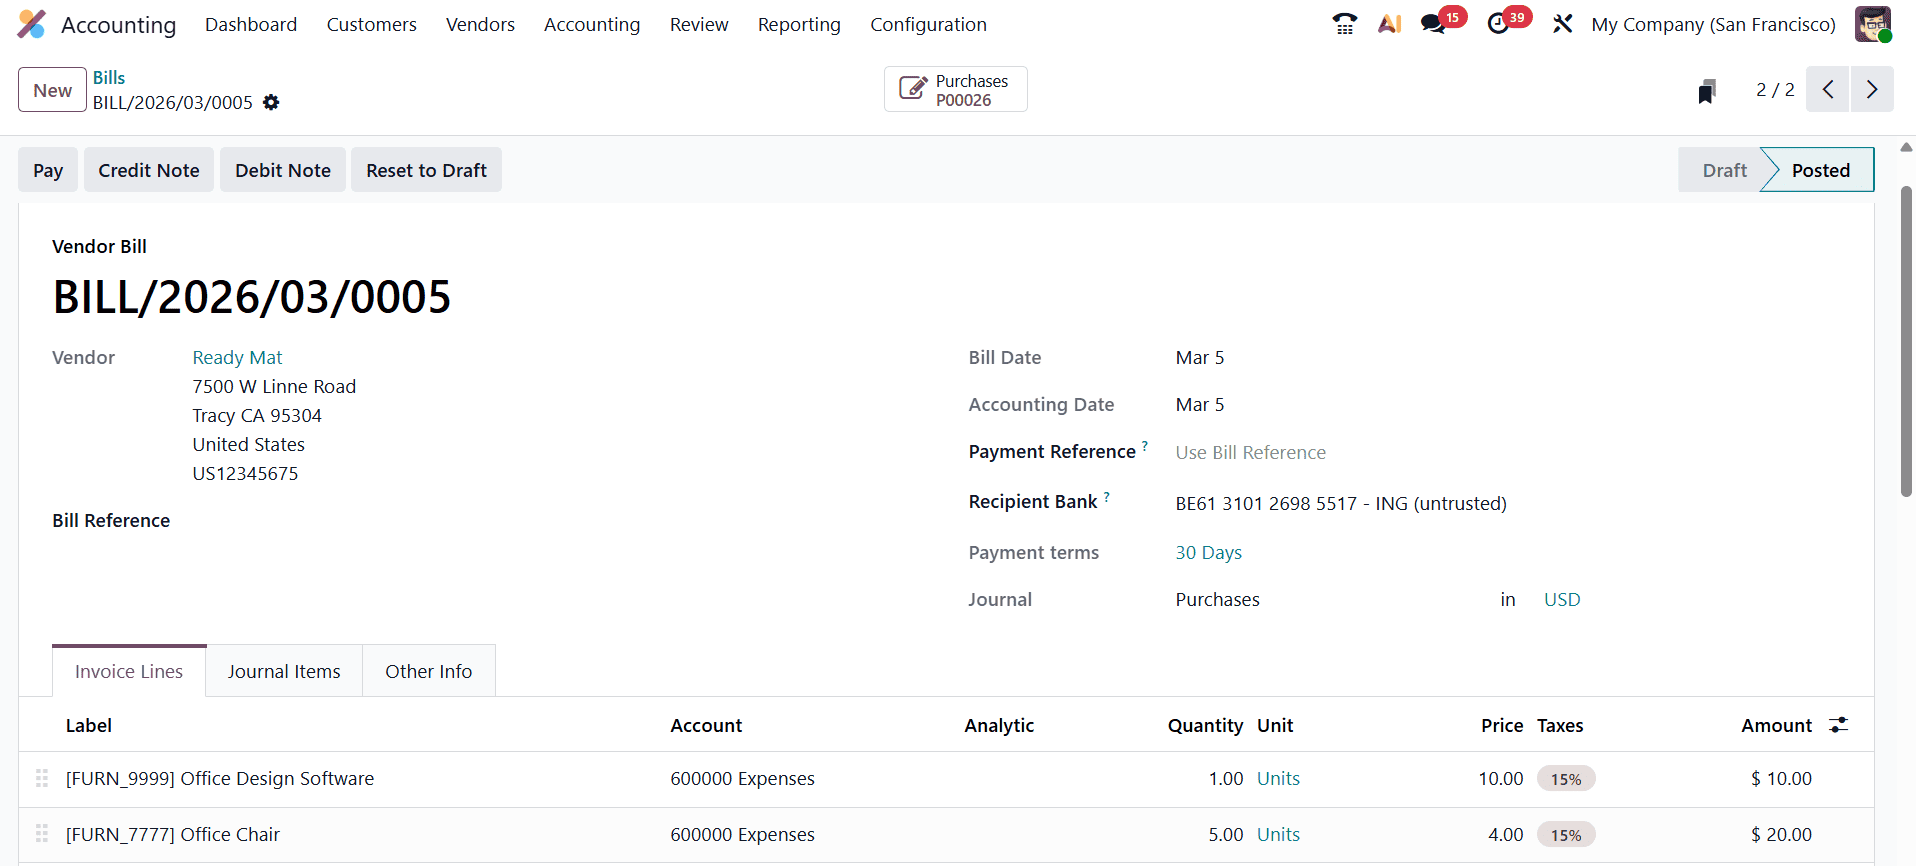
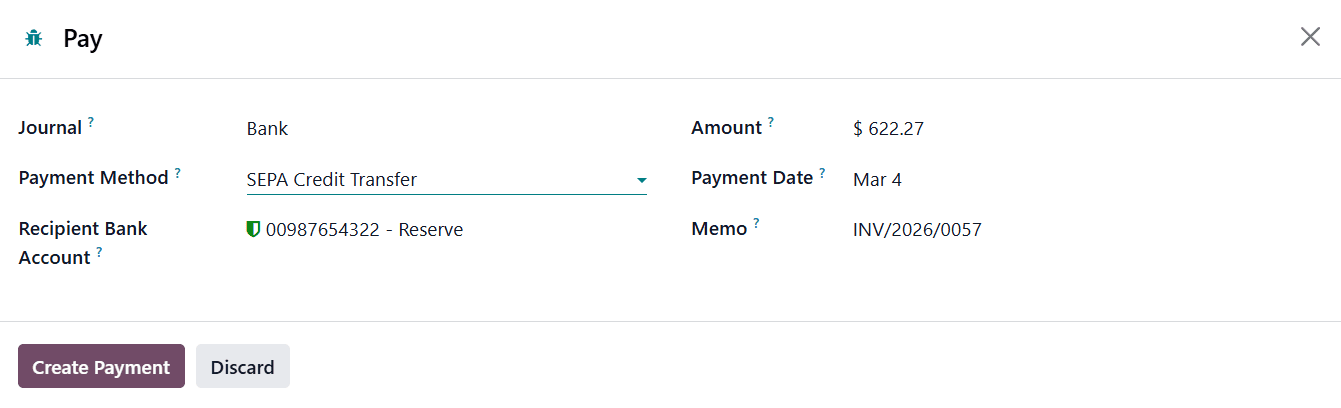
To do this, open the relevant vendor bill and click the Pay button. This action opens the Pay window, where several important payment details can be configured before confirming the transaction.
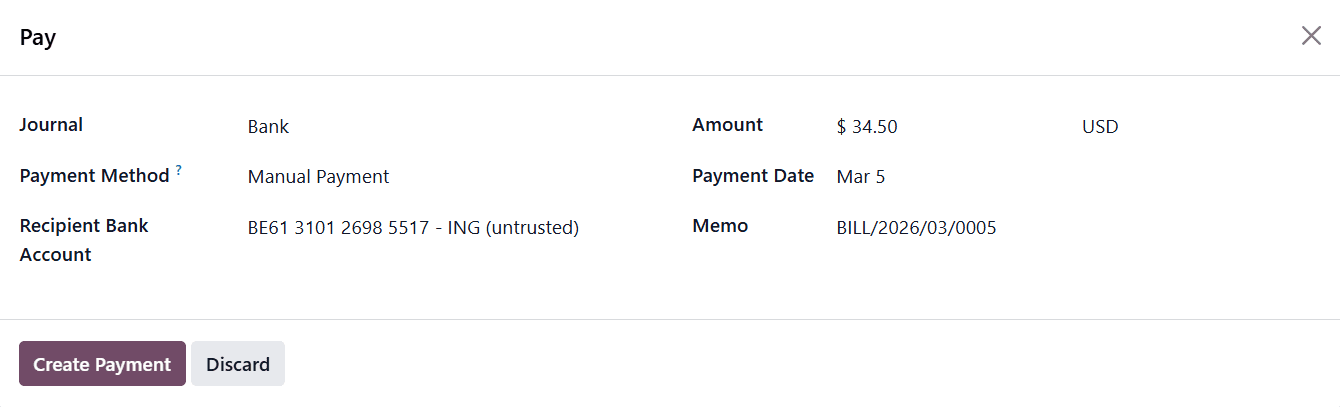
Within the payment window, users must select the Journal that will record the transaction. The journal represents the payment method used, such as a bank account, cash journal, or check payment journal. Choosing the correct journal is important because it determines where the payment entry will be recorded in the accounting system. The Payment Date must also be specified to indicate when the payment is being issued. This date is useful for financial reporting and helps maintain accurate accounting timelines.
Odoo also provides the convenience of automatically selecting the vendor’s preferred payment method if it has already been configured in the vendor’s contact record. For example, if a vendor usually receives payments via bank transfer or checks, the system will automatically populate the corresponding payment method. However, users can change the payment method if a different payment option is required for that specific transaction. If the vendor bill includes payment terms that divide the total amount into installments, the payment window will automatically set the Amount field according to the installment currently due. The Memo field can also be edited if additional notes or references are required. This field is often used to include payment references, check numbers, or internal remarks that may help identify the transaction later during reconciliation or financial audits. Once all the necessary details are verified, clicking the Create Payment button registers the payment in the system.
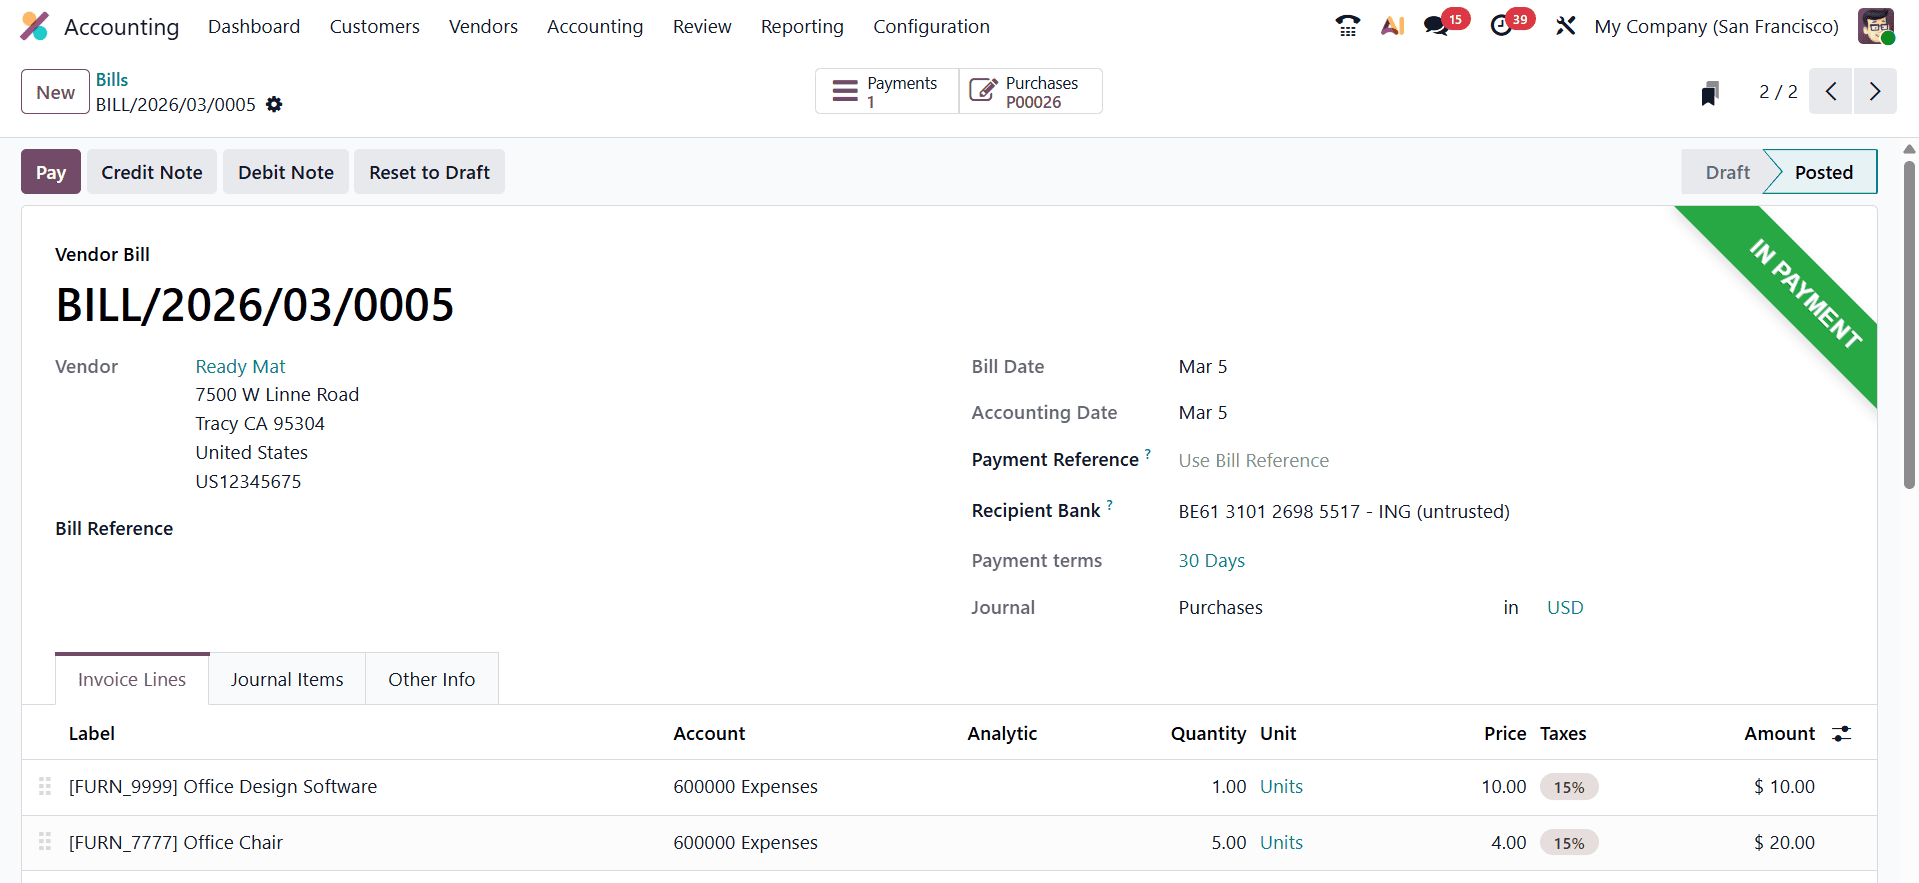
Once the payment is created, Odoo records it in the accounting system and automatically links it to the corresponding vendor bill. The bill status then changes to In Payment, indicating that the payment process has started and the check has been issued, but it may still need to be cleared during bank reconciliation.
After registering a vendor payment in Odoo 19, a smart button labeled “Journal Entry” appears on the payment form. This button provides quick access to the detailed accounting entry generated for the payment.
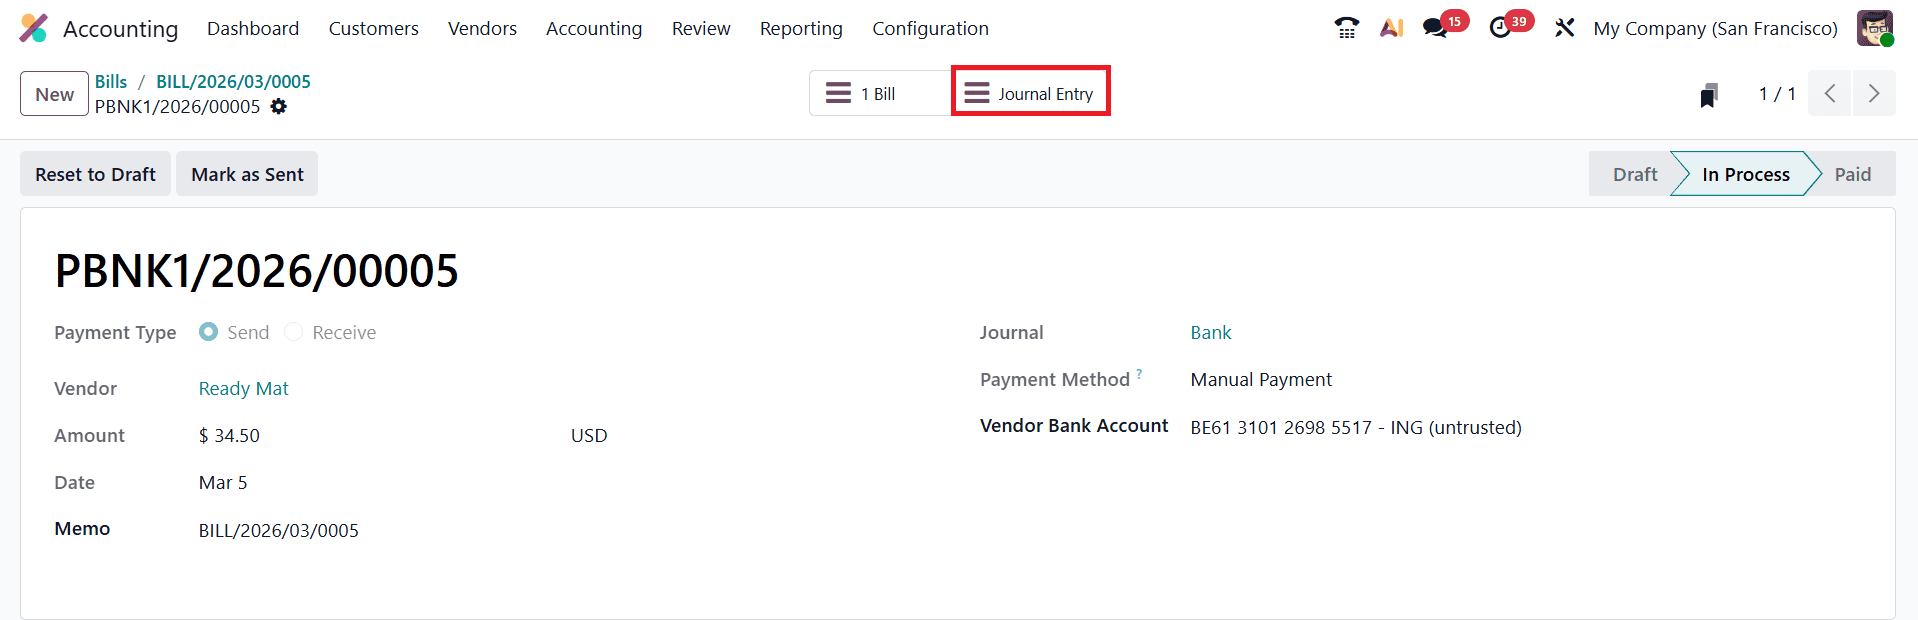
By clicking it, users can view the complete journal entry, including the debit and credit postings, the accounts involved, transaction references, and other relevant accounting details.
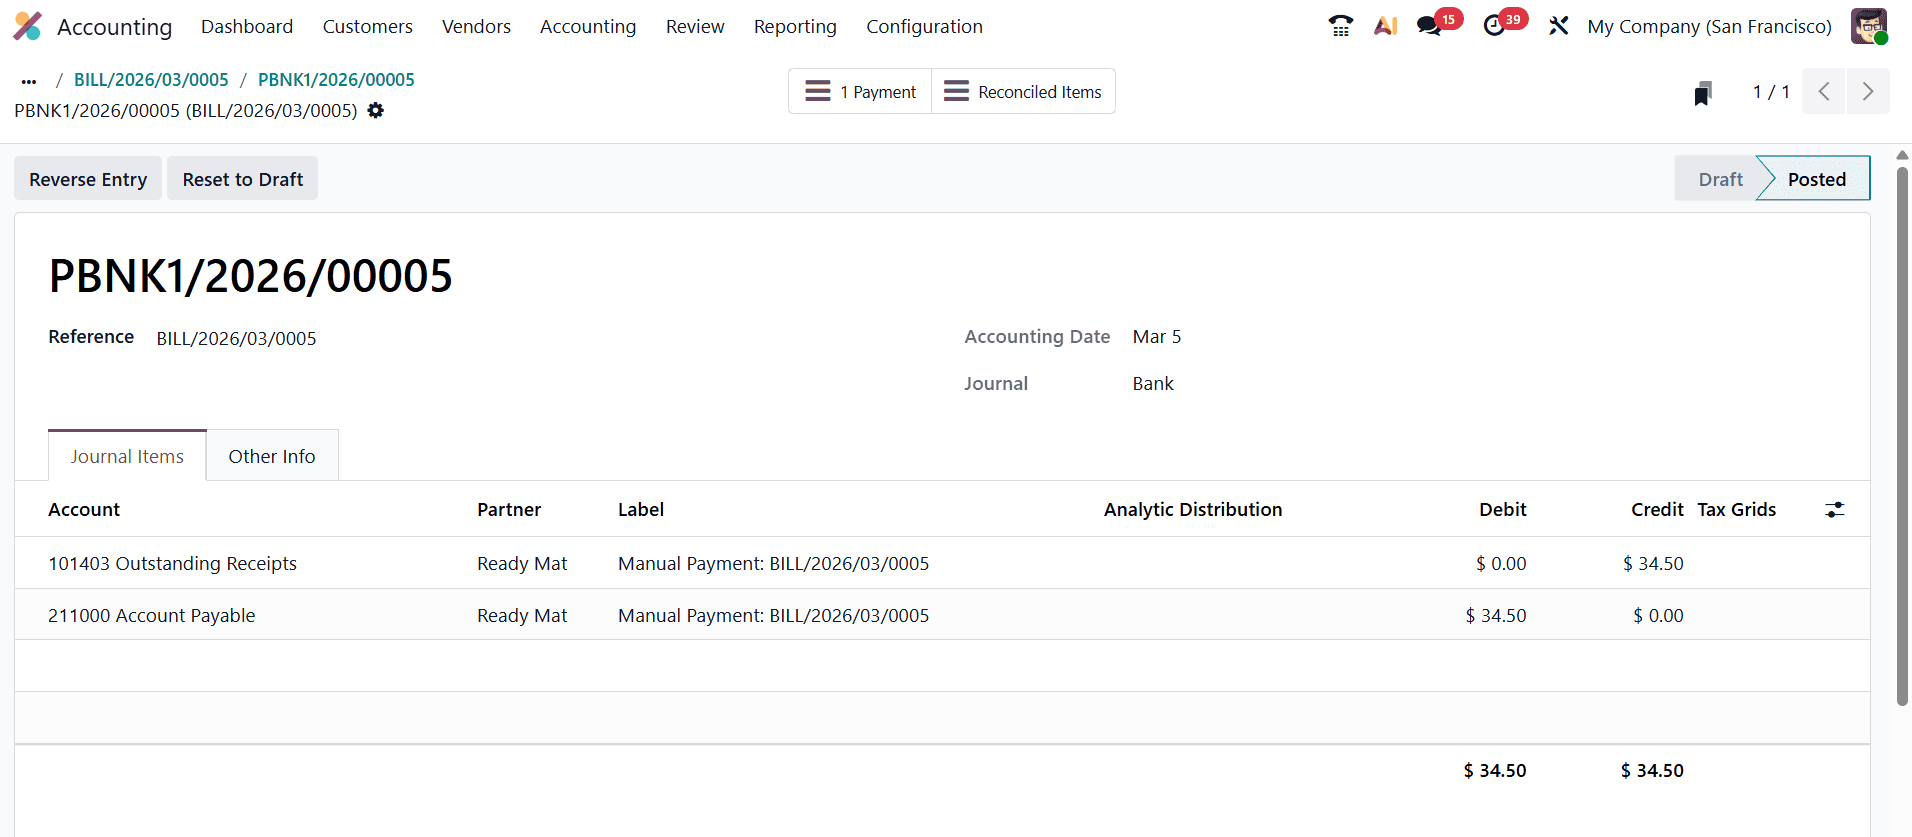
For example, when a vendor payment of $34.50 is recorded in the system, Odoo automatically generates a journal entry reflecting the transaction. Suppose the payment is dated Mar 5, 2026, and recorded in the Bank journal. In this entry, the Accounts Payable account is debited by $34.50, indicating a reduction in the company’s liability to the vendor. Since accounts payable represents a liability account, debiting it decreases the outstanding amount owed. At the same time, the Outstanding Payments or Bank-related account associated with the payment method is credited by $34.50, representing the reduction of funds from the company’s bank or payment account. In accounting terms, assets decrease when credited, which reflects the outflow of money used to settle the vendor’s bill.
You can begin the reconciliation process by navigating to the Accounting Dashboard and selecting the appropriate Bank Journal. Within the bank journal interface, users can manage bank statements and match them with the corresponding accounting transactions.
To start a new reconciliation, click the New button. This will open a new line where the bank transaction details can be entered.
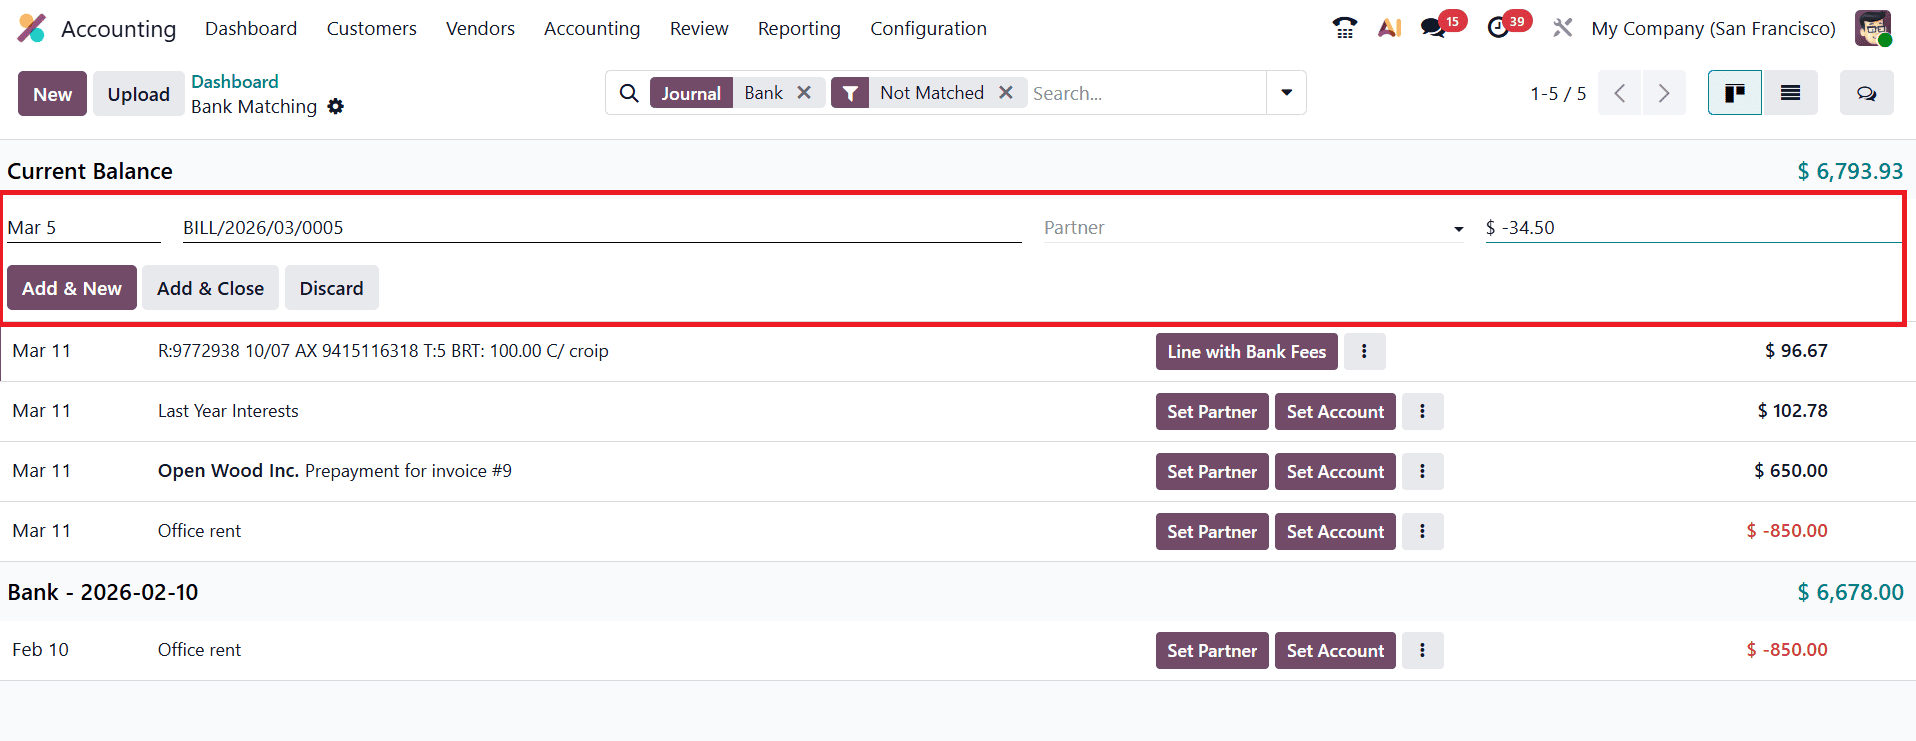
In this line, provide the required information such as the transaction date, description, vendor name, amount, and currency. These details help Odoo identify and match the bank transaction with the previously recorded payment. After entering the information, click Add & Close to save the statement line. Once the bank statement is created, Odoo will automatically suggest matching entries based on the recorded payments and reconcile them.
After confirming the match, the statement line will be marked as Reconciled, indicating that the bank transaction and the accounting entry have been successfully matched.
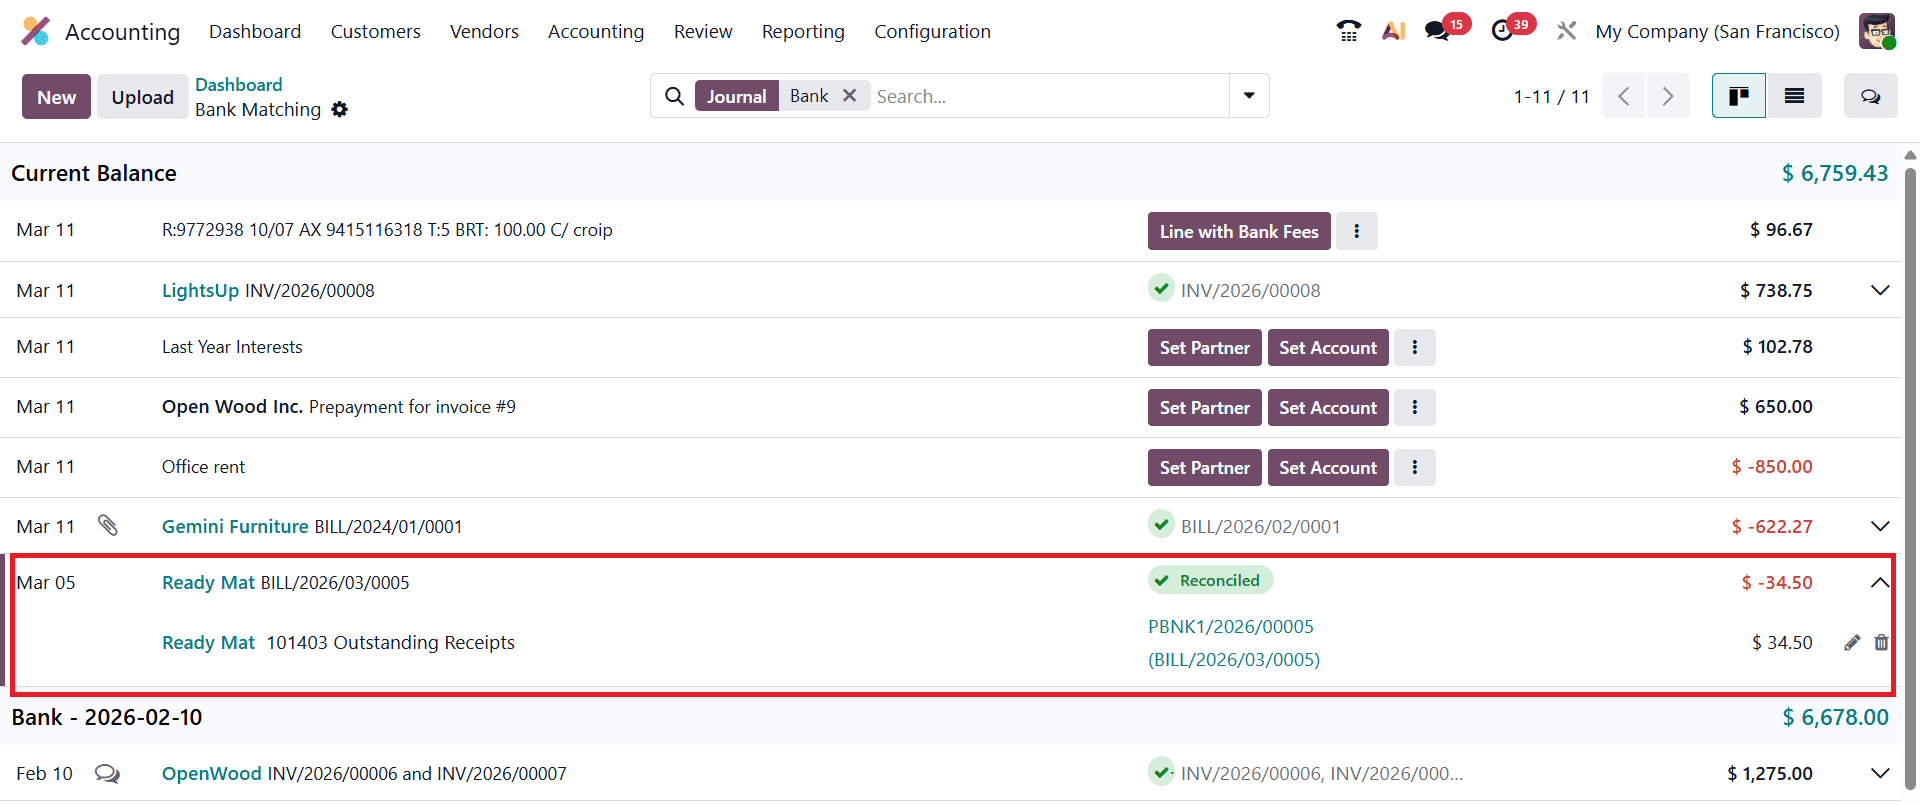
Once reconciliation is completed, the status of the related vendor bill automatically updates to Paid, confirming that the check payment has been fully processed and cleared through the bank.
This final step ensures that both the accounting records and bank statements remain accurate and consistent.
You can monitor and manage Vendor Payments using the Payments option under the Vendor menu.
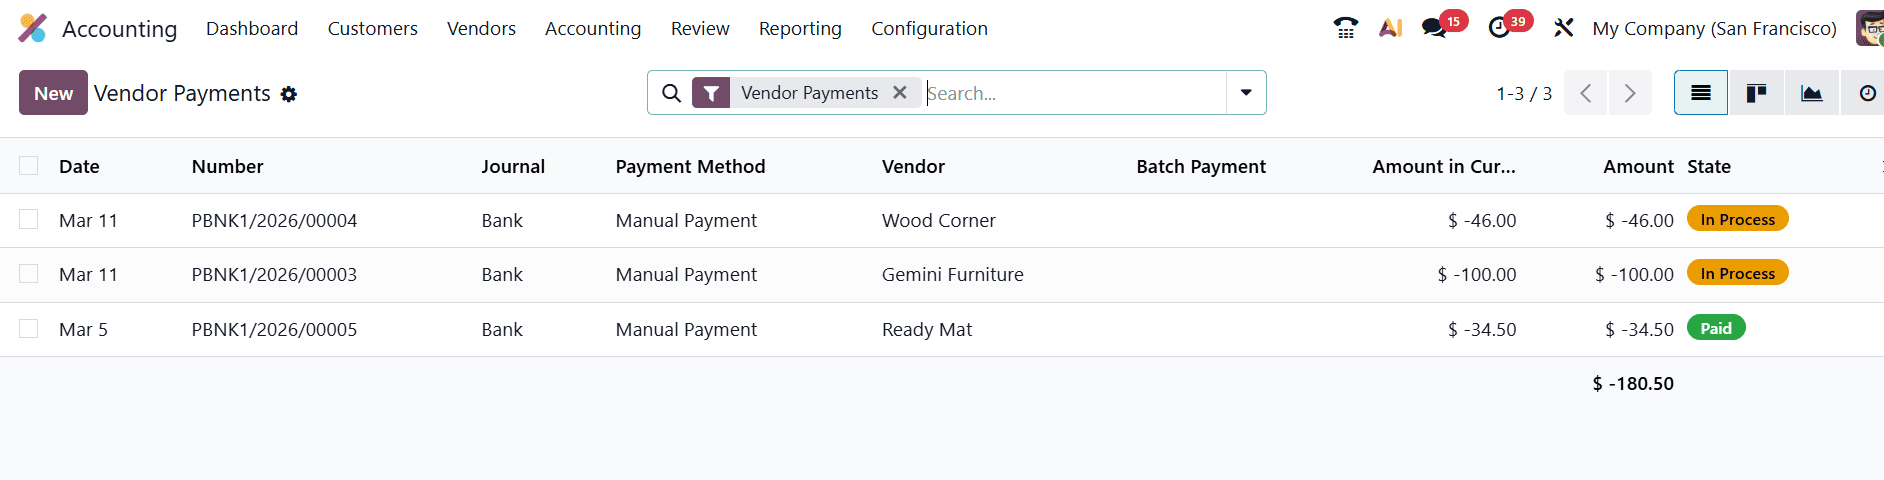
You can manage the payment that we created earlier here.
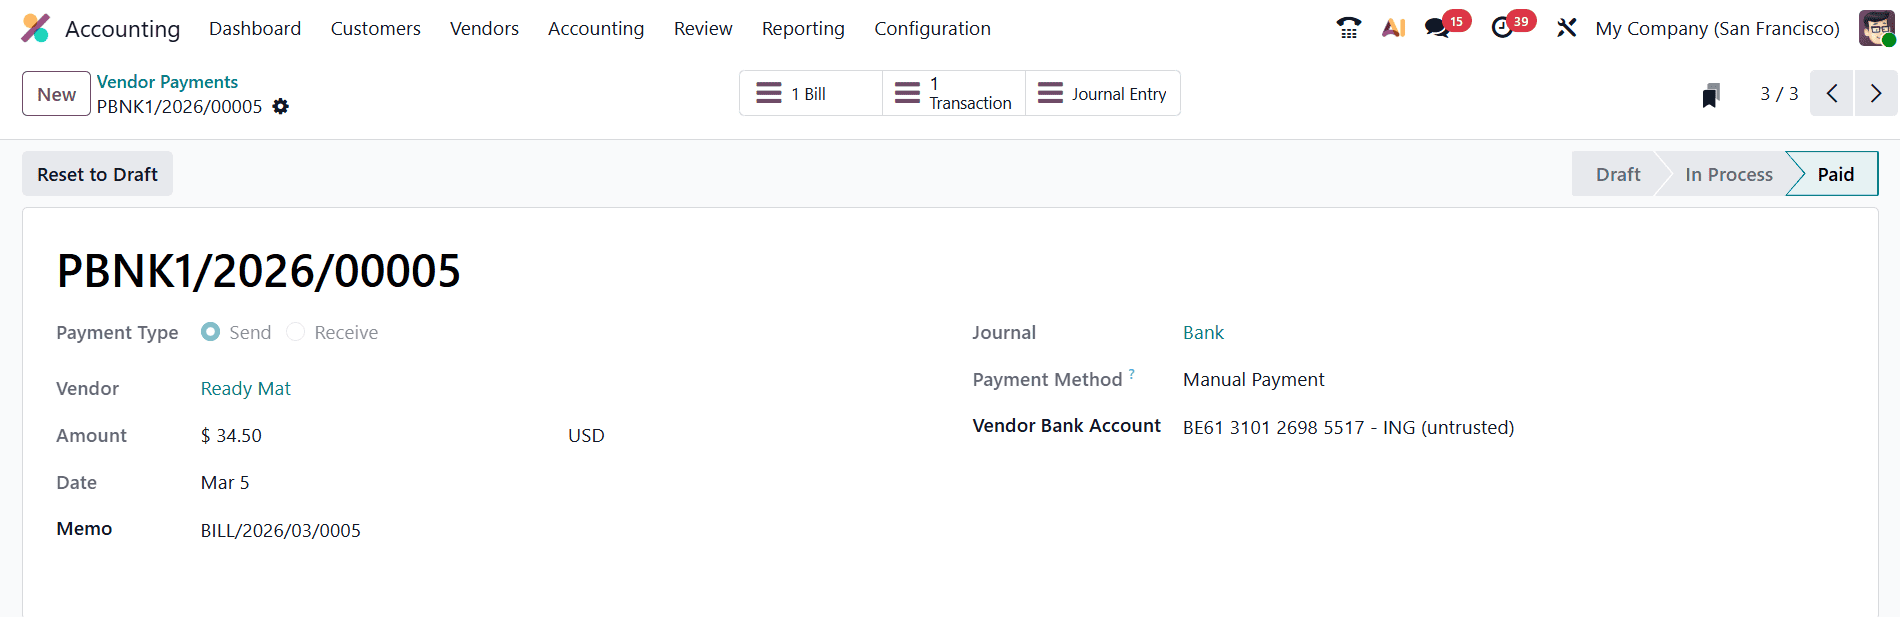
Here, you can observe the payment details, along with the smart buttons for related Bill, Transaction, and Journal Entry.
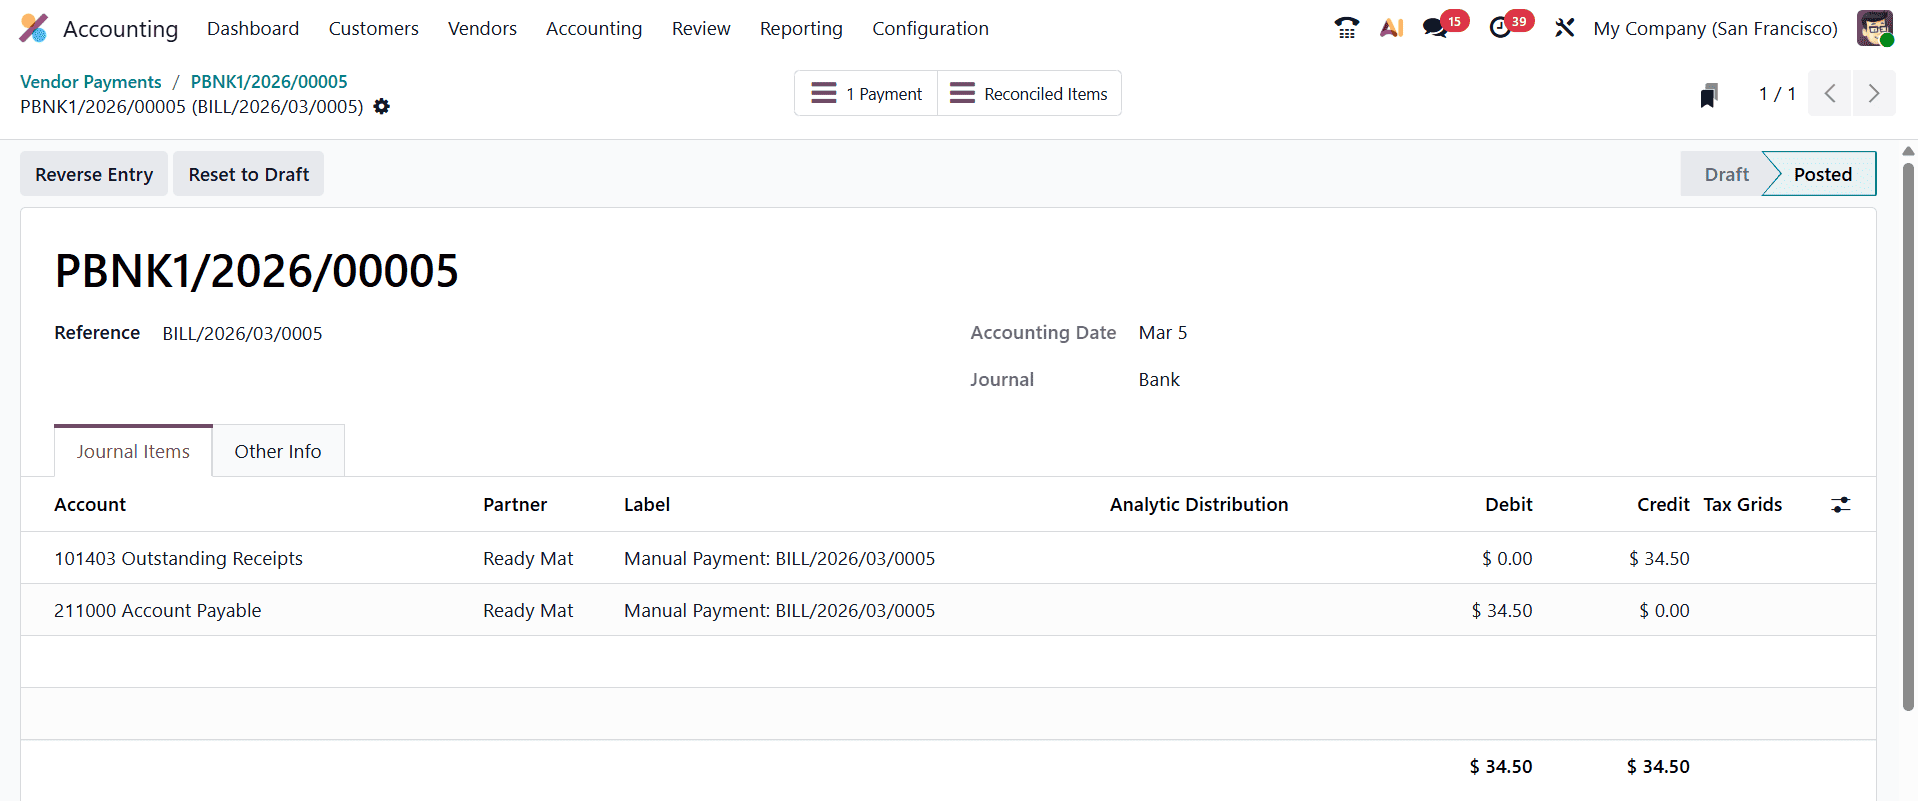
The Reconciled Items smart button will show the journal entry of the reconciled items.
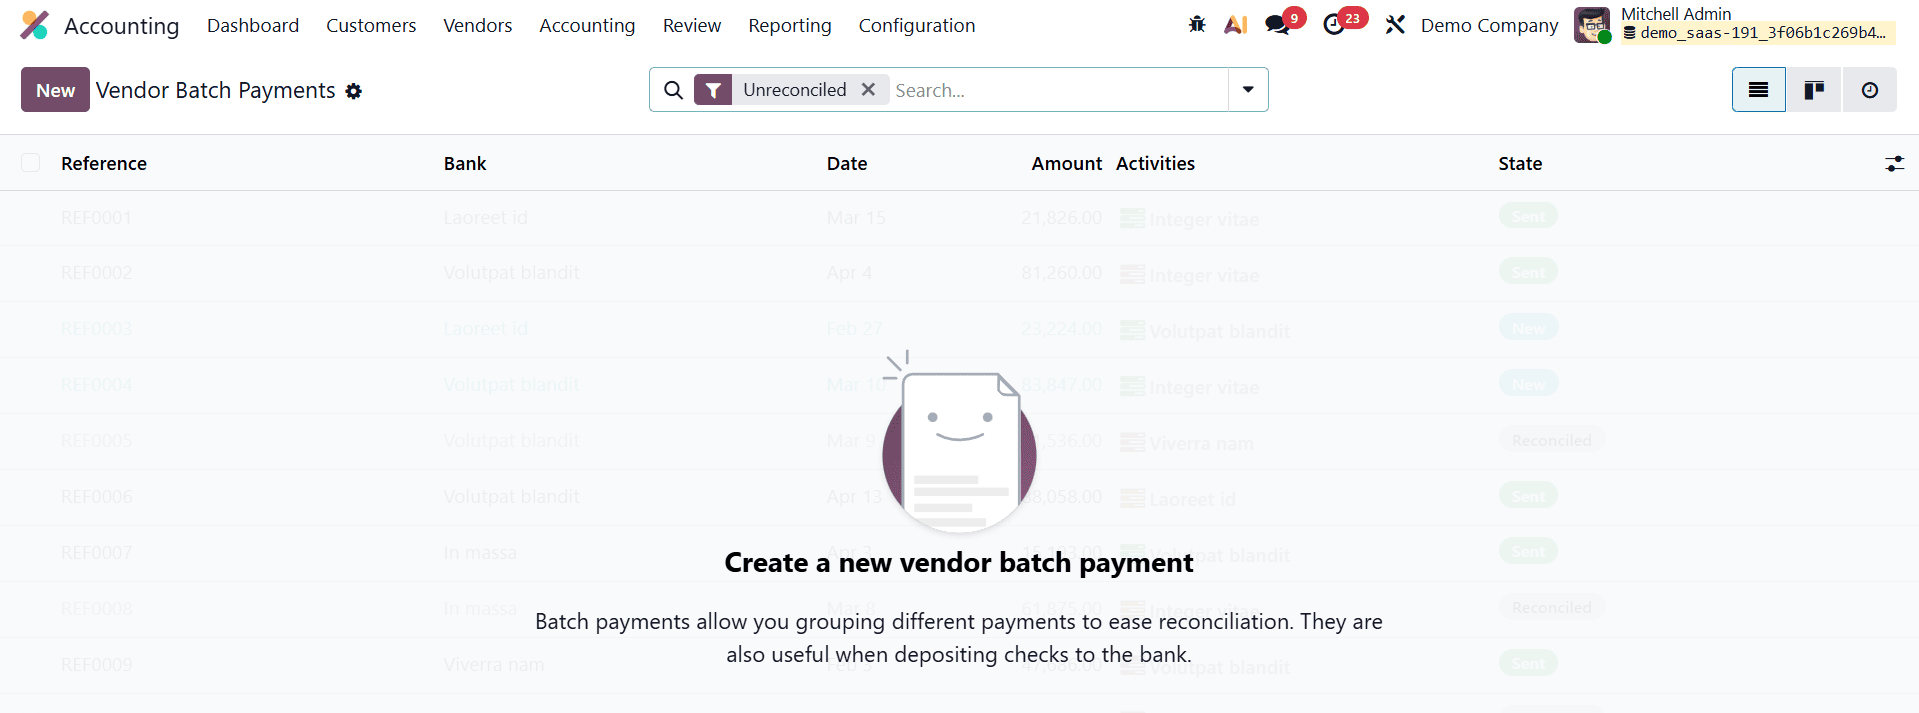
Vendor Batch Payment
In Odoo 19, managing multiple vendor payments becomes significantly more efficient with the Batch Payments feature. This functionality allows businesses to group several individual vendor payments into a single batch, making the payment process faster and more organized. Instead of processing each vendor payment separately, finance teams can combine multiple payments and handle them collectively, which is particularly useful when dealing with a large number of vendor bills.
To create a new batch payment in Odoo 19, navigate to the Batch Payments section within the Accounting module and click the New button at the top of the page. This action opens a configuration form where users can define the details of the payment batch. The form allows you to specify key information required to organize and identify the batch properly.
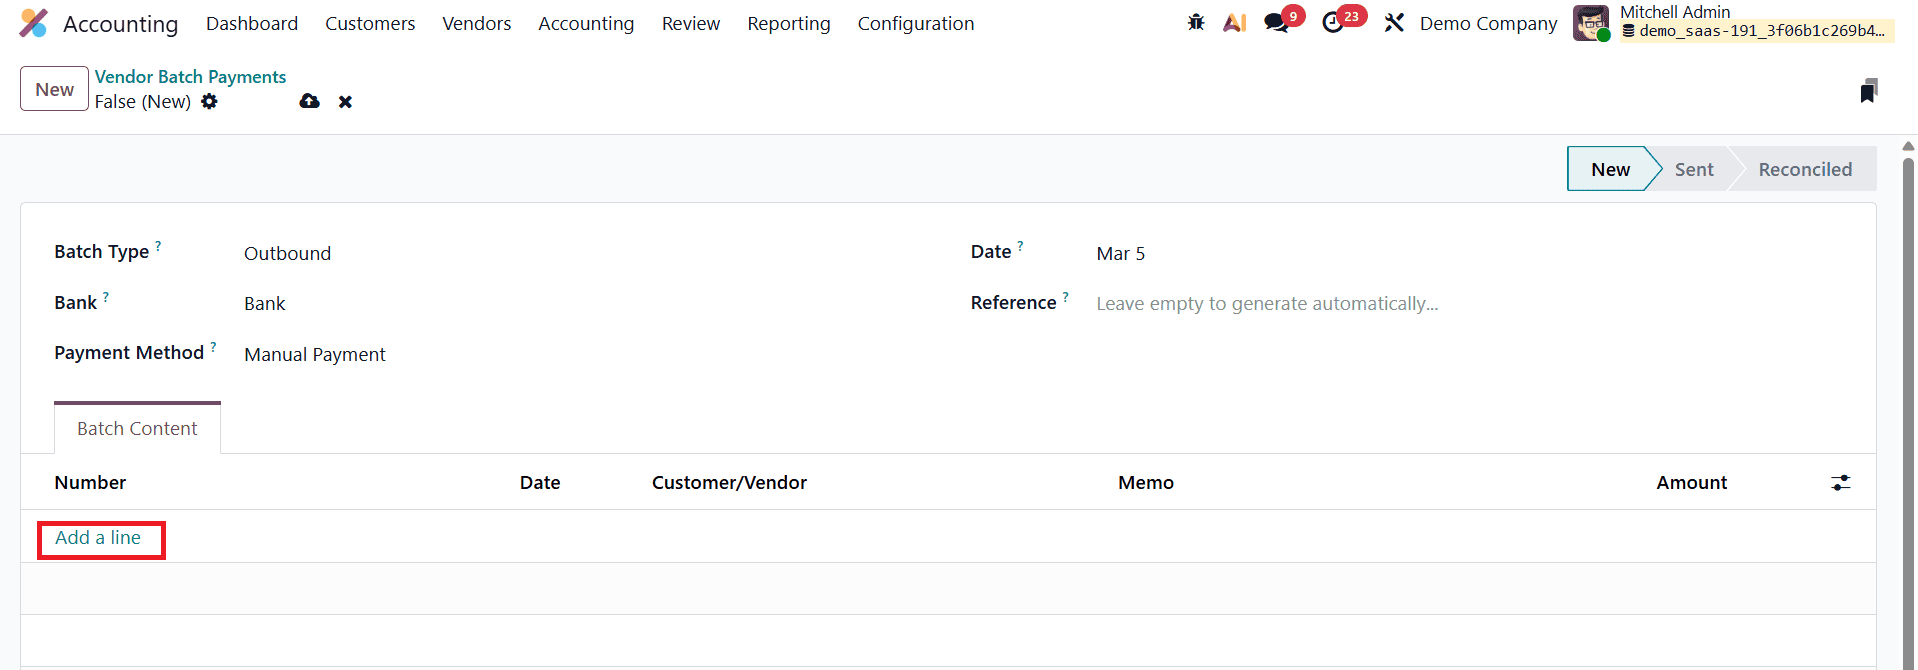
Within the batch payment form, users must enter essential details such as the Batch Type, Bank, Payment Method, Date, and a Reference for the batch. The batch type determines whether the payments are incoming or outgoing, while the bank and payment method define how the transactions will be processed.
Once the basic information is entered, individual payments can be added to the batch through the Batch Content tab. To include vendor payments, click the Add a line button. This opens a pop-up window displaying a list of available payments that can be included in the batch. In this window, users can review payment details such as the Payment Number, Date, Vendor Name, and Amount.
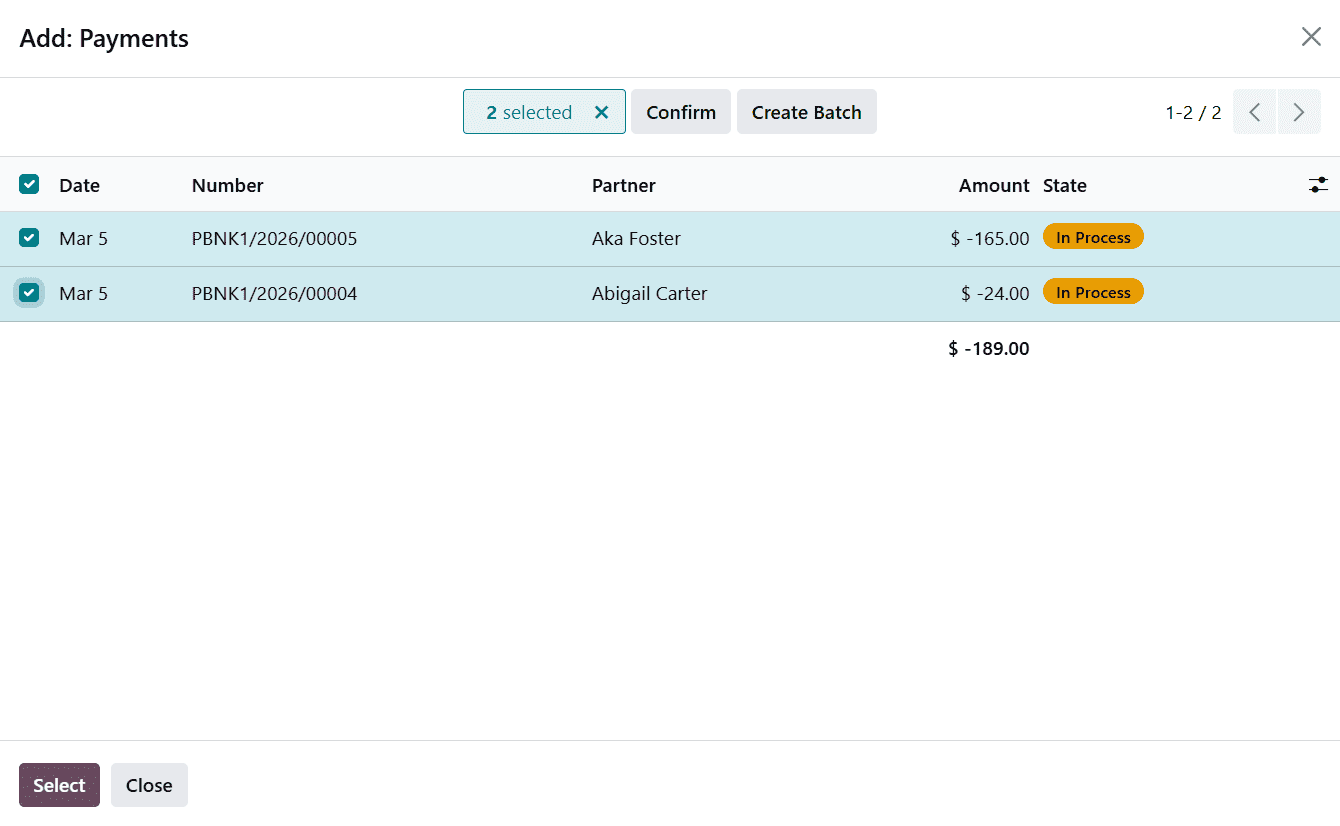
Simply select the relevant vendor payments that need to be processed together and add them to the batch. Odoo automatically organizes these payments within the batch, ensuring that they are grouped correctly and ready for validation.
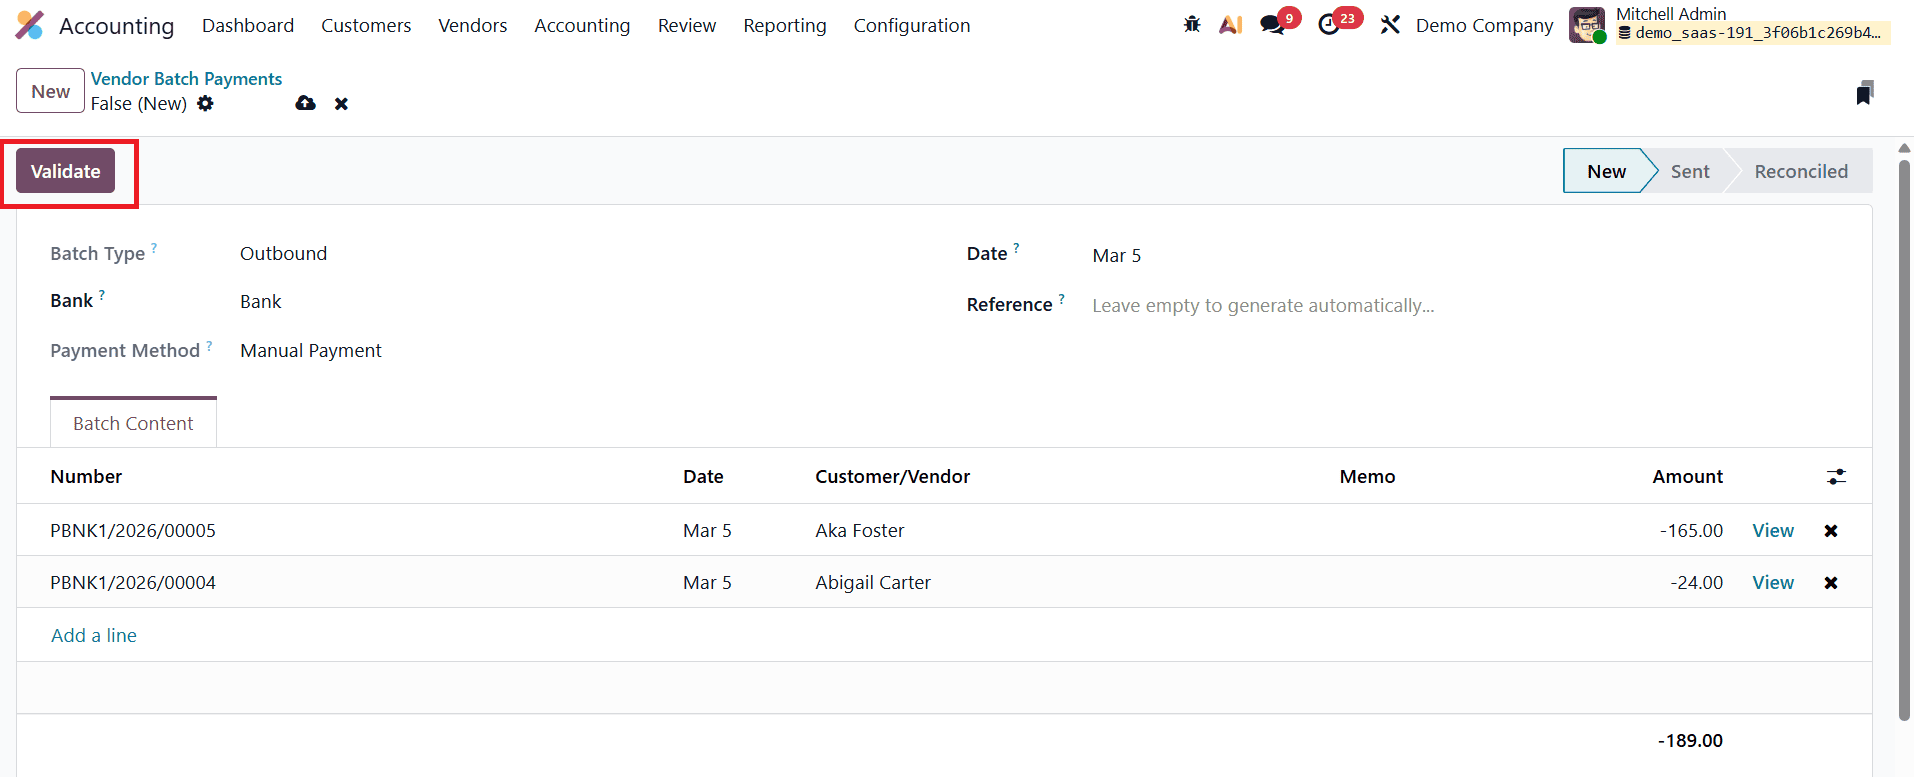
After reviewing the selected entries, the batch can be validated, allowing businesses to process multiple vendor payments in a single operation while maintaining clear and accurate accounting records.
You can also perform this action directly from the Vendor Payments window. Simply select the payments that you want to include in the batch from the list of registered payments. Once the relevant payments are selected, you can quickly group them into a batch for easier processing.
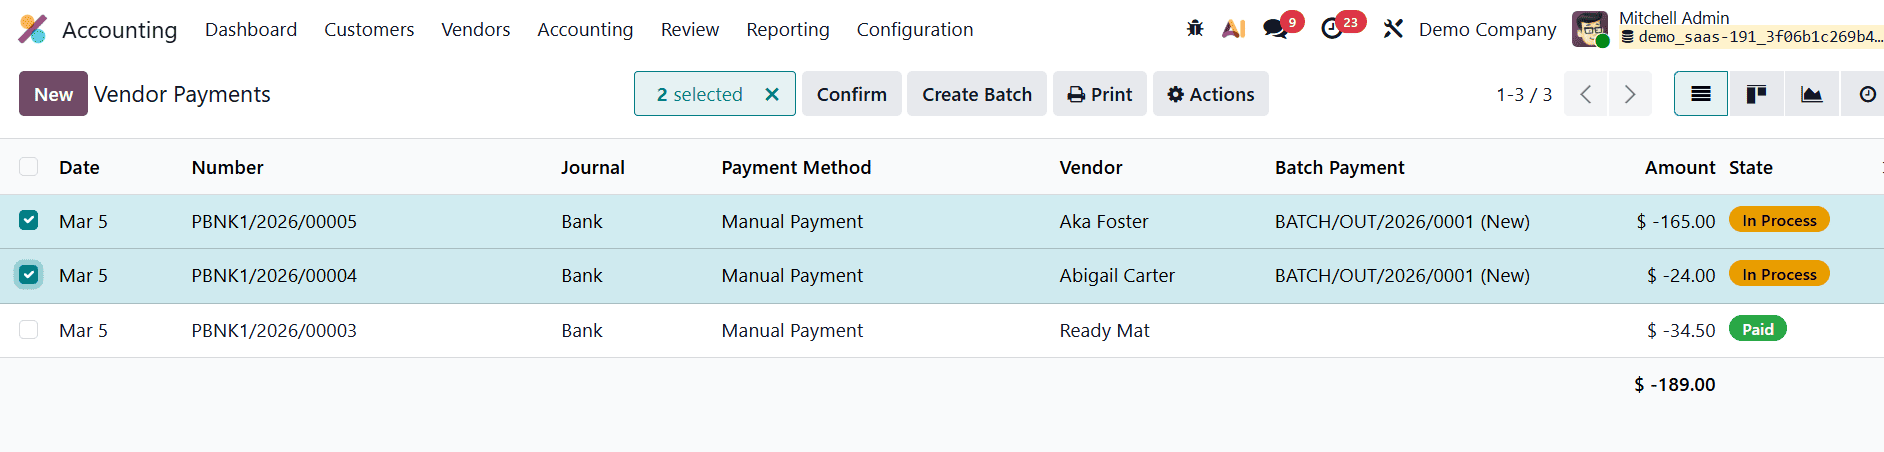
All payments included in a batch must use the same payment method. If necessary, payments can first be organized using the Payment Method Line to ensure compatibility before creating the batch. After selecting the appropriate payments, click Create Batch or open the Actions menu and choose Create Batch Payment. Odoo will then automatically group the selected payments into a single batch, allowing them to be processed together while keeping the records structured and easy to manage.
SEPA Credit Transfer (SCT)
The SEPA (Single Euro Payments Area) is a payment integration initiative developed by the European Union to simplify and standardize bank transfers made in euros across participating countries. SEPA enables businesses to send payment orders to their banks electronically, allowing them to automate bank wire transfers within the SEPA region. This system ensures that cross-border euro payments are processed as easily and efficiently as domestic transfers. In Odoo 19 Accounting, SEPA payments can be used to settle vendor bills, providing companies with a convenient method for managing supplier payments through automated bank transfers.
To use SEPA payments for supplier transactions in Odoo 19, the SEPA Credit Transfer (SCT) feature must first be enabled. This can be done by navigating to Accounting > Configuration > Settings, and locating the Vendor Payments section.
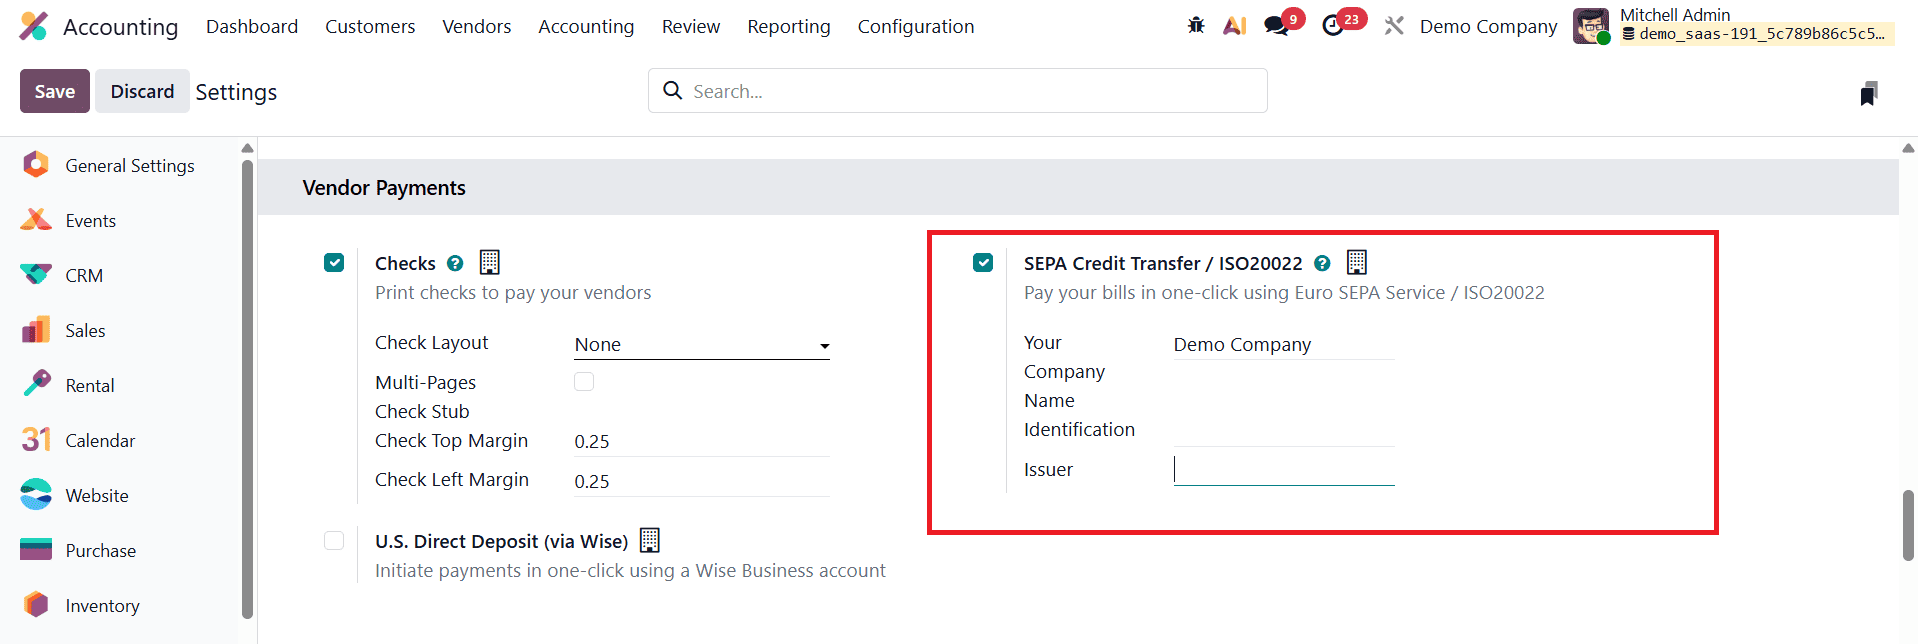
Within this section, activate the SEPA Credit Transfer (SCT) option. After enabling the setting, you will need to provide the necessary company banking information. Once this configuration is completed, the SCT payment method becomes available when registering payments for vendor bills.
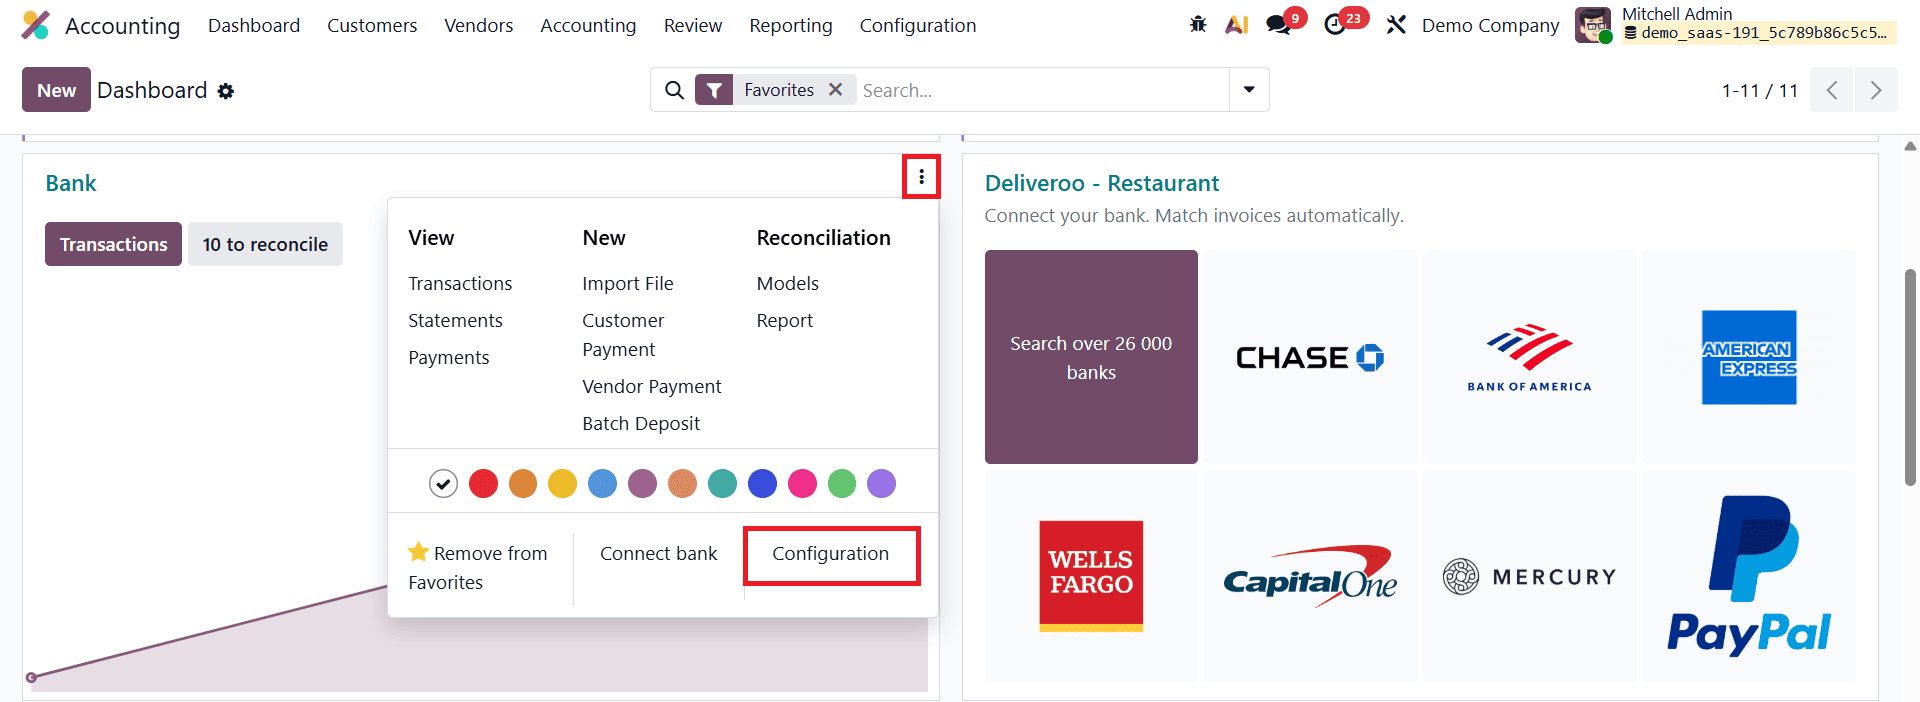
After activating the SEPA Credit Transfer feature, the payment method must also be enabled within the relevant bank journal. From the Accounting Dashboard, locate your Bank Journal, click the options menu, and select Configuration.
In the journal configuration window, open the Outgoing Payments tab.
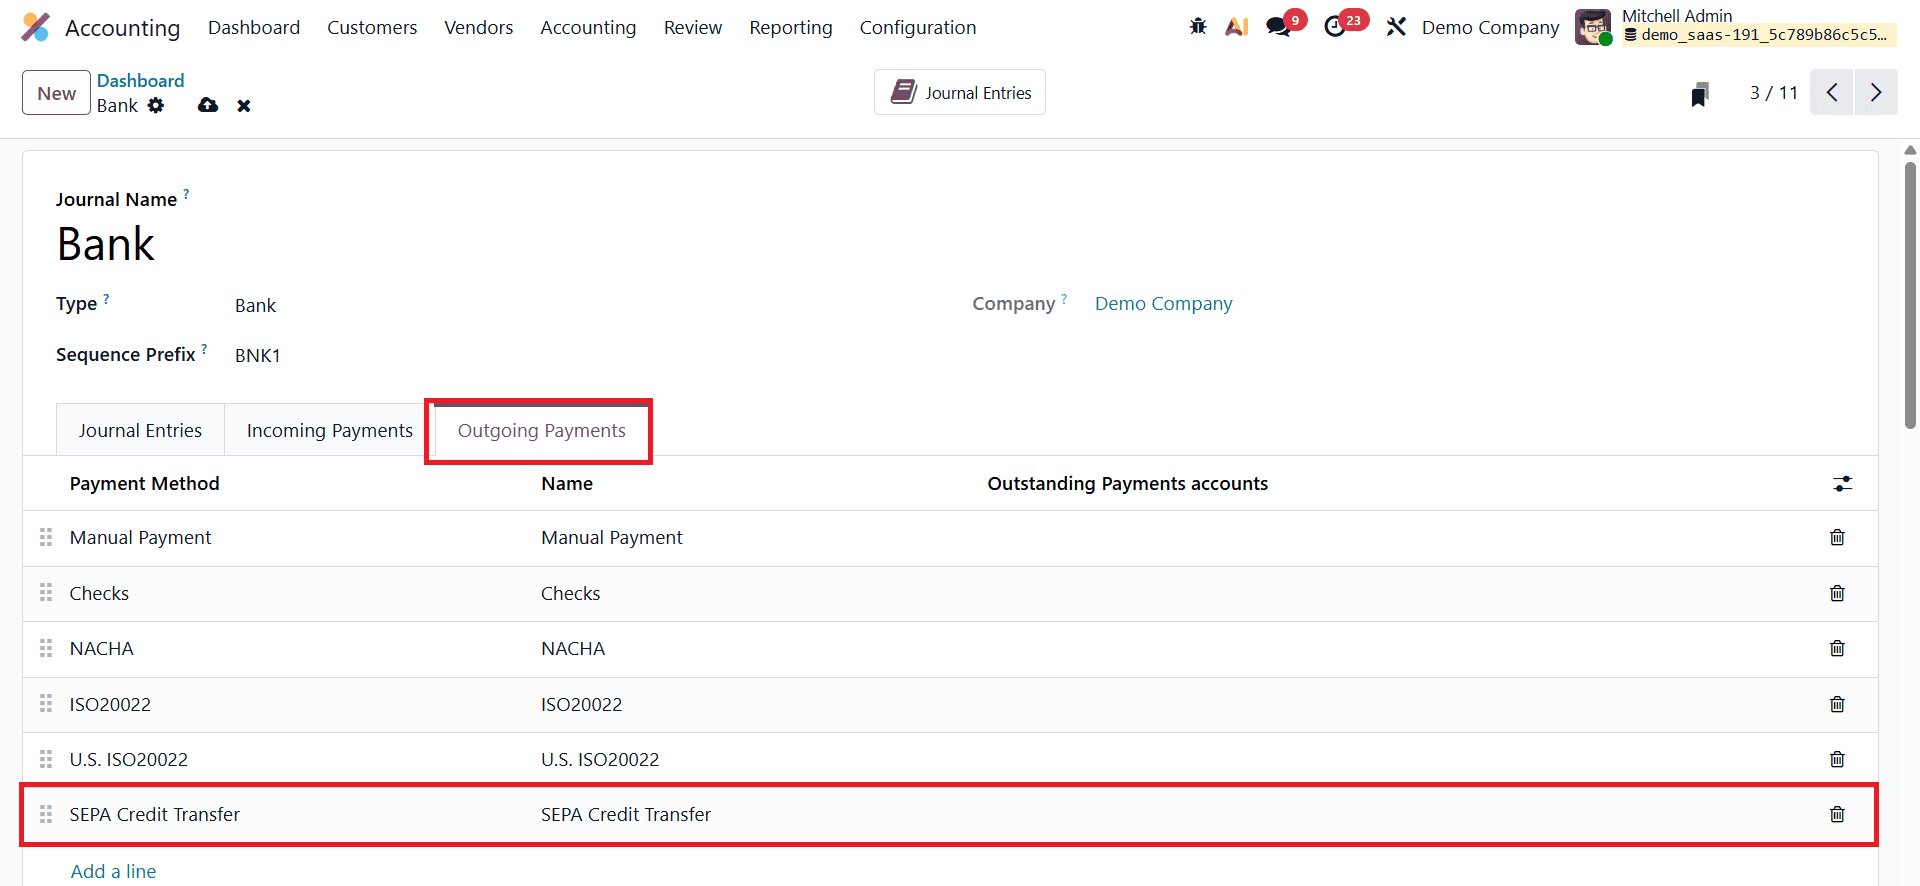
If the SEPA Credit Transfer option is not already listed, it can be added as a payment method for outgoing transactions. This ensures that SEPA transfers can be selected whenever vendor payments are registered.
For SEPA payments to function correctly, the bank journal must include the required international banking details. In the Journal Entries tab, make sure that the IBAN (International Bank Account Number) and the BIC (Bank Identifier Code) are properly specified. SEPA transfers require an IBAN rather than a domestic bank account number, as the system relies on standardized international banking identifiers to process payments between banks within the SEPA region.
Once the configuration is complete, vendor payments can be processed using SEPA. To register a vendor bill, navigate to Accounting > Vendors > Bills, and create a new payment record.
While entering the payment details, select SEPA Credit Transfer as the Payment Method. This indicates that the payment will be processed through a SEPA bank transfer rather than another method such as checks or manual transfers.
When making a SEPA payment to a vendor for the first time, you will need to provide the vendor’s banking details in the Recipient Bank Account field. This includes the bank name, IBAN, and BIC of the vendor’s bank account. Odoo automatically verifies the format of the IBAN to ensure that it meets international banking standards, reducing the chances of payment errors. After the bank details are saved, they become associated with the vendor’s record in the system.
Odoo 19 Accounting provides a comprehensive workflow for managing vendor payments, from registering payments on vendor bills to reconciling them with bank transactions. The process begins by creating and posting a vendor bill, registering the payment through the Pay window, and marking the bill as In Payment. The final step involves reconciling the payment with the corresponding bank transaction, which updates the bill status to Paid. This structured workflow ensures that vendor payments are accurately tracked, properly documented, and seamlessly integrated with the company’s financial records, ultimately helping businesses maintain transparent and reliable accounting practices.
To read more about Overview of Vendor Payment Management in Odoo 18 Accounting, refer to our blog Overview of Vendor Payment Management in Odoo 18 Accounting.