The Approvals module provides a centralized system for managing approval requests across different business operations. Instead of handling approvals manually through emails or external communication, users can create, submit, approve, and track requests directly within Odoo. They help organizations maintain control over critical transactions and ensure that certain operations are reviewed by authorized users before they are completed. Sometimes the company may require approval only when a purchase order is created for selected vendors. Similarly, approval may be required for high-value sales orders, large expenses, specific products, discounts above a certain percentage, or other business-specific conditions.
In this blog, let’s see how we can implement the conditional approval across the approval module in Odoo 19, using vendor-based Purchase Order approval as a practical example.
In a business scenario, a purchase order needs to be approved by the higher officials for only certain vendors. For other vendors, the standard Purchase Order workflow should continue without any additional approval.
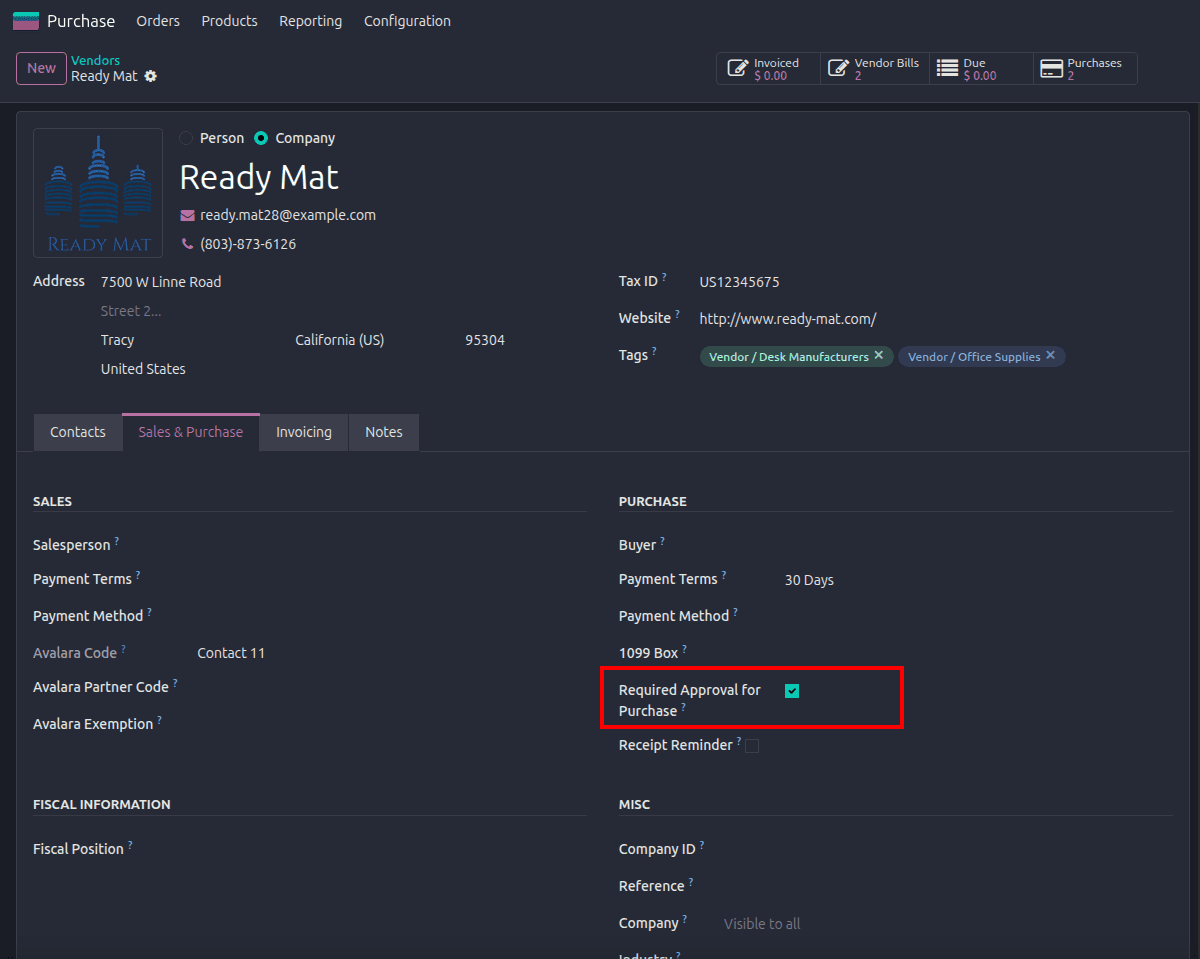
To achieve this, we add a Boolean field called ‘Required Approval for Purchase’ to the vendor form. When this option is enabled for a vendor, any Purchase Order created for that vendor must be approved before confirmation.
class ResPartner(models.Model):
   _inherit = 'res.partner'
   purchase_approval_required = fields.Boolean(string='Required Approval for Purchase')
Add this field to the vendor form view as;
<record id="res_partner_form_purchase_approval" model="ir.ui.view">
   <field name="name">res.partner.form.purchase.approval</field>
   <field name="model">res.partner</field>
   <field name="inherit_id" ref="base.view_partner_form"/>
   <field name="arch" type="xml">
       <xpath expr="//group[@name='purchase']" position="inside">
           <field name="purchase_approval_required"/>
       </xpath>
   </field>
</record>
This results in the following
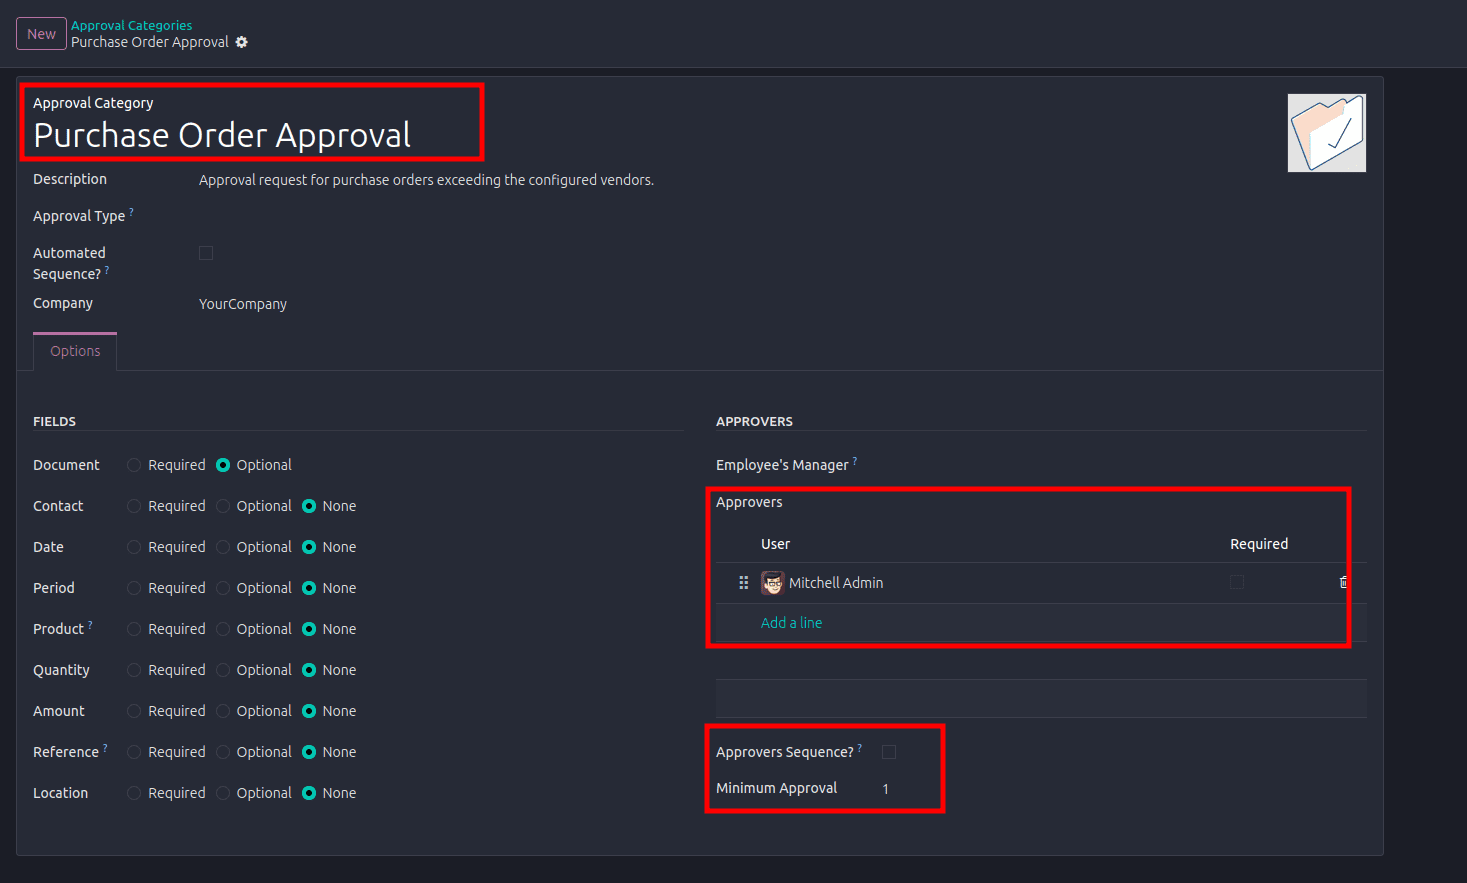
Also, we need to create an approval category exclusively for the conditional purchase approval. For that, create a data file in the custom module and create a record in the ‘approval.category’ model as follows.
<data noupdate="1">
   <record id="approval_category_purchase_order" model="approval.category">
       <field name="name">Purchase Order Approval</field>
       <field name="description">
           Approval request for purchase orders exceeding the configured approval limit.
       </field>
   </record>
</data>
This will create an approval category and set up all data in the same category, including approvers and approval sequence.
Approvals > Configuration > Approval Categories
Then, we need to check whether an approval request is needed for the selected vendor in the purchase model. For this, we need to extend the ‘purchase.order’ model and add a button in the same model. Also, we need to adjust the attributes of the existing buttons.
class PurchaseOrder(models.Model):
   _inherit = 'purchase.order'
   state = fields.Selection(selection_add=[('request_approve', 'Approval Requested'),
                           ('approved', 'Approved'),],
                           ondelete={'request_approve': lambda records: records.write({'state': 'draft'}),
                                     'approved': lambda records: records.write({'state': 'draft'}),},)
   approval_id = fields.Many2one('approval.request',string='Approval Request',
       copy=False,readonly=True,help='Approval request created for this Purchase Order.',)
   def action_request_approve(self):
       """Create an Approval Request when the Purchase Order amount exceeds
       the approval threshold. Otherwise, confirm the Purchase Order directly."""
       approval_category = self.env.ref('purchase_approval.approval_category_purchase_order')
       if not approval_category:
           raise UserError(_("The Purchase Order Approval category could not be found."))
       else:
           if self.partner_id.purchase_approval_required:
               approval_request = self.env['approval.request'].create({
                   'name': _('Approval Request for Purchase Order %s') % self.name,
                   'category_id': approval_category.id,
                   'reason': _('Approval is required for Purchase Order %(order)s '
                       'because the selected vendor, %(vendor)s, requires '
                       'approval before the order can be confirmed.'
                   ) % {'order': self.name,
                       'vendor': self.partner_id.display_name,},
                   'purchase_id': self.id,
               })
               self.write({
                   'approval_id': approval_request.id,
                   'state': 'request_approve',
               })
               approval_request.sudo().action_confirm()
           else:
               self.state = 'approved'
   def action_view_approval_request(self):
       """Open the Approval Request linked to the Purchase Order."""
       self.ensure_one()
       return {
           'type': 'ir.actions.act_window',
           'name': _('Approval Request'),
           'res_model': 'approval.request',
           'view_mode': 'form',
           'res_id': self.approval_id.id,
           'target': 'current',
       }
In the purchase order views,
<record id="purchase_order_form_conditional_approval" model="ir.ui.view">
   <field name="name">purchase.order.form.conditional.approval</field>
   <field name="model">purchase.order</field>
   <field name="inherit_id" ref="purchase.purchase_order_form"/>
   <field name="arch" type="xml">
       <!-- Add the new state to the status bar -->
       <xpath expr="//field[@name='state']" position="attributes">
           <attribute name="statusbar_visible">draft,sent,to approve,request_approve,approved,purchase,done</attribute>
       </xpath>
       <!-- Hide the standard Confirm Order button -->
       <xpath expr="//button[@name='button_confirm']" position="attributes">
           <attribute name="invisible">not state == 'approved'</attribute>
       </xpath>
       <xpath expr="//button[@name='button_confirm'][2]" position="attributes">
           <attribute name="invisible">1</attribute>
       </xpath>
       <!-- Add Request Approval button -->
       <xpath expr="//header" position="inside">
           <button name="action_request_approve" string="Request Approval"
               type="object" class="oe_highlight"
               invisible="state not in ('draft', 'sent')"/>
       </xpath>
       <!-- Approval Request smart button -->
       <xpath expr="//div[@name='button_box']" position="inside">
           <button name="action_view_approval_request" type="object" class="oe_stat_button"
               icon="fa-check-square-o" invisible="not approval_id">
               <div class="o_stat_info">
                   <span class="o_stat_text">Approval Request</span>
               </div>
           </button>
       </xpath>
   </field>
</record>
- State: Add two additional states, ‘request_approval’ and ‘approved’, to the existing state field to clearly distinguish the different stages of the Purchase Order Approval process.
- approval_id: A many2one connection between the purchase and approval request models. This field allows users to quickly access the Approval Request directly from the Purchase Order using a smart button.
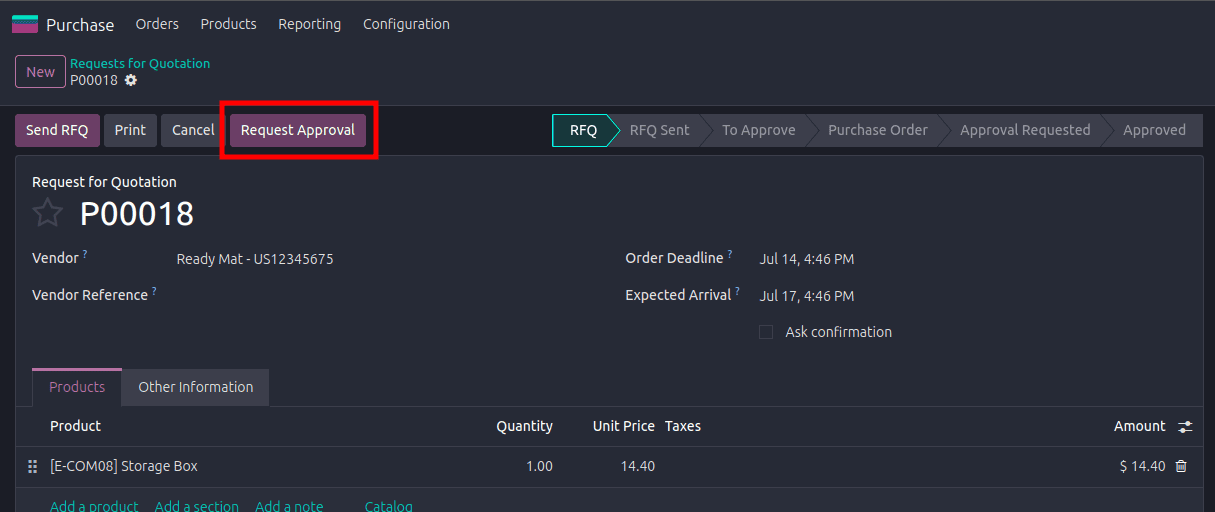
- action_request_approve(): This method is triggered by the Request Approval button added to the ‘purchase.order’ model. It checks whether the selected vendor requires approval based on the configured approval condition.
If approval is required, the method creates a new record in the ‘approval.request’ model and links it to the corresponding Purchase Order. The Purchase Order state is then changed to request_approve. To submit the newly created Approval Request for approval, the standard action_confirm() method of the 'approval.request' model is called.
If the selected vendor does not require approval, no Approval Request is created, and the Purchase Order is directly moved to the approved state, allowing the user to proceed with the standard confirmation process.
- action_view_approval_request(): This method is used to open the Approval Request associated with the current Purchase Order.
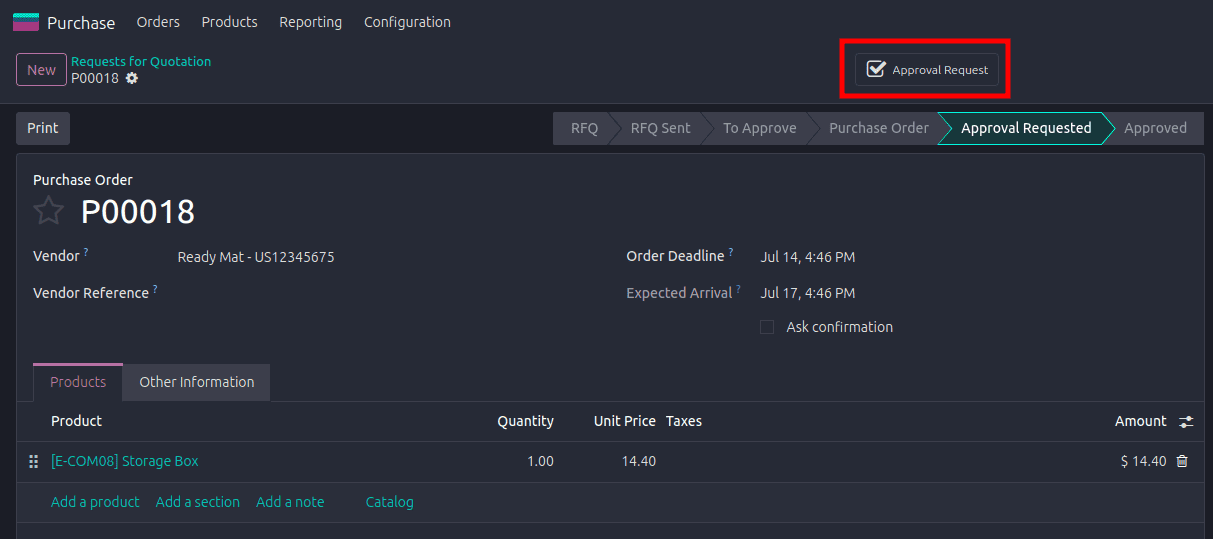
Also modifies the visibility of the standard Confirm Order buttons in the Purchase Order form view.
After creating the approval request, we need to approve it. For that, extend the ‘approval.request’ model and extend the action_approve method as follows.
class ApprovalRequest(models.Model):
    _inherit = 'approval.request'
    purchase_id = fields.Many2one('purchase.order',string='Purchase Order',
        copy=False,readonly=True,help='Purchase Order associated with this Approval Request.',)
    def action_approve(self, approver=None):
        """
        Extend the standard approval process. Once the Approval Request
        becomes fully approved, confirm the linked Purchase Order.
        """
        result = super().action_approve(approver=approver)
        if (self.request_status == 'approved' and self.purchase_id
                    and self.purchase_id.state == 'request_approve'):
                self.purchase_id.sudo().state = 'approved'
        return result
    def action_view_purchase_order(self):
        """Open the Purchase Order linked to the Approval Request."""
        self.ensure_one()
        if not self.purchase_id:
            raise UserError(_("No Purchase Order is linked to this Approval Request."))
        return {
            'type': 'ir.actions.act_window',
            'name': _('Purchase Order'),
            'res_model': 'purchase.order',
            'view_mode': 'form',
            'res_id': self.purchase_id.id,
            'target': 'current',
        }
- purchase_id: The field that links the approval request to its corresponding purchase order. This relationship helps to track the purchase document easily from the approval request via the smart button.
- action_approve(): Once the approvers approve the approval request, the state of the linked purchase order is changed to the ‘approved’ state. The confirm button in the purchase order is only visible if the approval request has been approved.
- action_view_purchase_order(): This method helps to show the linked purchase order in the approval request document through the smart button.
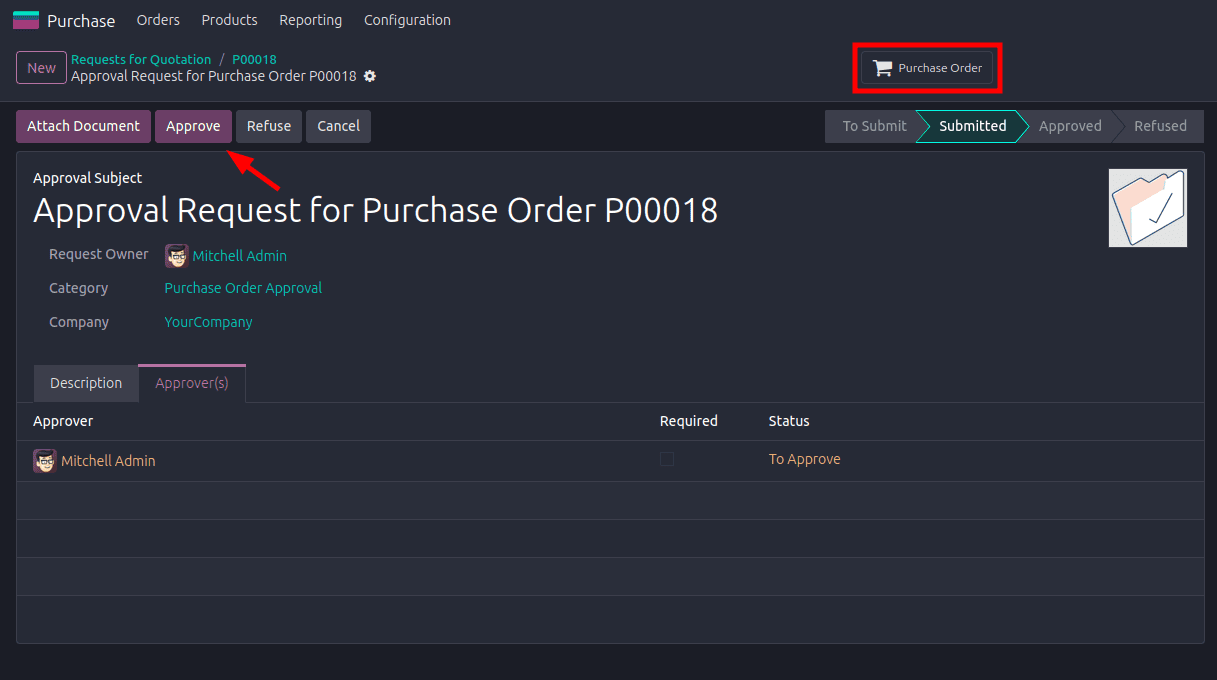
The following code can be used to view the purchase smart button in the approval request.
<record id="approval_request_form_purchase_order" model="ir.ui.view">
   <field name="name">approval.request.form.purchase.order</field>
   <field name="model">approval.request</field>
   <field name="inherit_id" ref="approvals.approval_request_view_form"/>
   <field name="arch" type="xml">
       <xpath expr="//div[@name='button_box']" position="inside">
           <button name="action_view_purchase_order" type="object" class="oe_stat_button"
               icon="fa-shopping-cart" invisible="not purchase_id">
               <div class="o_stat_info">
                   <span class="o_stat_text">Purchase Order</span>
               </div>
           </button>
       </xpath>
   </field>
</record>
This will result in the following.
Conditional approval workflows provide better control over critical business operations in Odoo. In this blog, we implemented a vendor-based Purchase Order Approval process by integrating the Purchase and Approvals modules. Purchase Orders for selected vendors are sent through an approval workflow before they can be confirmed, while other orders continue through the standard process. The same approach can also be adapted to implement conditional approvals based on order amounts, products, discounts, customers, or other business-specific requirements.
To read more about How to Configure Simple and Approval Workflows in Odoo 19, refer to our blog How to Configure Simple and Approval Workflows in Odoo 19.